On The Fly v3.0 build 175. November 2026.
Independent Software Developer, Designer and Author: ulneiz
This document contains over 16,000 words. Estimated reading time: 2 hours.
1. What is 'On The Fly' or 'OTF'?
Welcome to the User Manual for the
1.1. Concept.
Renoise DAW
   │
   ▼
ON THE FLY (MIDI Mapping)
   │
   ├──➤ MIDI Device 1 ───┐	      	    ┌─[SqP]──➤ Sequence Control ──➤ LIVE Playback Manipulation
   ├──➤ MIDI Device 2 ───┤	     	    ├─[PtS]──➤ Sound Control ┌──➤ Pattern and Track Sound States
   │		          │		    │			      └──➤ Continuous Recording of LIVE Sequence (Live Mode)
   │                      ├──➤ Pad Modes ──┼─[TrD]──➤ Track Effects Control (DSP)  ┌──➤ Preset Selector
   ├──➤ MIDI Device 3 ───┤  	     	    │	     				     └──➤ Parameter Control
   └──➤ MIDI Device 4 ───┘	   	    ├─[InT]──➤ Instrument Control ┌──➤ Instrument Selector
					    │				   └──➤ Playing and Transposing Notes from the Pad
					    └─[InP]──➤ Instrument Plugin Control ┌──➤ Program Selector
										  └──➤ Parameter Control
"Live Performance." How do you get started with a live performance? To begin using
"Live Sequence Recording." How do you get started with live recording? Besides live playback,
Possible live performance setup. A basic linking scheme to perform a live show and even record it for artistic content creation would be as follows:
- Use the tool
On The Fly as the control hub forRenoise , managing the sequence and other live controls. InRenoise , assign MIDI input Device A to create a single MIDI mapping forOTF (*1). - In
Renoise , assign MIDI input Device B to control a specific instrument, then link that instrument to a specific track. Alternatively, you can map this second MIDI device to controlOTF more broadly. - In
Renoise , assign MIDI input Device C to control a second instrument, then link that instrument to another track. - In
Renoise , assign MIDI input Device D to control a third instrument, then link that instrument to another track. - In
Renoise , use the audio input for a microphone. This allows you to sing with your voice or capture another real instrument through the microphone. - Additionally, depending on the sound cards or external audio devices available, it is possible to use two hardware sound devices for listening to the result (*2), so that it is possible to use the input of a sound card "A" for the microphone and the primary monitoring output (speakers) and in parallel, another hardware sound device "B" for the second monitoring output (headphones), at the same time.
(*2) Depending on the physical audio devices available on your computer, you can select a second listening device via your operating system's sound panel in the audio input. This allows you to use sound card "A" as the audio input (microphone) and audio output (listening 1) for speakers, and another sound card or external USB audio device "B" (listening 2) to play the entire output through headphones. Please learn how to make the most of your audio device's inputs and outputs to run live playback scenes, using
Basic requirements for live recording (Live Mode). To begin a continuous, full recording of the entire sequence, a very basic setup is needed. The song project can start with just a pattern, with the number of lines determined by the time signature. This pattern will be the first to be recorded and will be automatically cloned. Furthermore, you only need to organize the tracks to be used and the instruments that will be linearly linked to the tracks (so many tracks, so many instruments).
Renoise's large-scale MIDI mapping problem (lack of integration). The
Paging and distribution as a powerful tool for control.
In summary,
1.2. Demo and Full Version; Installation and Access Instructions.
The
- On The Fly. Demo Version. The demo version has the exact same features as the full version, but with a limited trial period and a floating timer window. In other words, it's not a limited version, but rather a time-limited one. You can try all its features, but you'll only have a few minutes to do so. Once the allotted time has elapsed, the tool will lock. If you wish to continue using the tool, get the Full Version.
- On The Fly. Full Version. The Demo Version uses the same installation package as the Full Version, but the Full Version is 100% functional, without limitations. The full version of
On The Fly only requires a Custom User License, which must be installed manually. If you are interested, please contact the author "ulneiz" to obtain your Custom User License.
Installing On The Fly.
- Microsoft Windows 10/11: "C:\Users\USER_NAME\AppData\Roaming\Renoise\V3.5.0\Scripts\tools\com.ulneiz.OnTheFly.xrnx\".
- Apple macOS: "VOL_NAME/Users/USER_NAME/Library/Preferences/Renoise/V3.5.0/Scripts/tools/com.ulneiz.OnTheFly.xrnx/".
- Linux: "/home/USER_NAME/.renoise/V3.5.0/Scripts/tools/com.ulneiz.OnTheFly.xrnx/".
Access the On The Fly root folder. After installing
- From the Operating System. Use the operating system's file browser and go directly to the path described above.
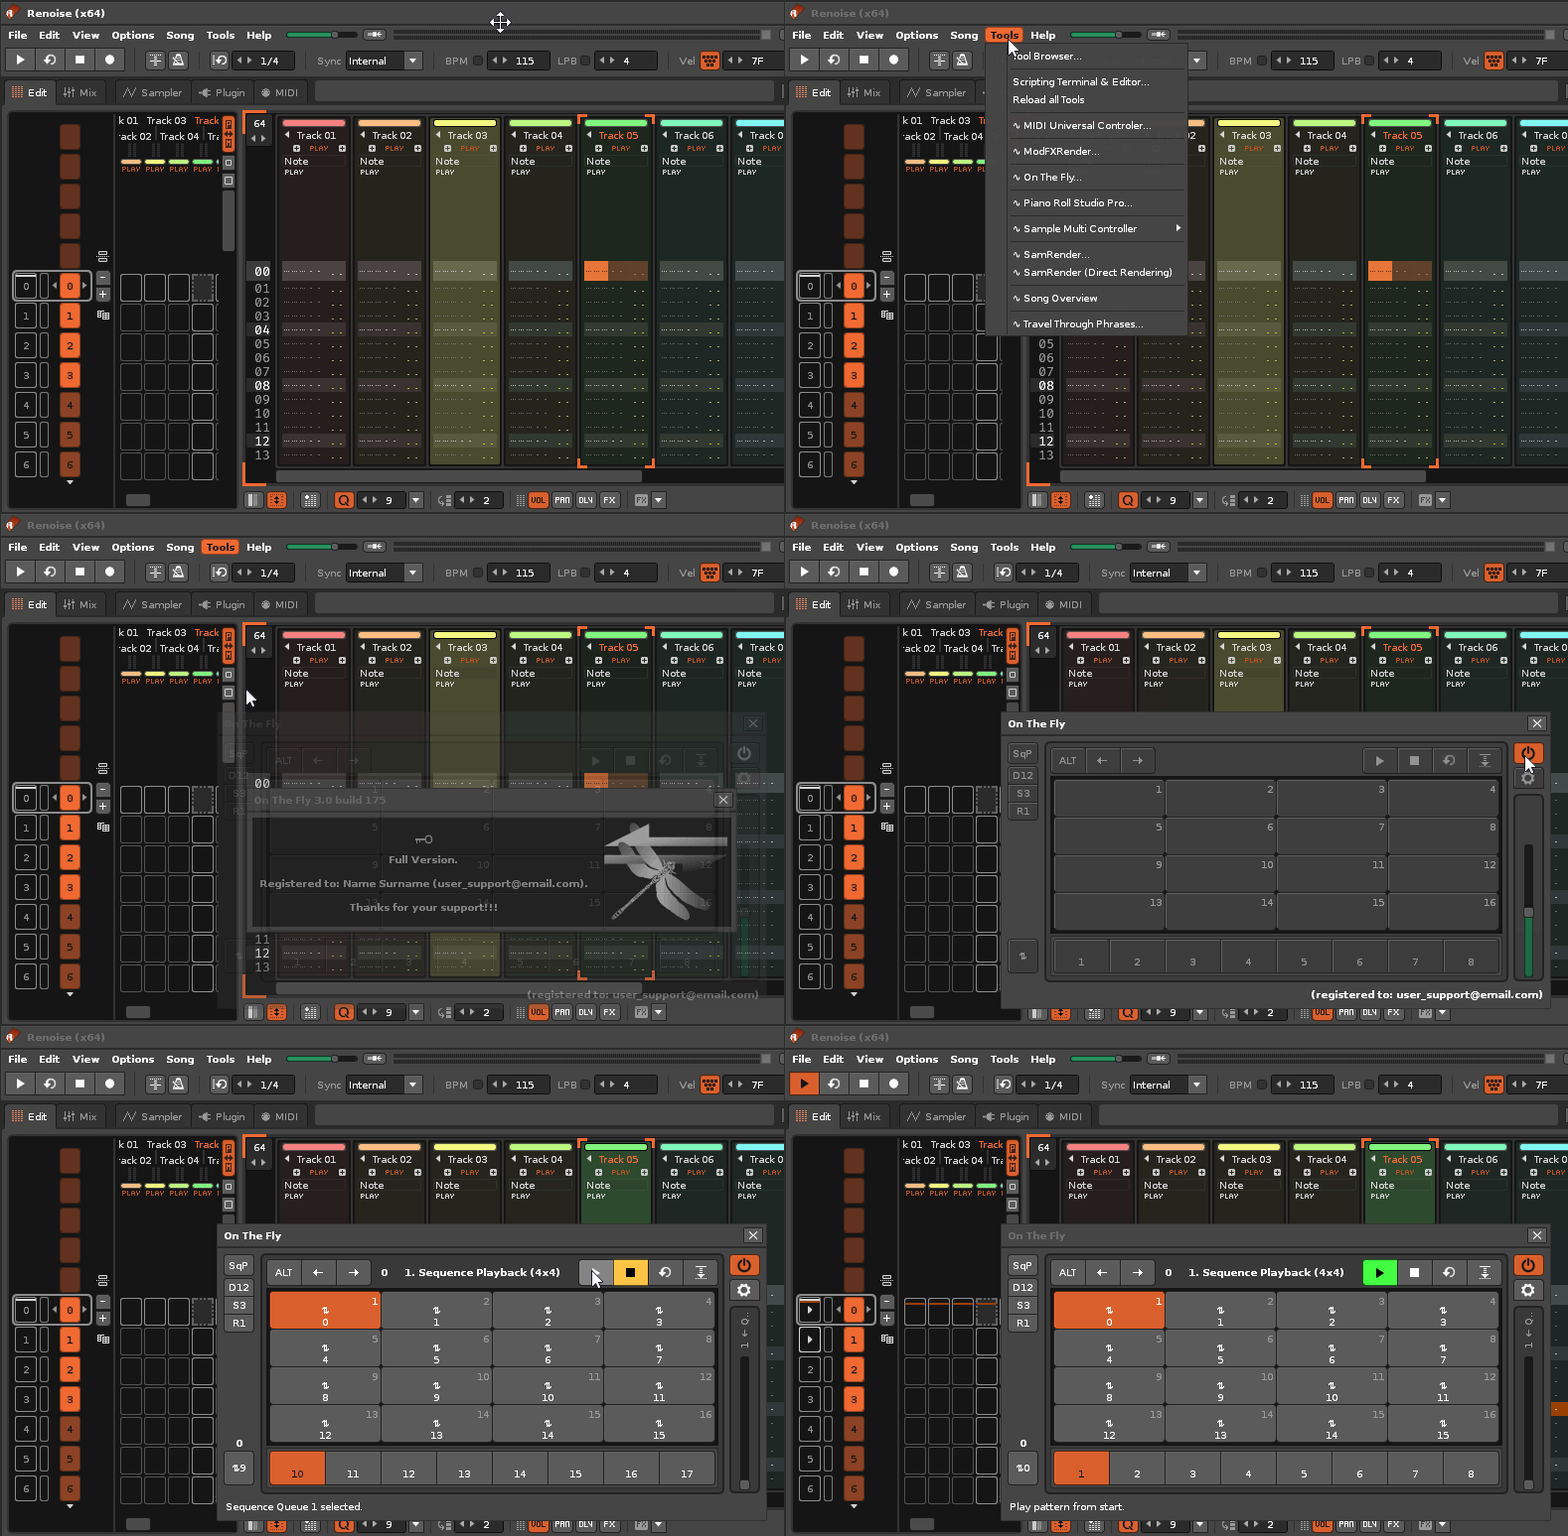
- From Renoise. Go to "Renoise: Tools / Tool Browser...", right-click on "com.ulneiz.OnTheFly (OnTheFly)" and select "Reveal in Explorer..."
- From within On The Fly. Open the
OTF window from "Renoise: Tools / ∿ On The Fly...", left-click the gear icon and then the {?} question mark button below, "Show About On The Fly". Finally, click the official logo on the right; this will open the root folder.
Accessing the On-The-Fly Window. There are three ways to open the
- Using the USB Mouse. To open the
OTF main window or bring it to the foreground, go to theRenoise menu and select "Renoise: Tools / ∿ On The Fly...". - Using a USB keyboard. To open or close the
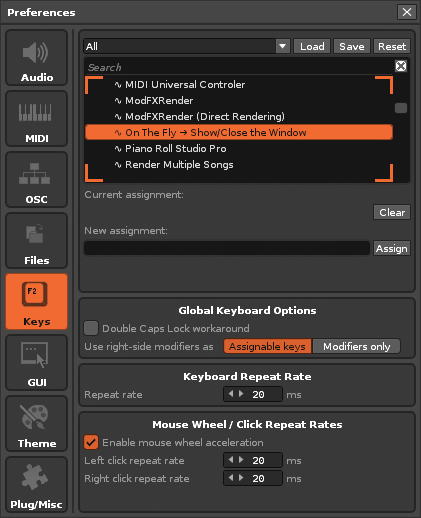
OTF main window with a keyboard shortcut, first go to "Renoise: Edit / Preferences / Keys: Tools / ∿ OTF → Show/Close the Window" and assign a free and easy-to-remember keyboard command, such as the free command [SHIFT O]. - With the USB MIDI Controller. To open or close the
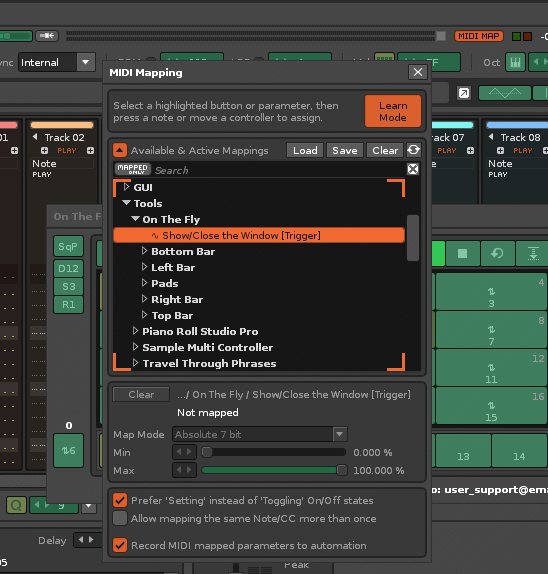
OTF main window, assign a MIDI mapping to "Renoise: MIDI Mapping / Global Mappings / Tools / On The Fly / ∿ Show/Close the Window".
2. General Characteristics. Recommended USB MIDI Controllers.
To use
2.1. Visual Configuration and Control Options.
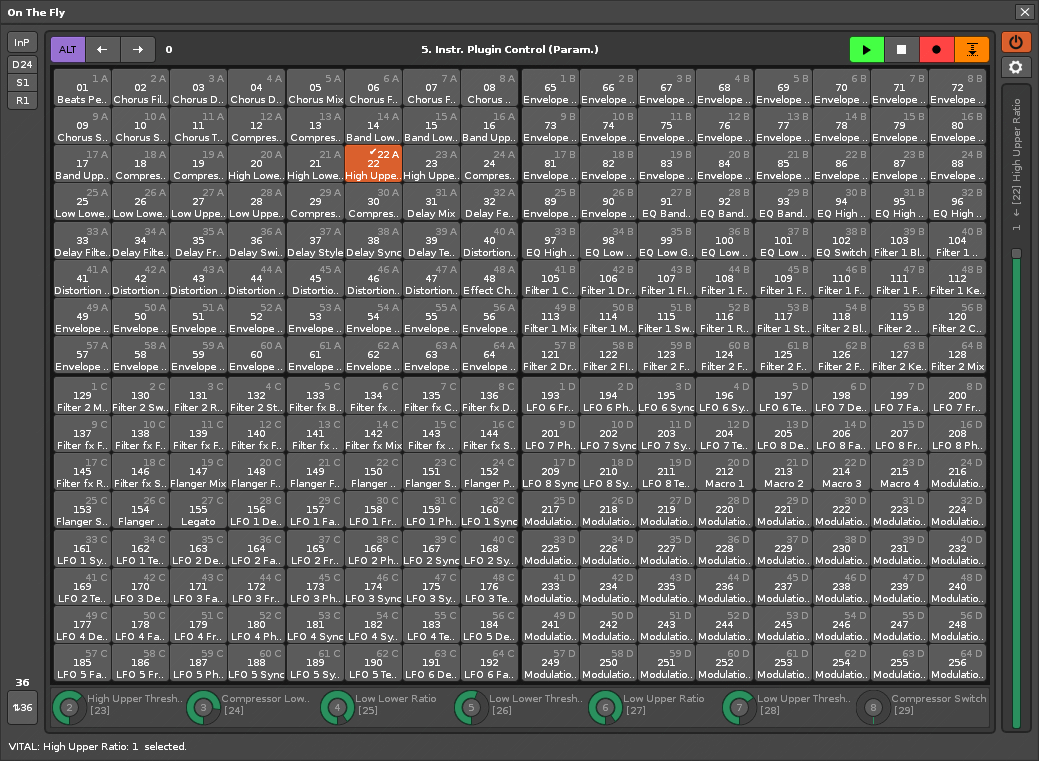
- Switch between up to 5 Control Panel Modes. Each Mode has 2 views, primary and secondary, with {ALT} turned off or {ALT} turned on. In reality, it offers up to 10 different control panels.
- Several configurable behavior options for "live mode".
- 25 layouts, 24 specifically for USB MIDI Pads physical controllers and one special one for USB MIDI Piano physical controller, with configurations from 1 octave (12 notes) up to 10 octaves (120 notes).
- 12 pad sizes. Specially designed for small or large window sizes, even for touch monitors.
- Normal or reversed pad layout. Normal order starts with pad 1 in the top row. Reversed order starts with pad 1 in the bottom row, specifically designed for the typical MIDI pad layout.
- Distribution-size-inversion lock, with padlock.
- Button {ALT} with 3 states: off, on, or press and hold for alternative controls.
- Navigation and pagination buttons. These allow you to navigate or paginate up to 250 times between the chosen pad layout (for example, if the chosen layout is a 16-pad pad, pages of 16 at a time).
- Automatic pagination for the sequence when playback tracking is enabled.
- Transport buttons: play (green), stop/panic (yellow), pattern loop (pink), song tracking, "Edit Mode" (red, pattern editor) and "Live Mode" (sky blue, sequence recording).
- Control panel mode change buttons: LOP (loop/reverse loop), RND (random), minimum and maximum value range for loop or randomization. Slot off, "Off", mute, and solo buttons. Note start change buttons, transpose scale selection, and scale start note button; fixed or variable volume velocity button (keystroke velocity). "Live mode" button, quantization button, multifunction pattern-track clone button, and pattern-track delete button.
- Pagination marker. It is possible to paginate up to 250 times, whether the layout is 4 pads or 256. This means, in the latter case, for example, that it is possible to control up to 250 x 256 = 64,000 parameters of a complex instrument plugin. In the former case, it would correspond to 250 x 4 = 1,000 parameters. 250 x 4 also implies being able to navigate from 1 to the 1,000th parameter in this extreme case.
- Selected sequence marker. This number shows the selected pattern in the sequence. It matches the playback sequence marker if song tracking is enabled.
- Playback sequence marker. This number shows the playback position in the sequence at any given time.
- Sequence control. The bottom bar shows the "sequence queue" with 8 slots that can be modified on the fly.
- Master slider and its secondary rotary encoders (1+7 format). From 1 to 7 additional secondary rotary encoders. This allows control of up to 8 parameters simultaneously, each time with each selection. They are compatible with "relative" or "absolute" physical modes. With normal or slow scrolling or rotation speed for precision (hold down the key {ALT}).
- Access to the Preferences Panel. Allows you to customize the appearance and behavior of the
OTF for more tailored control according to the needs of the composer or artist. - Compatible with direct instrument sound for sound playback and for editing in the pattern editor.
- Compatible with MIDI input for detecting pulse velocity sensitivity (0 to 127).
- Customization of some control features, such as: doubling the speed of the slider/rotary encoders, accelerating the tap and hold repeat speed, controlling the "color blend" of the tracks, among others.
2.2. General Characteristics of the Control Panel Modes.
All the functions listed below are intended to be controlled via MIDI mapping. Some of these features are not available in
- {SqP} Sequence Playback Mode. Sequence control and manipulation.
- Specifically designed for live performance. Allows for on-the-fly manipulation of the sequence.
- 8-slot sequence queue, fully customizable on the fly. Allows you to change each sequence slot live.
- It allows restoring the linear sequence.
- It allows you to skip patterns in the sequence. Playback of the sequence will skip them, as if they didn't exist as part of the sequence.
- Sequence loop (increasing) with configurable range. Reverse sequence loop (decreasing) with configurable range. Sequence randomization with configurable range.
- Sequence navigation, with tracking.
- Sequence selection, without tracking.
- Transport buttons: play, stop, repeat current sequence, playback follow button.
- Ability to create repeating loops from the current sequence, from 1 to 8 pattern repetitions.
- Flickering effect by pattern synchronized with the pulse rate of the song.
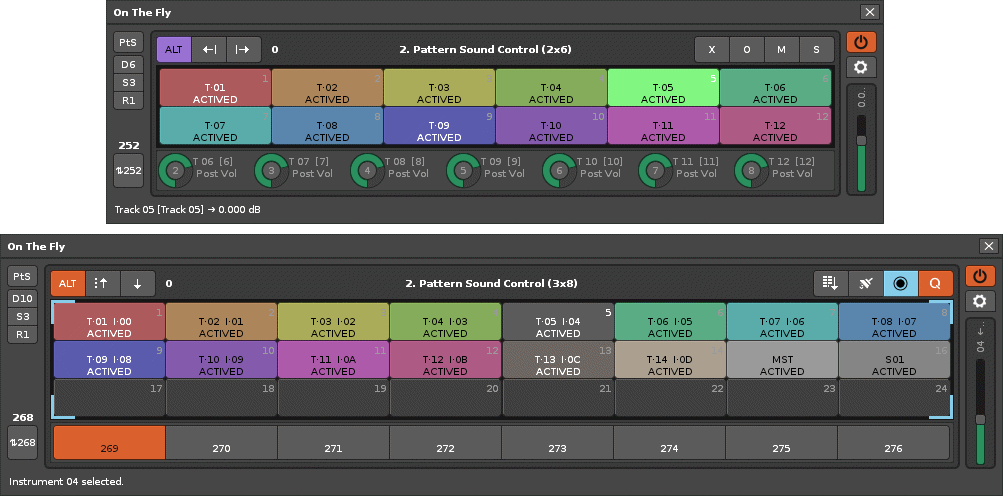
- {PtS} Pattern Sound Control Mode. Control of sound in pattern and track:
- Track selector.
- Track sound state change: matrix slot override in current pattern {X}. Track Off/On {O}. Track Mute/On {M}, Track Solo {S}(with recovery of previous state of all tracks).
- Post-fader volume control for up to 8 tracks at once, starting from the selected track (master slider + 7 rotary encoders).
- Sequence navigation from the pagination buttons.
- Live Mode ◉. Continuous recording in the sequence without stopping the sound. Configurable instrument links to tracks. Multifunction pattern-track cloning. Pattern-track deletion. Configurable quantization.
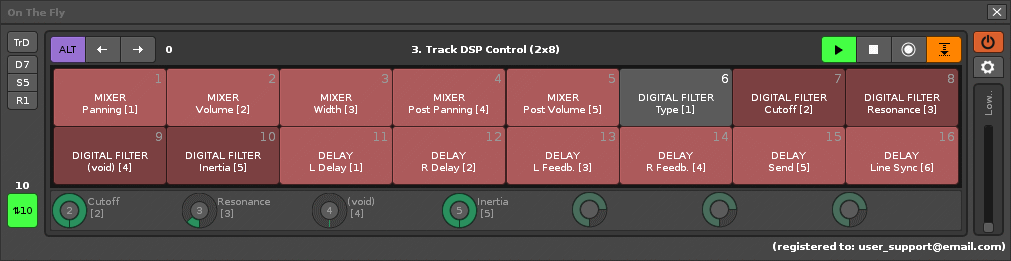
- {TrD} Track DSP Control Mode. Manipulation of the track effects chain sound:
- Bypass the entire effects chain of the track.
- Bypass of individual track effects devices.
- Control for selecting presets of the track's effects devices.
- Parameter selector for all track effects devices.
- Control of track effects device parameters (change variable values), up to 8 from the selected parameter (master slider + up to 7 rotary encoders).
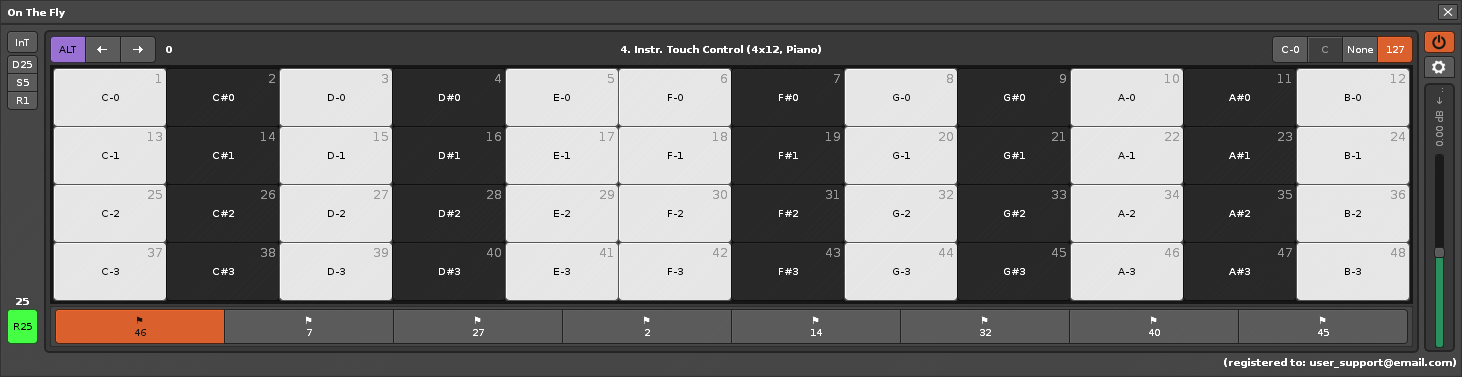
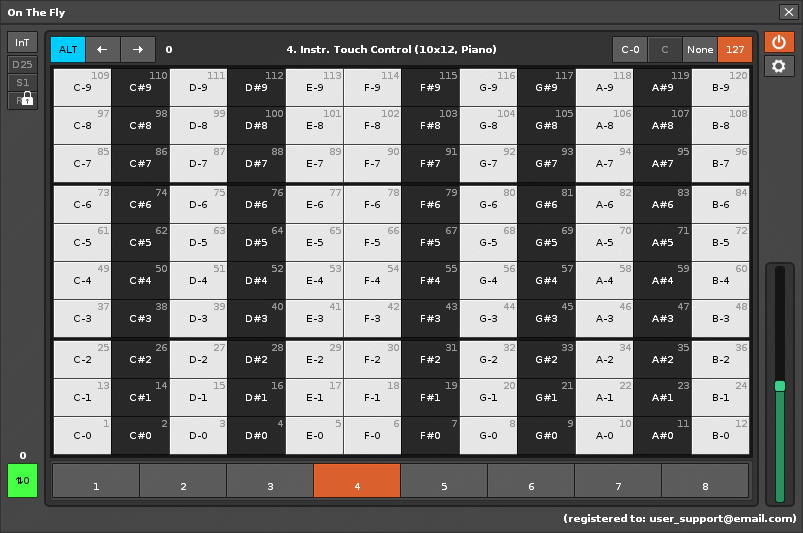
- {InT} Instrument Touch Control Mode. Play the instrument notes via the pad panel (MIDI input):
- Instrument selector.
- Change instrument volume via the master slider.
- Capable of playing up to 10 octaves, all 120 notes (C-0 to B-9), even with paging. Allows transposing the entire MIDI pad/keyboard on the fly with paging. Works with Direct Instrument Sound Control and MIDI input (touch velocity sensitivity).
- Customization of the number of octaves, from one octave to ten octaves.
- Fixed keystroke sound speed or speed via key or pad touch sensitivity.
- Initial key configuration capability, from C-0 to C-9.
- Transposition scale switching, up to 36 scales. Ability to change the initial scale note, starting from C.
- Edit mode button.
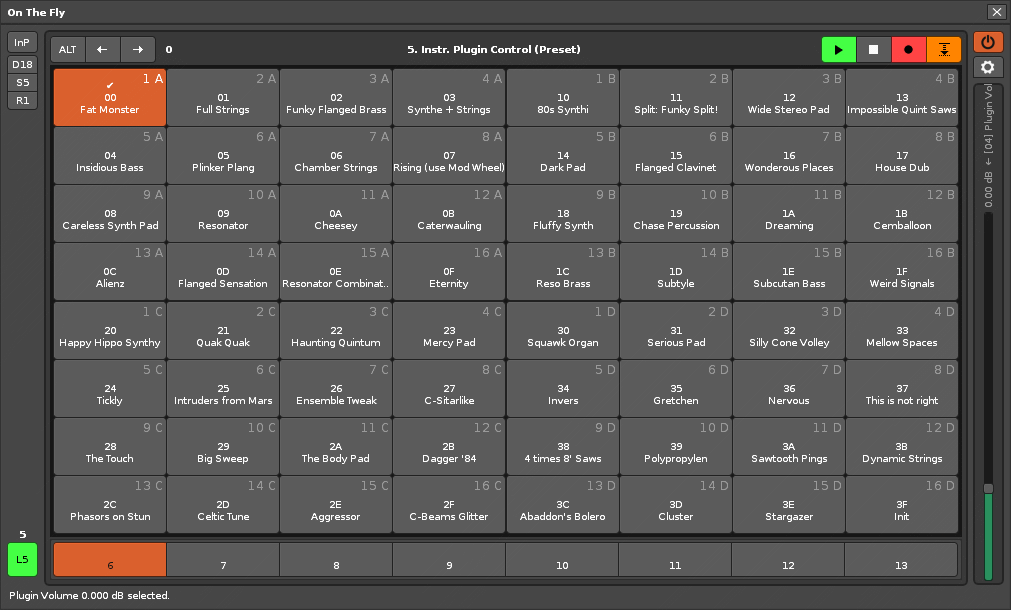
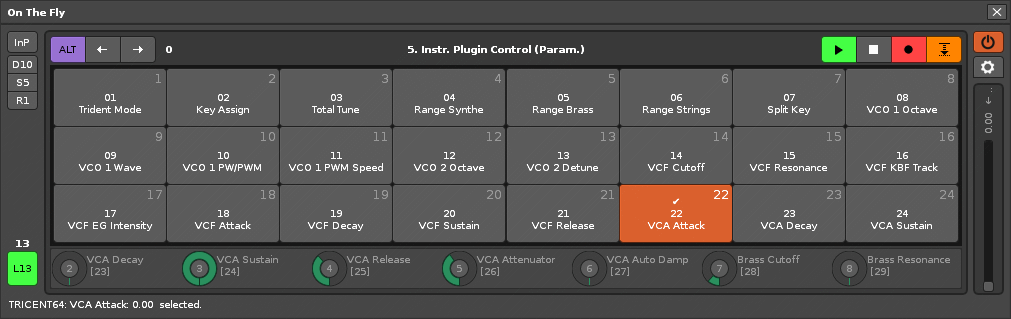
- {InP} Instrument Plugin Control Mode. Manipulation of the sound of the plugin loaded into the instrument:
- Instrument plugin preset selection control (compatible with preset listing).
- Change plugin volume via the master slider.
- Parameter selector for current instrument plugins.
- Control of current plugin parameters (change variable values), up to 8 from the selected parameter (master slider + 7 rotary encoders).
- Edit mode button.

2.3. Recommended Physical USB MIDI Controllers for Use with the OTF.
If you want to have expert control over your hardware, don't miss this section. Current physical USB MIDI controllers on the market can be classified into three categories: MIDI pad controllers, MIDI keyboard controllers, and a third category: a stage keyboard or pad, or synthesizer, that also functions as a MIDI controller. And there are even touchscreen controllers!
- Pad-style MIDI controllers require a computer to operate (they don't have built-in sounds) and are ideal for use with a DAW. They are characterized by several square, generously sized buttons designed primarily for triggering drums, with or without velocity sensitivity or even aftertouch. These controllers may include additional features such as faders, rotary encoders, other functions, and even banks to expand their MIDI routing capabilities (fewer physical knobs with greater MIDI linking capacity per knob).
- Keyboard-style MIDI controllers require a computer to function (they don't have built-in sounds) and are ideal for use with a DAW. These controllers may or may not include all the features of a standard MIDI pad, but their main characteristic is that they offer multiple octaves, functioning like a piano. The most compact models range from 25 keys to 88 keys for a full-size piano, and they often include additional controls. The keys may also be velocity-sensitive, and some may even include aftertouch.
- A stage keyboard, pad, or synthesizer that also functions as a MIDI controller. There are other types of products that can operate independently, without connecting to a computer. These are designed for live performances and are generally much more expensive. They may include, or rather function as, MIDI controllers of the pad or keyboard type mentioned earlier, meaning they can act as controllers for a DAW (Digital Audio Workstation). It's common for modern synthesizer-type keyboards or pads to also have MIDI controller capabilities, covering both aspects: stage performance with their integrated software, or controlling computer software via MIDI routing.
- Portable Full HD Touchscreen. A clear and effective alternative to USB MIDI controllers is to use a secondary touchscreen as a "direct control surface," because it directly displays all on-screen information and is touch-sensitive (generally, USB MIDI controllers do not display software information anywhere, and involve a noticeable visual jump between the main screen and the USB MIDI controller).
OTF is specially designed as a control surface with different sizes, notably the D23 and S5 configurations for 256 pads on the central panel, which accommodates a 1920x1080 pixel resolution. Don't underestimate the power of theOTF and a touchscreen as a real and fully capable alternative!
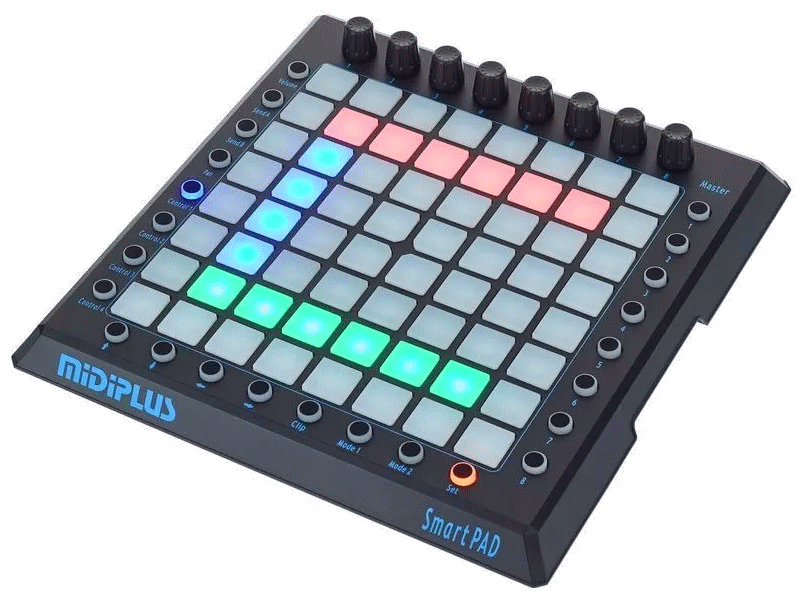
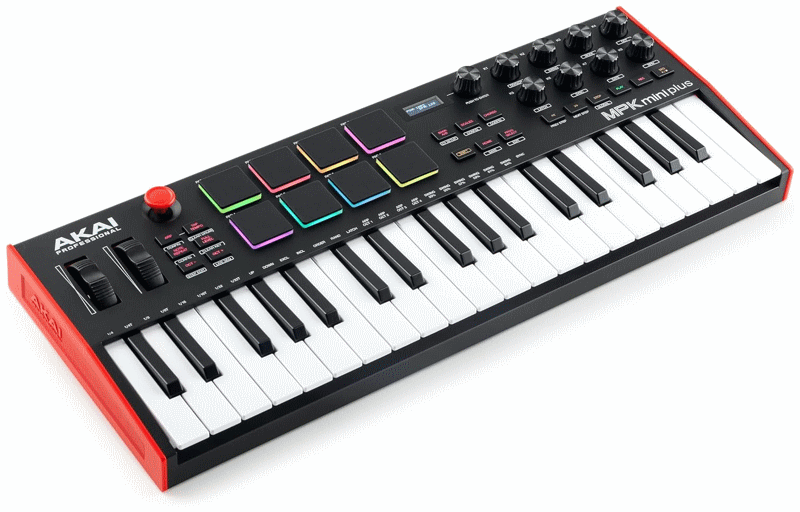
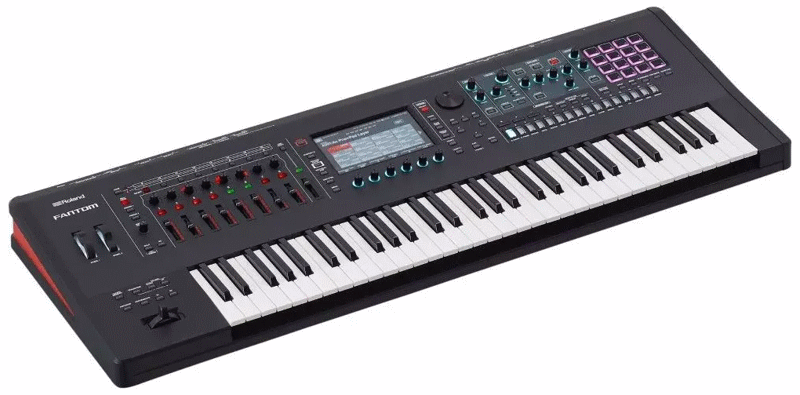

Purchase the appropriate MIDI controller (assignable buttons and endless rotary encoders):
Therefore, any artist or composer who is in the position of wanting to acquire a MIDI controller device to use the
The best physical control for managing a wide variety of assignable parameters is an "endless rotary encoder", also known as a "360° encoder", as it offers immediacy and precision. This greatly simplifies the selection of a MIDI controller when purchasing one. These precise controls, in turn, encourage manufacturers to add control banks (the more the better), which translates to more MIDI routing per control. For example, a MIDI keyboard with eight endless rotary encoders and three banks for those rotary encoders. This eliminates the need for 24 physical endless rotary encoders, while still providing the controller user with access to 8+8+8 MIDI routings—8 per bank, meaning three MIDI routings per wheel.
Unfortunately, the market is full of cheap or expensive controllers with limited-rotation encoders or faders, which are not the ideal devices to control any DAW. They are MIDI controllers made primarily to fill a market niche and generate profit, and not to meet the current real needs of composers or artists, since any DAW requires a multitude of control over a large number of disparate parameters, and the number of physical controls and surface area is limited.
In summary, the buttons will be used to change states or execute functions (multiple functions can be performed with the same button and MIDI link), such as selecting a track or changing screens, and even triggering/stopping notes. The endless rotary encoders will be used to change the value of any parameter, regardless of its range (multiple parameters can be adjusted with the same rotary encoder and MIDI link), or to control selection lists. This allows for maximum immediate control of
Below are listed, in no particular order, three groups of MIDI controllers as examples of those currently available on the market or even discontinued, categorized as recommended MIDI controllers, acceptable MIDI controllers (somewhat recommended), and non-recommended MIDI controllers, for controlling the
- Some recommended MIDI controllers:
- Akai APC Key 25 MK2 (highly recommended) [THE BEST COMPACT KEYBOARD PAD]
- Akai MPK Mini Plus (highly recommended) [THE BEST AND MOST COMPLETE COMPACT KEYBOARD]
- Akai MPK Mini Play Mk3
- Akai MPK mini mk3
- Akai MPK Mini mkII
- Akai MPC Key 61 (synthesizer) or other similar and inferior MPC models
- Akai Force
- Akai MPK225
- Akai MPK249
- Akai MPK261
- Akai Advance 25/49/61 [THE BEST CONTROLLER KEYBOARD]
- Akai Key 25 mk2
- Akai Fire
- Akai MPD218 (highly recommended) [BEST QUALITY/PRICE PAD]
- Akai MPD226
- Akai MPD232 (highly recommended) [THE BEST COMPLETE PAD]
- Akai MPX16
- Akai MPK Mini MKIII
- Akai APC40 mkII
- Novation Circuit Tracks
- Novation Rhythm
- Novation SL 49/61 MKIII
- Novation Impulse 25/49/61
- Native Instruments Maschine or Maschine +
- Arturia Keylab Essential 49/61 mk3 /88
- Arturia Keylab 49/61/88 mk2
- Arturia MiniLab 3 or 3 Alpine White
- Arturia BeatStep Pro / BeatStep (sequencer)
- Miditech Garagekey PAD (highly recommended) [THE BEST DESIGNED AND CHEAPEST KEYBOARD PAD]
- Presonus Atom or Presonus Atom SQ
- ESI Xjam
- Nektar Aruba
- Korg SQ-64 (sequencer)
- Midiplus Vboard 25
- Midiplus MiniControl 32
- Midiplus SmartPAD (highly recommended) [THE BEST PAD WITH THE BEST DESIGN AND CHEAPEST]
- Midiplus X-PAD
- Behringer Motor 49/61
- M-Vave SMK-25
- Donner StarryPAD
- Donner DMK-25 Pro
- World Panda 25
- Swissonic MiniKey P-25
- Avatar HXW EMP-16 Studio
- Avatar EMK 25
- M-Vave SMC-PAD (highly recommended) [BEST CHEAP PAD]
- M-Vave SMK-25/SMK-25 II
- WORLDE Orca pad16
- WORLDE Orca mini25
- Prokey 25
- Some acceptable (moderately recommended) MIDI controllers. It's not a bad idea to combine them with another complementary MIDI device:
- Akai APC Key 25
- Akai APC64
- Akai APC Mini mk2
- Akai APC Mini
- Akai APC Key 25
- Akai LPD8 Mk2
- Akai MPX8
- Novation FLkey 25/37/49/61
- Novation Launchpad Pro MK3
- Novation Launchpad Mini MK3 [BEST COMPACT PAD]
- Novation Launchpad X
- Novation Launchkey Mini MK3
- Novation Launchkey 25/37/49 MK3
- Native Instruments Komplete Kontrol M32
- Native Instruments Komplete Kontrol A25/A49/A61
- Native Instruments Komplete Kontrol S49/S61/S88
- Native Instruments Maschine Mikro
- Native Instruments Traktor F1
- M-Audio Oxygen 25/49/61 MKV or MKIV
- M-Audio Oxygen Pro Mini/Pro 25/49/61
- Alesis V25/49/61 MKII
- Alesis Vmini or V25/49/61
- Alesis VI25/49/61
- Nektar Impact LX Mini
- Nektar Impact LX+ 25/49/61/88
- Korg Keystage 49/61
- Korg nanoKEY Studio
- Korg nanoPAD2 + Korg nanoKONTROL 2 (two devices)
- Midiplus Tiny+
- Midiplus X2 25/37/49/61
- Donner B1 (synthesizer)
- Icon Pro P1 Nano
- Behringer X-Touch Mini / X-Touch One
- Behringer UMX610
- M-Vave SMC-Mixer
- Studiologic SL Mixface
- Some MIDI controllers are not recommended. Most of these devices are designed for specific controls and are not suitable for comprehensive and complex DAW control.
- Akai LP25 Wireless
- Akai MIDIMIX
- Novation Launchpad Control XL
- Native Instruments Traktor X1/Z1
- Arturia MicroLab
- M-Audio Keystation Mini 32 MK3
- Alesis Q Mini Q49/61 MKII
- Nektar Impact GX Mini/GX
- Nektar Impact GXP 49/61/88
- Nektar SE 25/49/61
- Korg nanoKONTROL Studio
- Korg nanoKEY2 / microKEY2
- Midiplus Tiny Mini/25/37
- Midiplus Tiny A
- Icon Pro P1-M / P1-X
- Icon Pro iControls / iConPad
- Behringer X-Touch Extender
- Swissonic EasyKey 25/49/61
- M-Vave SMK-25 Mini
- Studiologic SL73/88 Studio or SL88 Grand
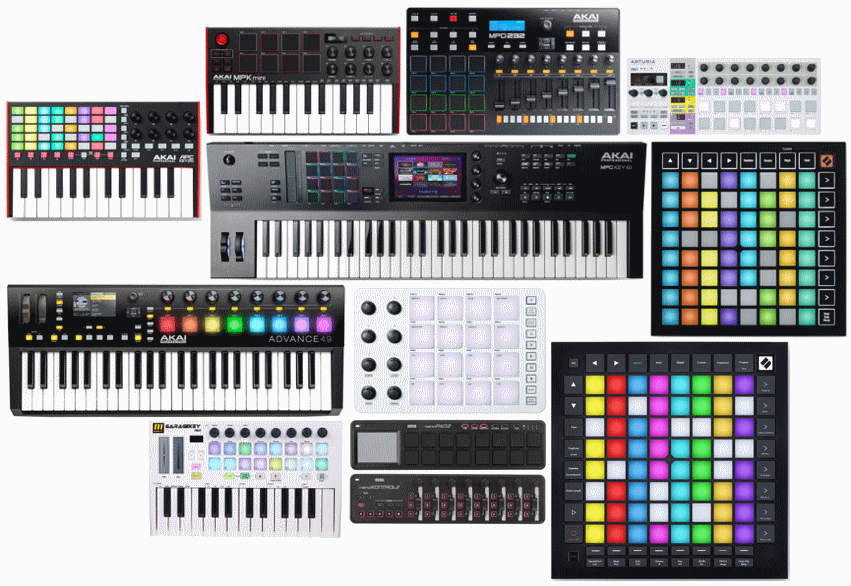
Specific SysEx compatibility. The current API for
One of the common uses of SysEx messaging is to control the lighting of the MIDI device's multicolor RGB pads so that they synchronize with the software (in this case with
2.4. MIDI Mapping of the USB Controller. Creating Links and Saving the XRNM Mapping File.
As currently designed, the
Instead,
Because the
Link the USB controller's MIDI mapping with OTF. To create the MIDI mappings for
- First, make sure you have the tool
On The Fly installed and active. OtherwiseRenoise will not detect your possible MIDI links. - Invoke the window of
OTF from "Renoise: Tools / ∿ On The Fly...". In the window of theOTF , press the top "OFF" button to change its state to "ON". - Use the mouse wheel over the {Dx} button on the left sidebar. Select the desired pad layout that most closely matches your physical MIDI controller. There are 24 layouts available, ranging from 4 to 256 pads.
- If necessary, click the button {Rx} on the left vertical bar with your mouse. This reverses the order of the pads if "Pad 1" on your MIDI device is in the bottom row, thus establishing a visual correspondence.
- Go to the top bar of
Renoise and press the "MIDI MAP" button or press the [CTRL M] command with theRenoise window in the foreground. This will open the "MIDI Mapping" window ofRenoise . - In the "MIDI Mapping" window, open "Global Mappings / Tools / On The Fly" and expand the list of mappings. With the "Test Mode" button active in "Learn Mode," you'll see that you can click on the illuminated controls in the window.
OTF , click on any of them and you will be able to route all the necessary controls. You will see that there is a direct correspondence between the window of theOTF and the MIDI link tree in the "MIDI Mapping" window. Familiarize yourself with this tree. Here you will find all possible routings, including the [Set] wheel links for parameter control.
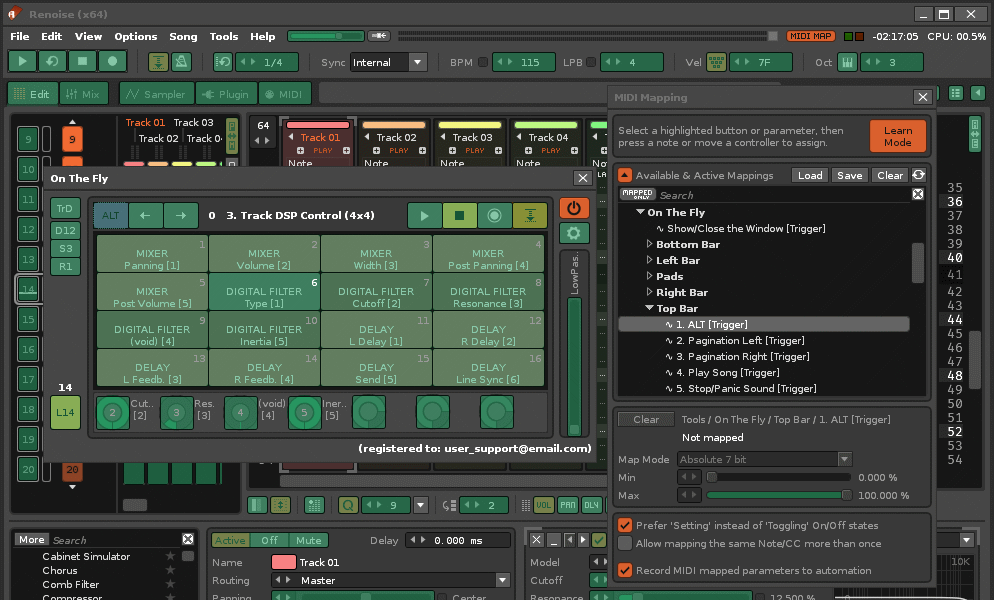
Save and reuse the XRNM MIDI mapping of the USB controller with OTF. Once you have finished mapping
- In the "MIDI Mapping" window of
Renoise , press the "Save" button. A new operating system window will appear with the save options. - Select the destination folder to save your MIDI mapping file.
- Enter the name "on_the_fly_device_name.xrnm", replacing "device_name" with the name of your physical MIDI device.
- Finally, press the "Save" button. This operation will save your MIDI mapping file in the specified folder, so you can load it later into any project.
Finally, to restore, reuse, or reload your MIDI mapping file, reopen the "MIDI Mapping" window, locate it, and load it after clicking the "Load" button. This loads the MIDI mapping defined in the XRNM file for
Consult the XRNM MIDI mapping and its links with OTF and Renoise. Once a MIDI mapping has been configured or loaded, the composer can review the list of assigned MIDI links. To do so:
- Go to "Renoise: Song / MIDI Mappings Info...". This opens a pop-up window with a complete list of all MIDI links. The composer can then visually check if all links are correct, or correct them if necessary by remapping each link.
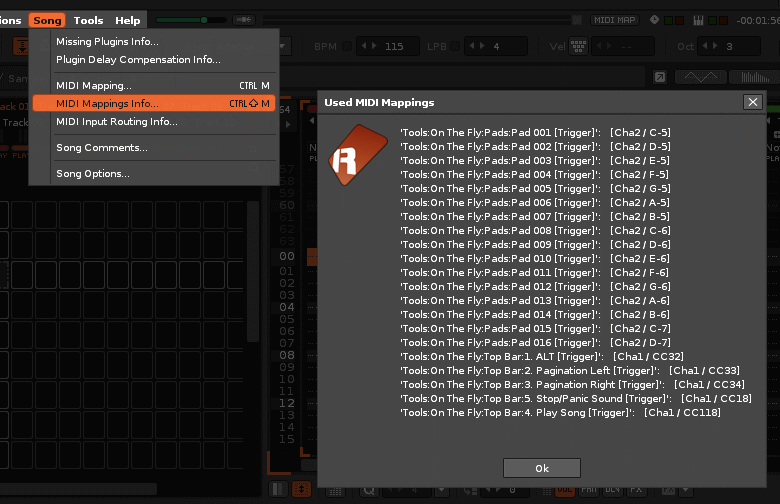
3. Graphical Interface I. The main window. Control elements, bars and panels.
3.1. The Main Window. General Layout.
On the Fly is visually controlled through a single main floating window. This window has a central panel of buttons, called pads. Surrounding this panel are four bars with different controls: the left bar, the right bar, the top bar, and the bottom bar. This ensures that the composer or artist always sees the same arrangement and location of the controls. Remember that you can configure the layout and number of pads, as well as their size and orientation, according to the needs of your USB MIDI device.
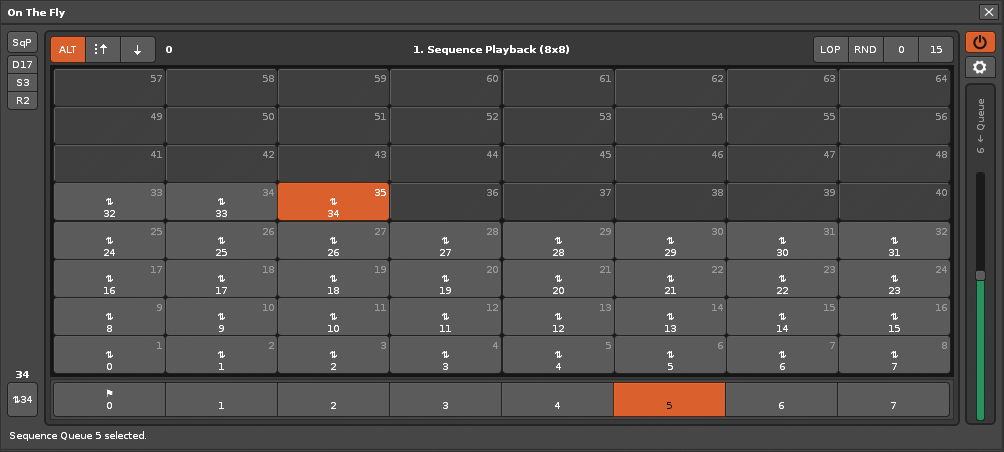
Some of the available controls can change dynamically depending on the selected Pad Mode; that is, the buttons can change state, symbol, text, or color, and even rotary encoders may appear. All the control content is strategically designed to minimize the number of MIDI connections while providing a wide range of general control of
3.2. Left Sidebar Control Bar. Elements and Usage.
The left sidebar has three sections: Pad Mode control, center panel settings {Dx} - {Sx} - {Rx}, as well as the current pattern index and the playback index in the sequence.
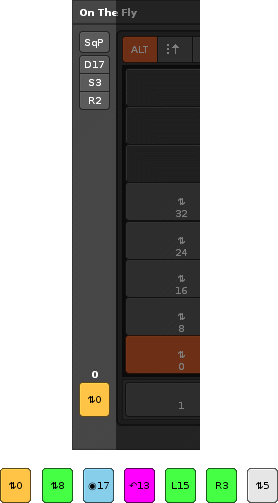
- "Pad Mode" button. Changes the Pad Mode of the center panel through 5 states, allowing you to control a wide variety of functions. A 3-letter abbreviation identifies each mode:
- {SqP} Sequence Playback Mode.
- {PtS} Pattern Sound Control Mode.
- {TrD} Track DSP Control Mode.
- {InT} Instr. Touch Control Mode.
- {InP} Instr. Plugin Control Mode.
- Center Panel Configuration Code [Dx]-[Sx]-[Rx]. The center panel configuration can be changed according to layout, size, and reversal using the controls {Dx} - {Sx} - {Rx}, which can also be locked for security. These controls, in turn, form an easy-to-remember or note-down "configuration code" for reuse or sharing with another composer or artist who also uses the
OTF and wish to use the same settings.- Layout Button [Dx]. This button {Dx} allows you to switch between 24+1 different pad layouts on the center panel, ranging from 4 to 256 pads. This allows you to use modest USB MIDI devices with few buttons, or even multiple USB MIDI devices with many buttons or pads. To change the layout, simply scroll the mouse wheel over the {Dx} button, or click to advance to the next layout, or {ALT}+click to return to the previous layout. You can also do this via MIDI mapping.
- Size Button [Sx]. This button {Sx} allows you to change the size of the visible pads between 10 different sizes based on width and height. This allows you to use a compact or adapted window, or a larger window, even for use on touchscreens. To change the size, simply scroll the mouse wheel over the button {Sx}, or click to advance to the next size, or {ALT}+ Click to return to the previous size. You can also do this via MIDI mapping.
- Reverse Button [Rx]. This button {Rx} allows you to reverse, flip, or reverse the pad layout, so the top row is placed on the bottom row and vice versa. This changes the pad numbering order, allowing for a better match to the actual pad or button layout of the connected USB MIDI device. To toggle the reverse, simply click the Rx button. You can also do this via MIDI mapping. It is recommended to configure this setting before creating a MIDI mapping.
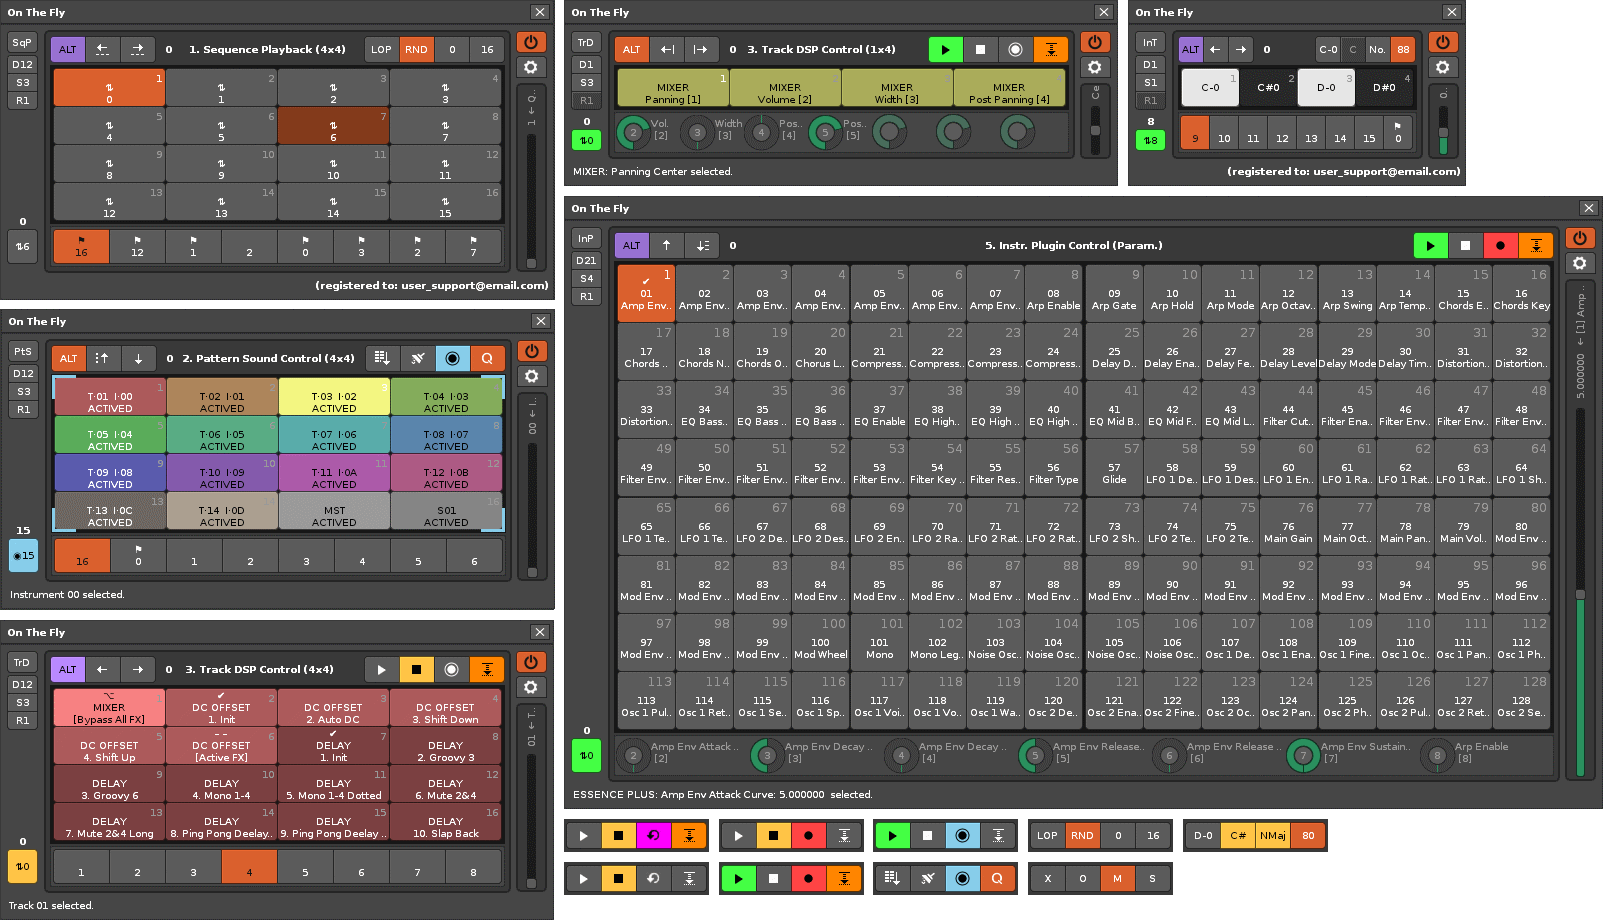
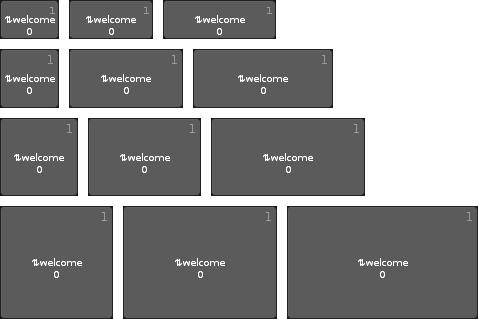 On The Fly. Views of the first pad, with 12 sizes.
- Pattern Marker and Sequence Marker/Tail Restore button. The top marker simply displays the decimal index of the current pattern (the selected pattern). The sequence marker button is very useful. It displays the decimal index of the current playback sequence and also shows various status symbols and colors. If necessary, to linearly restore the sequence queue, click the sequence button. This will restore all 8 slots of the tail, so that they always add up to +1 compared to the previous slot. The sequence button is directly linked to the sequence queue (bottom bar) and will change to green, red, or yellow depending on the status of the transport buttons in the top control bar, or to white if...
Renoise has sequence control (see the ⇅ Sequence Control option in the Preferences Panel). The two indices mentioned can be the same value if pattern tracking is enabled.
3.3. Right Side Control Bar. Elements and Usage.
The right-side control bar lets you turn
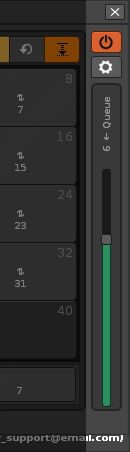
- OFF/ON button. This button allows you to turn the tool off {OFF} or on {ON}. When
OTF is {OFF}, it is not synchronized withRenoise and will not work. When it is {ON}, the window stays synchronized withRenoise , allowing the tool to control it.On The Fly must be enabled {ON} for the mapped MIDI links to work. To control it, simply click on it; it's the only button that doesn't have a MIDI link. - Preferences Button (Gear Wheel). This button allows you to switch the window view to the Preferences Panel or return to the main window. See section 4. Graphical Interface II. The Preferences Panel and the "About" panel for more information.
- Master Slider. Depending on the selected Pad Mode, the master slider lets you select a parameter or adjust the value of the parameter selected in the central pad panel. This allows you to control a large number of parameters with just one physical slider or wheel available on the USB MIDI device. This slider can be linked to between one and seven additional sliders, which can then appear to control more parameters in consecutive groups.
3.4. Top Control Bar. Elements and Usage.
The top control bar allows control of the button {ALT}, page buttons with their index, and transport buttons, which can be toggled to control other functions. Additionally, the name of the selected Pad Mode appears in the center of the bar.

- Button{ALT}. The {ALT} button changes the state of the selected Pad Mode, providing a second set of controls.
OTF also acts as a modifier, expanding the available functions without complicating operation. The button {ALT} has several working states and can be controlled with the mouse, via MIDI mapping, or with a key {ALT} on the USB alphanumeric keyboard.- {ALT} In the off state. The button {ALT} is off, without color. It displays the main center panel of the selected Pad Mode.
- {ALT} In the on state, the button {ALT} will display a solid blue color. It shows the secondary center panel of the selected Pad Mode.
- {ALT} It can be used in either of the two previous states, changing color to execute specific functions when combined with other controls. Some examples: combining it with the Pad Mode switch buttons {Dx}, or even canceling playback of a box in the sequence by pressing{Sx} a pad on the center panel in Pad Mode {SqP}. Things like that.
- Forward and backward paging buttons {←} {→}. These allow you to paginate the central panel, making it possible to achieve a very high range of indexes with few pads depending on the chosen layout. Paging is limited to 250 pages. This means that if there is only a 4-pad layout (a MIDI device with only 4 assignable buttons), it can reach a value of 1000 (4 x 250), potentially covering, for example, the maximum number of patterns it supports.
Renoise . The opposite extreme is with 256 pads (this could be four MIDI devices with 64 assignable pads each, or one with four banks), reaching a value of 64,000 (256 x 250). This latter case is very useful, for example, for controlling the programs or parameters of a complex, selected VSTi instrument plugin. The fewer pages you need to navigate, the faster and more responsive overall control will be. Paging is one of the most powerful features of theOTF . This brings enormous control to any USB MIDI device with a minimal or maximum number of physical controls (buttons and rotary encoders). The paging buttons accept a single click for precision or even press and hold for speed, with customizable variable speed (from the Preferences Panel). - Main pagination of the central panel for page change.
- Navigation between the 8 slots of the sequence queue.
- Track navigation.
- Sequence navigation.
- Instrument navigation.
- Page index. To the right of the page buttons, this is the decimal number or range marker from 0 to 250 that indicates the selected page. It will change via the page buttons and can be repositioned according to the window width for a compact view.
- Pad Mode Name. Displays a sequential number and the name of the selected Pad Mode, which may change depending on whether the primary or secondary center panel is toggled by the button {ALT}. It serves to easily identify the selected center panel. This name is directly related to the abbreviation of the Pad Mode change button.
- Transport buttons. In general, the
OTF offers 4+3 transport buttons:- { ▶} Play/Start. "Play song" button when the song is paused. It will also start the pattern if it is already playing. It lights up green, or white if the sequence is controlled by
Renoise . - { ■} Stop/Panic. "Stop song" button when playback is in progress. "Panic" button when playback is stopped. Panic mode mutes all sound. To resolve a panic while the song is playing, simply double-click. It will light up yellow.
- { ↶} {◉} {●} Loop/Live/Edit. Loop or pattern repeat button (pink). Switches to live mode in Pad Modes 2 and 3 (light blue). Switches to pattern edit mode in Pad Modes 4 and 5 related to instrument control (red).
- { ↓} Chase. Position chase button in the pattern during playback (orange).
- { ▶} Play/Start. "Play song" button when the song is paused. It will also start the pattern if it is already playing. It lights up green, or white if the sequence is controlled by

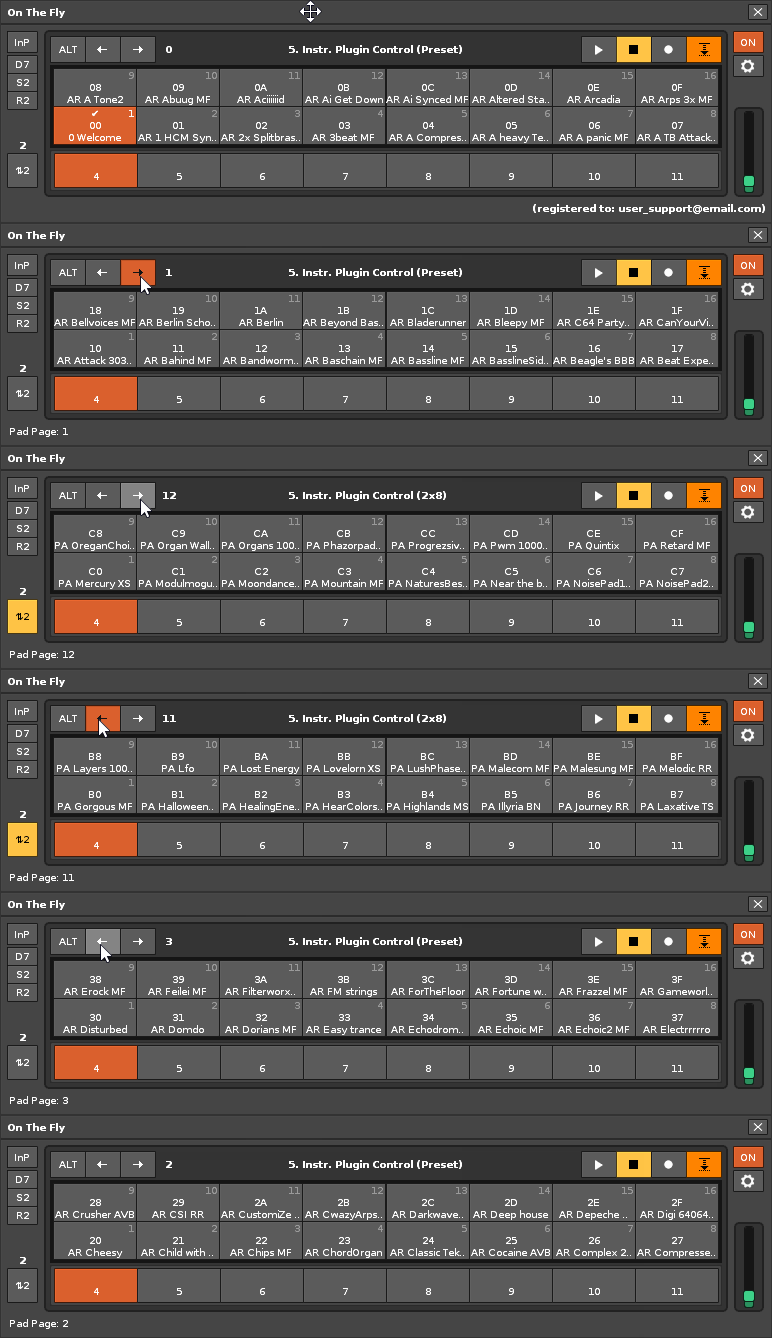

The paging buttons can also navigate between different

3.5. Central Pad Panel. Elements and Usage.
Basically, the central pad panel is an adaptable rectangular or square grid that strategically arranges, in a specific order, the buttons that "represent" interactive pads, according to the layout, size, and reversal used. It can display 4, 6, 8, 9, 12, 16, 24, 32, 40, 64, 128, 256, or even 120 pads (up to 10 rows of 12 for piano, and configurable). This allows you to adjust the number of pads according to the MIDI device used, even if it's a multi-octave MIDI piano. The central pad panel works together with the paging feature, so
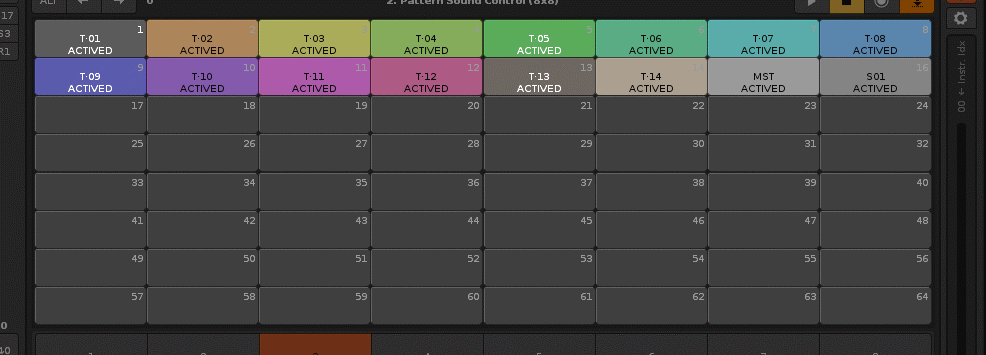
The displayed pads can change information (different values) depending on the selected Pad Mode, change color according to their function, or even blink. They will generally always display a pad index on the right or left (this can be hidden) that should correspond to the physical pad number on the USB MIDI device. Additionally, they will display two or three rows of text with symbols for information. With up to 10 different sizes available, it is recommended to use a size that is wider than it is tall to avoid text abbreviations. See section "5. Control Panel Modes. Live Playback and Sound Changes" for a complete explanation of all the functional details of the central pad panel.
3.6. Bottom Sequence Queue Bar or Rotary Wheels. Elements and Usage.
The sequence queue is a fundamental and unique feature of
The index of each slot can be changed on the fly during playback using the central pad panel. This allows for a jump in the sequence during a live performance or scene, for example, to skip to slot 4 (a change that will actually occur a few seconds later). In this case, the entire sequence will change linearly from slot 4 to 8, and this is how any change in any slot is controlled. This gives the composer or artist broader visual control and more practical manual control of the immediate playback queue, at least for the next eight patterns to be played. Ultimately, it provides quick and clear anticipation of what will happen seconds or even minutes later, depending on the duration of each pattern.
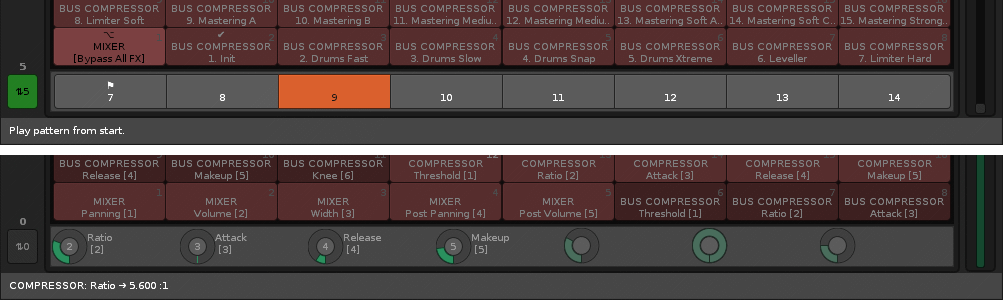
During playback, the sequence queue shifts to the left in near real time and updates its indices as needed. When the song stops, the queue pauses and retains its current contents. The sequence queue, together with other playback-control options (such as overriding a sequence matrix slot to prevent it from ever playing back, or muting tracks or matrix slots, among other volume control options), allows for precise, practical, and skillful control during live performance, whether for artistic recordings or stage events.
"Absolute" mapping mode for rotary encoders. Absolute mapping mode uses a decimal range of 0 to 127 for the MIDI standard. Any parameter range exceeding 128 will result in a loss of precision, with the range being accessed in jumps. This means that it is not possible to select all values within the range. This is common for physical (limited-travel) sliders and physical limited-rotation or 270° encoders, which will always operate in absolute mode.
"Relative" mapping mode for the rotary encoders. The relative mapping mode allows any value within the range to be achieved with maximum precision.
4. Graphical Interface II. The Preferences Panel and the 'About' Panel.
4.1. The Preferences Panel. Configuration and Customization.
The "Preferences Panel" provides a range of customization options for adapting certain aspects of the tool's operation to the needs of the composer or artist. Most options can be enabled or disabled using checkboxes, and each has a brief description. To open the Preferences Panel, click the gear button on the right-hand control bar.
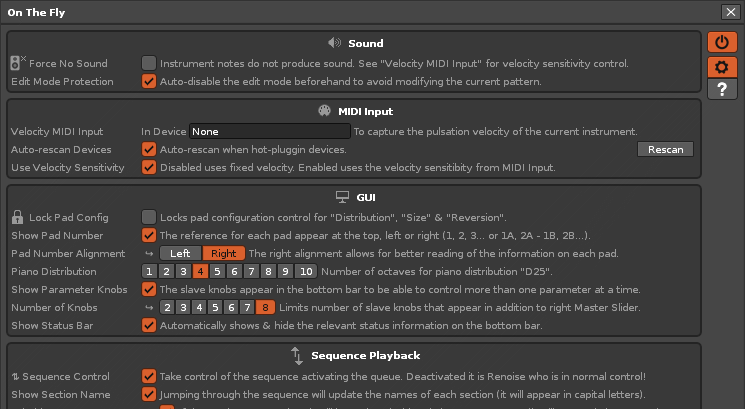
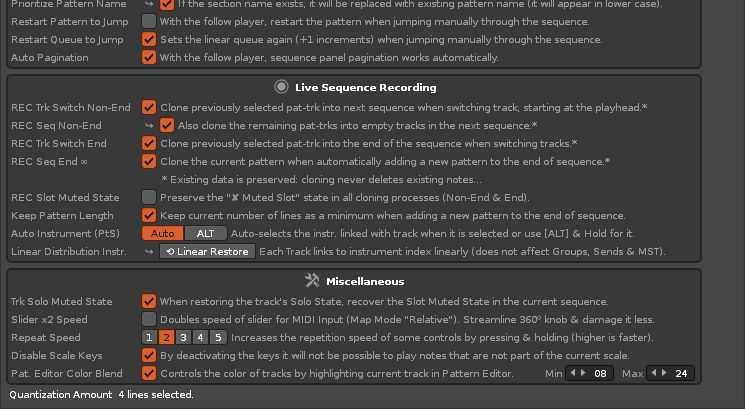
Some Preferences Panel specifics. Some options are specific and significantly change the behavior of
- Instrument Direct Sound Control. Disable the "Force No Sound" option to allow the instrument's notes to sound (note-on and note-off). This is necessary for sound to be played through Pad Mode {InT} Instrument Touch Control, with {ALT} enabled. Using the option Edit Mode Protection el
OTF will prevent accidental editing in the pattern editor while it is being used. - Velocity MIDI Input. Allows the velocity of the MIDI device being used (pad buttons or keys on a compatible keyboard) to be captured for the current instrument through MIDI mapping.
- Lock Pad Config. The lock allows you to lock the Dx-Sx-Rx buttons on the left side control bar for secure control, preventing accidents during live performances or stage setups. A padlock icon will appear over them, which can be deactivated with a simple click.
- Piano Distribution and Number of Knobs. It is possible to display a specific number of octaves in the D25 piano distribution. Additionally, it is possible to add from 1 to 7 more knobs to accompany the vertical slider for controlling parameter values.
- ⇅ Sequence Control. This option is necessary for the
OTF to take control of sequence playback. When this option is disabled,Renoise controls sequence playback. - Options for Live Sequence Recording. These allow you to change various recording control behaviors in live mode.
- Slider x2 Speed and Repeat Speed are options that allow you to accelerate/decelerate the rotation of the encoders or the press-and-hold action of certain buttons for finer adjustment for the composer or artist.
- Pattern Editor Color Blend. Allows you to highlight the current track by color in the pattern editor of
Renoise modifying two intensities, through the configuration of two intensity values: "Min" for minimum (for all unselected tracks) and "Max" for maximum (for the selected track). This allows, for example, not including colors in any track and only highlighting the color of the selected track, or playing with two intensities. This makes it easier to distinguish visually betweenRenoise andOTF .
4.2. 'About On The Fly' Panel. Tool Information.
The "About On The Fly" panel displays additional information about the tool. It also provides shortcuts to the Readme.txt and License.txt files, contact information, and access to the User Guides.
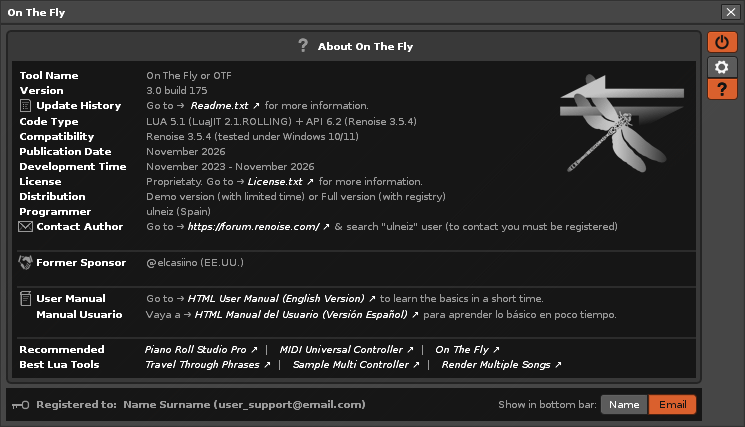
Other recommended tools. This information panel also displays links to learn more about other recommended tools also created by the creator and programmer ulneiz:
5. Control Panel Modes. Live Playback and Sound Changes.
The following are the 10 available control panels (5x2 depending on whether the button {ALT} on the top control bar is illuminated). Each panel describes the most common operations available in that mode. For live or stage use,
5.1. Sequence Playback Mode (ALT Off). Navigate and Override Patterns.
Select Pad Mode {SqP} and turn {ALT} off. Keep the center panel and the bottom bar of the sequence queue constantly visible, as well as the pattern and sequence markers on the left side control bar. The center panel allows you to navigate between patterns or cancel them.
- Direct Sequence Index Selection. Simply click on the desired pad in the center panel to select the pattern based on its decimal index. To access a hidden pad in the upper sequence index, use the pagination buttons in the top control bar. If pattern tracking is enabled, the pattern selection will match the sequence selection.
- Skipping patterns in the sequence. When a pattern is skipped, it will not play as part of the sequence; playback will jump to the next pattern that has not been skipped. This is a unique feature of
OTF that is not available inRenoise . Whenever the sequence jumps to a non-consecutive position, a flag symbol ⚑ will appear in the sequence queue. To cancel it, hold down the key {ALT} and single-click on the desired pad. It will turn red and display a strikethrough symbol ✘. You can skip as many patterns as you like so that they are omitted from the sequence. It is best to skip a pattern before it starts playing. You can also skip it during playback, but the change will take effect on the next pass. - Activate a pattern loop. On the top control bar's transport buttons, click to activate the loop button (third button). This will repeat the current pattern continuously until deactivated, preserving the sequence queue if it has been changed. The sequence index button will light up red, and the backspace symbol ↶ will appear.
- Create pattern repeat n times. You can repeat the current pattern up to 8 more times. To do this, press and hold {ALT} + single-click on any of the slots in the bottom bar of the sequence. The number of repetitions will depend on the slot's index. After the repetition, the linear sequence will automatically resume playback.
- Reset the linear sequence queue. The linear sequence is always defined by a playback queue whose slots are +1 relative to the index of the immediately preceding slot (jumps of +1). For example, 6-7-8-9-10-11-12-13. If non-linear jumps occur in the sequence queue and you wish to fully restore the linear sequence queue without disrupting the current playback, press and hold {ALT} + single-click the sequence index button in the left sidebar. The sequence index button will display the bidirectional symbol ⇅.
- Linear navigation between the sequence using the pagination buttons {:↑} {↓}. To move linearly through the sequence, hold {ALT} and click or press and hold the paging buttons; their icons will change. The center panel will automatically turn pages if the Auto Pagination option is enabled.
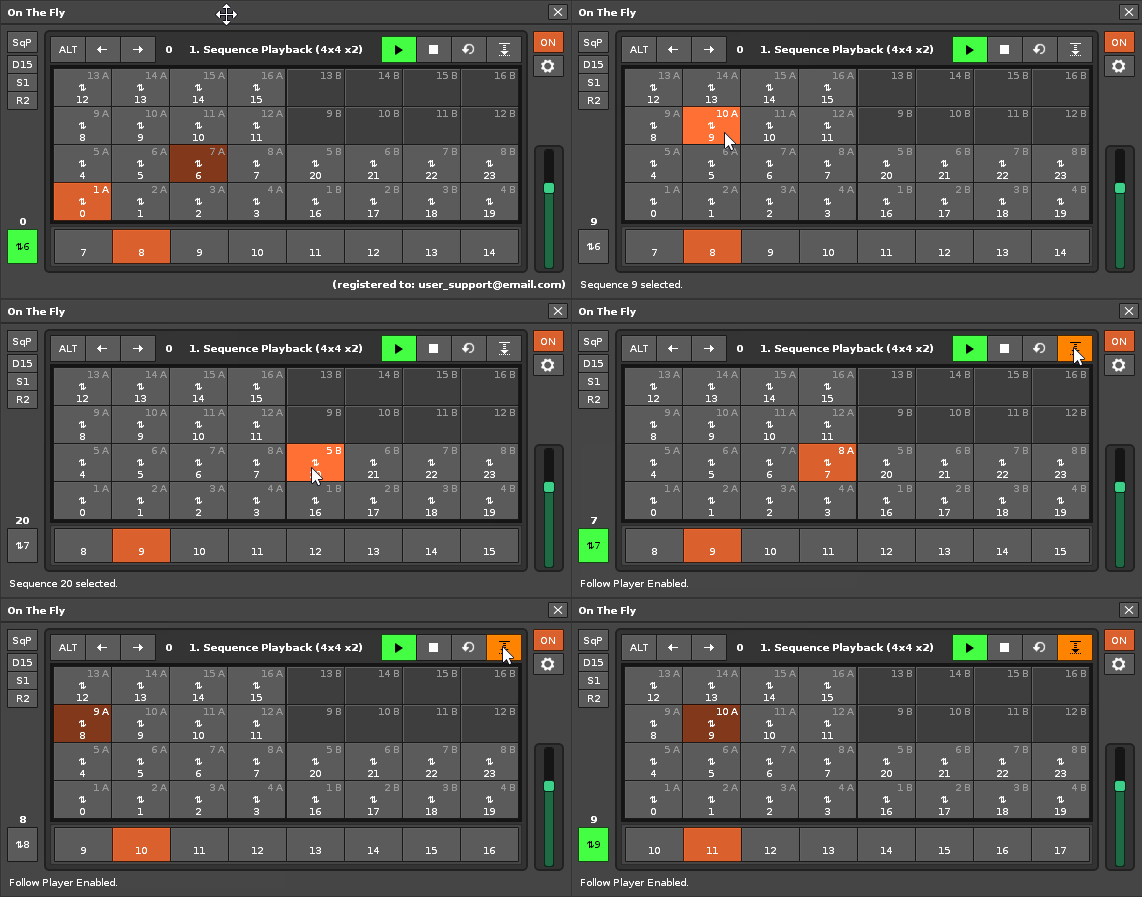
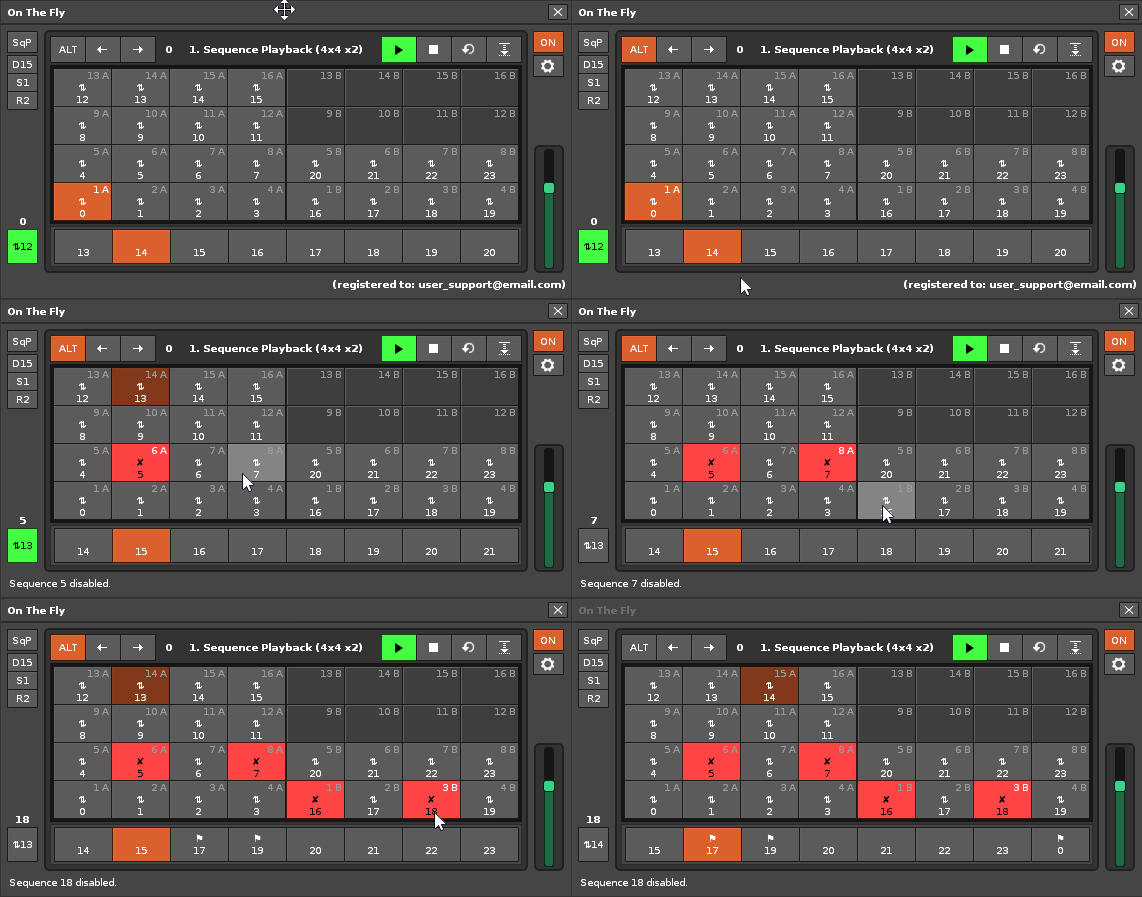
Pulse blinking effect on pads during playback. If a song is playing, the center panel will display a pulse blinking effect on the pad that is playing. This blinking per pad corresponds to the number of pulses that the pattern will last, so you can visually detect the rhythm being used at any given time. The pulse-blinking effect is shown only once, immediately after playback of each pattern begins.
5.2. Sequence Playback Mode (ALT On). Sequence and Queue Control.
Select Pad Mode {SqP} and turn {ALT} on. This will enable you to skip sequence queues, create loop/reverse loop ranges, or randomize by controlling the 8 immediate indices to be played. The sequence queue is displayed in the dynamic bottom bar, which contains eight buttons (sequence slots) with decimal indices. By default, they follow the song's linear playback order. For example, if the song starts playing with the sequence index "0," the queue will be "1-2-3-4-5-6-7-8," and you can change or restore this order on the fly.
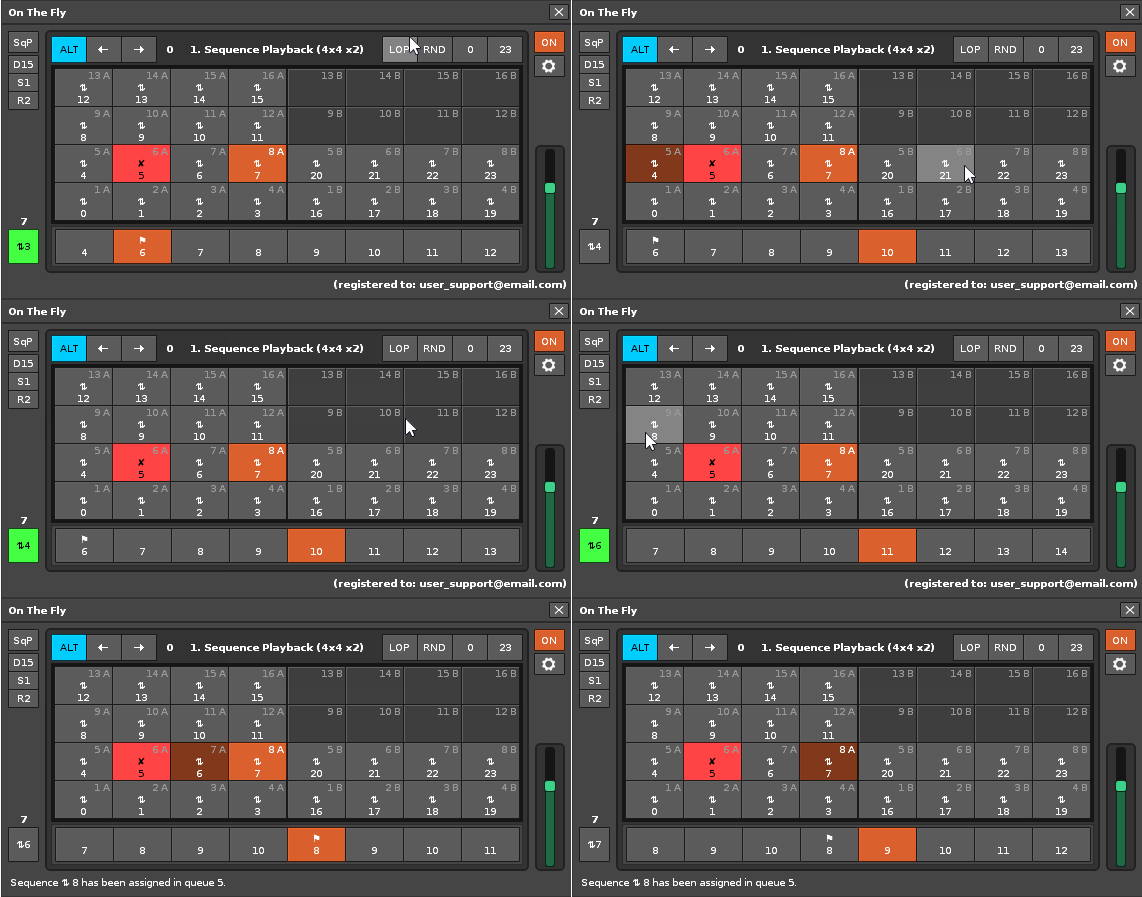
- To perform specific jumps in the sequence queue, in the bottom bar of the sequence queue, click to pre-select one of the eight available slots for modification. Then click the desired pad in the central panel. This will modify the slot's index in the queue and display the flag symbol ⚑ for non-linear jumps and the bidirectional symbol ⇅ for non-jumps.
- Continuous creation of up to 8 jumps in the sequence queue. Similar to the previous case, during pattern playback, you can define up to 8 jumps in the sequence queue immediately and continuously. To do this, single-click on the first sequence queue slot in the bottom bar. Then, press and hold {ALT} + single-click on the pads in the center panel to change the sequence index in the queue. This operation will then change the next slot in the sequence queue. Repeat these steps to quickly define all the desired jumps, up to 8. Try to perform these operations immediately when starting to play a pattern. Remember that the sequence queue is automatically updated when playing the next pattern in the sequence.
- Create pattern repeat n times. You can repeat the current pattern up to 8 more times. To do this, press and hold {ALT} + single-click on any of the slots in the bottom bar of the sequence. The number of repetitions will depend on the slot's index. After the repetition, the linear sequence will automatically resume playback.
- Reset the linear sequence queue. The linear sequence is always defined by a playback queue whose slots are +1 relative to the index of the immediately preceding slot (jumps of +1). For example, 6-7-8-9-10-11-12-13. If non-linear jumps occur in the sequence queue and you wish to fully restore the linear sequence queue without disrupting the current playback, press and hold {ALT} + single-click the sequence index button in the left sidebar. The sequence index button will display the bidirectional symbol ⇅.
- Create a normal looping range in the (increasing) sequence. This is another unique feature of
OTF . Single-click the {LOP} top control bar button (first transport button) to activate loop range mode. This will disable sequence randomization range mode (RDM) if it is enabled. To set the range, click or hold a number button to increase its value. Hold {ALT} and click or press and hold the same button to decrease its value. this applies to the two number buttons on the top control bar (third and fourth transport buttons). If the value of the left number button is less than the right, the loop will be normal, increasing. For example, if the range is 3-7, it will play...3-4-5-6-7-3-4-5-6-7-3-4-5... as soon as the value 3 is reached for the first time in the sequence queue. The sequence index button will display the letter L symbol. - Create a reverse-loop range in the (decreasing) sequence. This is another unique feature of
OTF . Perform the same operation as in the previous case. However, to define the inverted, decreasing loop, the value of the left numeric button must be greater than the right one. For example, if the range is 7-3, it will play...7-6-5-4-3-7-6-5-4-3-7-6-5... as soon as the value 7 is reached for the first time in the sequence. The sequence index button will display the letter L symbol. - Creating a loop in randomization on the sequence. This is another unique feature of
OTF . Single-click the {RDM} top control bar button (second transport button) to activate range randomization mode. This will disable sequence loop range mode {LOP} if it is enabled. To define the range, click or hold a number button to increase its value. Hold {ALT} and click or press and hold the same button to decrease its value. these operations are performed on the two number buttons on the top control bar (third and fourth transport buttons). The lower and higher values are always used as the randomization limits, regardless of the order in which they are set. The sequence index button will display the letter R symbol. - Linear navigation within the sequence queue using the pagination buttons {←} {→}. To scroll linearly through the 8 slots in the sequence queue on the bottom bar, click or press and hold the pagination buttons.
- Linear navigation between the sequence using the pagination buttons {:↑} {↓}. To scroll linearly between the sequence, press and hold {ALT} + single click or press and hold + click on the pagination buttons; their icons will change. The center panel will automatically turn pages if the Auto Pagination {ALT} option is enabled.

5.3. Pattern Sound Control Mode (ALT Off). Track Browser. Live Mode.
Select Pad Mode {PtS} and turn {ALT} off. Keep the center panel visible. The central panel lets you navigate between tracks. Each pad displays the track color, name, index, and sound status, making it easy to see whether a track is active, switched off, muted, or has a disabled slot in the current pattern matrix.
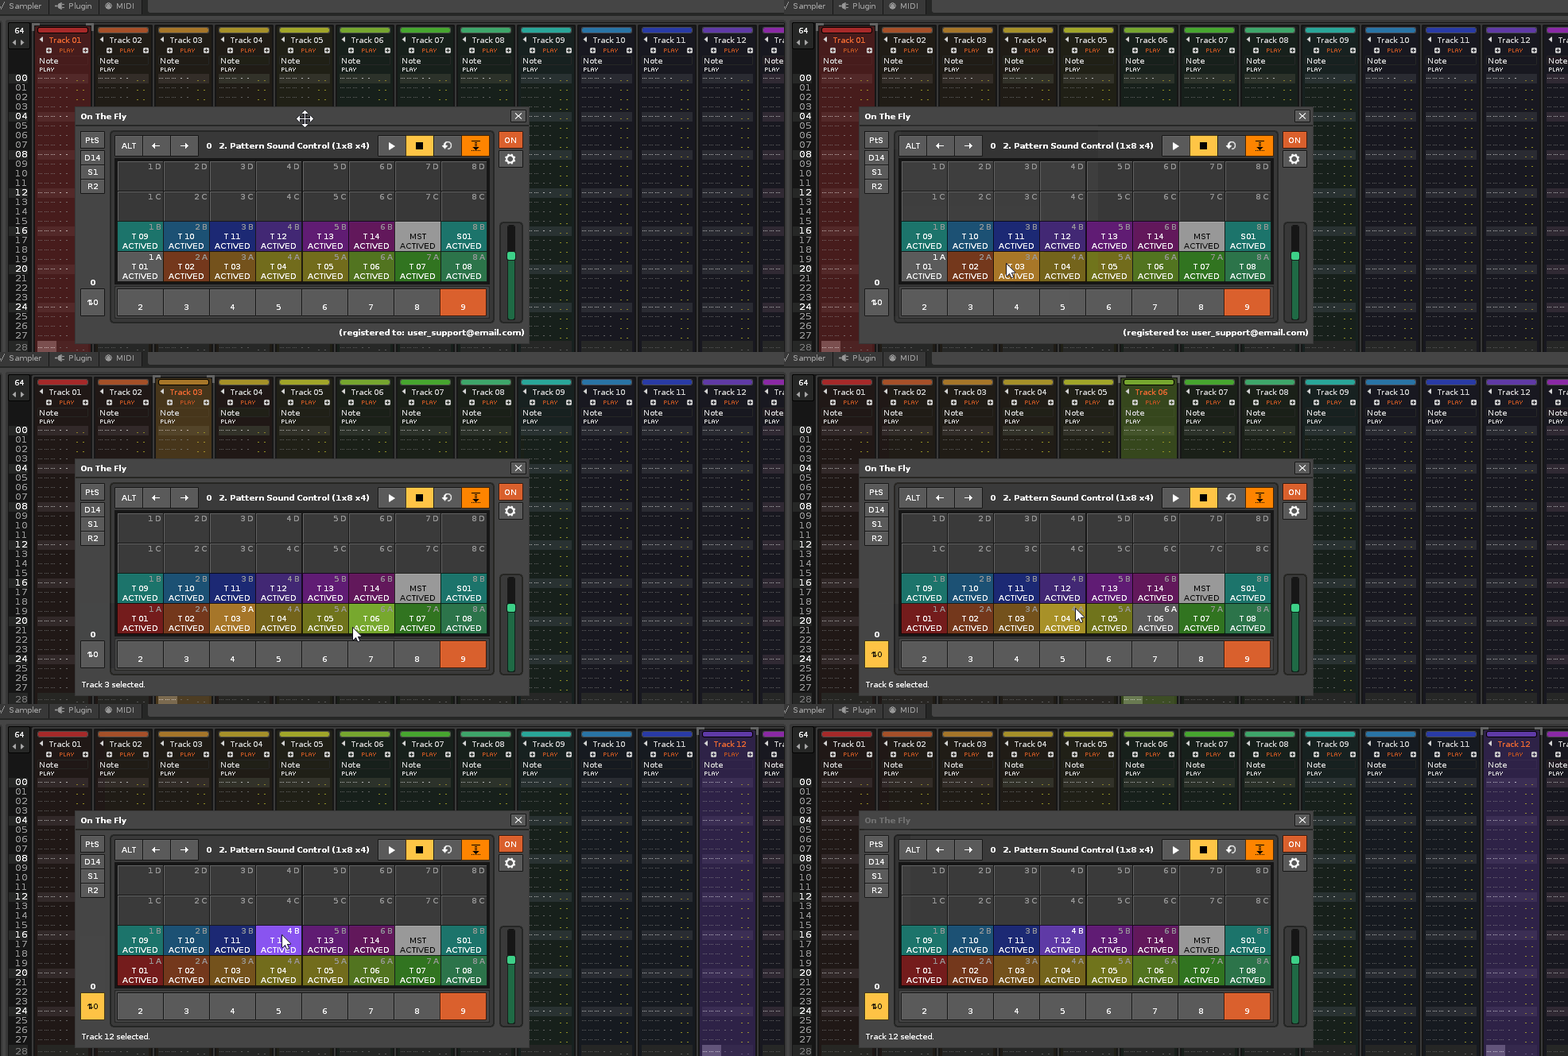
- Direct track selection. Simply click on the desired pad in the center panel to select the track according to its decimal index. Each pad displays the track name, abbreviated automatically as "T" for "Track", "G" for "Group", "M" for "Master", and "S" for "Send".
- Linear navigation between the sequence using the pagination buttons {:↑} {↓}. To move linearly through the sequence, hold {ALT} and click or press and hold the paging buttons; their icons will change. The center panel will automatically turn pages if the Auto Pagination {ALT} option is enabled.
Selection blinking effect on pads. When a track is selected, its corresponding pad will blink, indicating its selection.
Color highlighting in the Renoise pattern editor.
Live Mode: Sequence Recording. Live Mode takes control of the sequence and allows you to record live without stopping playback. The sequence grows automatically as patterns are completed. To prepare and perform a recording:
- Prepare the song template. Add as many tracks as you have instruments and arrange them linearly: one track per instrument. The sequence must contain at least one pattern. Also, configure the number of lines in the pattern according to the time signature you will be recording.
- Activate Live Mode. Press the button {◉}. The pad panel will display a light blue border. OTF will automatically link the instruments to the tracks in linear order and activate pattern editing mode to enable recording.
- Activate Tracking. Also activate sequence tracking {↓}. This will ensure the playback position follows the progress of the live recording.
- Press Play and record notes. If desired, activate the metronome's pre-count to prepare your entry. Press Play {▶} and begin playing from a MIDI keyboard, MIDI pad, or USB keypad. The sequence will automatically expand, and patterns will be completed without losing any recorded notes. You can observe the process in Renoise's sequence matrix.
- Switch tracks and continue recording live. Before the current pattern finishes, select another track from the pad panel to begin recording the next pattern. OTF will automatically select the instrument associated with that track.
- Change the instrument associated with the track. The pads display both the track index and the instrument index. With {ALT} turned off, hold down the {ALT} key and move the master slider to change the instrument assigned to the track.
- To clone the current track pattern using the multifunction controller, with the {ALT} power off, press and hold the key {ALT} and press the transport button on the Cloning Operator. If the current track pattern is empty, the first track pattern with data located above it within that track will be copied. If the current track pattern already contains data, the Clone Operator will clone it to the next position in the sequence. This allows you to retrieve the last track composed on that track or move it to a later position.
- To delete the current pattern/track: With {ALT} turned off, hold down the {ALT} key and press the transport button on the Delete Operator. The data in the current pattern/track will be deleted.
- Record notes mid-project. You can also start recording from the beginning of a sequence in a project that already contains completed parts. For example, you can keep a previously recorded drum section and complete other tracks live, without deleting or modifying the already completed tracks.
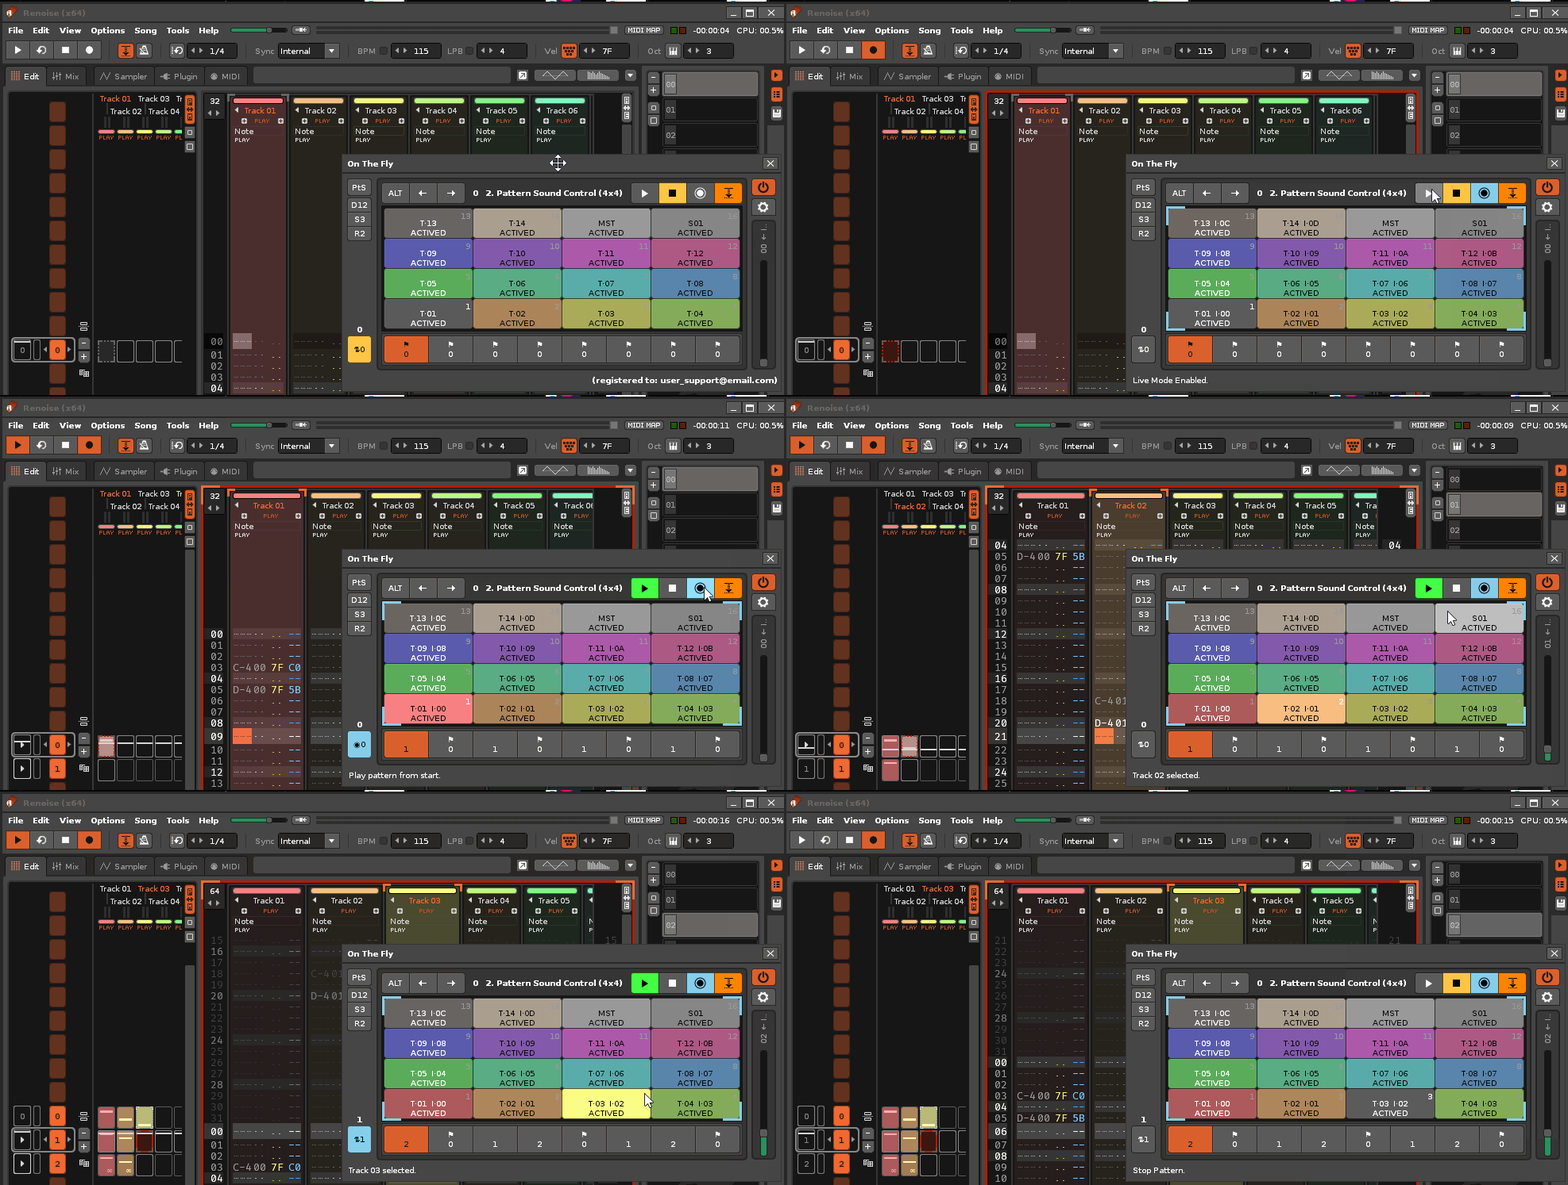
5.4. Pattern Sound Control Mode (ALT On). Pattern/Track Sound Control.
Select Pad Mode {PtS} and {ALT} turned on. In this mode, the transport buttons on the top control bar will change state and symbology, displaying the label "ACTIVE" when the track is active. Remember that they will continue to use the same MIDI routing. These buttons will display the following symbols:
- {X} To turn individual slots on or off in the sequence, click the button in the top control bar {X} to activate it. Then click the desired track pads in the central panel to fade the corresponding matrix slots in or out in
Renoise . The matrix slot corresponds to the pattern-track (intersection between pattern and track), not the entire track. This will only affect the momentary duration of that pattern. The muted pad will display the strikethrough symbol ✘ with the label "Muted Slot". - {O} To turn tracks on or off, click the button in the top control bar {O} to activate it. Then click the desired track pads in the central panel to fade the tracks in or out. This affects the track for the entire song. The changed pad will display the ∅ symbol with the label "OFF".
- {M} To mute/unmute tracks, click the button in the top control bar {M} to activate it. Then click the desired track pads in the central panel to mute or unmute the tracks immediately. This affects the track for the entire song. The changed pad will display the ∢ symbol with the label "MUTE".
- {S} To solo a track, use the solo function, which affects all tracks. In the top control bar, click the button {S} to activate it. It must remain activated to successfully activate and deactivate a solo. Then, in the center panel, click the track pad you want to use to solo an individual track or deactivate it by reactivating all tracks. This affects the track for the entire song. The selected pad will display the $ symbol with the label "SOLO". The composer or artist should only solo a track if they are sure they will later restore all tracks to the "ACTIVED" state, thereby cancelling the solo. They must always be aware of the other track states. Remember that the button {S} must also be activated to deactivate the track solo.
- Reactivate all tracks from the Master track. In the top control bar, make sure to turn off the 4 buttons. {X} To return all tracks to the "ACTIVED" state (except for slots that are switched off), press and hold the pad assigned to the Master track ("MST"), then click it once.
- To reactivate any track state individually, in the top control bar, make sure to turn off the 4 buttons {X}, {O}, {M}, {S}. To return an individual track to the "ACTIVED" state (except for a slot that is switched off), hold {ALT} and click the pad assigned to that track.
- Linear navigation between tracks using the page buttons {←|} {|→}. To move linearly between tracks, click or hold the page buttons. The central panel will switch pages automatically as needed.
- Linear navigation between the sequence using the pagination buttons {:↑} {↓}. To scroll linearly between the sequence, press and hold {ALT} + single click or press and hold + click on the pagination buttons; their icons will change. The center panel will automatically turn pages if the Auto Pagination {ALT} option is enabled.
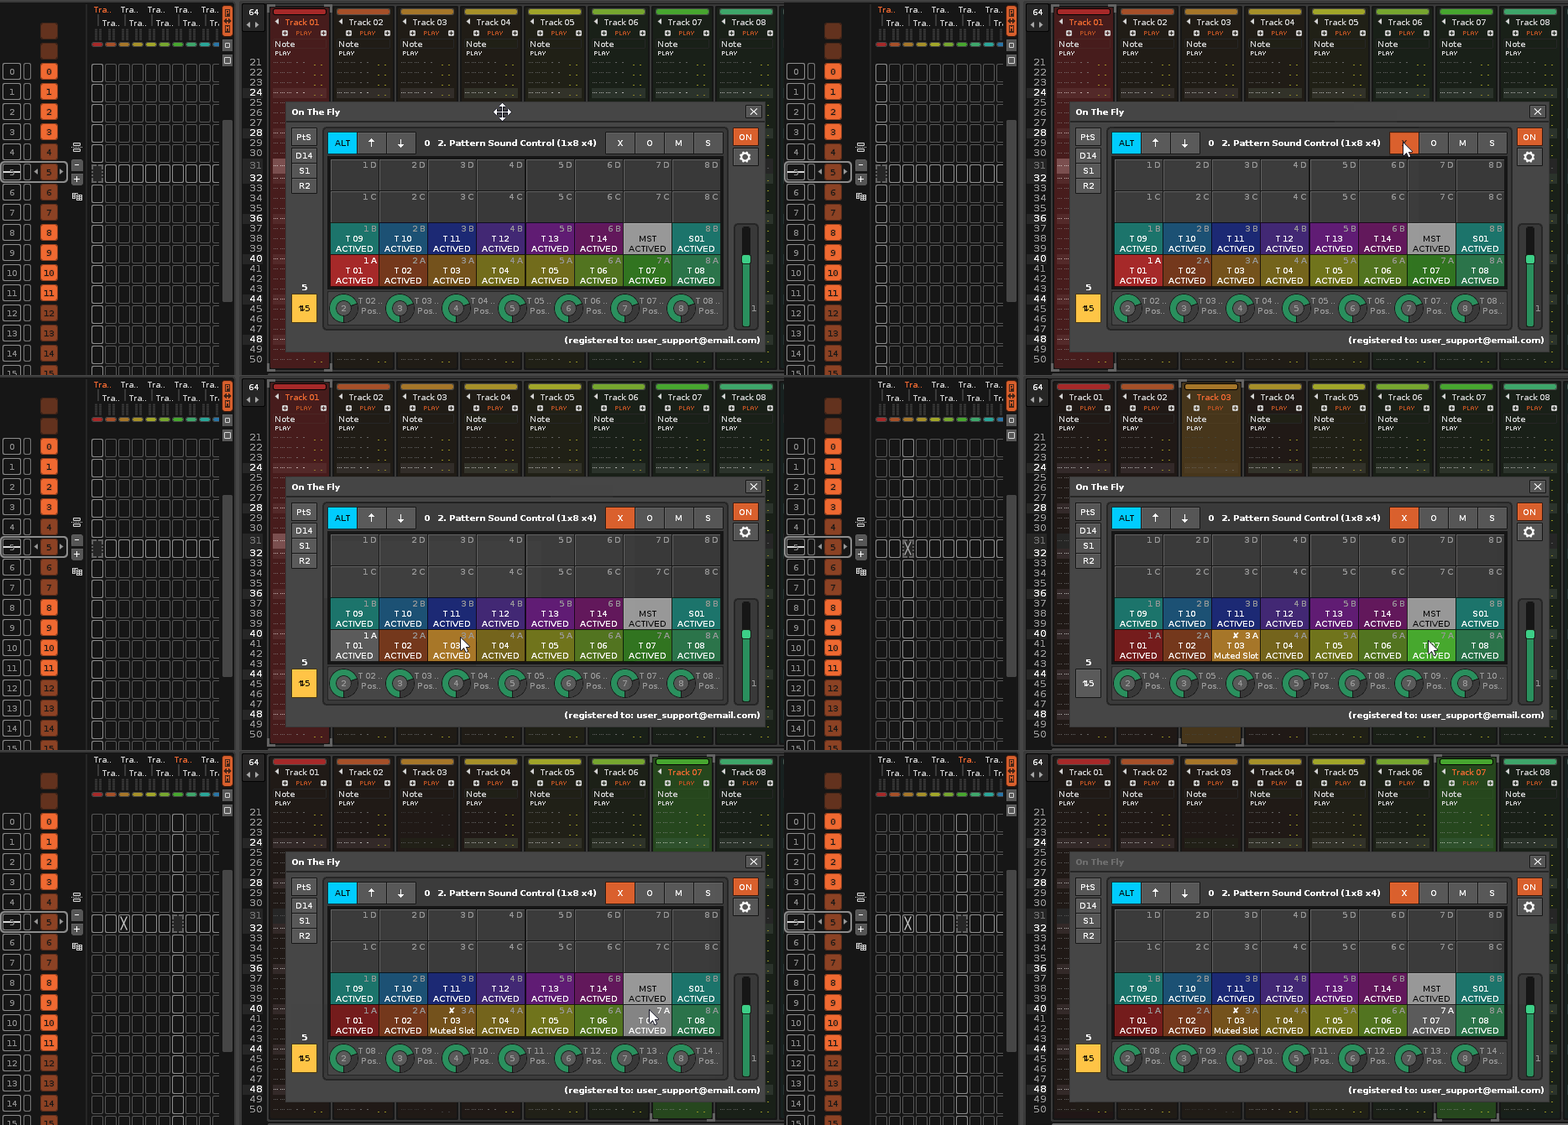
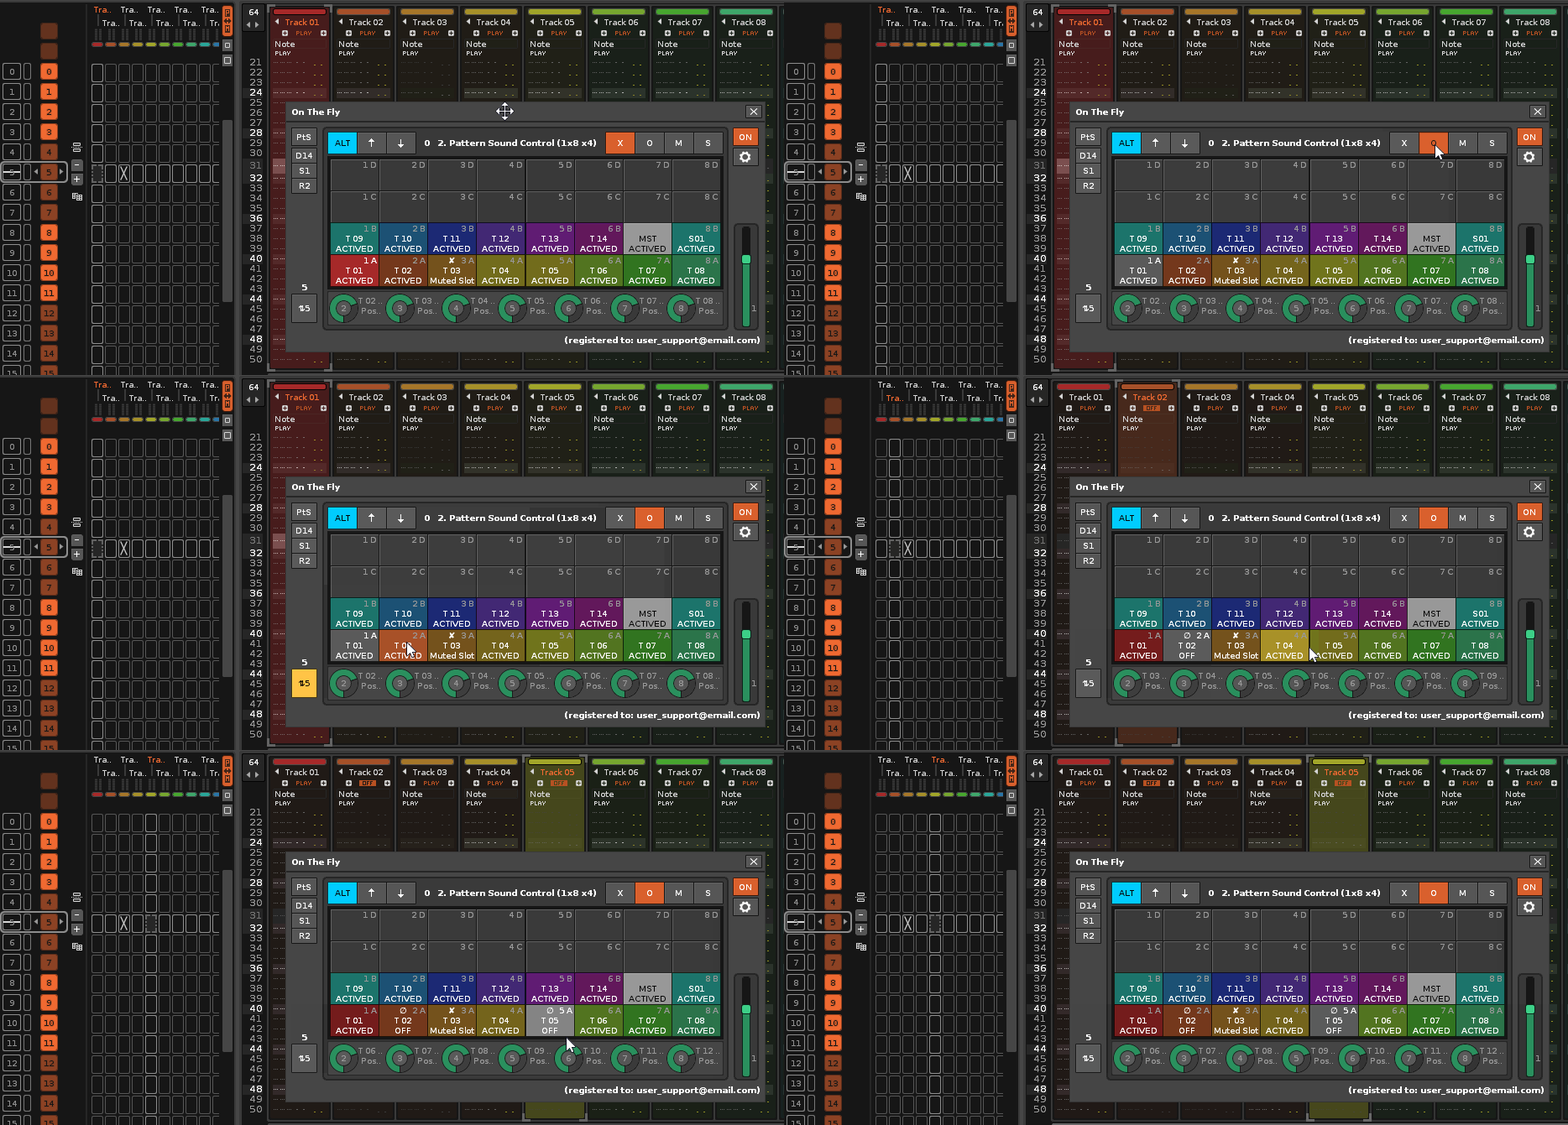
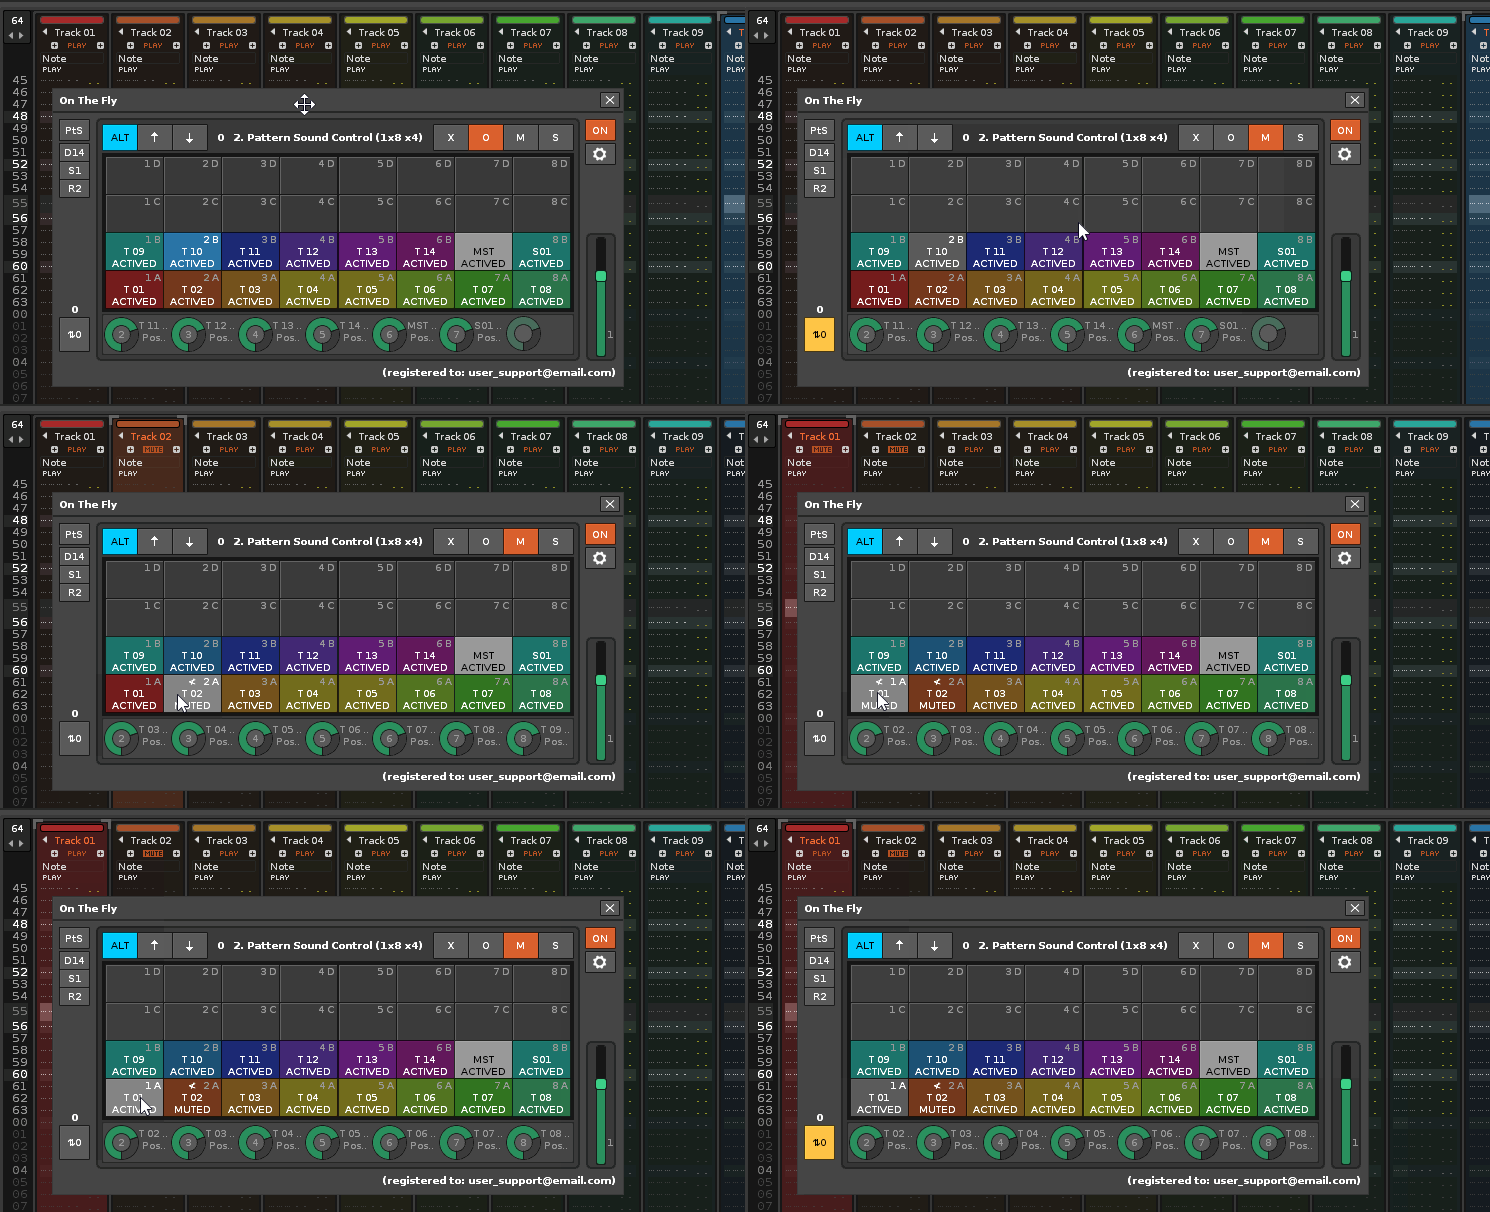
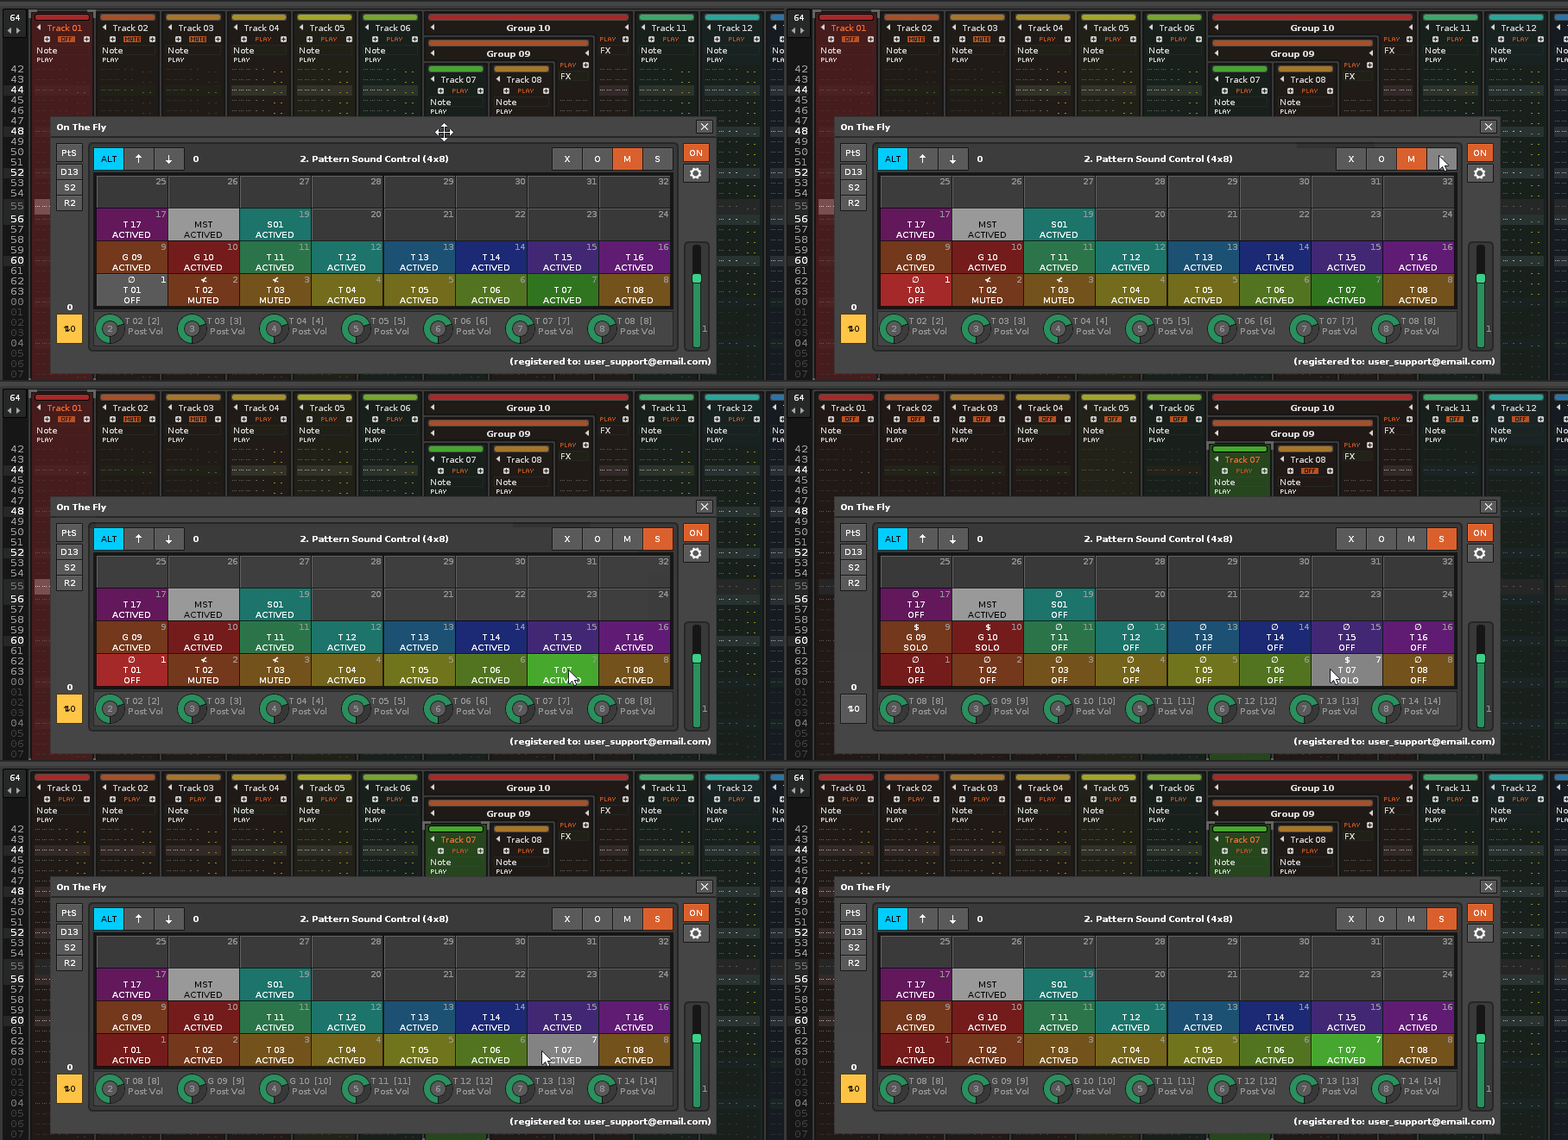
Priority for powering down array slots. Symbols and labeling of individual array slots.
Track Post Volume Control. The vertical slider and rotary encoders let you control each track's post-fader volume. In this case, the vertical slider will always control the selected track's post-fader volume. The visible knobs, 1 through 7, will control the post-fader volume of the next seven tracks. This allows you to control the volume of 1 to 8 tracks in a group, moving through the entire range of tracks. For example, if you have track 1 selected, you can control the post-fader volume of tracks 1 through 8. If you select track 9, you can control the post-fader volume of tracks 9 through 16 as a group. In the Preferences panel, see the Show Parameter Knobs and Number of Knobs options to display the desired number of rotary encoders, depending on the Pad Mode used. These knobs will also have their relative or absolute MIDI routing for control.
5.5. Track DSP Control Mode (ALT Off). DSP Preset Selector.
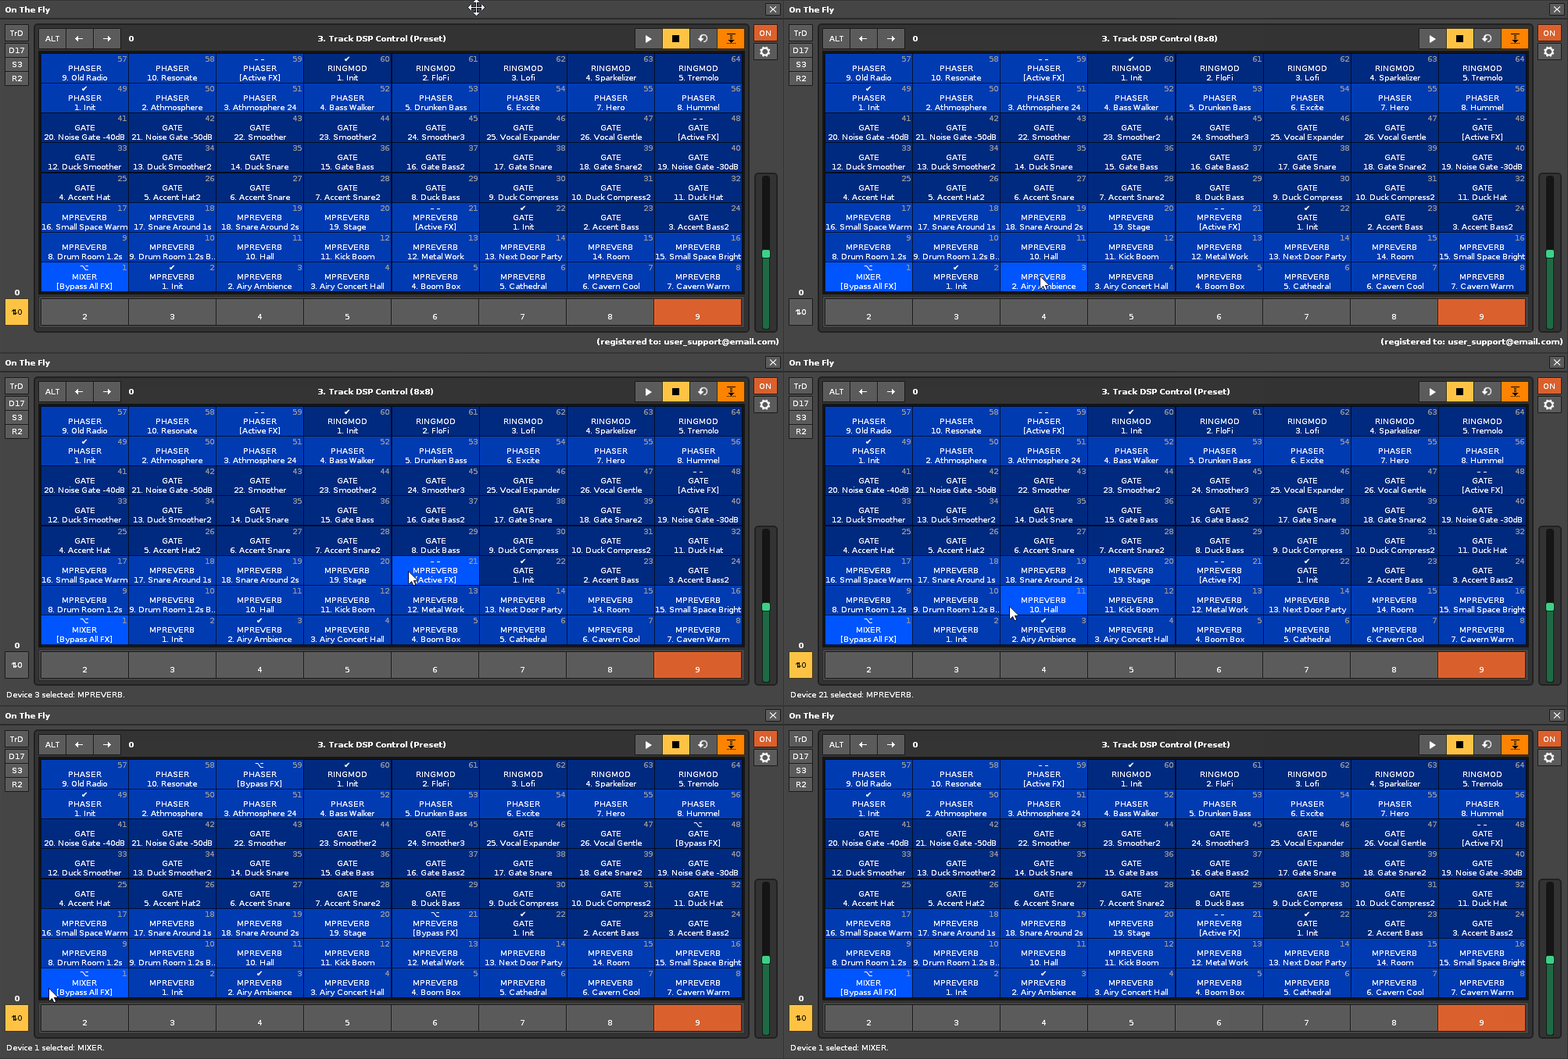
Select Pad Mode {TrD} and turn {ALT} off. Most DSP devices that can be added to the effects chain of tracks include several presets, programs, or configuration profiles for each device. The pads in the central
In addition, each device also allows bypassing (activating/deactivating that effect in the chain), which is very useful for tracks prepared for the stage. Furthermore, the first pad always allows bypassing the entire DSP effects chain. The ability to bypass the entire DSP chain and select presets directly are unique
The central panel will display the pads grouped with two alternating color tones (same color as the track) to classify the presets by device in a completely orderly manner.
- Selecting track DSP device presets. To select a specific preset, click on the preset pads for the selected track in the center panel. Remember that you can use pagination to navigate to the desired preset if needed. The selected pad will display a checkmark symbol ✔. Note that all presets are grouped according to device order.
- Create a track DSP device bypass. To trigger a device bypass, click on the last pad linked to each device with the symbol - - and label Active FX. This will change it to a checkmark symbol and label Bypass FX. Repeat this step to deactivate the bypass, and the effects device will function again.
- Create a bypass of the track's DSP effects chain. You can also bypass the entire effects chain of the selected track. To enable or disable a chain bypass, click the first "MIXER" pad, marked with the ⌥ symbol and labeled "Bypass ALL FX ". This will affect all devices in the DSP chain.
- Linear navigation between tracks using the page buttons {←|} {|→}. To scroll linearly between tracks, press and hold {ALT}+ single-click on the page buttons. The central panel will switch pages automatically as needed.
5.6. Track DSP Control Mode (ALT On). DSP Parameter Control.
Select Pad Mode {TrD} and turn {ALT} on. All DSP devices that can be used in the track's effects chain include a variety of parameters, including VST effects plugins or equivalents (AU, LADSPA, and DSSI). The center panel displays all parameters for all devices in the chain.
From the pads, you can select a specific parameter as "master" to change it using the master slider and up to seven additional parameters via the rotary encoders, allowing for group manipulation. Remember that the MIDI routing of the master slider and rotary encoders can be relative or absolute. This is a particularly efficient way to manage a large number of parameters with just a few controls through MIDI mapping.
- Selecting a track DSP device parameter. To select a specific parameter, click on the parameter pads for the desired DSP effect device in the center panel. Remember that you can use pagination to find the desired parameter if needed, as there may be many parameters in a single track effects chain.
- Modify the numerical value of the parameter using the rotary encoders. Once a parameter is selected, it is always linked to the master slider on the right-hand control bar, numbered 1. The remaining visible rotary encoders are numbered 2 through 7 and control the subsequent parameters. To change the value of each setting, move or rotate the slider or turn the encoder.
- Linear navigation between tracks using the page buttons {←|} {|→}. To scroll linearly between tracks, press and hold {ALT} + single-click on the page buttons. The central panel will switch pages automatically as needed.
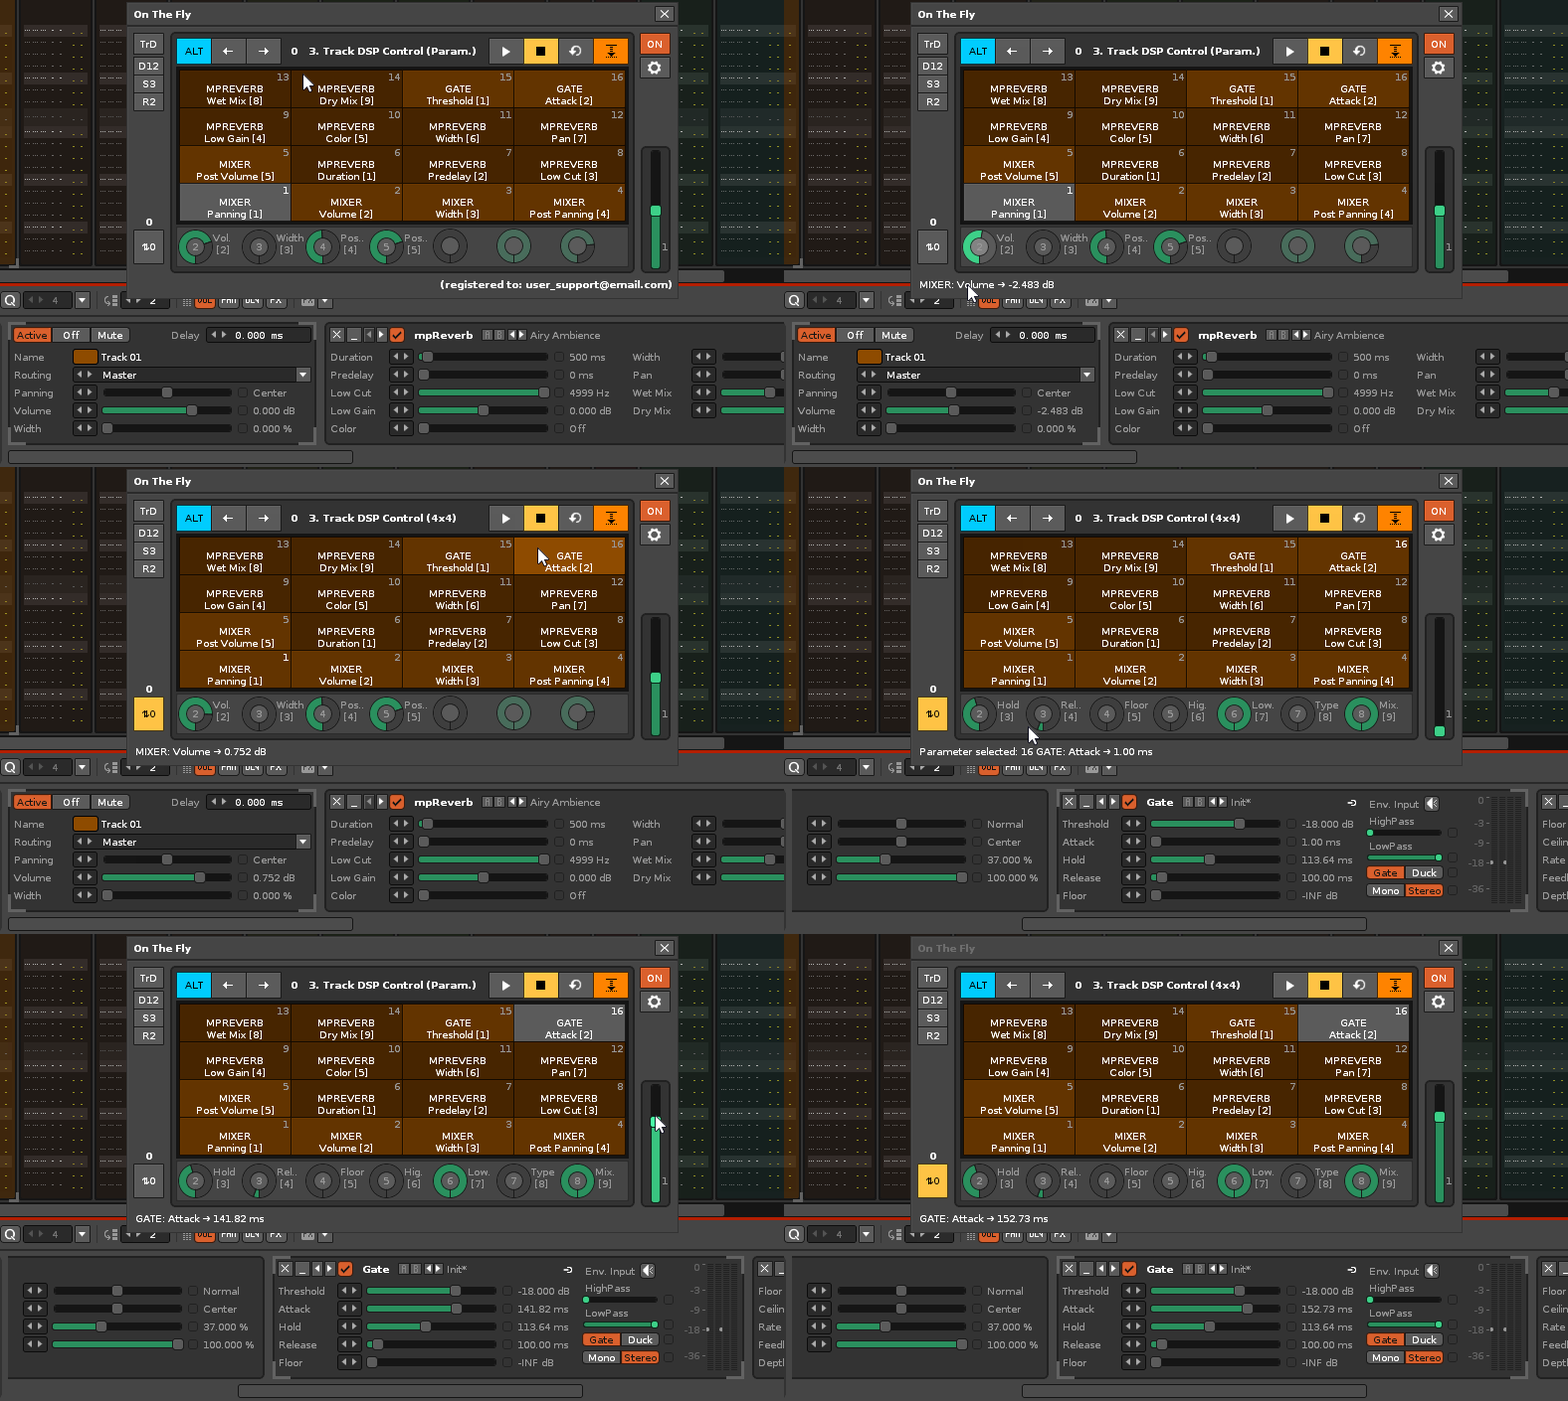
Relative mapping mode for endless rotary encoders at double speed and with precision control. When using endless or 360° rotary encoders with relative mapping mode, you can physically spin the encoder at twice the speed by enabling the Slider x2 Speed for faster option in the Preferences Panel. Additionally, you can drastically slow down the spin for greater precision by holding down the {ALT} key while turning the encoder.
5.7. Instr. Touch Control Mode (ALT Off). Instrument Navigator.
Select Pad Mode {InT} and turn {ALT} off. Again, keep the center panel constantly visible. You can navigate directly through the instrument list to select a specific instrument. If the instrument is unnamed, the label (Instr. xx) will appear with its decimal index included. Remember that
- Direct instrument selection. Simply click on the desired pad in the center panel to select the instrument by name or decimal index. If necessary, you can use pagination to select an instrument with a higher index.
- Control the instrument's volume level. Move the master slider to control the volume level of the selected instrument. This is an additional tool if you want to compensate for volume issues on a track for a given instrument. As a general rule for live performances, it's best to control the post-fader volume of the tracks.
- To activate/deactivate Renoise's pattern editor editing mode, simply click the third transport button in the top control bar (it will light up red). See the next section for more information...
- Linear navigation between instruments using the pagination buttons {↑} {↓≡}. To navigate linearly between instruments, press and hold {ALT} + single-click on the pagination buttons; their icons will change. The center panel will automatically switch pages as needed.
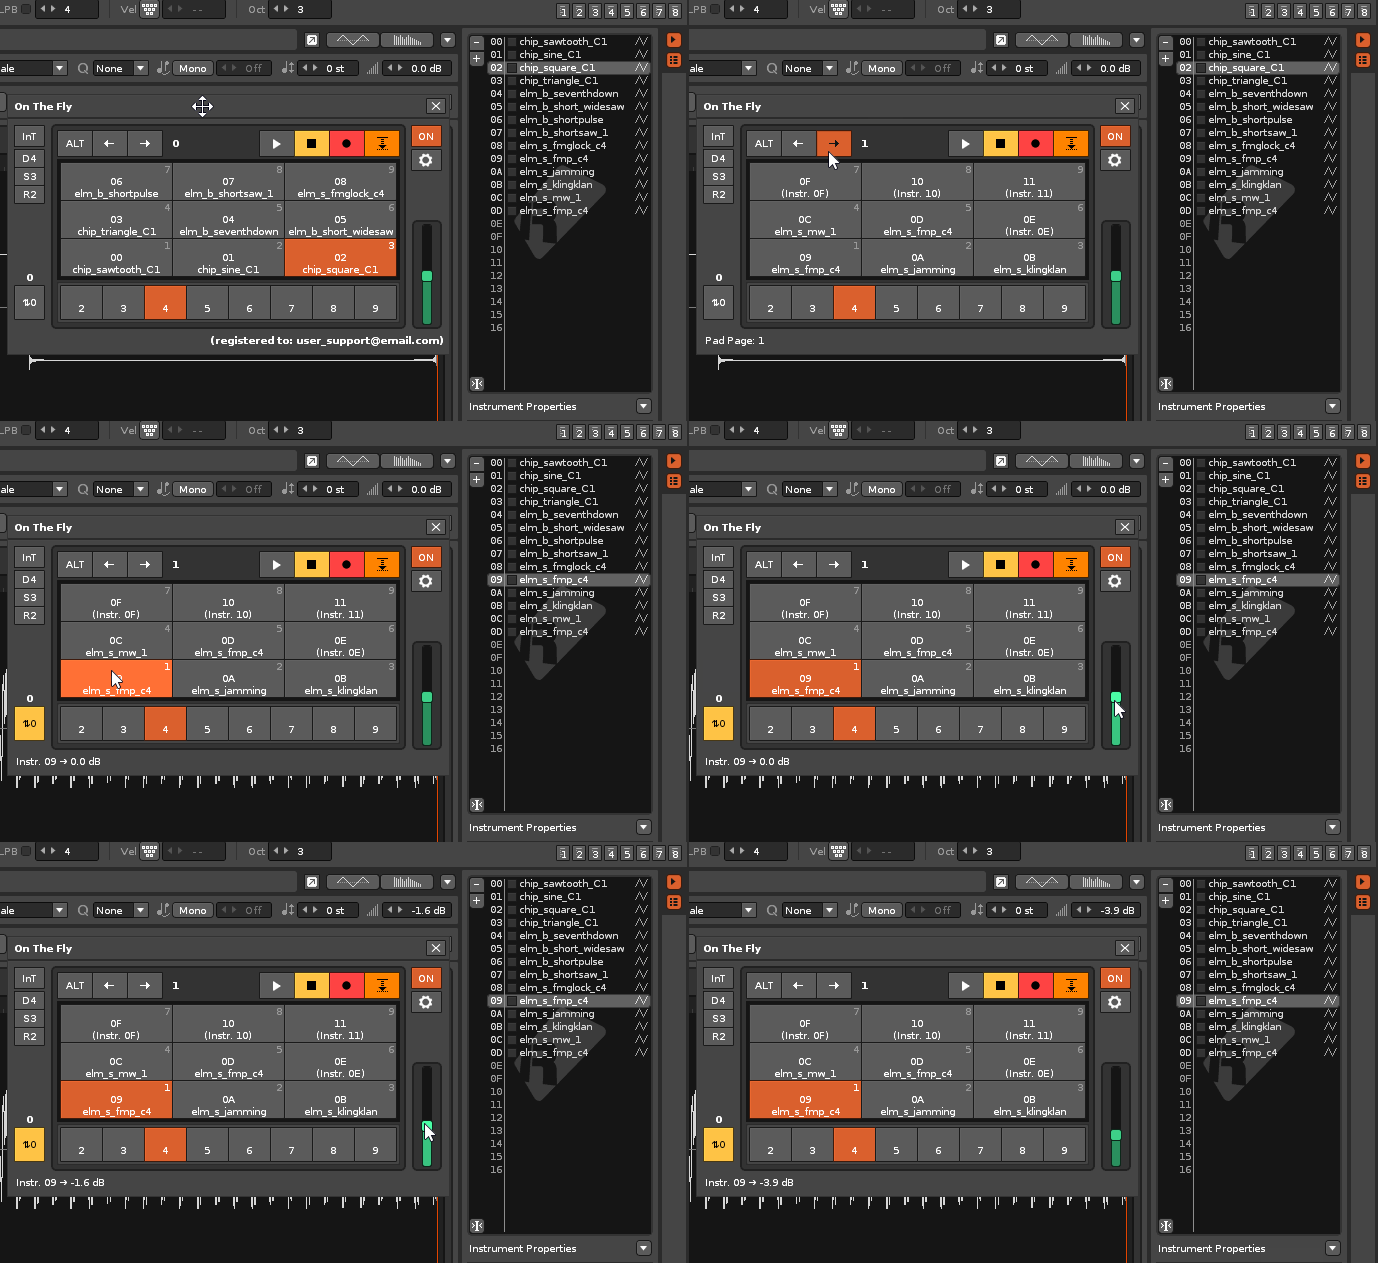
5.8. Instr. Touch Control Mode (ALT On). Play/Record Notes.
Select Pad Mode {InT} and turn {ALT} on.
- Play notes safely. Click or hold on any pad in the center panel to play the corresponding note. To prevent editing, a safe mode is available through the Edit Mode Protection option in the Preferences panel.
- Record notes. First, make sure to disable Edit Mode Protection, and activate the pattern editor's edit mode, with the pattern editor view active. Click or hold on any pad in the center panel of the
OTF to play the corresponding note. - General transposition by changing the starting note of the center panel. Using the first transport button on the top control bar, click or hold the key {ALT} + single click to increase or decrease the value of the starting note, which can be changed from C-0 to C-9. This operation will transpose the entire center panel, useful if not all octaves are visible or if you want to adjust the layout to your physical USB MIDI device.
- Configure the instrument's transposition scales. Using the second and third transport buttons on the top control bar, you can change the instrument's starting note and transposition scale, increasing or decreasing either value as needed. The starting note can only be changed when a scale is selected. Each scale is identified by a three-character abbreviation on the third button.
- Configure the velocity value (MIDI device sensitivity). The MIDI device velocity ranges from 0 to 127 (decimal values). You can also increase/decrease this value as usual using the fourth transport button. Velocity control works only when the button is enabled. To do this, ensure that the " Use Velocity Sensitivity" option is enabled and that you have configured a compatible USB device in the "Velocity MIDI Input" option in the Preferences panel.
- Linear navigation between instruments using the pagination buttons {↑} {↓≡}. To navigate linearly between instruments, press and hold {ALT} + single-click on the pagination buttons; their icons will change. The center panel will automatically switch pages as needed.
5.9. Instr. Plugin Control Mode (ALT Off). Plugin Preset Selector.
Select Pad Mode {InP} and turn {ALT} off. Some VST 2.0 or VST 3.0 instrument plugins or equivalents (AU, LADSPA, or DSSI) offer a program list that
Caution! Before using your instrument plugins, please ensure you experiment with them and verify they function correctly before using them live to avoid unwanted behavior during live performances. These plugins should be responsive and stable.
- Selecting Instrument Plugin Presets. To select a specific preset, click on the preset pads for the selected instrument plugin in the center panel. Remember that you can use pagination to navigate to the desired preset if needed. The selected pad will display a checkmark symbol ✔. Note that all presets are grouped according to the order provided by the plugin.
- Control the plugin volume level. Move the master slider to control the volume level of the selected instrument plugin. Don't confuse this volume with the instrument's volume! This is another useful tool for compensating for volume on a track for a given instrument plugin. As a general rule for live performances, it is best to control the tracks' post-fader volume.
- Linear navigation between instruments using the pagination buttons {↑} {↓≡}. To navigate linearly between instruments, press and hold {ALT} + single-click on the pagination buttons; their icons will change. The center panel will automatically switch pages as needed.
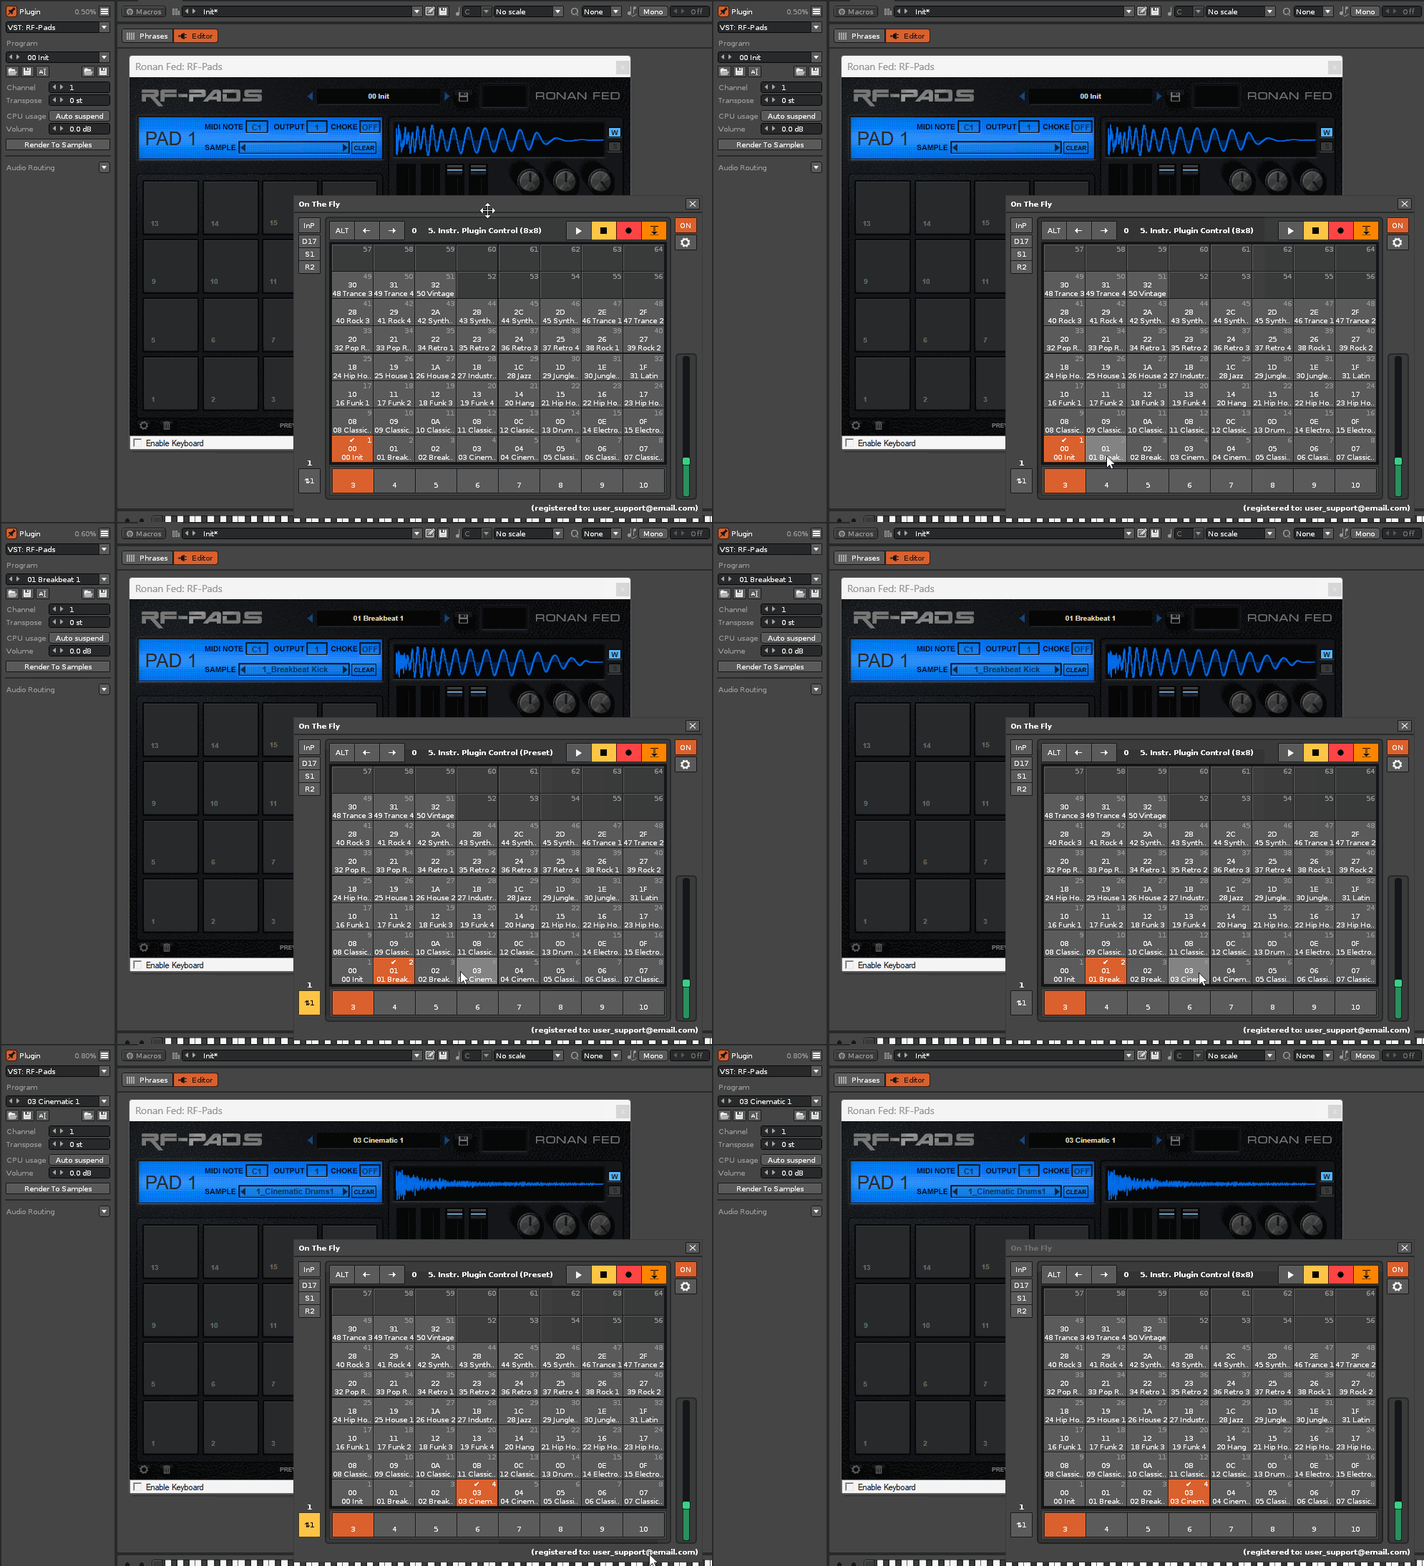
In some instrument VST plugins or equivalents (AU, LADSPA, or DSSI), the program list can be quite long. Remember that you can use pagination to quickly find and select any preset.
Some VST instrument plugins with a "program list." There are a wide variety of VST instrument plugins (or VSTi) or equivalent formats depending on the operating system, both free and commercial, that offer a "program list." However, in other plugins, you can only change presets from the plugin's own interface, limiting their use. To view this preset list in
- Abakos [HERCs Music Systems] (32bit).
- Sylenth1 [LennarDigital] (32bit).
- TranceDrive (32bit).
- ANA2 [Sonic Academy].
- Carbon Electra [Plugin Boutique].
- Dexed [Digital Suburban].
- Predator [Rob Papen].
- Punch / Punch-BD / Punch Multi [Rob Papen].
- Blue/Blue2 [Rob Papen, RPCX].
- RAW [Rob Papen].
- RG [Rob Papen].
- SubBoomBass [Rob Papen].
- Essence [Ronan Fed].
- Essence Plus [Ronan Fed].
- Pneuma [Ronan Fed].
- RF-AB303 [Ronan Fed].
- RF-Bassline [Ronan Fed].
- RF-Drums [Ronan Fed].
- RF-Pads [Ronan Fed].
- ModulAir [Full Bucket Music].
- Fb330064 [Full Bucket Music].
- Oxid [Full Bucket Music].
- Tricent mkIII [Full Bucket Music].
- Organ [SocaLabs].
- PAPU [SocaLabs].
- RP2A03 [SocaLabs].
- SFX8 [SocaLabs].
- SID [SocaLabs].
- SN76489 [SocaLabs].
- Voc [SocaLabs].
- Wavetable [SocaLabs].
- BIGROOMKIXSYNTH [Alan Hinton] (32bit).
- AvatarST [HGFortunex2] (32bit).
- Ragnarok [Hans Peter Willems + Bjoern Arlt].
- OrchestralCompanion Strings/Brass/Woodwinds (and others) [SONiVOX].
- Elek7ro-II [TAL].
- NoiseMaker [TAL].
- Olga [schwa] (32bit).
- Tunefish4 [Brain Control].
- Pianoteq 6 [Modartt].
- Viking Synthesizer [Blamsoft VK-1].
- Gladiator [Tone 2].
- VASTvaporizer2 [Vast Dynamics].
5.10. Instr. Plugin Control Mode (ALT On). Plugin Parameter Control.
Select Pad Mode {InP} and turn {ALT} on.
- Selecting an instrument plugin parameter. To select a specific parameter, click on the parameter pads of the desired instrument plugin in the central panel. Remember that you can use pagination to find the desired parameter if necessary, as the plugin may provide a large number of parameters.
- Modify the numerical value of the parameter using the rotary encoders. Once a parameter is selected, it is always linked to the master slider on the right-hand control bar, numbered 1. The remaining visible secondary rotary encoders are numbered 2 through 7, representing the subsequent parameters in sequence. To change the value of each setting, move or rotate the slider or turn the encoder.
- Linear navigation between instruments using the pagination buttons {↑} {↓≡}. To navigate linearly between instruments, press and hold {ALT} + single-click on the pagination buttons; their icons will change. The center panel will automatically switch pages as needed.
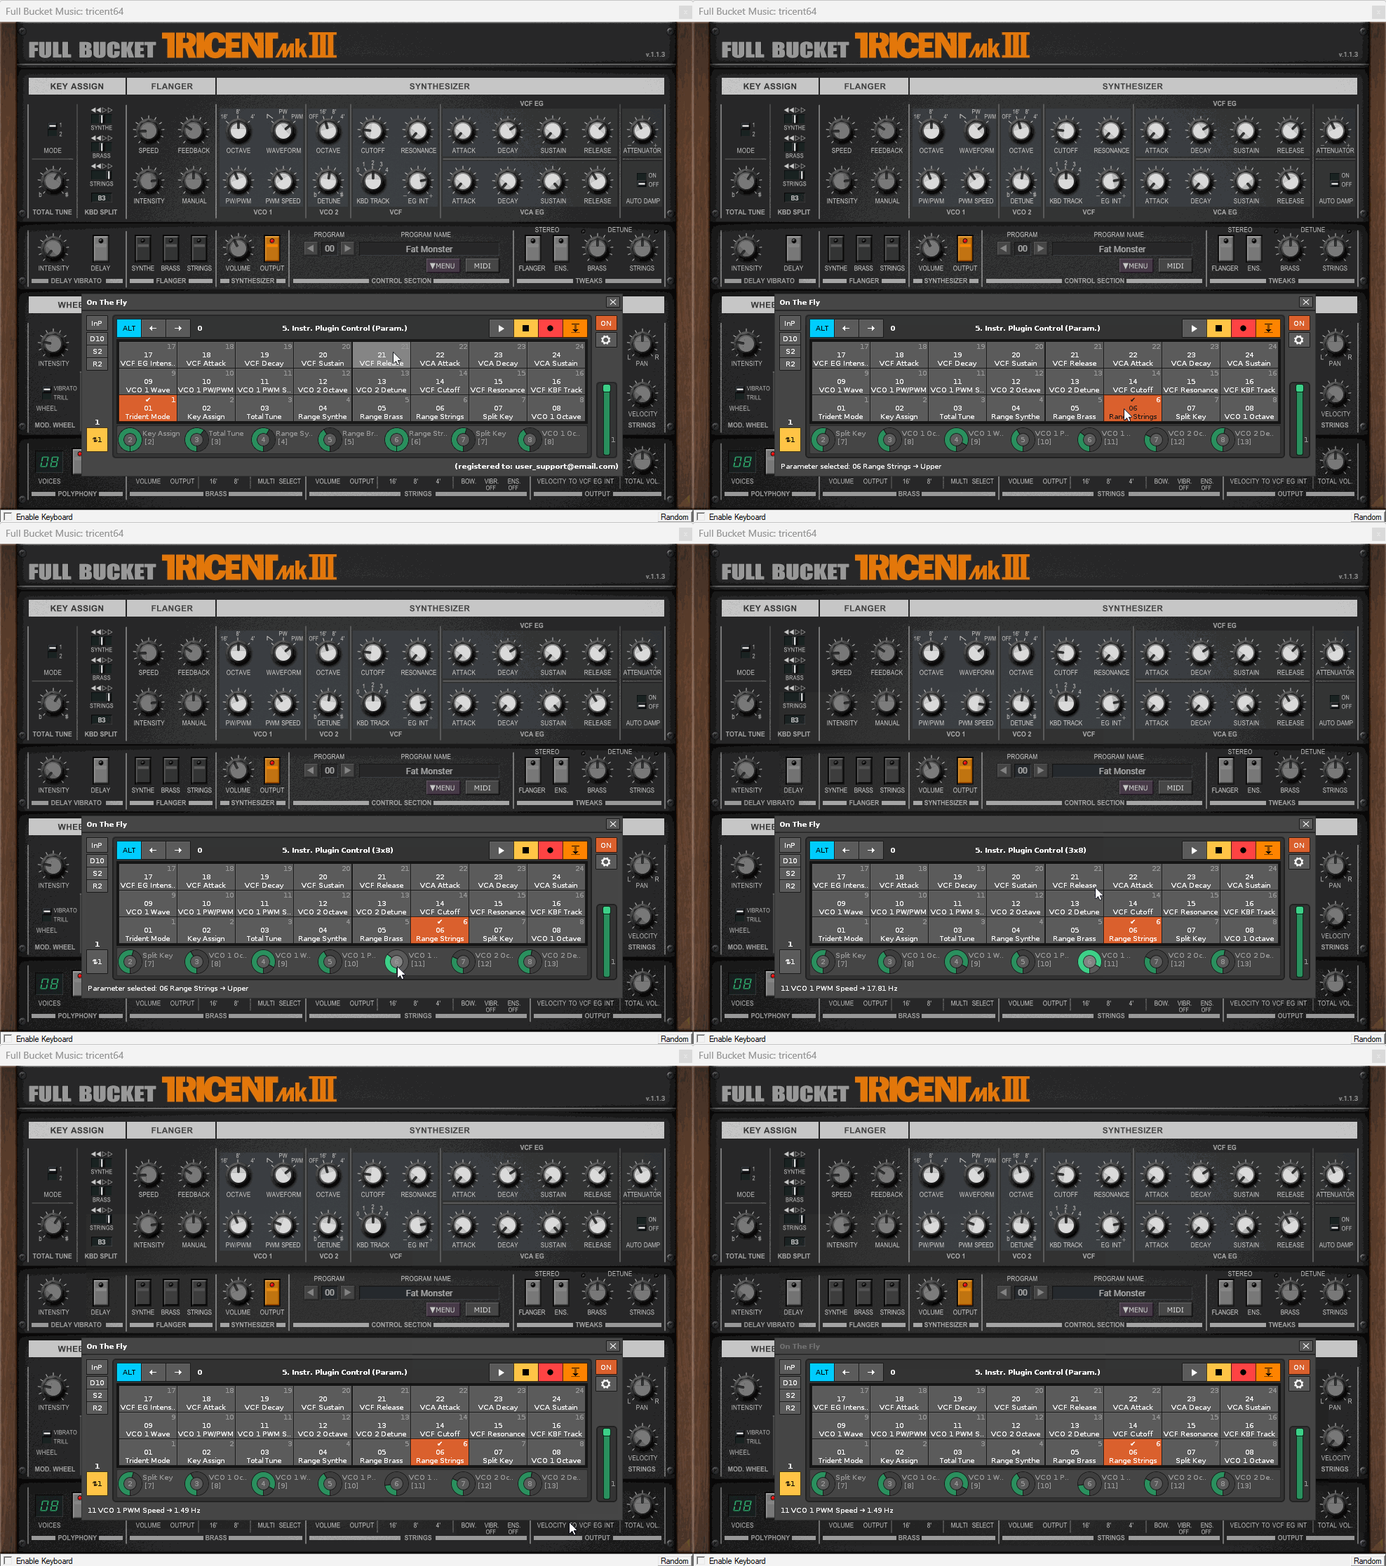
Relative mapping mode for endless rotary encoders at double speed and with precision control. When using endless rotary encoders in relative mode, you can turn the encoder at twice the speed by activating the Slider x2 Speed option for increased speed. Additionally, you can drastically slow down the spin for greater precision by holding down the {ALT} key while turning the encoder.
As with the previous example, in some VST instrument plugins or similar, the list of parameters offered can be overwhelming. Remember, again, that you can use pagination to access and control any parameter. However, to fully master the sound of plugins, a fairly in-depth understanding of them is necessary. Be sure to familiarize yourself with the plugin to correctly locate the desired parameters.