An original multi tool for the Renoise DAW.
Piano Roll Editor - Basic User Guide
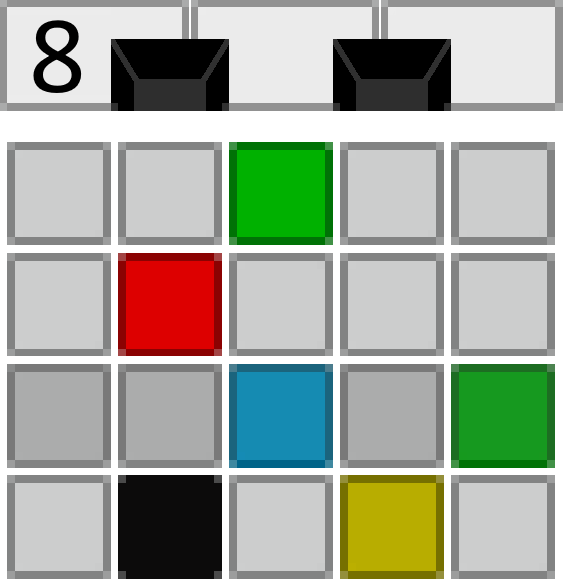
Piano Roll Editor v8.1 build 312. Created by ulneiz - Spain, February 2020.
This document contains more than 20.000 words. Estimated reading time: 3 hours.
Content Index
- 1. ¿Qué es el "Piano Roll Editor"?
- 2. Top bar. Main controls.
- 2.1. On or off switch: ON/OFF.
- 2.2. Octave selector.
- 2.3. Lines Piano Roll Selector (LPR).
- 2.4. Lines Per Block Selector (LPB).
- 2.5. Jump lines switch according to LPB or to note.
- 2.6. Advanced editing buttons.
- 2.7. Navigation controls of note columns.
- 2.8. NC and TR modes, compact modes and access to Preferences.
- 2.9. Monitoring of notes with the lower virtual piano.
- 2.10. Sort and distribute notes or sort and stack notes automatically.
- 3. Octave display. Superior mirror piano.
- 4. Simple editing of notes: insert and edit on the roll.
- 4.1. Insert or delete a note. Insert notes with jump of lines.
- 4.2. Duration of the note. Insert a note-OFF.
- 4.3. Transposition. Change a note tone.
- 4.4. Change the triggering position of a note.
- 4.5. Select and "clone" the selection with tone transposition.
- 4.6. Select and "cut and paste" the selection with tone transposition.
- 4.7. Direct creation of chords using only the USB alphanumeric keyboard.
- 4.8. Direct creation of chords using the mouse.
- 4.9. Inserting notes with note-OFFs from "note-OFF mode".
- 4.10. Insert, move or delete several group note-OFFs.
- 4.11. Modify volume, panning or delay values. Humanization of notes.
- 5. Advanced edition: blocks/columns or range of lines. The joystick.
- 6. Mapping the MIDI input.
- 7. Keyboard commands. Navigation, control and editing.
- 8. Preferences: 'OSC Server', timers, more customization and other windows.
- 8.1. Configuration of the "OSC Server".
- 8.2. The timers.
- 8.3. Colors of the tracks. Skins and styles.
- 8.4. Manually increase the size of the fonts. A bit of hacking!
- 8.5. Miscellaneous. Metronome MBxx/MLxx. Follow SEQ.
- 8.6. Time Calculator window.
- 8.7. Sequence Times window.
- 8.8. Hexadecimal to Decimal Converter window.
- 8.9. Velocity Histogram window.
- 8.10. Phrase Manager window.
- 9. Advanced editing operations.
- 10. Chord Builder. Construction of chords or percussion.
- 10.1. Create and play a chord. Inversions and displacements.
- 10.2. Load predetermined chords and modify them.
- 10.3. Load scale templates. Play auto-adjusted chords.
- 10.4. Create and play percussion kits.
- 10.5. Banks of chords. Use 120 slots to play and save custom chords.
- 10.6. Piano Chord Mode. Division to record on until 10 contiguous tracks.
- 10.7. Take advantage of the MIDI input. Mapping of virtual pianos on several MIDI channels.
Initial note: Renoise 3.2.0 has improved its API for tools, from version "API 5" to version "API 6". This implies some important updates that require you to use version 6 of the Piano Roll Editor (or higher version) from version 3.2.0 of Renoise. If you use a lower version of Renoise, some recent functions of the Piano Roll Editor will not work correctly. Please always keep your software updated, you will get a better experience.
1. What is the "Piano Roll Editor"?
1.1. Concept. ▲
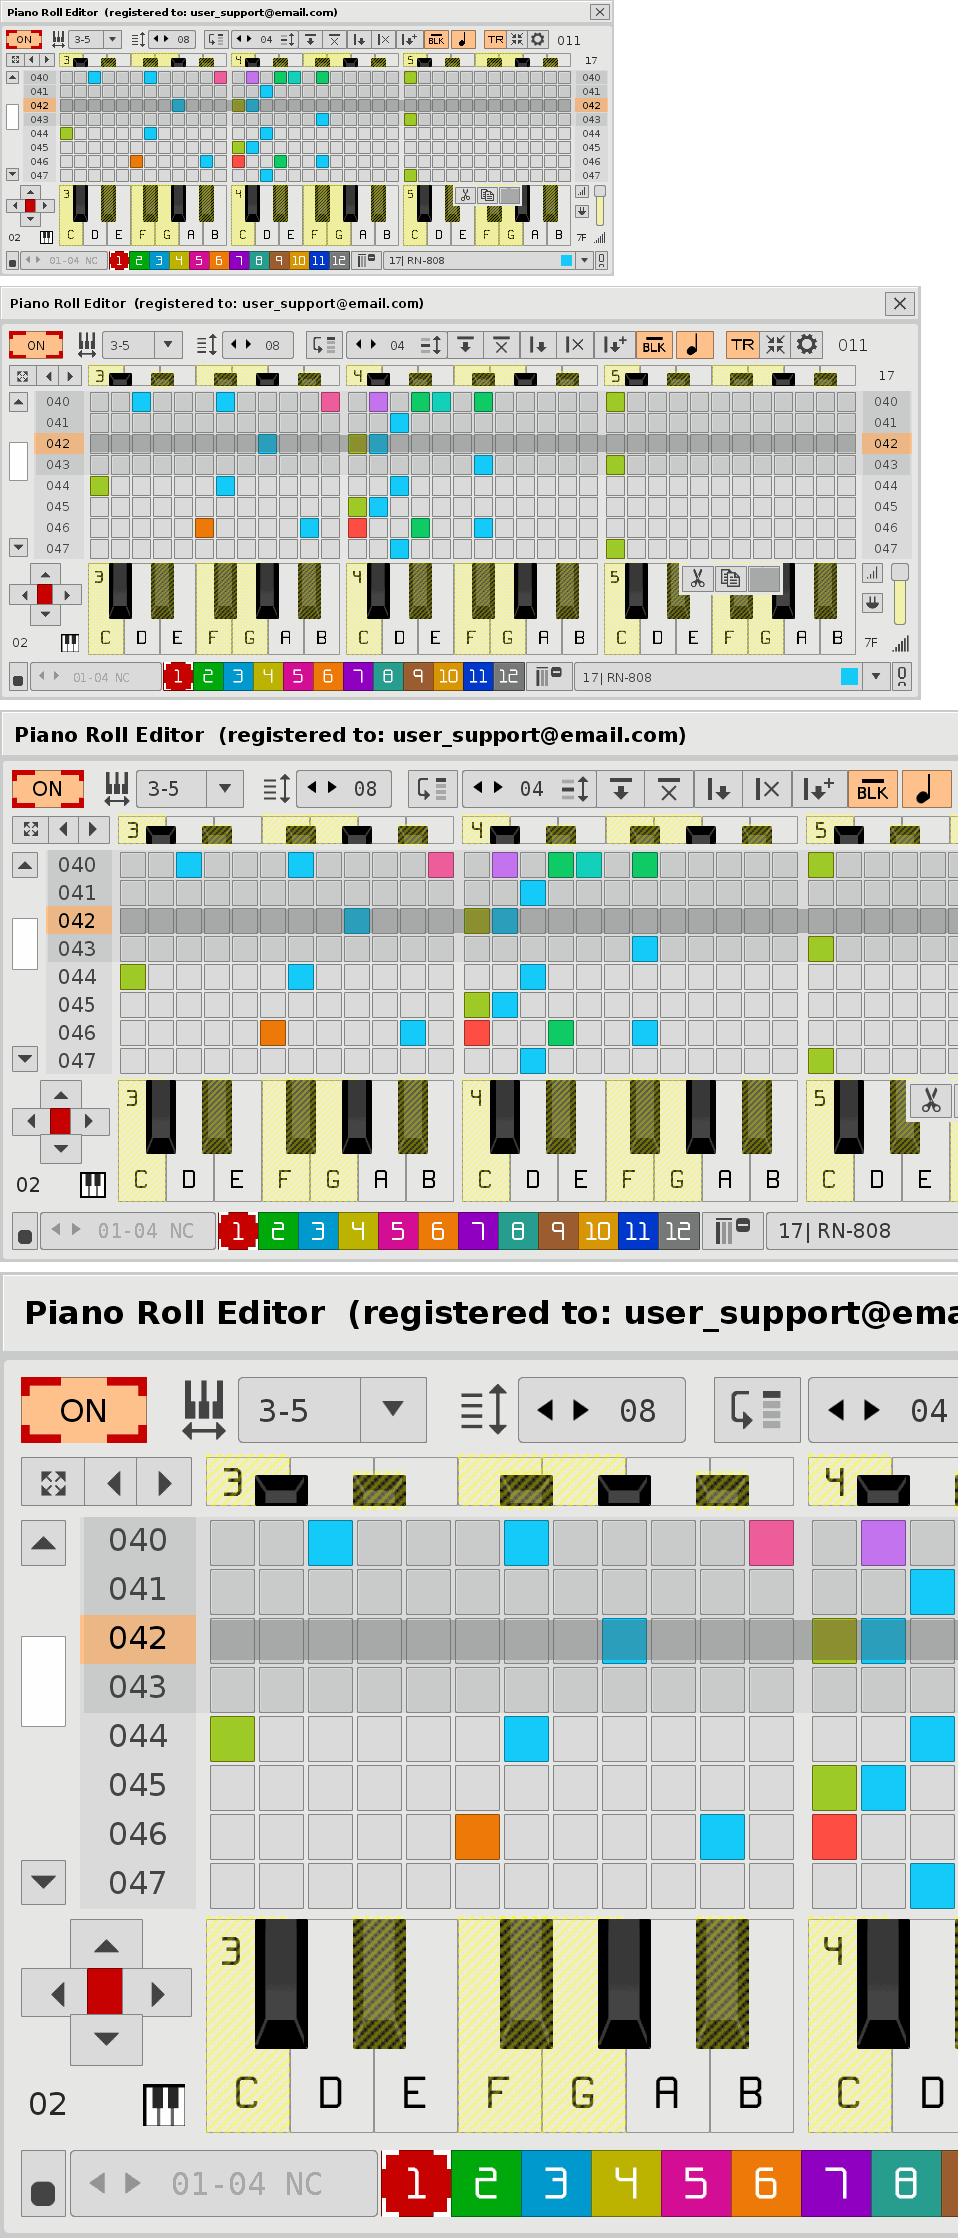
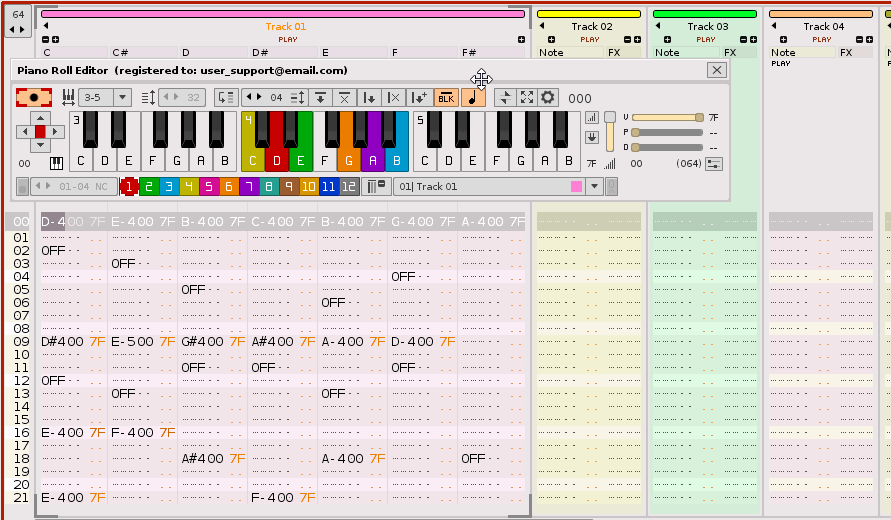
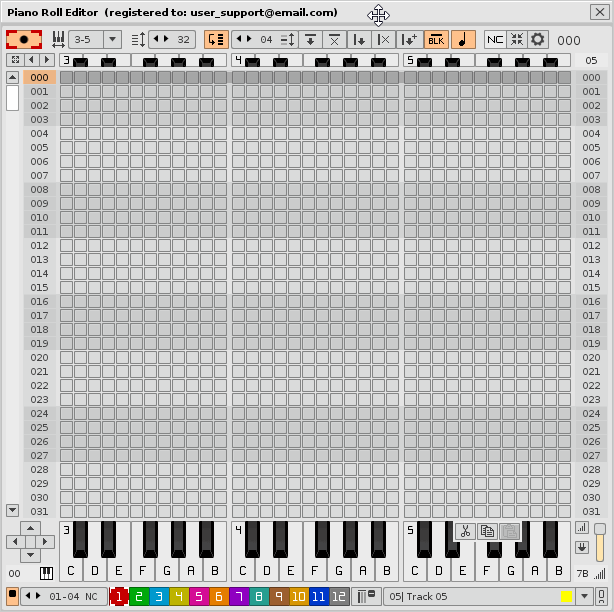
The Piano Roll Editor or also called PRE as an abbreviation is a tool for the representation and advanced notes editor for the DAW Renoise (current version 3.2.1 of 64 bit), www.renoise.com. Basically it is a piano roll arranged vertically, with a top bar of controls, a grid that represents the roll and surrounded by two virtual pianos, a small upper one and a larger lower one.
In addition, the PRE is much more than a piano roll. Not only is it a great note editor that can replace the Renoise Pattern Editor for multiple editing or post-editing tasks, it also includes other panels intended for editing, such as the Chord Builder or advanced operations modules, among them the FX module, to directly edit the main effects parameters.
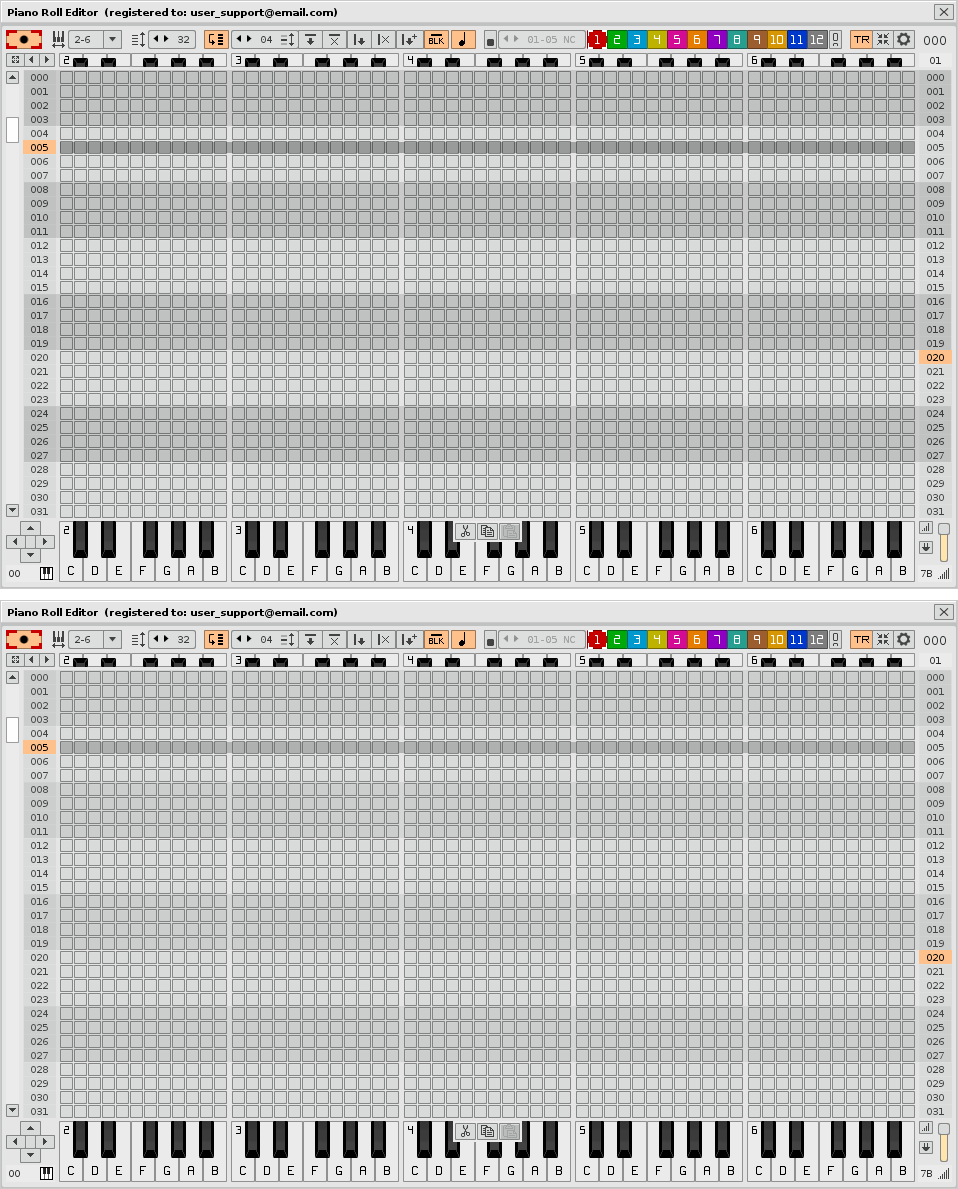
Piano Roll Editor compacted (3 octaves and 16 lines). Below is the correspondence with the Renoise pattern editor.
The PRE allows you to display between 3 octaves (36 notes) and 10 octaves (120 notes) horizontally and between 8 and 64 lines vertically. The roll will show a part of the pattern or its totality, according to the number of lines of this one. The sequence of the pattern is represented in a fixed way, changing when necessary, while the position of the reproduced line moves vertically from top to bottom. You will quickly notice that it is different from the way the Renoise pattern editor moves.
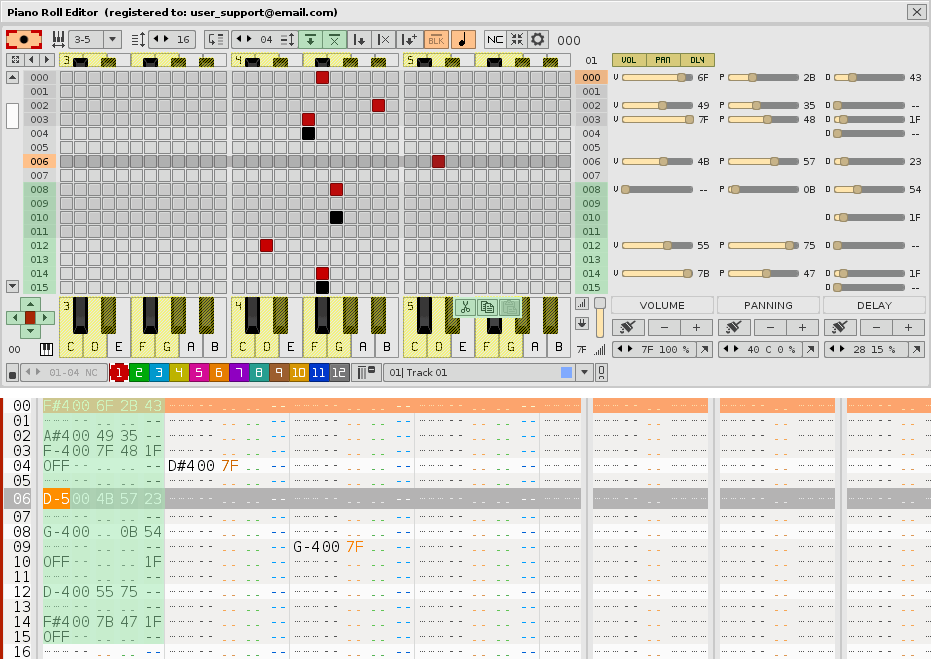
This tool allows editing by blocks (horizontal), editing by columns (vertical), editing by selecting a range of lines (from 1 to 512 lines), always using a specific clipboard. At the same time, you can move groups of notes vertically (change their trigger position) or transpose the notes horizontally (change the tone in groups of notes). In addition, it allows directly modifying the volume, panning and delay values by means of sliding bars, and easily navigating between the 12 note columns of each track, through a color code. For the editing of more specific effects parameters, the FX module has the ability to edit these parameters directly in the pattern editor through a small additional floating window.
"Preferences" window and "About the Piano Roll Editor".
In addition, the PRE allows advanced operations of cloning or editing notes or specific parameters and their amounts in a direct and simple way, auto-insertion of patterns for editing or live recording or different options to randomize the amounts of specific effects or parameters, as well as as the group insertion of notes off, among other things.
PRE has another arsenal of great additional tools, such as the separate Phrase Manager window to manage phrases, the Hex to Dec Converter window to convert values, the Sequence Times window to better control the timing of the music composition sequence, the Time Calculator window to distribute bars, pulses and the relationship with the lines and their duration or the Velocity Histogram window for visual control of the velocity sensitivity when pressing physical keys.
The PRE is compatible with the OSC protocol to be able to insert and sound notes. It is compatible with the MIDI input, to control the PRE from a compatible MIDI device, either a MIDI controller keyboard or a MIDI pad. It also has a large number of own keyboard commands for its control. In addition, this multitool will add a lot of power to your mouse. In fact, it allows you to compose an entire song just by using the mouse.
The PRE is conceived as an editor, mainly for post-editing tasks. Use Renoise to compose the usual way while viewing the PRE. Use the PRE to monitor the position and tone of the notes, identify and correct them quickly, or edit the effects parameters with greater speed. Or else compose your entire song from the PRE. Combine both programs to improve your composer experience without fighting between what it means to use a tracker (the pattern editor of Renoise) or what it means to use a piano roll (the PRE).
Piano Roll Editor with the roll and lower piano unfolded (5 octaves and 16 lines).
1.2. Demo and Full Version. Installation. ▲
The PRE program is distributed in 64-bit XRNX format through a demo version or "Demo Version", free, so that anyone can try it and through another full version or "Full Version", which requires a personalized use license. Please, contact the author "ulneiz" to get your license of use.
Caution! If you want to reinstall or update the tool to a new version, if you have new "custom chord banks" created manually within the Chord Builder, make a backup copy of the banks of chords to avoid losing them ("Backup All Chords" button). Then, restore the folder "chord_banks" previously saved in the installation folder of the tool.
PRE is compatible with Renoise 3.2.1 (or higher) and must be the 64bit version. To install the PRE tool, it is installed like any other tool, by double clicking on the file "name_of_the_tool.rnsx" or by dragging that file over the Renoise window. Keep in mind that the installation folder is different depending on the operating system used. For example, in Windows 10 the address or installation path of the tool's root folder is as follows:
"C:\Users\USER_NAME\AppData\Roaming\Renoise\V3.2.1\Scripts\Tools\com.ulneiz.PianoRollEditor.xrnx\"
Pay attention. Please, before continuing reading this user guide, go to the installation folder of the tool and read the files "Readme.txt" and "License.txt", which include very relevant information about the installation and use of the tool. To open the container folder of the tool go to "Renoise: Tools / Tool Browse ...". In the "Installed Tools" list, search for "com.ulneiz.PianoRollEditor (Piano Roll Editor)" and right-click and then "Reveal in Explorer..." to locate and read these text files.
1.3. How to start to edit notes? Previous steps. ▲
To start editing notes with the PRE, first you need to configure Renoise and the PRE correctly, both. Follow these steps:
- Start Renoise 64bit.
- Go to "Renoise: Edit / Preferences / OSC". Activate "Enable Server" checkbox (configure the OSC equal as "PRE: Preferences / OSC"; Protocol "Udp" & Port "8000").
- In Renoise, load an instrument inside a slot of the Instrument Box.
- In Renoise, be sure to select the pattern editor.
- Start the PRE. Go to Renoise:Tools/Piano Roll Editor...
- Enable the PRE (activate in "ON", top left switch of window). That is, select the PRE window in the foreground & press [º] command.
- Enable Edit Mode in Renoise. That is, press [ESC] command.
- Now you can use the mouse to edit notes on the roll.
Caution! Activating the OSC is necessary so that Renoise can receive messages through this protocol. By activating the OSC and configuring it correctly, the Piano Roll Editor can play the notes (sound) and also edit them (write) on the pattern editor. For more information, read the section: 8.1. Configuration of the "OSC Server".
1.4. Configure the user interface scaling beforehand. ▲
PRE6 or higer version already supports HiDPI (Retina) screens. Be sure to set your preferred scaling beforehand. Go to "Renoise: Edit / Preferences / GUI: User interface scaling" and set the scaling value. It is recommended to restart Renoise when changing this value. You can also restart all the tools in case of finding a graphic error when changing this scaling.
Piano Roll Editor with scaling in 100%, 150%, 200% & 350%.
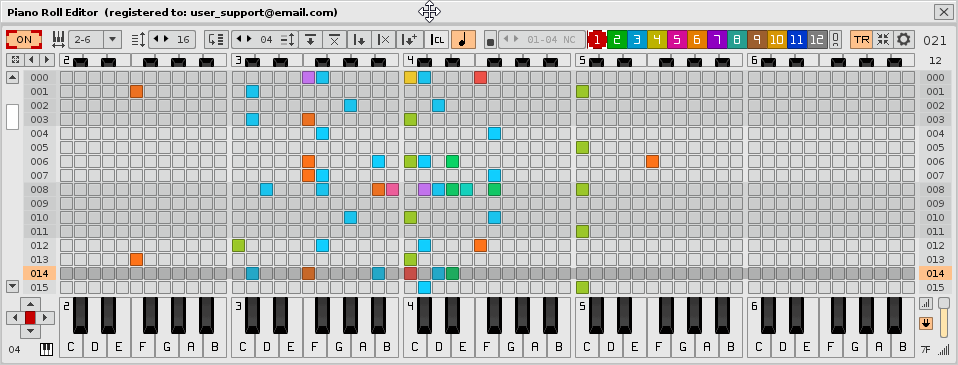
2. Top bar. Main controls.
The top bar shows several controls arranged from left to right. This bar is autoadaptable according to the width of the window, so you can show more controls if you show more octaves or even invade the lower area of the window to compact it. The layout is simple, starting with the on/off switch, octave selectors, lines and blocks, advanced note editing controls, navigation of note columns and additional navigation between tracks and instruments.

Upper bar controls, autoadaptable.
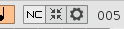
In addition, this upper bar always shows on the right a grouping of 3 buttons, to change the NC or TR modes, display modes and invoke the Preferences window. Finally, the index of the song sequence always appears on the right of this bar.
2.1. On or off switch: ON / OFF. ▲
The On/Off switch On or Off is always located at the top left. This switch activates the tool to read specific data from the pattern editor. If it is not activated, the roll will not update (it will not work) and a lot of the controls and keyboard commands will not work either. You can use the [º] key to turn it On or Off.
ON/OFF switch, in different states.
This switch will show different states when it is "ON". If the cursor in the pattern editor is over a note column, the switch will show a colored frame. You can display up to 12 different frame colors, depending on the selected note column. However, if this cursor is on any effect column, regardless of the type of track, this colored frame will not appear. Remember that PRE ignores any effect parameter, and therefore, any effect column. On the other hand, you will see that the central switch of the joystick will have a similar visual behavior.
Keep in mind that this switch only activates or deactivates the tool. When not in use, keep the tool deactivated (switch "OFF") in order to respect all Renoise performance. Also, the tool will not edit in the pattern editor if the Renoise Edit Mode is not activated. You can use the [ESC] key while the tool window is in the foreground to activate or deactivate the Edit Mode. Then the switch will show a black circle.
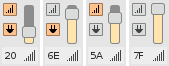
- Switch "ON": the roll becomes a "notes detector". This is especially useful with the TR Mode, which is capable of displaying several tracks at once. When you click on a random note on the scroll, it will jump directly to the line and the track corresponding to that note and also to your note column. It will also select the instrument of that note in the instrument box. It can also detect its volume, if any, if the "Auto Capture Volume" switch is activated. Note detection allows you to directly locate the associated note in the Renoise pattern editor. Of course, the note will also sound. In order for the "note detector" to function correctly in the TR Mode, it is necessary that all the tracks have a different RGB color. If necessary, in PRE:Preferences/Tracks RGB Color: Adjust button, you can subtly change the RGB color of all tracks in a single action.
- Switch in Edit Mode (black circle): the roll becomes a pure "notes editor". By clicking with the mouse in any note slot, the composer will be able to edit (insert or delete a note), as well as the whole battery of editing options offered by the PRE.
2.2. Octave Selector (Oct X-X). ▲
The octave selector allows you to modify the range of octaves to be displayed. It is possible to select the ranges of 3,5,6,8 or 10 octaves in up to 17 combinations. Modifying the range may involve changing the width of the window. Show only 3 octaves is valid for low resolution screens. However, displaying 10 octaves is designed to contain at least one HD screen, approximately 1920 pixels.
Octave Selector (Oct X-X). Change of octaves 2-6 to 3-5.
2.3. Selector of "Lines Piano Roll" (LPR). ▲
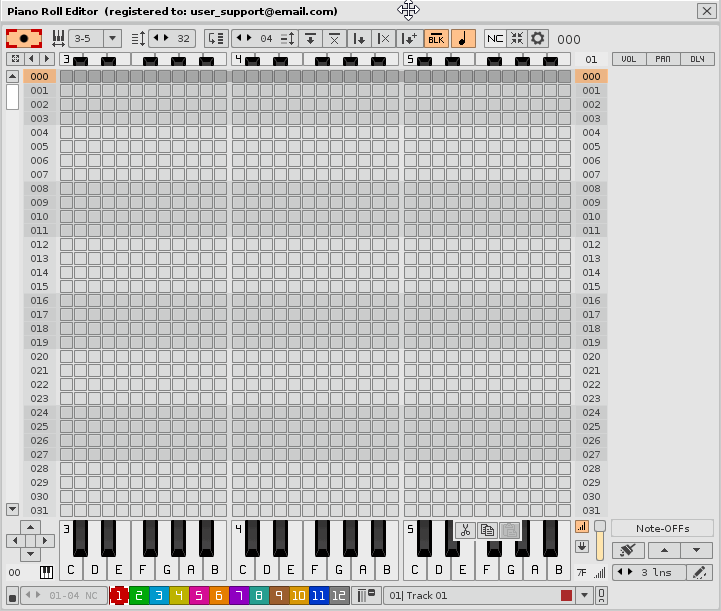
As the octave selector can modify the width of the window, the line selector can also play with the height of the window. With the line selector the compositor can establish a range between 8 or 64 lines (the value 0 will completely hide the roll), keeping in mind the duration of each pattern and the compass employed. For example, if the pattern has 64 lines, it is valid to select a range of 64, 32, or 16 lines. If the pattern is 96 lines, you can use 48 or 24 lines, and so on. PRE will update the range of lines according to the playback progress, so it will keep showing what is playing.
LPR selector. Change from 32 to 8 lines and 0 lines.
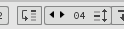
2.4. Selector of "Lines Per Block" (LPB). ▲
PRE has a special form of selection: the so-called "blocks" of lines. A block contains one or several lines, and all blocks will always contain the same number of lines as long as they agree with the correct division of each pattern. The block can match or not with the duration of the compass used. It is controlled similar to the native LPB of Renoise, but referring to these blocks, instead of the "beats". In this way, it is possible to divide the pattern by line blocks to modify as a group everything they contain, the notes and their parameters.
LPB selector change from 4 to 8 lines per block. From 4 blocks it passes to 2 blocks in the 16 lines shown.
The blocks can be from 1 to 32 lines, with increments of one unit. In this way, it is possible to use odd values for more complex measures. To select each block, it is only necessary to select any line contained in it through the perimeter columns of line selection that has the roll, marked with 3 digits in decimal. Although Renoise allows you to change the value of the line in hexadecimal, it is advisable to keep this value in decimal when you use this tool.
2.5. Jump lines switch according to LPB or to note. ▲
PRE has a switch for two automatic line jump modes ([APPS] keyboard command), according to a specific value of lines equal to the LPB value (Lines Per Block), or by jumping directly to the next note in the current note column. In both jump modes and unlike Renoise, PRE is able to analyze up to 32 contiguous patterns in the sequence. If the next note is placed up to 32 patterns lower in the sequence, it will be able to jump to the line that contains that note.
Lines jump modes switch. According to LPB or to note.
The [NEXT] and [PRIOR] keyboard commands are used to jump lines down or up according to the LPB selector value, analyzing up to 32 patterns towards up or down. The jump can be 1 up to 32 lines.
The [CTRL NEXT] and [CTRL PRIOR] keyboard commands are used to jump lines up or down according to the next or previous note in the current note column. If you execute these commands while within an effect column within a track of notes, it will analyze the 12 note columns at once. This allows a smooth navigation between the notes within a specific note column or within an entire track, ignoring the empty lines and joining the patterns together as if they were one. Better analyze how the notes are distributed on each track.
Edit notes with jump of lines using the lower virtual piano. Use also of the keyboard commands.
2.6. Advanced editing buttons. ▲
Providing the composer with easy-to-use utilities and controls is one of the major difficulties of any programmer. This difficulty increases when it comes to the granular edition; how far to go and what would be more useful as a support tool. Renoise already has most of the selection and granular editing, and quite remarkably, in the pattern editor and in the pattern matrix.
In the PRE the advanced editing buttons are intended to cover in an agile way the edition by blocks of lines or by pattern-tracks. This implies having group control of several notes (several lines) and some of its parameters (volume, panning and delay). Duplicating blocks of lines down or modifying the pitch of notes in horizontal are tremendously simple and direct tasks with this tool.

Advanced editing buttons.
The editing buttons are, from left to right: block copy down (with overwriting), block erasure, copy of note column(s) down (with overwriting), deletion of note column(s) and insertion of new pattern with copy of note column(s).
The central switch of the joystick will allow to select between the selected note column or all the note columns of the selected track. For more information, go to section 5. Advanced editing: blocks or columns. The joystick. Always keep this switch in mind, in addition to the last 2 advanced editing switches, placed further to the right...
On the one hand, the so-called "Area Type" serves to swap between the selection by blocks (horizontally) or the selection between columns (vertically). Edit between slices of the pattern ("in block") or between the whole pattern ("in column").
On the other hand, for the simple edition of notes (insert or delete a note with the mouse) exist a dedicated control switch that allows you to change between the simple note (from C-0 to B-9) or note-OFF. This is useful, for example, if you want to continuously correct notes off with the mouse. In addition, it is possible to simultaneously insert notes + Note-Offs, establishing a duration by number of lines.
Pay attention. The note-OFF will always be represented in black in each slot of the roll, always in NC mode. This note type selection switch will turn black to record note-OFFs. Additionally, PRE has several ways to insert a note-OFF, for example, by pressing the [CAPITAL] or [A] key as in Renoise. You can use the [DEL] key to delete a note or click on it. For a matter of cleaning, slots that have note-OFF do not appear in the TR mode, where only the trigger notes are displayed.
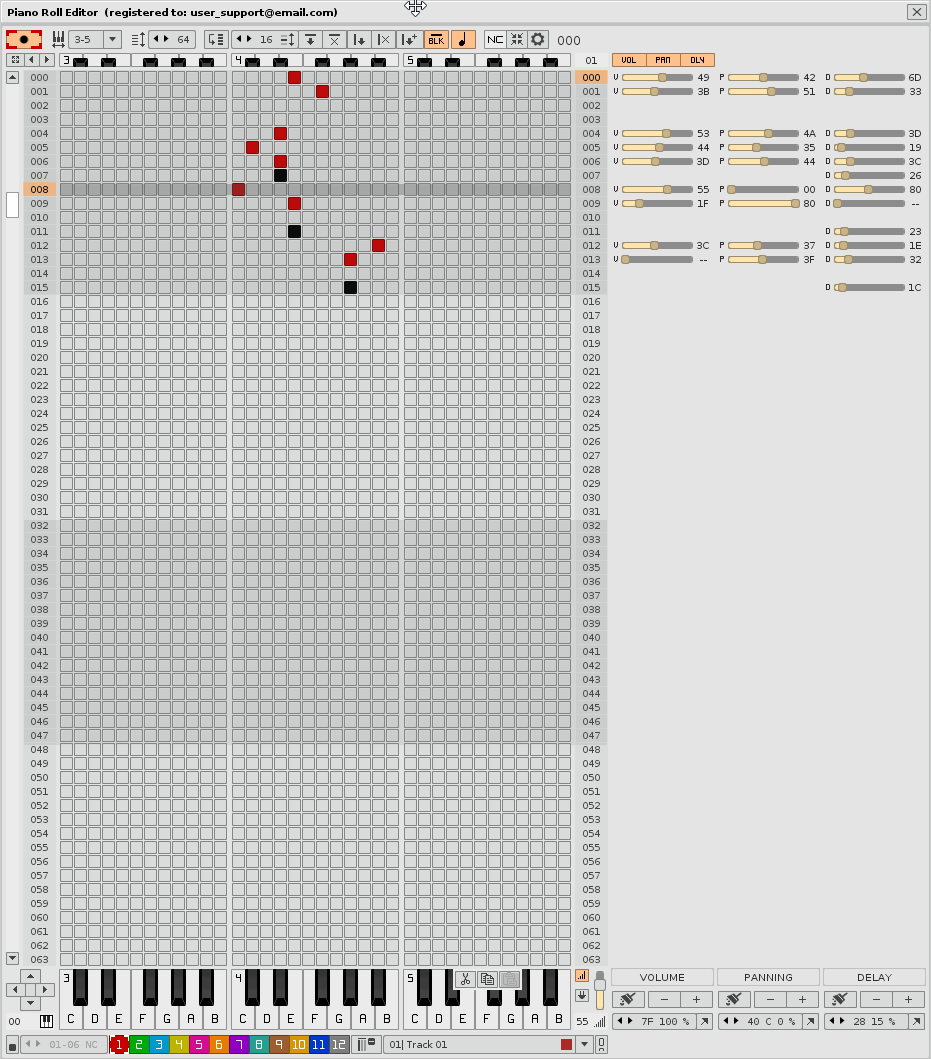
2.7. Navigation controls of note columns. ▲
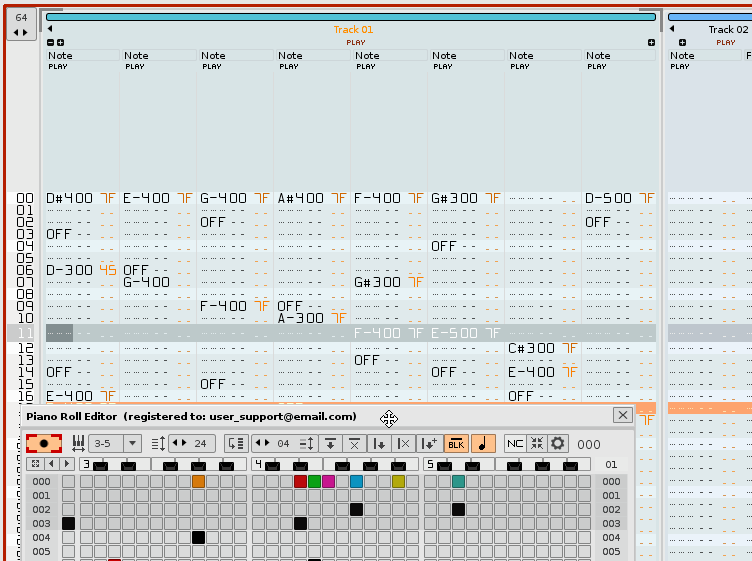
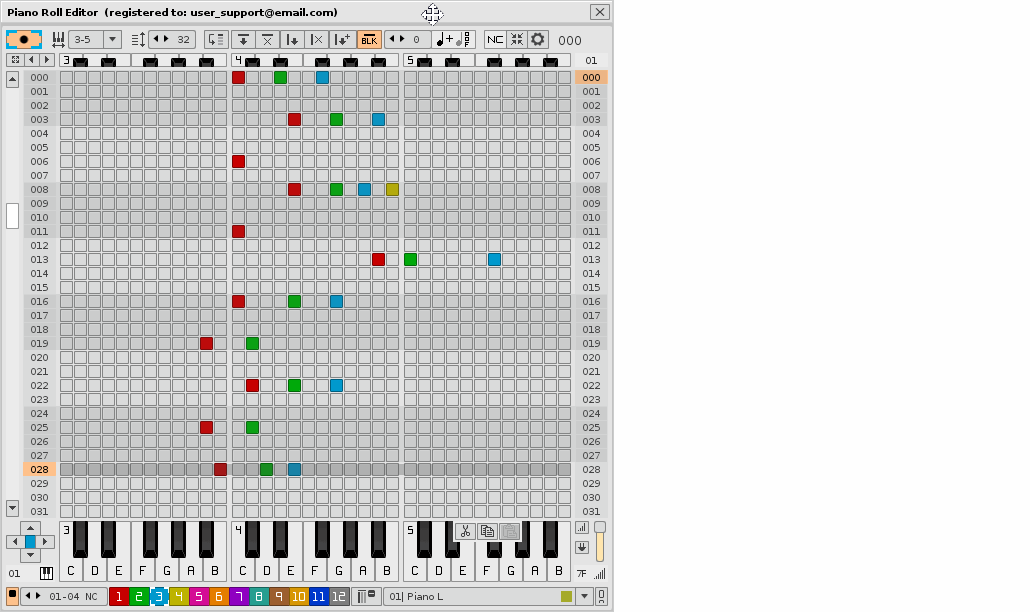
PRE is able to consistently show the notes of the 12 note columns of a track. Note that in PRE a line can only contain a note corresponding to a single note column. In the PRE, representing 12 note columns is equivalent to showing 12 superimposed lines, one on top of the other. One way to explain it is "layer stacking", so that on the line the column of note that is more to the left will always be superimposed on the others. This means that a note that is placed on the same line of the note column number twelve, can never hide a note that is in a lower note column, for example in the first. Therefore, do not confuse what is "a line" in the PRE (which contains 120 note slots and up to 3 sliders) of what is "a line" in Renoise, which is everything that contains the line within of a note column (note parameter, instrument number, volume parameters, panning, delay and effect...). The main understanding of this tool is concentrated here.
Actually, PRE has up to 4 ways to visualize notes, 3 within "NC mode" and a 4th one with "TR mode"...
The first is the simplest: the isolated display of the selected note column. It is possible to press any colored button from 1 to 12 to jump between the notes columns of the selected track, and also press the [PAUSE] key to hide from the right to the left those columns without parameters, both notes and effects. Both the central button of the joystick and the ON/OFF switch will be marked with the color of the selected note column. However, if you select an effects column, PRE will not display these colors, since you are not prepared to work with these types of parameters. Under the tool, all effect columns are ignored.

Display and navigation controls of note columns, main track (15|Hefty Snare) and slave (01|Top).
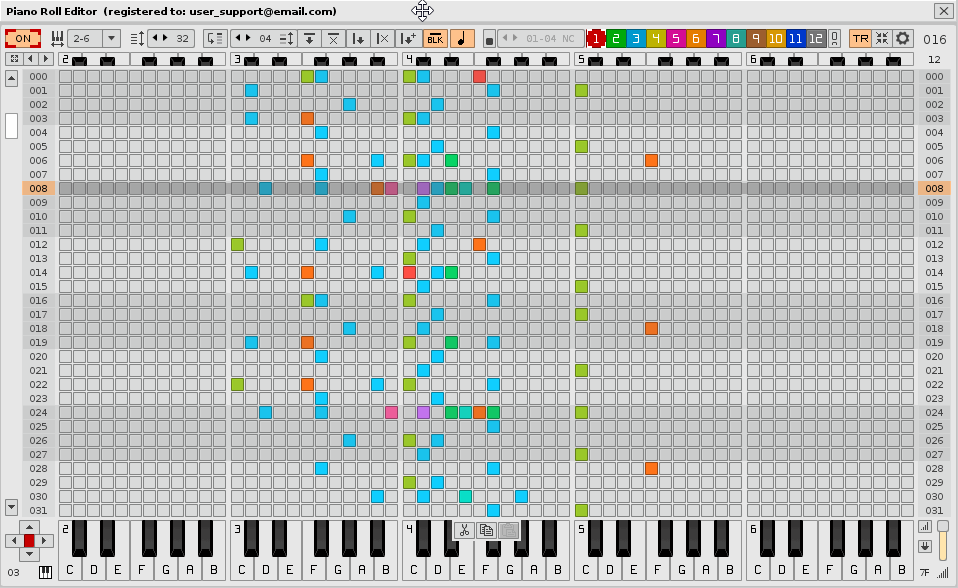
If the composer wants to see more note columns through the roll, he must use the second display mode, activating the multiple column selector of notes (the switch placed on the left). This selector allows you to display a range between 1 and 12 note columns in the roll, for example, from 1 to 4 or from 1 to 7, but you can not hide the first note columns.
View of the PRE in NC mode. In this example only the notes of the selected note column are displayed.
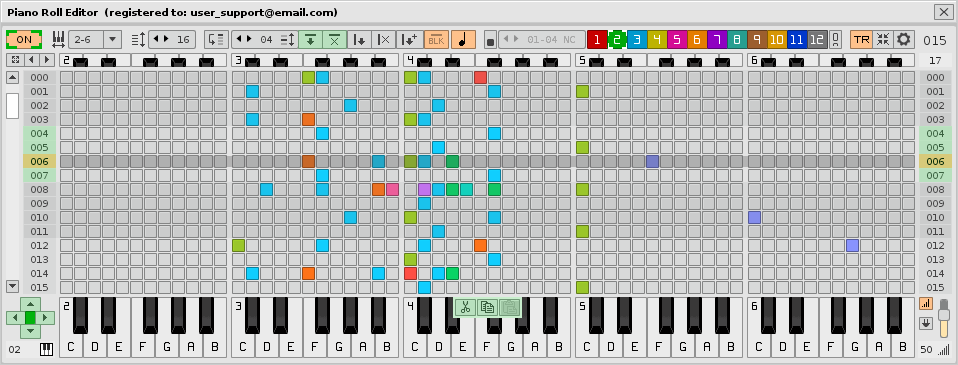
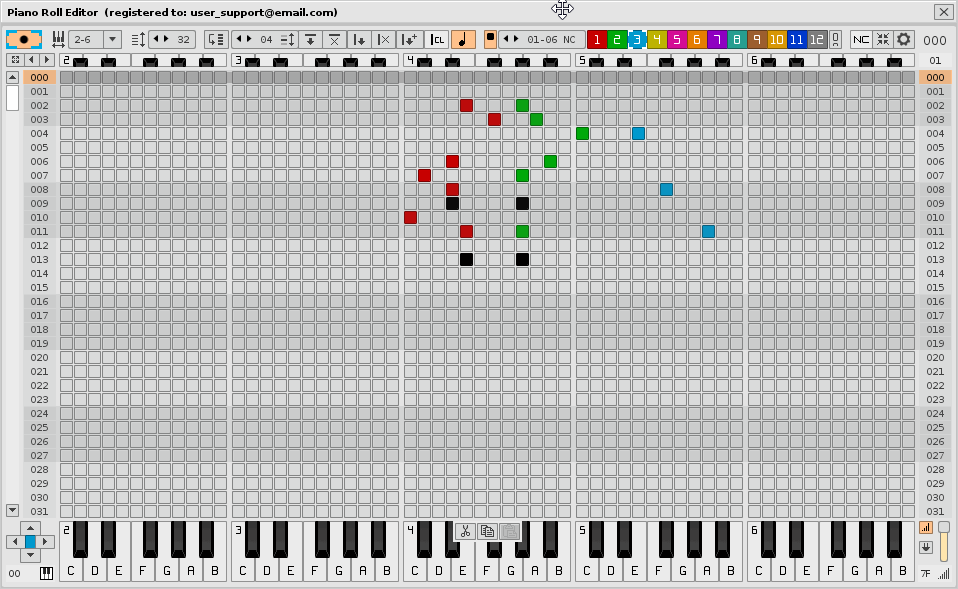
The two previous note display modes are not ready to compare notes between different tracks. To do this, PRE has the ability to show an additional slave or secondary track, at the same time as the selected track, the latter always superimposed. So, the composer can compare two tracks, the track selected by default in Renoise and another additional track selected through the slave track selector, being able to compare one or several note columns of both. For example, the composer may show track number 18 with track number 5, knowing that both tracks are widely separated from each other. To activate the slave track selector, it is necessary to press the vertical chain switch, located on the right side of the navigation buttons of the notes columns.
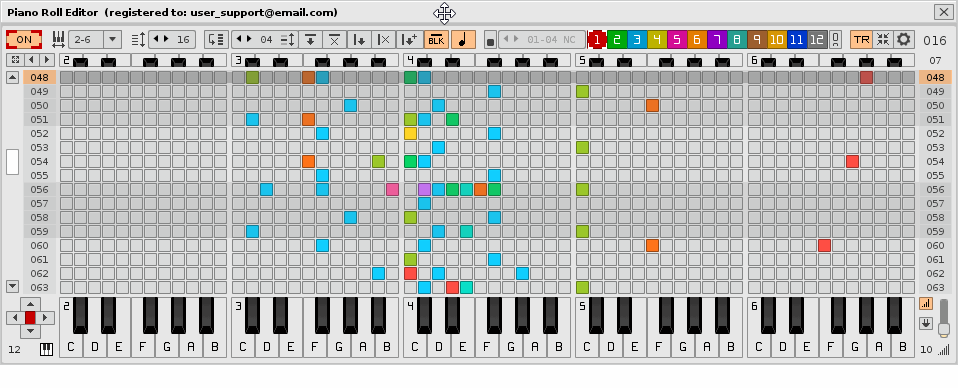
View of the PRE in TR mode. Displays all the notes of all the tracks in the range set in the preferences window.
Pay attention. The "TR mode" is a "more aggressive" display mode, since it will display more notes from different tracks. This mode allows you to select a track as central, and from 00 to 16 perimeter tracks, through the preferences window. The default range is "-4 TR +4" (it will show 9 tracks) and the maximum range is "-16 TR +16" (a total of 33 tracks), always superimposing the tracks that are closest to the center and always superimposing the columns of notes that are more to the left.
Keep in mind that PRE will have to read all the necessary data to show all the notes through the roll within these ranges. The more notes there are, it is possible that there are overlays of the same notes (they are the same tone in the same line). Take a look in the pattern editor if you have any questions or switch to NC mode and navigate between the tracks. As a general rule, if you use the PRE to compose, you will not have this kind of overlap problems that can be given if you load an already composed song from the Renoise pattern editor. Please, always keep this in mind when you approach the analysis of your composition through this tool.
2.8. NC and TR modes, compact modes and access to Preferences. ▲
To switch between "NC mode" (note column mode) and "TR mode" (track mode) the NC/TR switch is used. It is possible to use either of the two modes at any time, but never mix their capabilities. For example, for an overview of the song, you can use the "TR mode", but if you intend to surgically edit each note column, use the "NC mode" and its variants.
Controls NC and TR modes, compact modes and access to Preferences.
On the other hand, the versatile switch of compact window allows to hide or show the roll with a simple click of the mouse, or hide or show the lower virtual piano with a click maintained for approximately one second. This allows different combinations of window display. For example, show only the roll, or just the bottom virtual piano (which will act as a note monitor) or just the top bar, or show it all displayed. Combine this switch with the "Oct X-X" and LPR selectors to play with the size of the window.
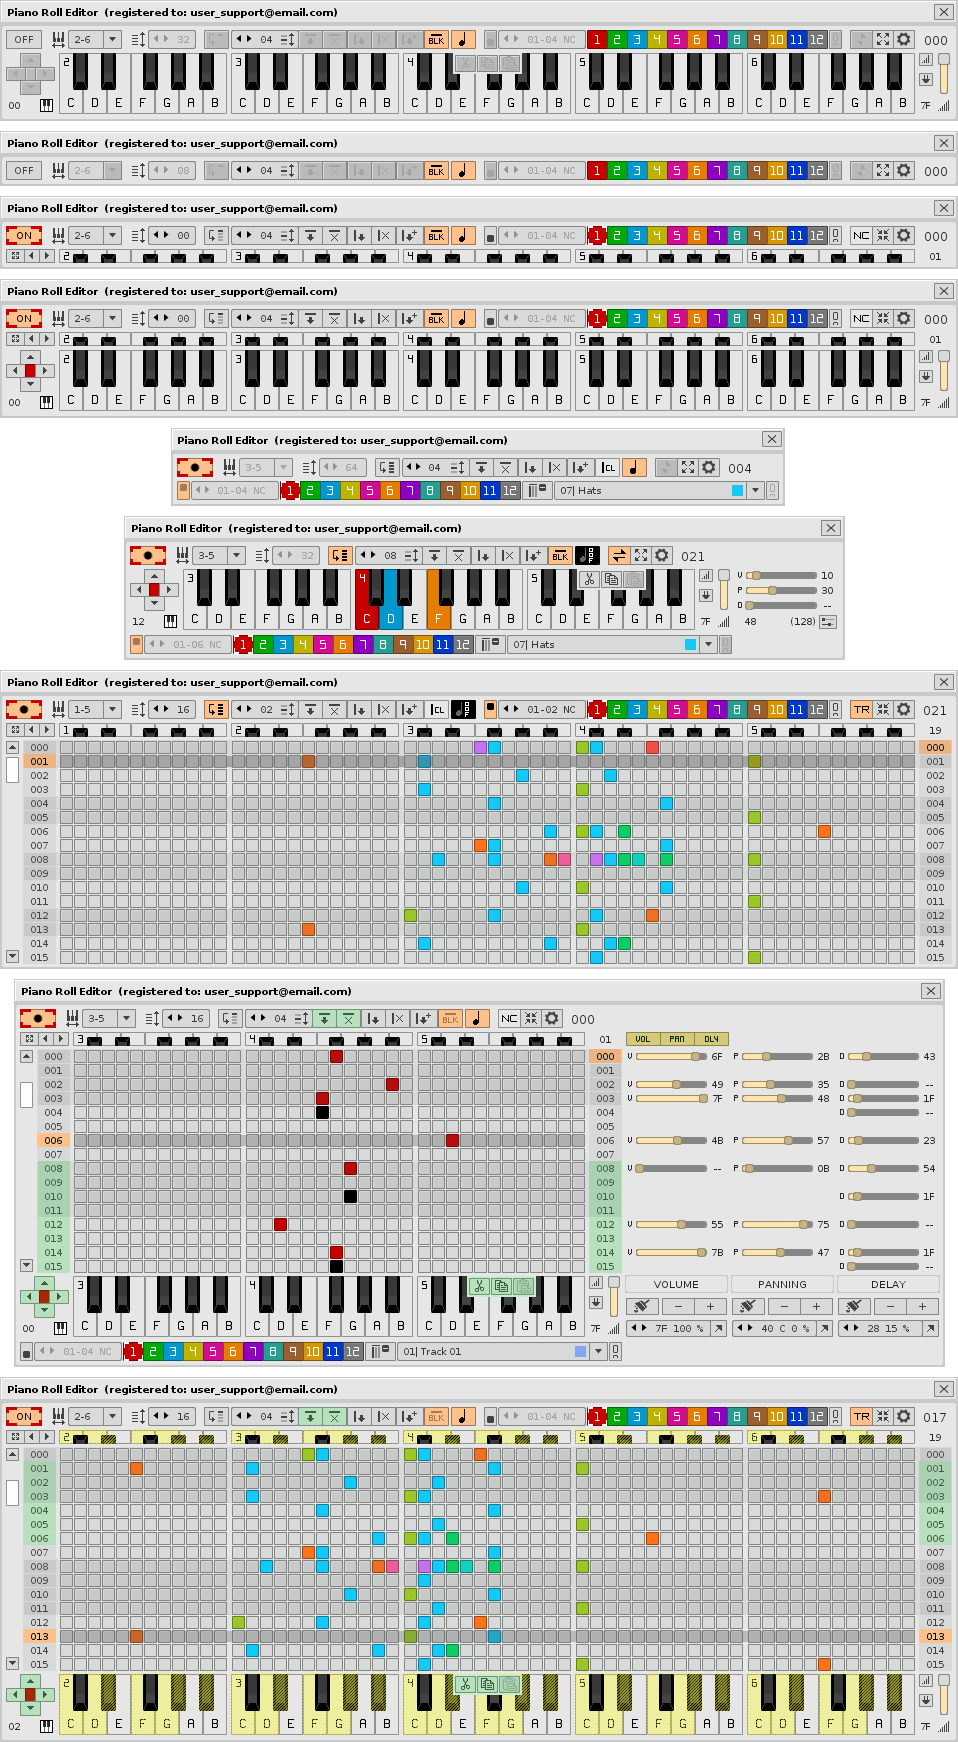
PRE and its different display modes. Remember that you can display up to 10 octaves and 64 lines.
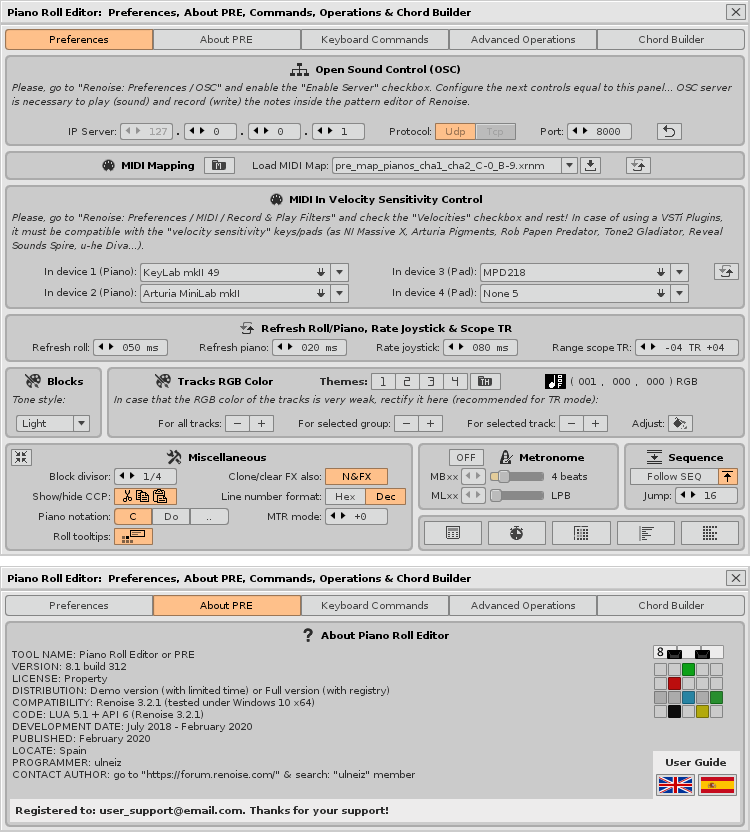
And there could not be a dedicated switch to display the separate preferences window, information about the tool, available keyboard commands, some modules for advanced editing operations and an advanced module for chord construction: Chord Builder. All information and controls are distributed through 5 tabs.
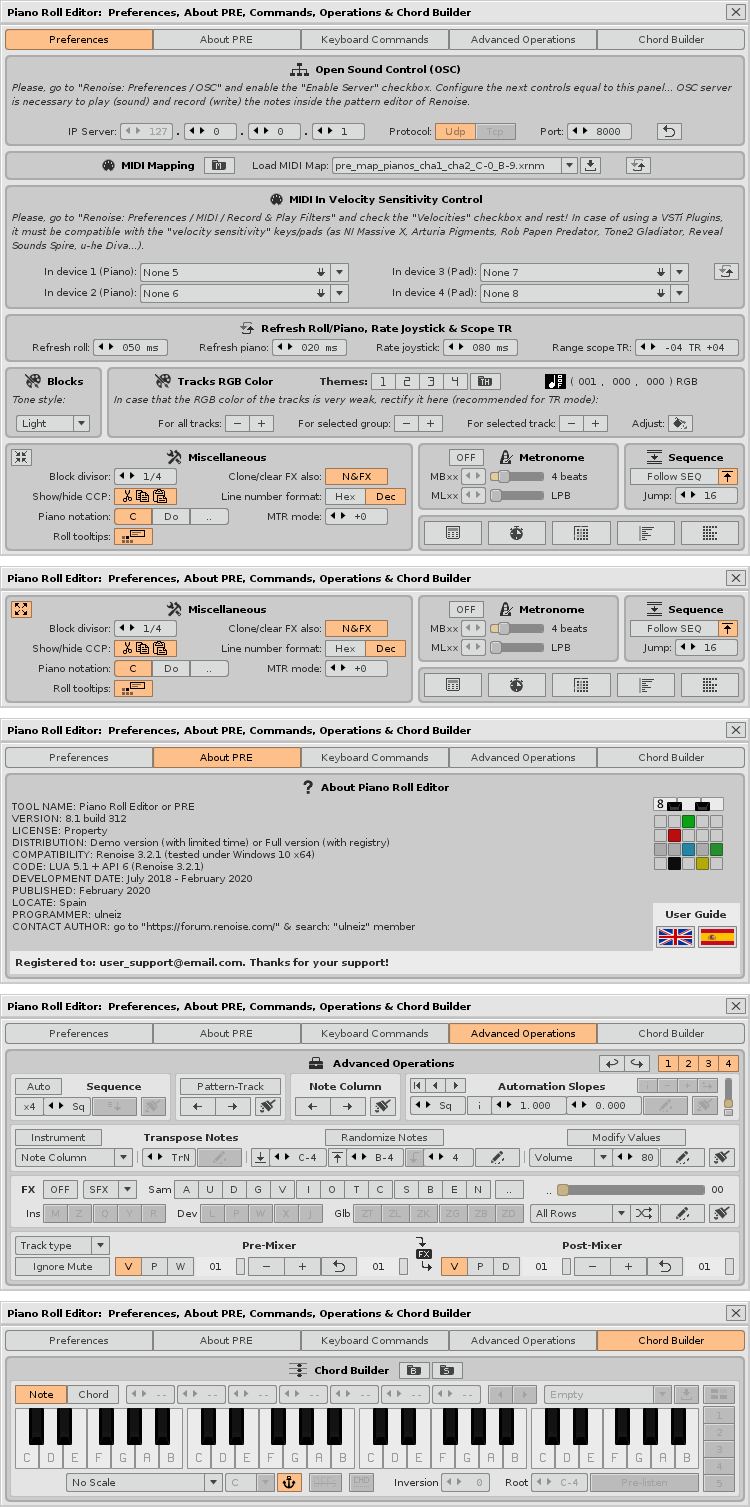
Floating preferences window with the rest of available tabs.
Review the preferences before using the tool and use the advanced operations for a support edition on the Renoise pattern editor. Similarly, take your time to learn the keyboard commands available for the tool.
In addition, in the "About Piano Roll Editor" tab you can directly access this basic user guide in HTML format, which is available in English and Spanish.
2.9. Monitoring of notes with the lower virtual piano. ▲
By hiding the scroll and showing only the lower virtual piano, it becomes a "note monitor". The piano will represent the notes of all the note columns of the selected line within the selected track.
In addition, the sliding bars on the right allow you to directly edit the volume, panning and delay parameters. With the lower right button you can invoke the window of the FX module, to edit the various effects parameters directly in the pattern editor.
PRE in compact mode for monitoring notes. FX Module.
In addition to being able to insert or edit notes from the piano through the mouse, it is possible to locate the written notes to correct them. For this, it is only necessary to move vertically between the lines, whether it is continuous or if jumps are made. The visualization of the piano will help to better understand the notes in the pattern editor.
Additionally, with the visible roll you can disable the edit mode [ESC] to click with the mouse on the specific note slot of the roll where you want to jump. This operation will work in the two TR or NC display modes. The PRE will perform the appropriate jump in the pattern editor, jumping between tracks, note columns and lines, also selecting in the instrument box the instrument index of the note slot pressed with the mouse.
Monitoring of notes through the vertical displacement of the lines.
2.10. Sort and distribute notes or sort and stack notes automatically. ▲
With the roll hidden, the PRE has another triple position switch with the automatic ability to sort (from least to greatest tone) and in two different ways the notes already written from the current line of the selected track:
- "Sort and distribute the notes" among the 12 note columns (simple click). It will sort the notes according to the tone of the note (C-, C#, ..., B-) and distribute them in the 12 note columns, including the 10 octaves. It will also add or remove note-OFFs as necessary to preserve the composition.
- "Sort and stack the notes" in the leftmost note columns, as possible (press and hold). The note-OFFs will always accumulate further to the right. If you already have the notes stacked, you can sort them from lowest to highest tone.
Switch to sort notes with triple position (with the mouse: simple click or press and hold).
It is possible to use the song playback to automatically sort from top to bottom (or even from bottom to top). In the same way, you can jump to the desired line to sort it or simply jump continuously between lines to modify specific ranges of lines.
Operations of sorting notes automatically by continuous vertical scrolling of the lines.
These operations of sort of notes will ignore the effect parameters that are on other lines that do not contain notes or note-OFFs. Therefore, it is reasonable to execute them when the pattern does not include intermediate effect parameters, or includes very few, to maintain control of the musical composition.
Caution! Given the complexity of these two operations it is advisable to use them with caution and knowledge. Know what you are doing. In some more complex cases, sort the notes will involve slightly modifying the original melody. Therefore, it will be necessary to perform a subsequent listening and probably some manual modification if you need to keep it. Use these operations with caution!
3. Octave display. Superior mirror piano.
Additionally, PRE includes 3 octave display control buttons, on the second upper bar, on the left. The first is a versatile switch with direct access to several modes. Press it with a simple click to switch between a range of 2-6 to 0-9 octaves and vice versa. Hold it down for approximately 1 second to change 2-6 octaves and 32 lines or 1-8 octaves and 64 lines. In this way, you can maximize or compact the window in a more direct way. The other two left and right buttons will navigate between the 17 octave ranges available in the "Oct X-X" selector. Keep these buttons pressed with the mouse to repeat the operation.

Octave display and the superior mirror piano. Each octave shows its 12 notes with white and black keys.
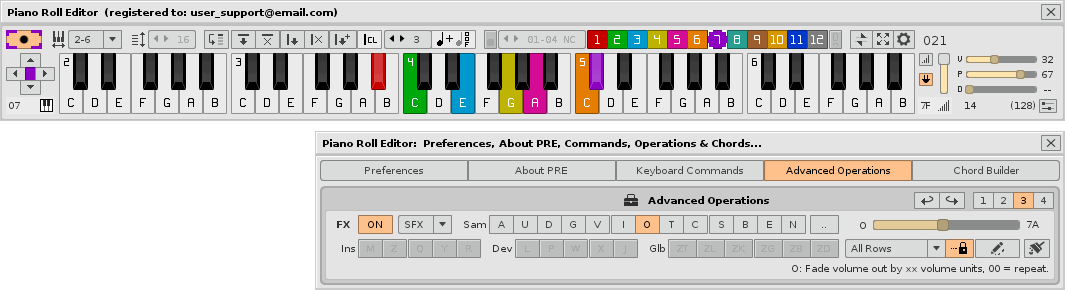
On the other hand, PRE has a slender piano placed on the top of the roll. This piano is nothing more than "a compact mirror" of the lower virtual piano, this one much larger. You can press your keys in the same way. Also, if you press the slots in the roll, the piano keys will light up. This way you can check the concordance of the tone of the note you are playing at all times. This top piano will always appear along with the roll. The superior mirror piano can also trigger chords. Go to the section 10. Chord Builder. Construction of chords or percussion for more information.
In addition, the value of the track index is always shown on the right. You can change this value manually. If you do not know which clue is, you can check the name of the clue by keeping the mouse pointer over the value.
4. Simple editing of notes: insert and edit on the roll.
Using the PRE, there are four different ways to insert (or delete) notes on the roll:
- From the USB alphanumeric keyboard (the notes will also sound, with Renoise 3.2.1 API 6 or higher).
- By clicking on the note slots of the roll, with three modes of insertion of notes:
- Note insert mode.
- Note-OFF insert mode.
- Note + note-OFF insert mode.
"Note mode" switch with its three modes.
You can use different alphanumeric keyboard modifier commands combined with the click of the mouse to be able to execute other more complex editing operations. - By clicking on the keys of the upper and lower virtual pianos. In the upper mirror piano you can switch between "note mode" or "chord mode", using the sophisticated Chord Builder.
- Using the MIDI input mapping of the two virtual pianos, upper and lower, playing from the USB MIDI controller keyboard. This last option allows you to configure the PRE by dividing the keyboard to shoot notes from different controls. For example, you can play the same notes from different MIDI devices.
Know that any note you modify in the pattern editor will also be reflected in "real time" on the roll, as long as the tool is activated.
Concentrating attention on the roll and the use of the mouse with the "NC mode", PRE allows several operations:
- Insert/delete a note.
- Insert/delete a note-OFF.
- Insert/delete a note with its note-OFF.
- Resolve previous operations with a specific line break.
- With the joystick, move groups of notes horizontally (modify the pitch) or vertically (change their shooting position). It can be done by block (horizontal), column (vertical) or selection of an area.
- Select a group of notes.
- Clone the selection of the group of notes.
- Cut and paste the selection of the group of notes. This is equivalent to the typical "drag and drop" operation.
- Delete a group of notes, using block (horizontal), column (vertical) or selection of an area.
With the current API, keep in mind that in most cases it is indifferent to press the right, middle or left mouse button. Usually, the tool will do the same action.
Information on the roll about different keyboard + mouse commands and keyboard commands.
In addition, the USB alphanumeric keyboard also allows you to insert or delete notes and also insert chords in a somewhat special and skillful way, including the sound re-pipe of the notes, all directly on the roll. You can solve the following operations:
- ["Letter Keys"] or [Click] insert/delete a note.
- [CAPITAL] or [A] insert/delete a note-OFF.
- [SHIFT Click] insert/delete a note with its note-OFF.
- [CTRL SHIFT Click] insert/delete notes consecutively for a chord (including or not its note-OFFs).
- [ALT SHIFT Click] insert a chord according to the Chord Builder (including or not its note-OFFs).
- Resolve previous operations with a specific line break.
- ["Letter Keys"] with press and hold: build a chord by inserting notes consecutively.
In most of the above cases, you do not need to change the state of any switch, except in some more complex cases. Also remember that for the editing to work, the pattern editor must be in edit mode ("Edit Mode" enabled). You can press [ESC] to change it. Remember that you can use the [º] key also to activate or deactivate the tool. You can also press the two [ESC] and [º] keys at the same time.
Representation of part of the roll, with its grid and note insertion slots.
PRE also allows you to manipulate the off notes to specify the duration of the previously placed notes (above). This editing program incorporates a note analyzer per pattern, automatically placing the note-OFF where appropriate on the roll. That is, even if the composer places a note-OFF in a "wrong" slot, PRE will autocorrect it in its correct position (the same tone as its associated note) on the same line. Keep in mind that note-OFF does not understand tones. Actually, it doesn't matter if you place a note-OFF in any slot on the same line, it will always turn off what is playing in the target note column of the pattern editor. Also note that note-OFFs will not appear in "TR mode", in which only notes appear.
While doing these operations with the notes, it is a good exercise to contemplate what is happening in the Renoise pattern editor. You will quickly understand the agreement between said editor and the PRE roll.
Pay attention. If you want to play without editing a specific note placed on the roll, first press [ESC] to deactivate the "Edit Mode" of the pattern editor. Then you can click on the colored slot that represents that note. The note will sound, but will not be modified.
Remember at all times that for notes to be inserted or played, you must have your OSC Server configured correctly.
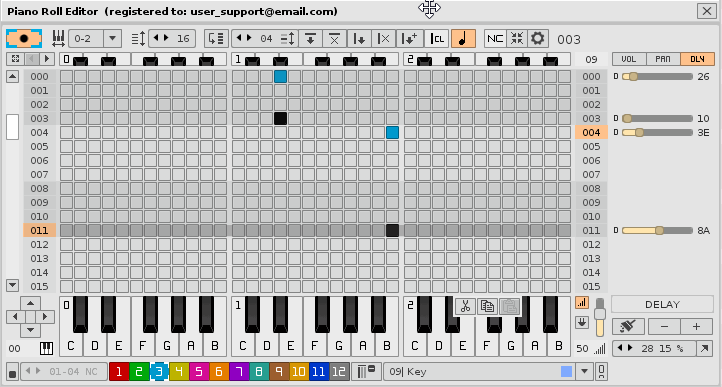
4.1. Insert or delete a note. Insert notes with jump of lines. ▲
To insert a note you only need to click on a slot in the roll. The note should sound. Distribute the value of the LPB before correctly to have a visual guide according to your compass used or have some control over the times. When you insert a note, the slot will be colored one color and select the line that contains it. Repeat this same operation to perform your composition. You can press and hold the [UP] or [DOWN] keys to raise or lower the selected line or click with the mouse on the left side column of the roll, thus avoiding changing anything contained in the roll.
The insertion of a note implies the inclusion of the instrument value and the volume value. Use the vertical slider to the right of the lower virtual piano to assign the volume value. You can also set the instrument value below the joystick (Ins: XX). Remember that both values are in hexadecimal notation. You can use the horizontal slider bars on the right panel to modify the volume (speed), panorama and delay of each note.
You can also avoid recording the volume (or velocity) value. Go to "Renoise: Edit / Preferences / MIDI" and in "Record & Play Filter" disable the "Velocities" option. In this way, it will only record the note value and the instrument value.
Insert a note (from the roll or from the piano) or delete a note.
To delete a note it is only necessary to simply click on the groove of the roll where it is located. This way, this slot will no longer be colored. You can press the [DEL] key to delete the note of the selected line. With a little skill, you can make complex compositions very quickly. It is advisable to have a high performance mouse with precise control. Don't fight with your laptop's touchpad!
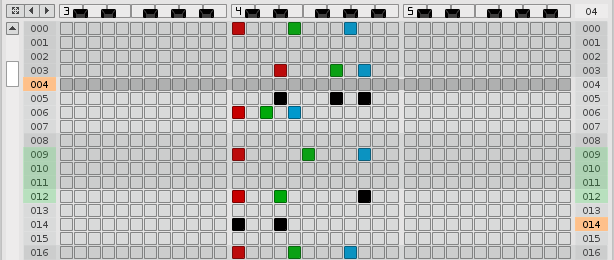
You can also insert notes with jump of lines. To achieve this, first activate the "Jump Lines to LPB" line jump switch. The jump made will be of the LPB value. For example, if the LPB value is 2, inserting a note immediately afterwards will automatically jump 2 lines down. You can repeat the operation to keep the same shooting distance of the inserted notes. The best way to do all this is by using the lower virtual piano.
Insert notes with jump of lines. Line jump with LPB = 4 and using the lower virtual piano.
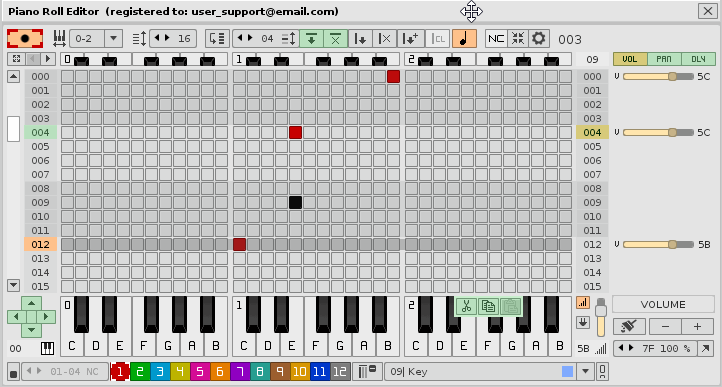
4.2. Duration of the note. Insert a note-OFF. ▲
To insert a note-OFF from the mouse, press the note change button to note-OFF (black button status). Thus, you can add a note-OFF or simply delete any note already written in a slot.
The duration of the note, if applicable, will be determined from the beginning of the trigger note until the beginning of the note-OFF. You can delay one or both with the delay slide bars. Remember that a slot also has a duration, modifiable with the delay parameter (or "delay"). In the following example, the duration of the F-4 note is extended almost three times its initial duration. The initial duration would be 4 lines, while the final duration would correspond to 11 lines. Of course, the composer must also be guided by his ears.
Note off and note duration. Press the [A] key to change the newly inserted note to note-OFF.
There is a trick to do this much faster by combining the mouse and keyboard. Without changing the note change button (non-black button status), insert a note with a simple mouse click. Then press the [A] or [CAPITAL] key, the uppercase lock key. This will change the note of the selected line to note-OFF. You can also stretch the duration of the note by "shifting" the note-OFF down. You can use the column of notes off always to the left of the roll to insert or delete note-OFFs.
Using these two keyboard commands, you can also change any note to note-OFF by first selecting the line that contains it, through the two perimeter columns of the roll.
4.3. Transposition. Change a note tone. ▲
Changing a note's tone is the easiest and fastest procedure that this tool is capable of offering. Simply click on the slot of the desired tone and the note of that same line will move to that slot. Remember that the line (horizontally) distributes the tones.
Change a note tone. From B-1 to C-1 and then to F-0.
4.4. Change the triggering position of a note. ▲
Changing the firing position of a random note on the roll requires at least two steps, inserting a new note of the same tone in the target slot and deleting the previous note. PRE does not allow drag and drop with the mouse. Since deleting a note is very fast and straightforward, changing its position is too.
The following example shows the change of firing position of 2 notes. The first is a simple note, while the second is accompanied by a note-OFF three lines below. Remember that you can press the [A] key to change a note to note-OFF (black slot).
Change the firing position of a note. Move one note and another with note-OFF.
Remember that you can also use the [UP] or [DOWN] keys to change the selected line and use the lower virtual keyboard with the mouse to insert the notes of the desired tone.
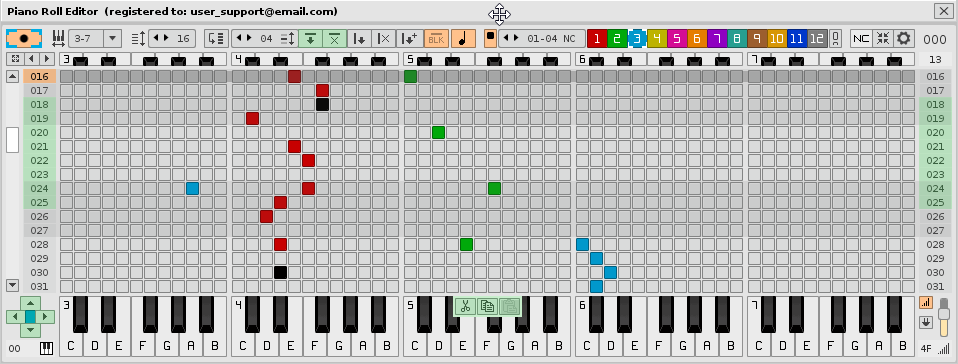
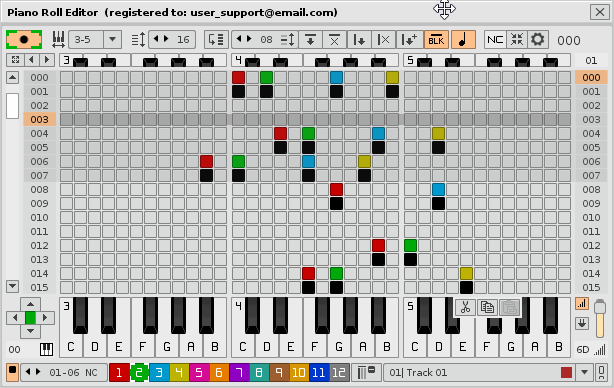
4.5. Select and "clone" the selection with tone transposition. ▲
PRE allows you to directly select an area of notes (several contiguous lines) on the roll for later editing. To select a line, simply press the ALT command plus mouse click [ALT Click] on top of any note slot. Repeat this operation on any other slot contained in another line; You can even expand lines later. Subsequently, you can clone that selected line area by pressing [CTRL Click] on another note slot, with data overlay. You will see that the selection will remain static. The composer may repeat this last cloning operation as many times as he wishes within the same pattern. Please compare this operation with the operations in the following sections.

Insertion of notes, selection of 7 contiguous lines [ALT Clic] and varied cloning with transposition of notes [CTRL Click].
PRE has several ways to select several contiguous lines to define an area:
- Select with the mouse on the right column that contains the indices of each line.
- With the mouse, click [ALT click] on note slots in two different lines.
- With the alphanumeric keyboard, using keyboard commands:
- [ALT Q] selects a block of contiguous lines dividing the pattern. In the Preferences you can change the value of the divisor.
- [ALT A] selects all lines of the pattern above the current line, including this one.
- [ALT Z] selects all lines of the pattern below the current line, including this one.
- [ALT B] for multiple selection of contiguous lines. Select one and then another.
- [ALT N] selects only the current line.
- [ALT DEL] With this command you will delete the data only from the selection.
Various modes of selection and extension of the selection, with the mouse or with keyboard commands.
Remember that you can always change between selecting only the current note column, or select all the note columns of the track, using the joystick center switch, or by pressing the [1] command.
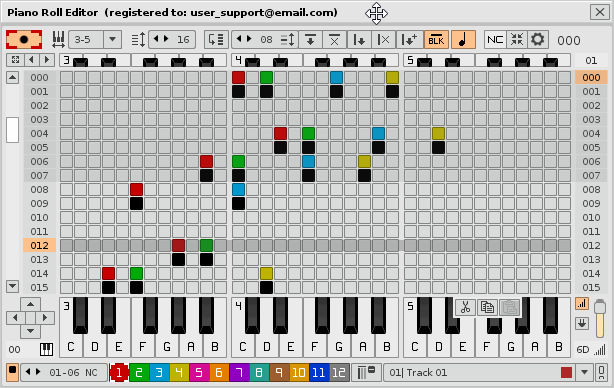
4.6. Select and "cut and paste" the selection with tone transposition. ▲
In addition to cloning, the PRE allows you to "cut and paste" the selection, similar to "drag and drop". To do this, first select several contiguous lines, in the same way as the previous section with [ALT Click]. Subsequently, use the [CTRL ALT Click] command, clicking on any reference slot to cut and paste the selection into another slot. You will see that the selection also moves. You can repeat this operation to relocate the selection as many times as you want within the same pattern, knowing that the selection will superimpose the data of all the destination lines.

Pre-selection with varied cutting and pasting with transposition of notes [CTRL ALT Clic].
The operation of cutting and pasting a selection (and that of cloning) is possible in two ways: with transposition of notes or without transposition of notes. The first, with transposition, is to ensure that the first line of the selection contains a "reference note" or origin. This will be the reference note for cutting and pasting an area of lines (also for cloning). That is, the note slot where you click will deposit that source note. Thus it will be possible to transpose the entire area of notes, with that original note. The second way, without transposition, is to select an area whose first line does not contain a reference note. Thus, you can cut and paste (or clone) without transposing the notes, regardless of the destination note slot.
4.7. Direct creation of chords using only the USB alphanumeric keyboard. ▲
PRE allows you to directly enter chords with the USB alphanumeric keyboard without losing the initial note column (without jumping from the note column), playing the sound of the final chord (all chord notes). As an example, to solve this operation to create and play a three note chord, first make sure you are within a note column and obviously, with the editing mode activated. Press and hold the first chord note key. Then press and hold the second chord note key. Then press and hold the third chord key; the three notes will sound, the entire chord. And finally, release the three keys. You will have written 3 notes on the same line, without losing the initial note column and have heard the final chord of the three notes.
Direct creation of chords from the USB alphanumeric keyboard, with full chord sound.
The composer can combine this operation by also activating the line break switch [Apps] and also activating the third note insertion mode, that of entering note plus note-OFF [R.CTRL]. Thus, you will not only skip a set number of lines after entering the notes, but also add the note-OFF associated with each note of the chord.
4.8. Direct creation of chords using the mouse. ▲
PRE also allows you to enter chords directly with the mouse, automatically jumping in that column of note (with empty row, without note) that is more to the left. However, you cannot play all the chord notes at the same time. To enter them, press and hold the [CTRL SHIFT] command and then click on the note slots to build each chord within each line. When you already have the chord or chords built, you can now release the keyboard command. You can build them horizontally or vertically. You can also enter note-OFF for each note, setting the distance of note-OFF at >= 1 line.
Direct creation of chords from the mouse using [CTRL SHIFT Click].
Pay attention. When you press and hold a keyboard command, everything you do when entering notes is considered a single action or step. If you press [CTRL Z], you will skip to the previous step, eliminating everything done. To avoid this, release the [CTRL SHIFT] command to separate each desired step.
4.9. Inserting notes with note-OFFs from "note-OFF mode". ▲
This is one of the most skillful sections of the PRE. The "note-OFF mode" (black color switch) is primarily used to edit note-OFFs. You can click on an upper and lower slot to an existing note-OFF and automatically the note-OFF will move there, or click on a note-OFF slot to remove it.
Skillful insertion of notes with note-OFFs [SHIFT Click] and duration modification.
However, with the "note-OFF mode" a very skillful scenario is created to quickly edit notes with their note-OFFs. In both "note mode" and "note-OFF mode", pressing [SHIFT Click] will automatically invoke "note mode + note-OFF", and releasing the original mode will be restored, either "note mode" or "note-OFF mode". Then, when doing this operation with the "note-OFF mode", with [SHIFT Click] you can insert a note with note-OFF, and when you release the SHIFT key, you can quickly change the note-OFF (its distance by one click) respect to the top note) or eliminate it. In this way, it is very fast to edit notes with note-OFF, even changing the duration of the note practically on the fly.
4.10. Insert, move or delete several group note-OFFs. ▲
With the PRE you can not worry about the note-OFF when composing a pattern, because you can add them later and modify them if necessary. When the tool is activated, a group editing panel dedicated to note-OFF (Note-OFFs) will appear in the lower right. In it you can insert, delete or edit (drag up or down) off group notes, either using the block, column, or a selection area.
In column, insertion of note-OFFs in groups with a line jump of +2 (each note will last 2 lines).
Remember that the PRE offers several ways to insert note-OFFs, both individually and in groups using the right editing panel. The note shutdown will also have a delay value (delay slider), since it affects the duration of its associated note.
4.11. Modify volume, panning or delay values. Humanization of notes. ▲
You will have seen that, when inserting several notes, several horizontal sliders will appear in the right panel. Obviously, you must have the VOL, PAN and DLY panels activated beforehand. You can activate one or several when appropriate. These bars will only appear if there are associated notes or at least the corresponding parameter exists in the pattern editor. That line that is empty in the note column will not show these bars. If you want a more advanced edition, you must use the pattern editor.
Use these sliders to correct their volume, panning and delay parameters. Slide the bar to change the value or double click on the bar to eliminate the value (the bar will disappear).
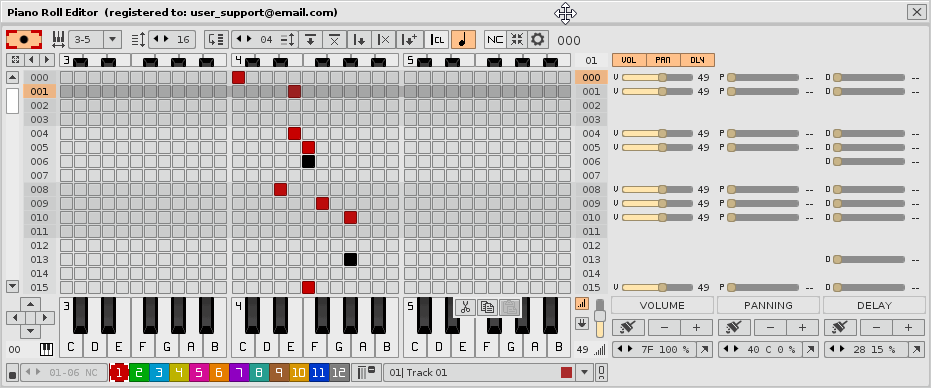
Volume, panning and delay sliders.
Having these bars can visually help to understand the behavior of the notes, their punch, their position in space and their alteration over time. This is much harder to appreciate if you can only see hexadecimal parameter values. You can quickly vary the values manually to emulate a deeper humanization, preventing the result from sounding too flat, too artificial or too humanized. Remember that you can press the [CTRL] key while sliding a slide bar to achieve a slower and more accurate scrolling.
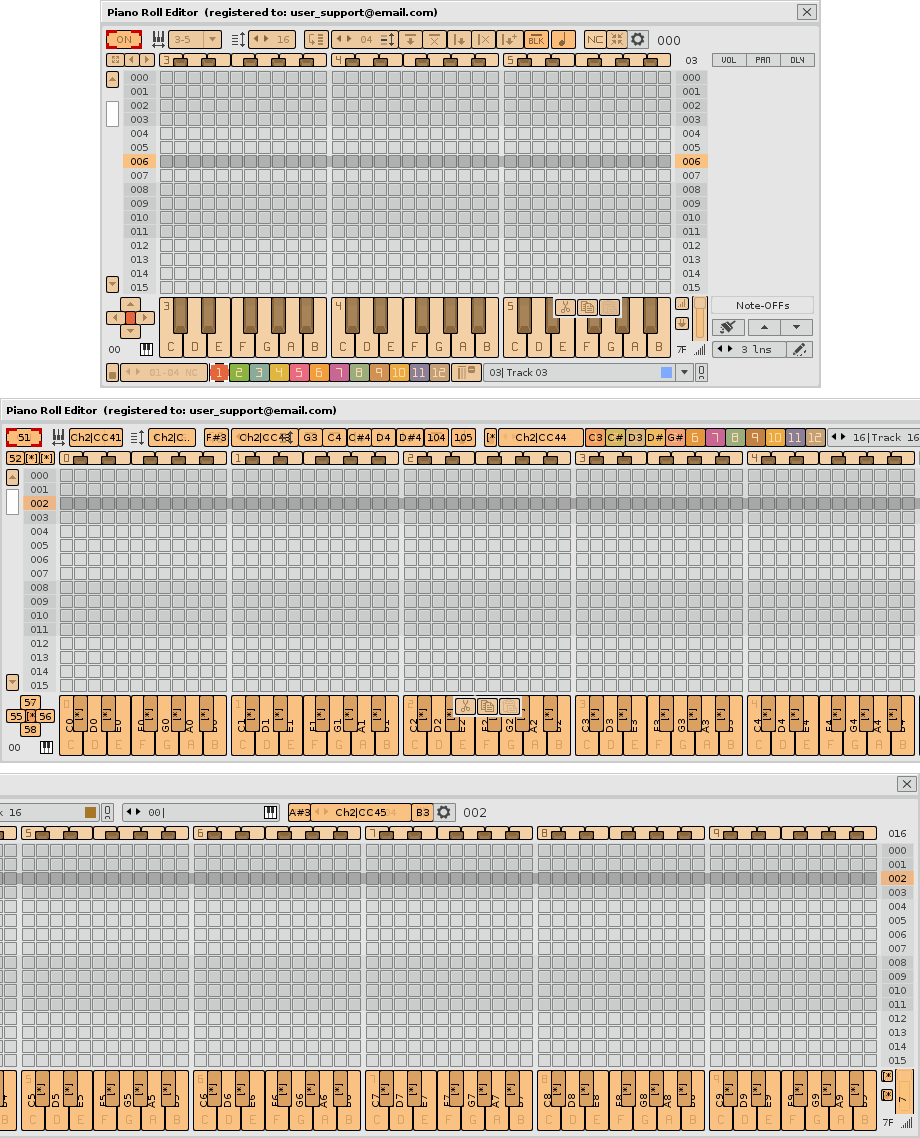
5. Advanced edition: blocks/columns or range of lines. The joystick.
PRE has several selection combinations for the advanced edition, with its virtues and limitations. Unlike other programs, it is not necessary to select an area with the mouse, it is enough to select a line within a block. Remember that you can change the number of lines per block from the LPB selector of the tool. Next, you can configure the following controls...

"Area Type" switch. Edition "in block" or "in column".
The "Type of Area" switch allows changing the selection area between a block or between an entire column. If it is "in block" (horizontal rectangle), it means that the joystick can modify all the lines contained in the block. Being "in block" implies having the pattern divided into equal slices, as many slices as blocks. You can jump between blocks simply by selecting any line within them.
If it is "in column" (vertical rectangle), it means that all the lines of the pattern will be modified, even if the whole pattern does not appear on the roll. Always keep this situation in mind.
This switch also serves as an area selector for the lower controls of the right panel VOL-PAN-DLY.

Center switch of the joystick. Editing by a note column or all the note columns.
Observe the color of the joystick's central switch. Combining with the previous control of the "Area Type", it is possible to select only the selected note column, or all the note columns, 12, of the selected track. To select a note column, use the colored buttons from 1 to 12. To set all the note columns, press the center joystick switch so that no color appears. That is when it will be modified in all the note columns.
Once you have control of this entire selection system for this tool, you will find that it has certain limitations. To modify parameters more precisely, go to the pattern editor. Remember that the Piano Roll Editor is not designed to replace the Renoise pattern editor, but works as an editing and visualization support.
On the other hand, if you want to just modify lines, set the value of the LPB selector to 1. At all times it is a good exercise to observe what is happening in the pattern editor during these editing tasks with the tool.
5.1. Change the tone in block. ▲
First set the "Area Type" button to "in block" position. Afterwards, use the right or left arrows of the joystick to move the notes as a group. You can use the middle button to scroll only the selected note column or all the note columns. Note that editing will only affect the contained lines of the selected block. In the following example you will see that it is very easy to modify certain chords.
Change the tone in block. Move the block of a note column or the block of all note columns.
5.2. Change the tone in column. ▲
First set the "Area Type" button to the "in column" position. Afterwards, use the right or left arrows of the joystick to move the notes as a group. You can use the middle button to scroll only the selected note column or all the note columns. Note that the edit will affect the entire note column of the pattern (all its lines).
Change the tone in column. Move a note column or all note columns (even if they do not look whole).
5.3. Change the position in block. ▲
Changing the position of certain group notes can be a somewhat tricky edition, but it can be useful in certain cases. For example, if you play with the roll to insert some initial notes when beginning to compose in a pattern, it will be very easy to correct the triggering position in height of the notes to fit them better. You can also play with the delay parameter or "delay" if the resolution used is small (the playback of the pattern sequence is slow).
Since you have several blocks, that is, the pattern divided into slices you can move the notes within each block using the arrows above and below the joystick. If the block has few lines, it will be common to leave the block. If this is the case, the notes will be deleted. To recover them you can press the command [CTRL Z].
Change the position in block.
5.4. Change the position in column. ▲
You can do the same procedure from the previous point, but changed "in column" instead of "in block". You can even duplicate a block if you wish. The result is that the joystick will modify the position of all the notes of the selected note column, or all the notes of all the note columns, depending on the state of the central switch of the joystick. You can directly change this middle button with the [1] key.
Change the position in column. Move a note column or all note columns (even if they do not look whole).
Pay attention. Look at the total number of lines of the pattern. The roll only shows 16 lines while the pattern has 4 times more. When you scroll down, you will see that no notes are deleted. The opposite happens if it exceeds the first line of the pattern, which is when the notes will be erased. At all times you must know what you are manipulating.
5.5 Modify volume, panning or delay values in groups. ▲
Following the steps of the previous points again, it is possible to change the values of the sliders "in block" or "in column", thanks to the "Area Type" switch or use the green selection area of contiguous lines. Look at the lower controls on the right panel VOL-PAN-DLY. Click or hold the "-" or "+" buttons with the mouse to decrease or increase the group values, whether the area selection mode is "block" or "column", or if you use a green selection area, in all three ways. You can press any of the delete buttons to reset the slide bar values or double-click the individual slider.
Note that all the value boxes to the right of the sliders accept the change of value manually. All these values are in hexadecimal notation.
Modify volume, panning or delay values in groups.
On the other hand, you can use the lower boxes to change the values of the sliding bars equally. These boxes of values show the value in hexadecimal, as well as its equivalent in percentage. You can also use the "PRE:Preferences\Advanced Operations" to create humanized parameters in groups, through the randomization controls. Remember that anything related that changes in Renoise, will appear updated in real time in this tool if it is activated (power switch "ON").
5.6. Select, cut, copy and paste blocks of tracks or a range of lines. ▲
PRE also has its own internal clipboard to cut, copy or paste blocks of tracks or ranges of specific lines. The 3 control buttons for cutting, copying and pasting are located above the lower virtual piano. You can first select the block you want to edit, selecting any of the lines contained within it or use the numbered column on the right to select a specific line range or using the keyboard command [ALT B].

Buttons to cut, copy and paste blocks.
You can use the usual commands to cut [CTRL X], copy [CTRL C] and paste [CTRL V], using the central joystick switch to select the selected note column or all the note columns. If you cut by mistake and want to recover a previous step, you can use the [CTRL Z] command. You can also use [CTRL Y] to advance a step if it exists. Keep in mind that all parameters within each block or range of lines will be copied, including the effect parameters.
Granular selection of a range of lines (or use the keyboard command [ALT B]).
In addition to block editing, you can select a desired range of lines using the right column (by clicking on it), being more surgical from the PRE itself. First select a line, it will be marked in green, and then another higher or lower line, establishing the range of lines in green. You can also press the right column for more than one second to select the entire pattern, even if it is 512 lines. Therefore, PRE has 3 selection forms, in block or in column (the cut, copy and paste buttons will not be green), and the selection of a range of lines (the cut, copy and paste buttons will be green).
Remember that PRE has its own keyboard commands. You can navigate or jump between the lines using the commands and use the [ALT B] command to set the range of lines. Simply press the command once, and then jump to another line, repeat the command to set the range of lines. You can also use the [CTRL Q] command to directly select a pattern divider block (from 1/1 to 1/32) or the command [ALT N] to select only one line.
6. Mapping the MIDI input.
6.1. MIDI Input. Navigation, control and editing. ▲
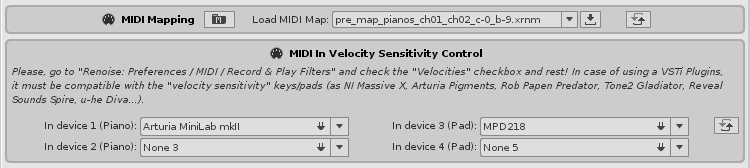
PRE has a multitude of controls that can be controlled from the MIDI input, practically 90% of the program. Use the navigation and editing controls from your MIDI device. All these controls need to be mapped previously. In addition, the superior mirror piano (which can trigger chords) and the lower virtual piano allow MIDI input mapping on all its keys, the 120, plus the vertical volume slide bar on the right.
To map the MIDI input there are two options, one slow and one fast: map everything manually, each control one by one, or quickly use already established mappings. In the Preferences of the PRE you will find a small panel with a drop down list with several already established MIDI mappings. These XRNM mappings are configured to quickly map, with a couple of clicks, the superior and bottom virtual pianos. It is possible to save more complex custom mappings in the container folder for later loading in other song projects.

Access to the "MIDI Mapping" panel with its drop-down list.
Caution! When loading a MIDI mapping from the list, all the MIDI mapping already set in the song will be overwritten. That is, it will delete all the previous mapping and load the selected new mapping. This is useful for starting song projects.
To map everything step by step you need to access Renoise and press the "MIDI MAP" button on the top bar, or press [CTRL M]. Then navigate to the following address: "Tools/Piano Roll Editor". With the "Learn Mode" enabled you can modify all controls one by one with their physical buttons/keys/pads, slide bars or knobs.
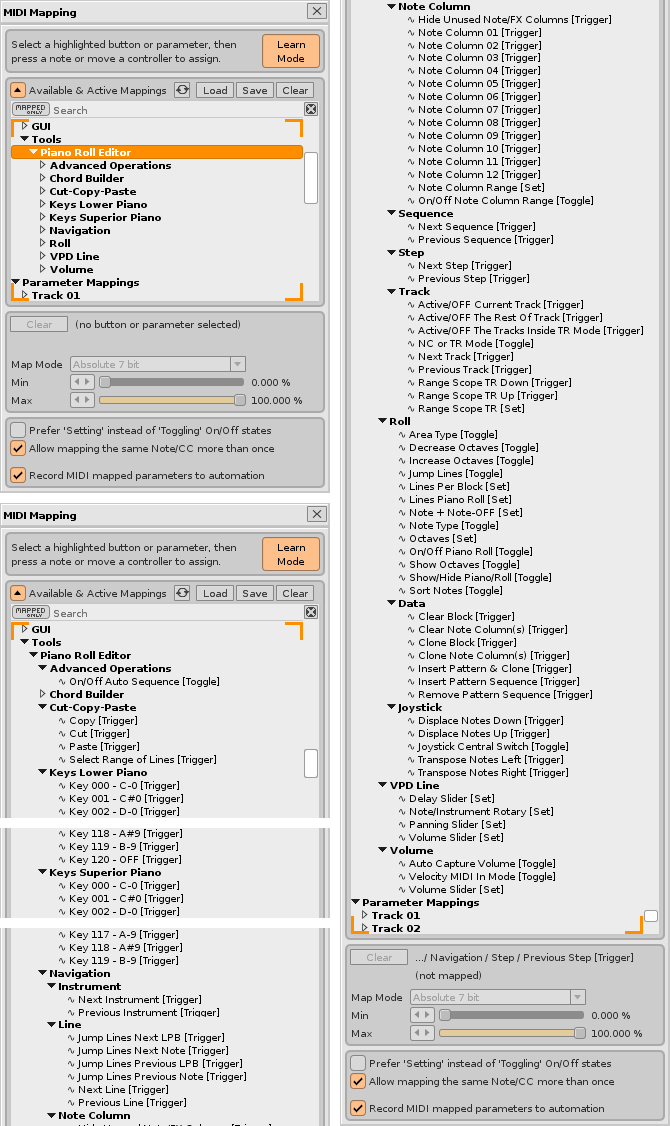
Access to the Renoise MIDI input configuration. Press [CTRL M] with Renoise in the foreground.
The final look after the MIDI mapping is finished is like the following example. Keep in mind that the skin "Gray Cream Day" is used, which is not Renoise's default skin. If you use another custom-looking theme, the colors shown will probably be different.
This example links each key tone exactly to its corresponding MIDI physical keyboard. Since the composer is most likely to use a keyboard with less than 10 octaves, you should be able to change the octave range of your keyboard to map the 10 octaves. Keep in mind that it is possible to map some keys and not others, or use different MIDI devices (for example, several physical MIDI keyboards) to map all the keys.
View of the mapping of the MIDI input of the virtual piano already mapped.
In addition to mapping all these controls, it is possible to map with the same MIDI controller device other controls available in Renoise, combining them both. After completing the mapping, be sure to save your XRNM mapping file in a secure folder. So, later you can load that mapping into another song when necessary. Also know that if you save a song with that mapping, the data from this mapping will also be saved in the XRNS song. That is, if he loads that song again days later, the mapping he used will continue in it. Be sure to load PRE before loading the song.
Go to the Preferences window of the tool and press the button with a folder that contains the letter "M". A folder containing an example MIDI input mapping file XRNM, valid for the MIDI MIDI keyboard Launchkey 61 of Novation, will be invoked. Actually, this is an XML file. You can change the extension of this file to XML to view the saved data. Make a copy if necessary each time you handle these files.
6.2. MIDI Input. Velocity setting (volume). ▲
PRE has various ways to control the volume of the notes for live recording or simple editing. For simple editing with the mouse, you can use the volume vertical scroll bar to the right of the lower virtual piano to set the volume value of the note. The range of values is from 00 to 80 (in hexadecimal). In the volume, the value "80" is equivalent to not putting any value. Both cases are the maximum volume.
Volume bar with note volume self-capture switch and pulsation velocity sensitivity switch.
You will see that the bar is accompanied by a small upper switch and another with a plug. The first switch is used to auto-capture the volume of the selected note. The second is used to activate the velocity sensitivity of the linked MIDI device, and therefore, the volume slider will be ignored. Thus, when you press a key on your physical piano or a pad on your MIDI pad that is sensitive to the beat rate, PRE will interpret velocity-sensitive volume values. Please make sure that your connected MIDI device is sensitive to velocity (with a range of 00 to 7F). Use the mouse or the MIDI controller to control the volume values of the notes to be inserted or edited.
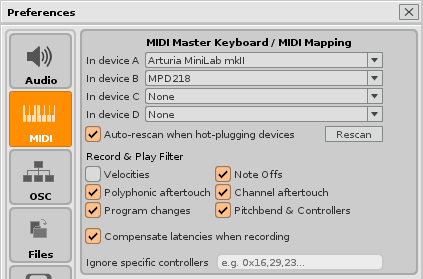
To assign a MIDI device, go to the PRE Preferences panel and in the "MIDI In Velocity Control" section assign a velocity-sensitive MIDI device: a USB MIDI controller with a piano or a USB MIDI pad.
Preferences in PRE. MIDI device configuration for sensitivity to the velocity of pulsation.
Remember that, if there is no MIDI device assigned, PRE will take the last velocity value that remembers the last device used to set the volume. You can reuse the volume slide bar by turning off the power switch. Similarly, remember that once the notes are inserted, you can edit the volume value with precision of each note through the horizontal sliders in the right panel.
If you do not want to record the volume value, be sure to turn off the "Velocities" function in "Record & Play Filter" in the MIDI settings of the Renoise preferences. Then each note will take the maximum volume, equivalent to the value 80.
Preferences in Renoise. Deactivation of the option "Velocities".
PRE is not compatible with polyphonic aftertouch. Any aftertouch shipment will be ignored. You can see all velocity activity or even aftertouch in the "MIDI" tab and "Monitor" of Renoise. You may even notice if your device is highly sensitive or not at the velocity of pulsation. The "Velocities" option affects all MIDI devices linked in slots A through D.
6.3. Live recording of the notes with the MIDI input. ▲
Thanks to having already established the mapping of the MIDI input, you can use the live recording with your USB MIDI keyboard or pad MIDI, using PRE as "bridge link", sending messages in real time through the OSC protocol.
Live recording with the playback of the active sequence. Insertion of a chord.
The previous example shows the action of inserting a chord of 3 notes with the live recording and with the NC mode activated and with the switch showing multiple note columns activated. You will see that all the notes of the chord are recorded with the delay value at the moment of being pressed with the keys of the MIDI piano, as well as the note-OFFs when the keys are released. You can record any melody, however complex it may be, even during the whole tour of the song.
If you do not want to capture the shutdown of each note (the Note-Off), go to "Preferences" of Renoise and in "MIDI/Record & Play Filter" deactivate the option of "Note Offs".
7. Keyboard commands. Navigation, control and editing.
PRE also has its own keyboard commands, more than 100 available. Most of them replace a mouse click on a specific control, such as a button, or a switch. To use these keyboard commands it is necessary to have the PRE window or its Preferences window in the foreground. If you want to use the Renoise keyboard commands, you must put it in the foreground.
Key commands. Go to the "Preferences" window of the PRE and click on the "Keyboard Commands" tab.
As you will see, most of the necessary controls are available. In this way, the composer can combine the USB keyboard commands with the power of the mouse. For example, use the [F1] to [F12] keys to switch between note columns of the selected track or press [PAUSE] to close the note columns or columns of unused (empty) effects. Use [TAB] or [SHIFT TAB] to switch between tracks or [CTRL UP] and [CTRL DOWN] to switch between patterns. Read keyboard commands carefully and learn them with practice.
Pay attention. Know that all functions that are invoked from these keyboard commands are in the tool, not in Renoise. For example, if something went wrong, something that should never happen, it would usually be the tool's fault, not Renoise's. If you detect an error, please contact the "ulneiz" programmer and provide a detailed report of the error. Thank you!
On the other hand, to close the window of the tool, the key [<], not modifiable, is assigned. However, to invoke the PRE window it is necessary for the composer to manually enable a specific keyboard command not used for anything else. Please go to "Renoise: Preferences/Keys: Global/Tools/Piano Roll Editor". If you wish, you can assign the suggested [<] key again, which is usually free. In this way, you can press this key to open or close the tool window as many times as you want. Remember that the act of "opening the window" implies putting it in the foreground, and "closing the window" implies putting the Renoise window in the foreground.
At this point, reflect a little. Take care to understand all the control capabilities with the mouse, those of the keyboard commands, as well as all the control possibilities of the MIDI input. With all this, you will be able to control this tool skillfully.
8. Preferences: 'OSC Server', timers, more customization and other windows.
8.1. Configuration of the "OSC Server". ▲
Although this section should probably be in the first place in the guide, it is worth extending a bit about it, since it is usually a sea of initial doubts.
You can refer to the Renoise User Manual where it describes what the OSC protocol is and how to configure it. Please inform yourself and understand what it means to use the OSC in Renoise.
Open Sound Control uses the Renoise OSC server that receives data and an OSC client, responsible for sending data. To configure it you must do 2 steps:
- Go to "Renoise: Preferences/OSC" and activate "Enable Server". Use the "Udp" protocol and a port, for example "8000". In this way Renoise acts as an OSC receiver server, as a listener, ready to receive incoming data, messages.
- Go to "PRE: Preferences/OSC" and enter a value of "IP Server", by default "127.0.0.1" and the same port "8000". Thus, PRE can send messages through OSC for Renoise to interpret them.
Preferences in Renoise. OSC configuration.

Preferences in PRE. OSC configuration.
It is possible to use an IP between "127.0.0.1" and "127.255.255.255" and a port between "1" and "9999", generally a port higher than "1024" is used, by default "8000". In this way, PRE will send data to the Renoise OSC server through the selected port. If you have problems with the port, change it in both steps to "8001" for example. The "Udp" protocol is always used because of its high transfer rate and stability.
Caution! If OSC is not configured correctly, PRE can not send messages through this protocol and, consequently, Renoise will not be able to interpret them. This means that PRE can not record or edit notes or make them sound, giving the feeling that something does not work, when what happens is that it is not properly configured. Please be sure to perform both steps correctly.
With correctly configured OSC, PRE will use real-time note triggering and shutdown messages, such as "renoise/trigger/note_on" or "renoise/trigger/note_off", among other messages. These messages will edit the notes in the Renoise pattern editor and cause them to sound if they have a loaded instrument associated with those notes.
8.2. The timers. ▲
PRE has a couple of configurable settings from the preferences window. On the one hand, you can adjust the update or refreshing time of the roll, "Refresh roll", between a range of 5 to 500 milliseconds (50 ms by default) or the refresh time of the lower virtual piano, "Refresh piano", between a range of 5 to 500 milliseconds (20 ms by default). This is controlled from a pair of internal timers. The lower these values are, the faster the information that the roll shows (its colored slots and the ones that do not) or the lower virtual piano will be updated. To give you an idea, PRE is optimized to work at all times with 120 slots per line and up to 512 lines per pattern, which is a total of 61440 note slots for the roll, and up to 120 notes for the piano.

Preferences in PRE. Setting the roll update time and the scroll speed of the joystick.
PRE also allows you to configure the repetition time of the joystick movement, through the "Rate joystick". By default it is in 80 milliseconds, which is a reasonable rate. You can change it between a range of 20 to 200 milliseconds.
Finally, remember that you can configure the value of the "Range scope TR", when using the TR mode. This configuration is recommended to set it to a fixed value and not to modify it repeatedly. This way you will remember at all times how many tracks you want to show. Remember that the selection of the center track is "the guide" that commands over all the others.
These four value settings are stored internally in the tool, even if you close your Renoise session. When reopening Renoise, these configuration values will be remembered.
8.3. Colors of the tracks. Skins and styles. ▲
It is possible to load a previously song composed with Renoise whose RGB colors of the tracks are too dark. This means that the note slots are not well appreciated when using the TR mode. With the following panel it is possible to correct the brightness of these colors...

Rectification panel of the RGB color of the tracks.
With this panel it is possible to correct the dark color in several ways, either by changing the color of all the tracks, in group or in the selected track. Press or press and hold the - or + buttons to decrease or increase the RGB color values. On the other hand, if there is a track that has a color too similar to another, you can rectify one of them directly. It is designed so that the essence of the original color is not lost. For more specific cases, you can modify the entire color of each track from Renoise. Remember that for the PRE it is advisable to use distinguishable and vivid colors on the tracks, since with the TR mode the note slots depend on these colors.
It is also possible to modify at any time the RGB color of Note-OFFs, which by default is black (001,000,000). Use bright colors to highlight them, different from the default colors of the 12 note columns.
On the other hand, PRE includes 4 additional skins: (1)"Gold Blue Speed", (2)"Gray Cream Night", (3)"Ivory Gray", (4)"Gray Cream Day". Use the 1,2,3,4 buttons to load them.
Different skins for PRE + Renoise.
Finally, PRE includes 3 styles to mark the blocks and the line of reproduction: "Dark", "Middle", and "Light". Use the "Dark" style for dark themes, and "Light" for light themes.
PRE: Styles "Middle" (top) and "Light" (bottom).
8.4. Manually increase the size of the fonts. A bit of hacking! ▲
If you use a monitor with a higher resolution than HD and you have reading problems because the text fonts look very small, it is possible to "correct" this problem slightly increasing only the size of the fonts. The graphical interface of Renoise, and therefore the available API, is designed pixel by pixel. The current version of the PRE has been designed to allow this small increase in fonts, at least by 2 points.
To increase the fonts, follow these steps:
- Run Renoise, go to "Renoise: Preferences / GUI: Pattern Editor" and establish "Font Size" in "Huge".
- Close Renoise.
- Go to the installation folder (for Windows): "C:\Program Files\Renoise 3.2.1\Resources\Skin\Fonts".
- Increase there the values of the two XML files "PatternConfig.xml" and "Config.xml", add at least 2 points to each value:
- Save the changes to both files and run Renoise. Now you should see the largest fonts. Remember that it is also possible to change the font type.
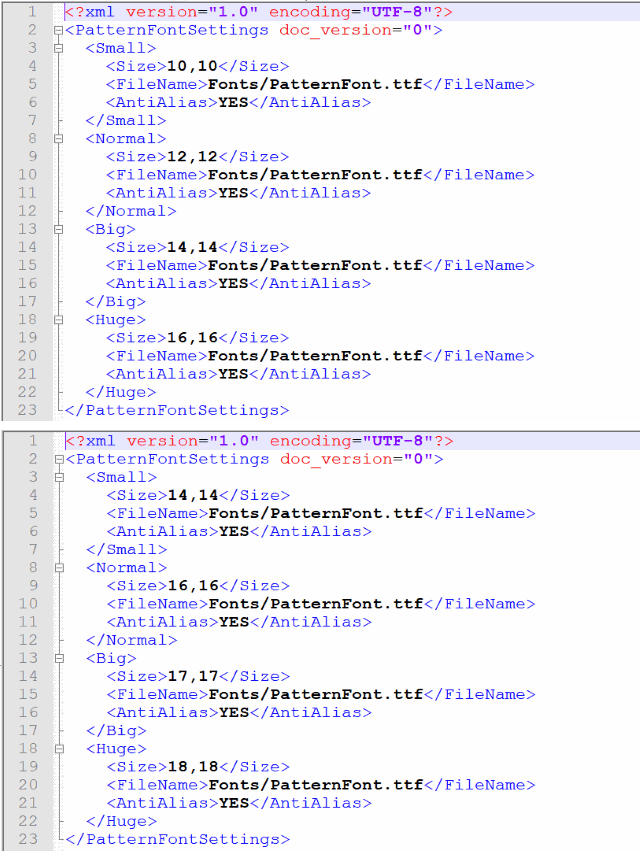
PatternConfig.xml. Above the original version. Down the augmented version.
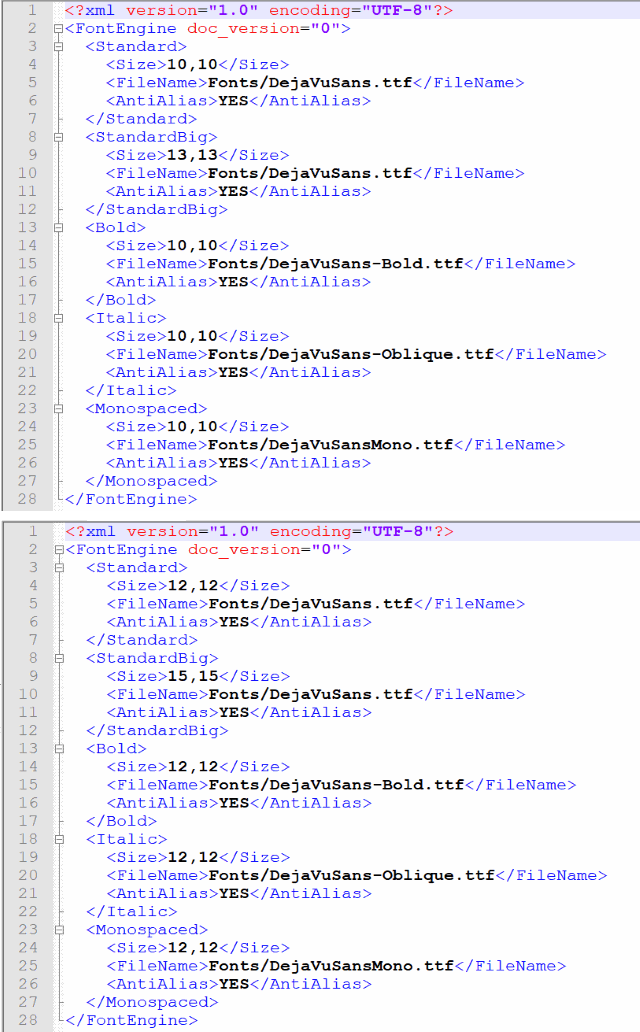
Config.xml. Above the original version. Down the augmented version.
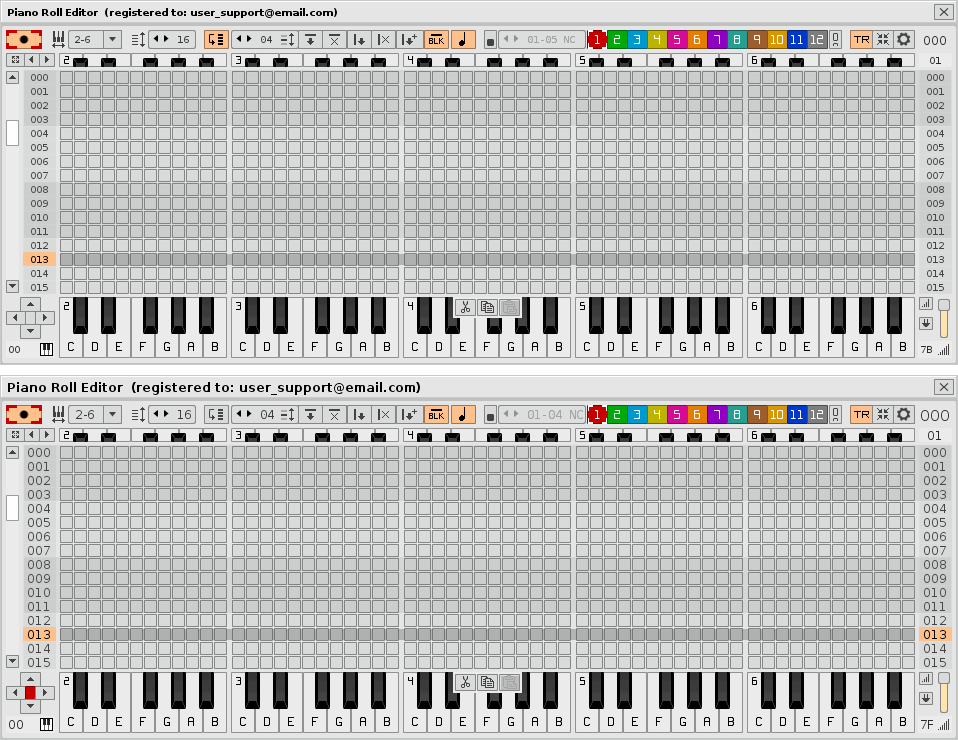
PRE with the original font size and augmented approximately 2 points.
The Miscellaneous panel allows you to configure or customize some PRE options:
- Change the divisor of the command [CTRL Q] to select a block of dividing lines of the pattern (1/1 to 1/32).
- The "N&FX" switch is for the PRE to also cut-copy-paste all effect columns (FX1 to FX8) of the pattern when the cursor is within a note column.
- Show or hide the CCP panel (Cut-Copy-Paste) that appears above the lower virtual piano.
- Use one of two "Hex" or "Dec" modes to change the numbering lines of the PRE in hexadecimal or decimal, as in Renoise.
- The piano notation allows you to switch between the Anglo-Saxon notation C, D, E ..., the Latin notation Do, Re, Mi ... or hide it for the lower virtual piano and the Chord Builder piano.
- MTR mode allows routing of the destination track to record notes with the lower virtual piano, with a range of +0 to +16, from the selected track (only for MIDI input).

Miscellaneous panel. Sequence panel. Metronome panel with sliding bars for MBxx and MLxx.
The Metronome panel allows you to use 2 new parameters, MBxx and MLxx, which are used to modify the behavior of the metronome throughout the sequence of the patterns, using the first two effect columns of the master track:
- Use the MBxx parameter (01 to 10 in hexadecimal) to modify the number of pulses per bar in column FX1.
- Use the MLxx parameter (00 to 256 in hexadecimal) for the number of lines per pulse in the column FX2.
Pay attention. Renoise 3 does not allow you to change the number of pulses per bar or the number of lines per pulse during song playback through effect parameters. If you use these 2 parameters, they will only obey the PRE, but if it is not installed, there is no problem that they are present in the patterns. Renoise can ignore a lot of unused or free parameters (without any assignment).
The Sequence panel offers another way to show track playback of the song. Instead of a smooth-track reproduction, chasing the position of the reproduction, it allows slow playback, using the same jump repeatedly. In this way, tracking song playback is more static, and therefore easier to read.
Some buttons to invoke specific windows are also included. These windows represent other integrated tools for PRE with specific utilities.
8.6. Time Calculator window. ▲
The Time Calculator window is very useful to define the compass to use in the pattern according to the chosen musical style, the metronome configuration, number of measures and the number of lines of the pattern, as well as the values LPB (lines per beat) and BPM (beats per minute).

Time Calculator window.
This window not only calculates the duration of the line (in milliseconds), the duration of the bar (in seconds) and the duration of the pattern (in seconds), but also establishes the number of note figures (pulses or beats) according to the selected bar (3/2, 4/4, 6/8...) and shortens the distance between a tracker and a musical score. For the composer it will be easier to configure each pattern and to control the times better, a task that can be somewhat cumbersome when beginning to compose.
8.7. Sequence Times window. ▲
Unfortunately, Renoise 3 does not have a timeline for the sequence. This serious lack, for example, prevents Renoise from composing original soundtracks, which is music synchronized with a movie. The following window, far from being a definitive solution, can help the composer to better understand the song times, specifically the accumulated duration of each pattern at the end of it. The window returns the indices of the sequence (idx), the number of lines of each pattern (nol), the duration of each pattern (m:s) and also the cumulative duration for the entire musical composition at a fairly high resolution (h:m:s).
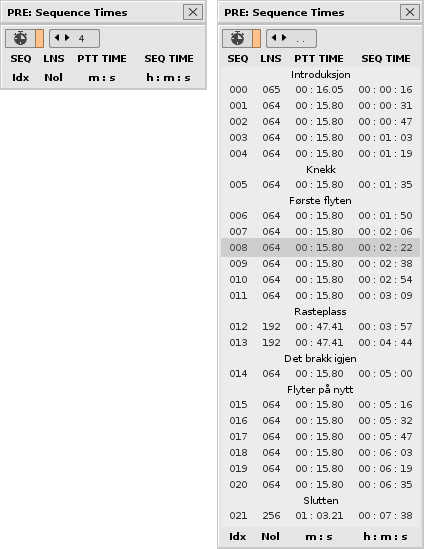
Different views of the Sequence Times window. Accumulated times (h:m:s) of each pattern in the sequence.
Pay attention. This window solves some calculations in a limited way, and does not do it in real time (it is necessary to press the upper left button to recalculate). It will only address the parameters ZTxx (BPM) and ZLxx (LPB). The rest of the parameters that influence the duration of the song will be ignored, as well as any parameter related to the time of the song that comes from the automation editor. Unfortunately, with the current API (Renoise 3.2.1) it is impossible to obtain the correct calculations, and less in a quick or instantaneous way. A timeline in the sequence that shows the duration of each pattern as well as the cumulative duration of each pattern in the sequence should be an optional feature, developed under the hood of Renoise and fully integrated, something impossible to solve through a tool.
8.8. Hexadecimal to Decimal Converter Window. ▲
The following window is a utility that will help to better understand the hexadecimal and decimal values. This window has an X-Y coordinate panel to define a hexadecimal value from 00 to FF, obtaining the decimal equivalent value (or vice versa) by means of the represented area, which is a mesh of 256 values in decimal notation, from 0 to 255.
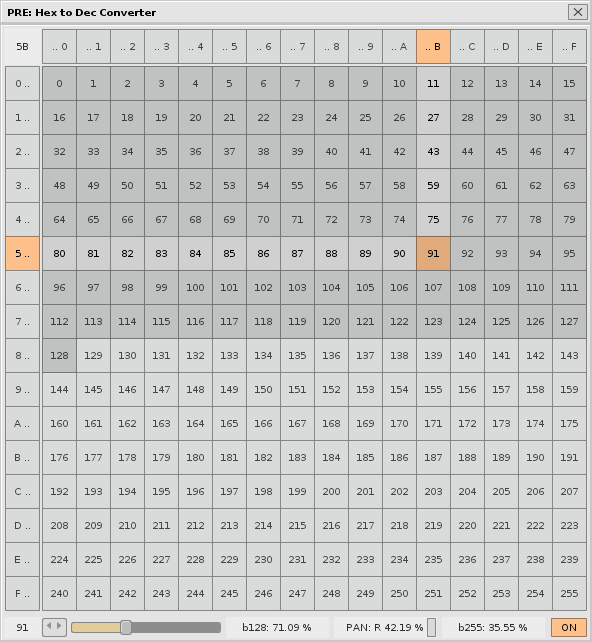
View of the Hex to Dec Converter window. Conversion of different values (hexadecimal to decimal and vice versa) and several %.
It is also possible to obtain the percentage based on a range of 0 to 128 values (b128) or based on a range of 0 to 255 values (b255), valid for volume or delay values, for example. Likewise, it is possible to obtain the percentage of the panning, in a range from 0 to 128, that is, it will return a value between L 100% ... L 1% ... C 0% ... R 1%. .. R100% (both left and right is calculated with a distance from 0 to 100%). In addition, it has a dedicated button to obtain the reverse value in the panning. For example, for hexadecimal value 19, its hexadecimal back is 67. This is especially useful for playing with panning values.
8.9. Velocity Histogram window. ▲
The Velocity Histogram shows to the composer a visual registry of the pulse velocity while playing, very useful for MIDI devices (keyboard or pad) with velocity sensitivity when pressing the keys. This facilitates accuracy when playing a MIDI keyboard and even allows you to check if the MIDI device is of high quality. If you find it impossible to achieve very low pressure (too little) or too high pressure (heavy), it will mean that the MIDI keyboard is not "very sensitive and precise".
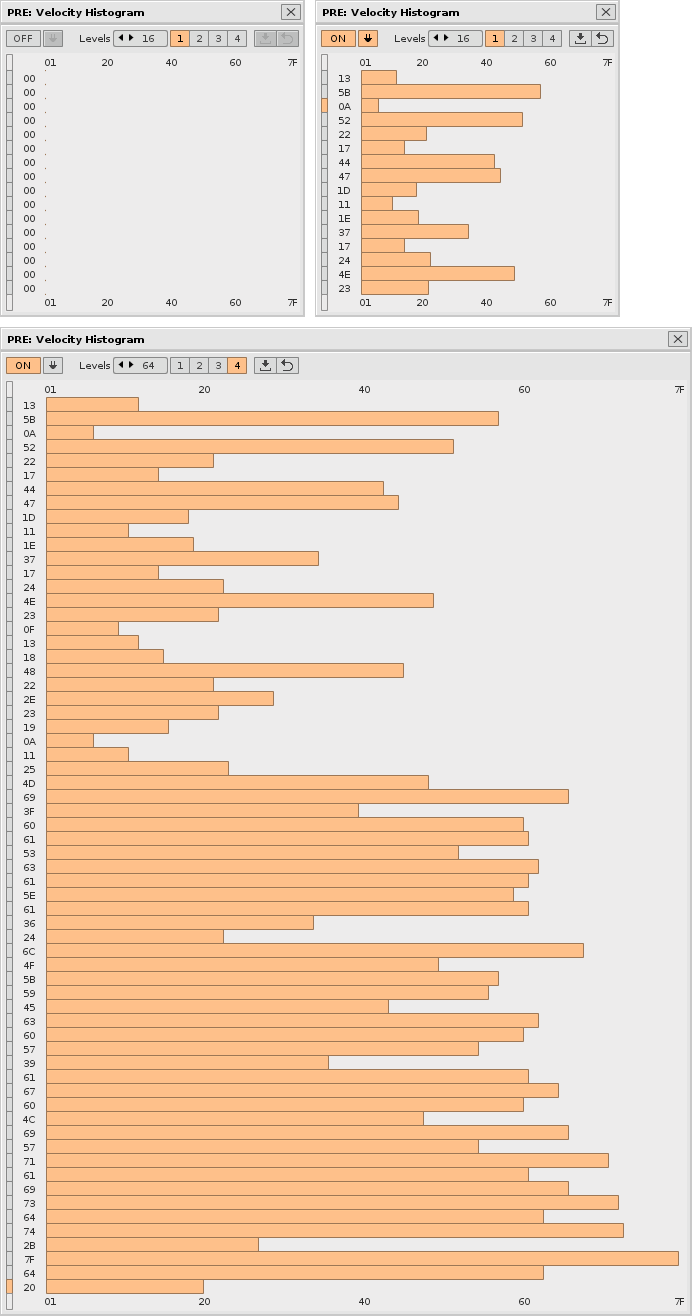
Views of the Velocity Histogram window. Visual control of the pulsation velocity sensitivity.
It is possible to modify the number of velocity levels from 1 to 64 levels, and use up to 4 levels of horizontal zoom for greater visual accuracy. Be sure to enable the plug switch so you can use the pulsating velocity sensitivity.
With the Velocity Histogram it is also possible to restart the registration sequence (start over), jump position or recover the previous position. Finally, it is possible to import up to 64 levels of the selected track pattern, from the selected line. This is especially useful to comfortably check all the volume levels of each note visually, and even be able to compare them.
8.10. Phrase Manager window. ▲
The next window is a complete phrase manager quite intuitive. It serves so that the composer has a more general and quick idea of all the phrases contained in each instrument. You will have an overview of the phrases, with all their main characteristics (Index, Phrase Name, Number of Lines, LPB, Shuffle, Autoseek, Looping, Key Tracking and Base Note) visible and accessible in a single sorted panel.
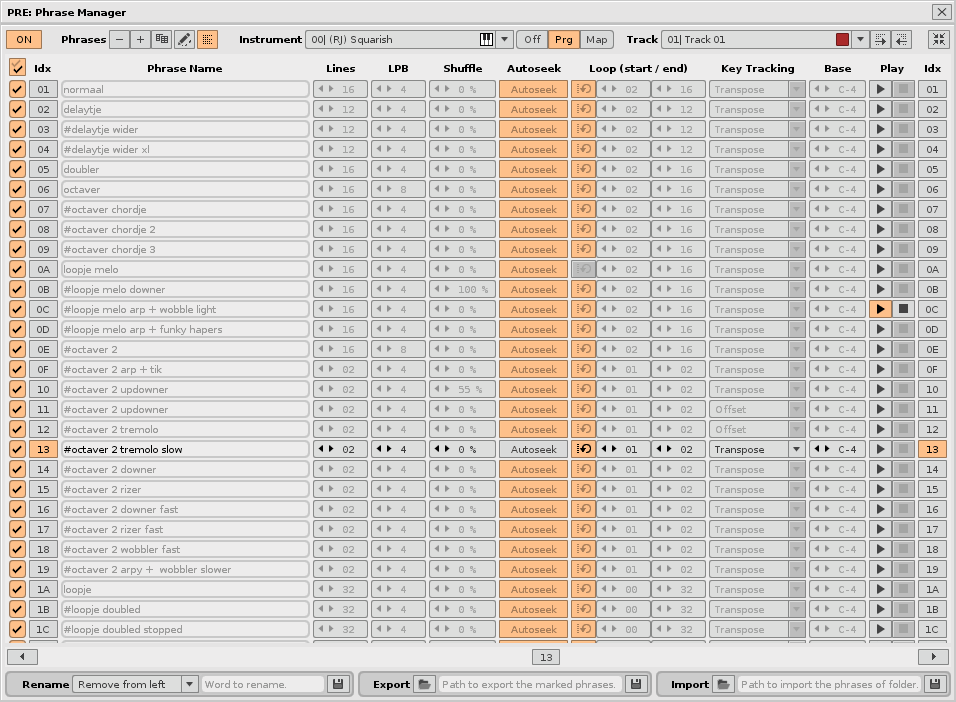
View of the Phrase Manager window. Manage phrases easily together.
The Phrase Manager allows several operations, useful to sort and classify phrases better to save them in folders and identify them better. Its main capabilities are:
- Delete, insert or clone a phrase.
- Cumulative edition of names, with dedicated switch.
- Multiple edition of several names at once, with more than 10 options to rename. For multiple selection, the markers in the left column are used.
- Multiple mark/unmark and reverse the phrases to edit their names or export to a folder.
- Specific multiple phrase export in a folder, using marks for multiple selection.
- Import all the phrases in a folder at once (up to 126 phrases in cumulative form).
- Multiple direct access to properties: Lines, LPB, Shuffle, Autoseek, Loop (start/end), Key Tracking and Base Note, of all sentences.
- Individual direct pre-listening of all the phrases of the instrument (the sound is played through OSC).
- Export the selected pattern-track (from the current line) to the selected phrase. If there is no phrase, one will be created.
- Export the selected phrase to the selected pattern-track (from the current line), keeping the number of lines in the pattern.
When Phrase Manager shows a limited number of phrases, a horizontal navigation bar will automatically appear in the lower area. It can list up to 126 existing phrases of the selected instrument.
On the other hand, like the previous windows, with the Phrase Manager window in the foreground, it is also possible to use the PRE keyboard commands. For example, use [SHIFT NUMPAD-] and [SHIFT NUMPAD +] to jump between phrases of the same instrument.
Caution! When exporting a set of phrases to a folder (which will be called equal to the selected instrument), the phrases with the same name will always be overwritten (the name will be the same as the name of the XRNZ file of each saved phrase). Therefore, it is very advisable to always use different names in phrases. If some phrases have the same name, at least it is advisable to list them with multiple renaming options. On the other hand, know that to pre-listen a phrase with the "Keymap" mode activated, the phrase must be mapped on the virtual piano of the instrument.
9. Advanced editing operations.
PRE also includes a wide battery of functions for advanced editing operations for the pattern editor and for the automation editor. These functions are accessible by means of modules or small panels separated from each other. Invoke the preferences window and click on the "Advanced Operations" tab to access it. In this way, the composer can use the piano roll to edit through it or use in parallel all these editing controls, most of them destined to modify parameters in groups.
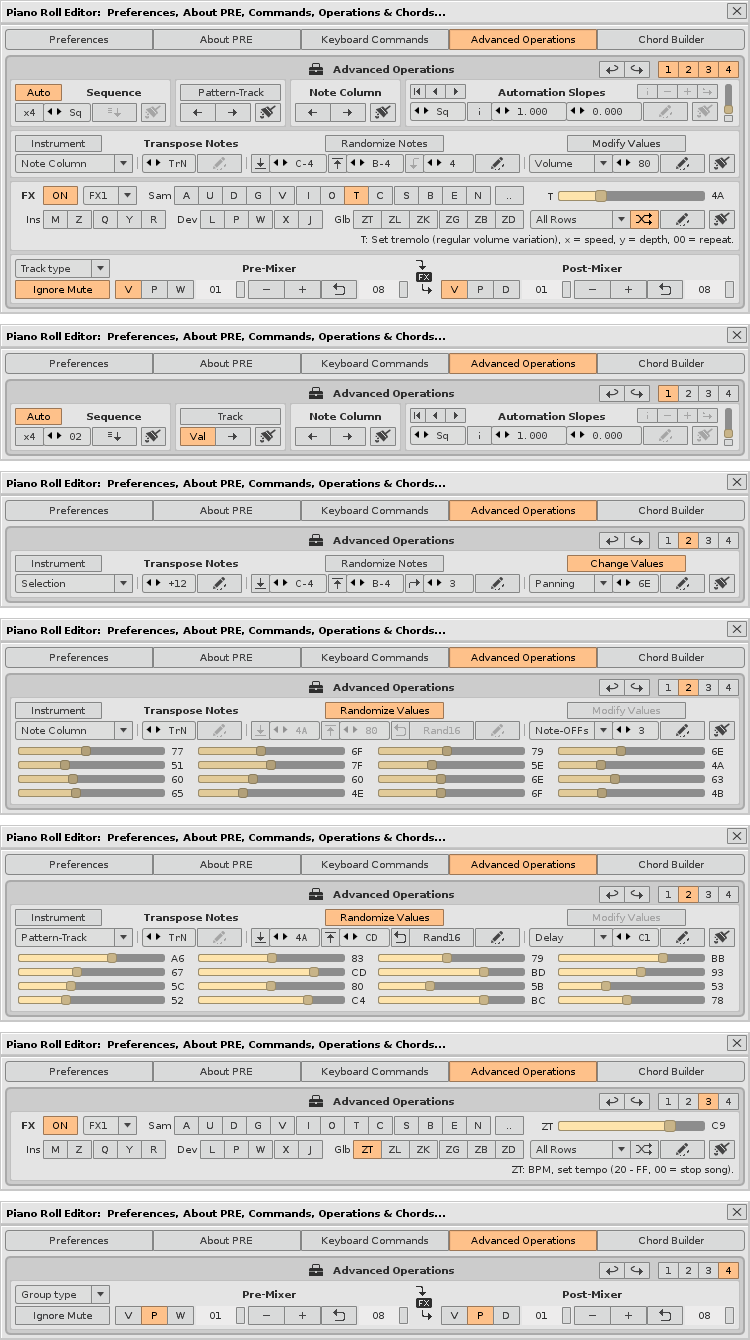
"Advanced Operations" window. For the pattern editor and the automation editor...
In the following list are named the capabilities of this battery of functions, distributed in 4 panels:
- Panel 1:
- Auto-frequency capability ("Auto" switch). While activated, it will automatically insert a new empty pattern always at the end of the sequence. The new pattern inserted will take the number of lines from its previous pattern.
- Cloning of the sequence in a range between 1 and 32.
- Copy of pattern-track to left or right. Remember that a "pattern-track" is equivalent to a slot in the pattern matrix. It implies the overwriting of the parameters.
- Track cloning to the right, with or without parameters included.
- Copy of note column to left or right. It implies the overwriting of the parameters.
- Automation slopes for each pattern. It allows to generate slopes and curves of 2 points per pattern-track for a selectable range of up to 64 pattern-tracks, or else the entire track. This module is experimental. You can try to generate curves with it for very specific cases that encompass many contiguous track patterns at the same time.
- Panel 2:
- "Instrument" button to substitute the value of the instrument. Pre-select a slot in the instrument box and a selection area in the lower selector (line, note column, pattern-track or selection area with the mouse).
- Group transposition of notes with a range of ± 24 semitones (± 2 octaves). Pre-select a selection area (line, note column, pattern-track or selection area with the mouse).
- Advanced ordered randomization of note groups for specific areas, with control of note range (low and high), number of notes and line skipping. This operation is tremendously powerful.
- Group modification or substitution of parameters, for volume, panning or delay. Pre-select a selection area (line, note column, pattern-track or selection area with the mouse).
- Group insertion of shutdowns of notes according to a number of lines with respect to each note.
- Accurate group randomization of parameters, for volume, panning and delay, by means of 16 sliding bars. It allows controlling up to 16 values that will be used in each process. Use it to humanize or to increase the panning in percussion sections.
- Panel 3:
- Full "FX module" for advanced editing of effects parameters and quantities for the pattern editor. It allows the manipulation of the main effects, both the effect type and the quantity, both in the columns of notes and in the columns of effects.
- It also allows the randomization of quantities or blocking the type of effect to change their amounts, among other things.
- Panel 4:
- The "Mixer module", for the control in group of the sliding bars from the Mixer (buttons - +).
- It allows to select the type of tracks, the range of tracks, to ignore or not the muted tracks and to control the sliding bars directly in the Pre-Mixer or in the Post-Mixer.
10. Chord Builder. Construction of chords or percussion.
Chord Builder is another powerful module integrated within the PRE; for Renoise it is like an integrated tool within another tool to complement it. This versatile "chord generator" concentrates its potential in the sectioning of up to 16 groups of notes to play separately, with the distribution of specific instruments in adjacent tracks and in the "construction" of chords or percussion, which basically involves adding two or more notes to be fired and stopped at the same time from a single key, this being any of the 120 piano keys.

Instrument editor of Renoise. "Mono" switch disabled!
Pay attention. To use the Chord Builder the mono restriction of the instrument must be disabled; "Mono" switch disabled in the instrument editor. If the Mono switch is enabled, it will only record the last note of the chord builded.
The Chord Builder module allows you to generate chords manually or load up to 59 predetermined chords of between 2 and 7 notes, loading them in an interface of up to 4 octaves (48 notes), with inversion capacity (jump of an octave), displacement of the chord to add more notes to the left or right of it, or adjust the chord according to a certain scale, being able to superimpose the notes of any chord on any scale. Through a dedicated button it is also possible to import automatically sorted chords from the selected line of the pattern editor. All these capabilities provide a wide range of possibilities, not limited to a closed pad of buttons to trigger chords according to a scale, but goes much further.
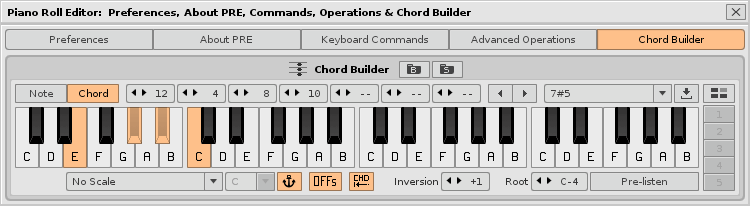
Chord Builder. With charge of chord "7#5" with first inversion.
Chord Builder is linked to the superior mirror piano of the PRE (the small one). Press the switch on "Chord" to play through this piano the built chord. Each key will play the entire chord. It is very easy to play or record the chord directly from the 120 piano notes. Each of these keys represents the first note (tonic) or "root" of the built chord and each chord can be automatically adjusted to a certain scale (both its sound and its recording). If the switch is in "Note" each key of the superior mirror piano will play its natural note. Chord Builder is not linked to the lower virtual piano of the PRE (the big one), it can only trigger individual notes.
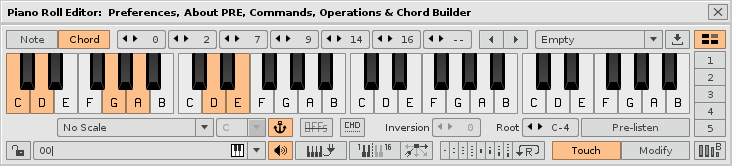
Chord Builder. With manual loading of groups of notes for percussion.
With the percussion kits or groups we work in a similar way. Pre-load an instrument that is a percussion kit or similar. Build your group of notes with the Chord Builder to trigger them from a single key through the superior mirror piano of the PRE, as if it were a chord. You can trigger up to 7 notes at a time in a range of up to 4 octaves.
The Chord Builder module allows you to accompany each chord of Note-Offs to cover up to 7 columns of notes on the same line. This serves to prevent any note from continuing to sound by changing chords with different number of notes along the sequence. To use it activate the "OFFs" switch. For example, a chord "C-D-F#" would be inserted as "C-D-F#-OFF-OFF-OFF-OFF".
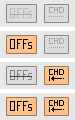
Chord Builder. Insert switch of Note OFFs (left) and switch for cleaning and forced line for chords (right).
On the other hand, it is possible to clean previously and automatically the selected line to introduce a new chord, and that it always starts in the first column of note of the track, always more to the left. This is useful to avoid, as far as possible, the accumulation of notes within the same line, which in Renoise is limited to 12 notes per track. For example, if 2 chords of 7 notes were inserted, they would be 14 notes, exceeding this limit, whose result would be a cut of the second triggered, losing 2 notes. To activate it, use the switch of cleaning and force the line.
10.1. Create and play a chord. Inversions and displacements. ▲
To manually create a chord, first activate the module by pressing "Chord". Next, press and drag down on each of the 7 valueboxes of notes to add notes quickly, always starting on the left. Once you have adjusted the notes to make the chord, press the "Pre-listen" button to listen or even insert the result. You can change the tonic note from the "Root" valuebox, which will only affect this "Pre-listen" button. Changing the value of "Root" will shift the whole chord of pitch.
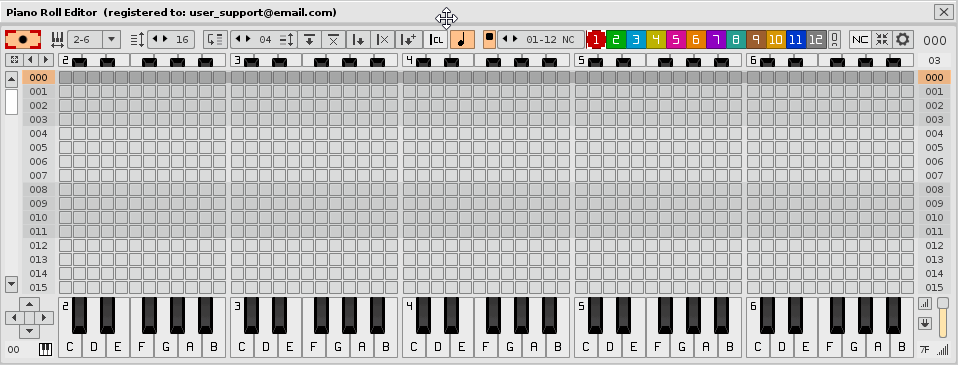
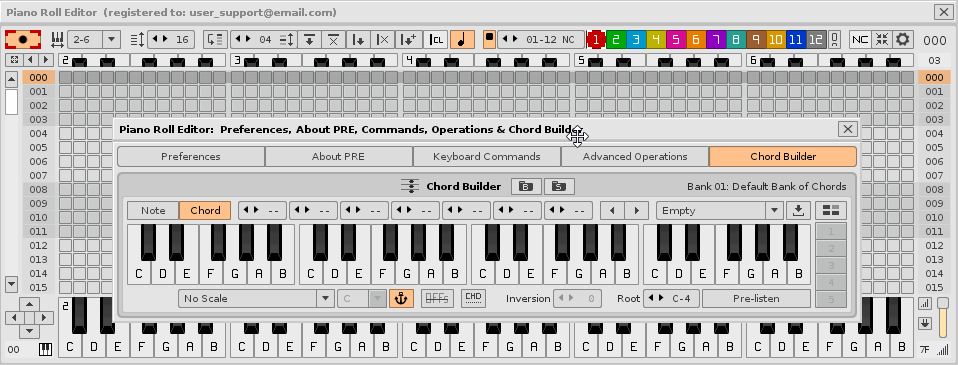
Chord Builder. Create and insert a chord.
You can also invest any chord in up to 7 inversions, using the "Inversion" valuebox, a procedure that will modify the original chord. Chord Builder does not limit the type of chord, so, to invest it is advisable to use chords whose notes are within a single octave, which are usually 3 to 5 notes.
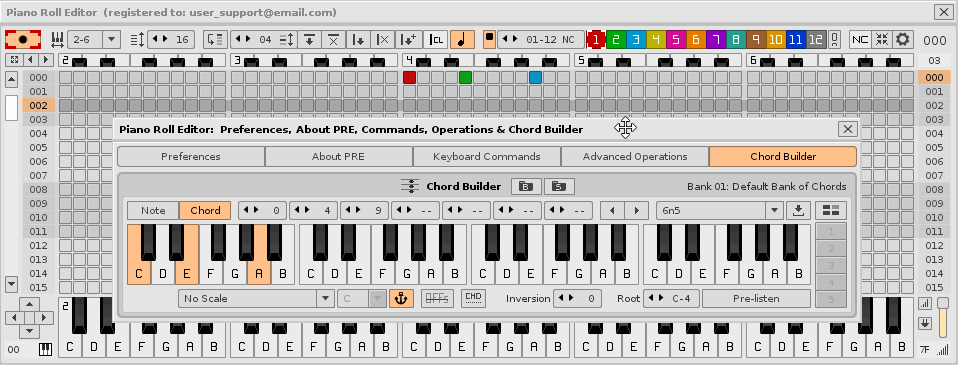
Chord Builder. Inversion in a chord.
In addition to the inversion, Chord Builder also allows you to move the built chord, without modifying it, within a range of 4 octaves. This allows freeing space to the left of the chord to add other notes to it. In this way, it is possible to add more notes both to the left and to the right of the chord to add more strength. To move the chord, use the left and right buttons placed on the left side of the drop-down list of the default chords. To record the chords of the Chord Builder use the superior mirror piano of the PRE (with the mouse or with the MIDI input) or press the command [SHIFT ALT] and click in the roll directly.
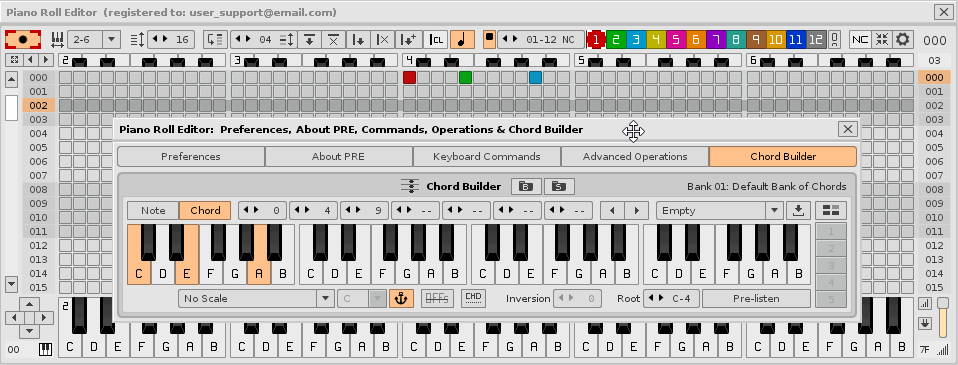
Chord Builder. Displacement of a chord with additional note.
10.2. Load predetermined chords and modify them. ▲
To load a predetermined chord, first activate the module by pressing "Chord". Next, open the chord drop-down list and select the desired default chord. You will see that the boxes of values load the number of each note (0, 1, 2, 3, 4...), showing the type of note on the keys of the lower piano (C, C#, D, D#, E...). After loading the desired chord, it will be possible to modify it if necessary, through the valueboxes of notes.
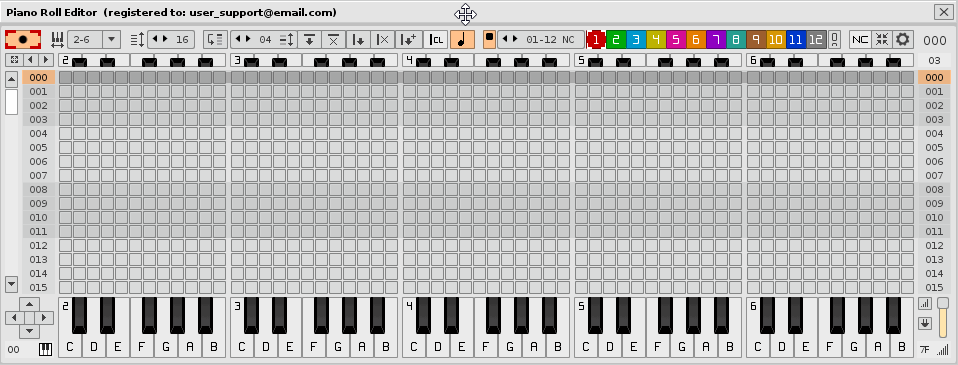
Chord Builder. Load and insert a predetermined chord.
10.3. Load scale templates. Play auto-adjusted chords. ▲
Chord Builder harnesses the potential of the Instrument editor of Renoise to adjust the chords to the available scales. Go to the instrument editor of Renoise by clicking on the "Sampler" tab and focus on the scale drop-down list, whose default value is "No scale". Now go to the Chord Builder module of the PRE and change the scale of the lower scale template drop down list, with the anchor switch activated.
This activated anchor switch will match the scale of the Chord Builder with the scale of the Renoise instrument editor, within the selected instrument. If the anchor is not activated, the scale shown on the Chord Builder piano will only be a visual template, which will make it easier to adjust the chord manually to a certain scale. However, if the anchor is activated, it will force to sound and record the notes of the chord within this scale, adjusting it automatically, even if the chord notes are not within the chosen scale.
Rembember that to record the chords of the Chord Builder use the superior mirror piano of the PRE (with the mouse or with the MIDI input) or press the command [SHIFT ALT] and click in the roll directly.

Chord Builder. "Pentatonic Minor" scale template anchored. Insertion of chord "6#5" autocorrected according to scale.
10.4. Create and play percussion kits. ▲
Like the chords, it is possible to do something similar to trigger several notes for percussion. Follow the same procedure as in point 10.1. Create and play a chord. Inversions and displacements. loading the notes manually from the Chord Builder, according to the instrument's percussion kit, which will have a certain order of notes for each sample. In this way, you can play up to 7 notes at a time from a single key. Use a Renoise native XRNI instrument or a percussion VSTi, for example, with libraries for Native Instruments Kontakt Player or similar.
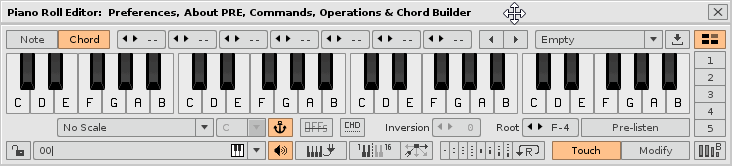
Chord Builder. Load a group of notes for percussion.
10.5. Banks of chords. Use 120 slots to play and save custom chords. ▲
Chord Builder has up to 99 banks of chords with up to 120 slots each distributed in a grid, divided into 5 groups of 24 slots. Each slot is represented by a button numbered 1 to 120, with the saved name of the chord. This name only accepts up to 20 characters of text, including blank spaces.
Chord Builder. Show/hide the slots groups of chords.
To show or hide the panel of the slots of chords press the upper right button. Below it there are 5 buttons numbered from 1 to 5 to show or hide the groups of slots. In this way, you can show all the groups, one of them or the combination of several.
The bank panel has a padlock switch to lock the selected instrument. Place the padlock closed to hold the desired instrument to play the chords. In this way, you can navigate through the Renoise instrument box to play another instrument at the same time.

Chord Builder. Padlock for instrument and modes.
The speaker switch allows you to enable/disable the sound of the 120 chord pads. When it does not sound, it will not be edited in the pattern editor of Renoise. This option allows you to change the chords on the fly from the chord pads of the Chord Builder while playing the superior mirror piano, very useful for experimenting with live recording.
Also, the bank panel has two modes: "Touch" (switch in "Touch" position) or "Modify" (switch in "Modify" position). In "Touch" mode, the 120 buttons trigger or stop the stored chords. In "Modify" mode, a text box will open to modify the name of the chord and save it in the desired chord slot. Then, each button will serve to save your custom chord, and will remain saved in the PRE even if you close your Renoise session. Return to "Touch" mode to play the saved chord again.

Chord Builder. Make a backup of all chord banks.
Pay attention. The 120 slots are stored in a bank in XML format in the "chord_banks" folder that is inside the root folder of the Piano Roll Editor tool. All slots of the selected bank are recharged each time the tool is rebooted. Therefore, you can save the "chord_banks" folder in a safe place as a backup if you want to keep your personalized chords saved. To do this, below there is a button to perform a backup, called "Backup All Chords". If you uninstall or reinstall the tool, these custom banks will be lost. Please make a backup copy of this folder if you need to keep the banks with your custom chord slots. To restore it, you only need to replace the folder that you previously saved.

Chord Builder. Chord banks in "Touch" mode. Play chords from the chord slots 1 to 24.
In "Touch" mode, the 120 buttons are like pads to trigger/stop chords. Show the banks you need to play. When you play a chord, it will play on the top and bottom pianos of the PRE, that is, you can record the chord in the roll, and therefore in the Renoise pattern editor. In this way, you can play or record up to 120 manually configured chords. You can also touch the "Pre-Listen" button and change your "Root" to test the chord tone. Remember that you can use the superior mirror piano of the PRE if you want to play the chord along the 10 octaves.
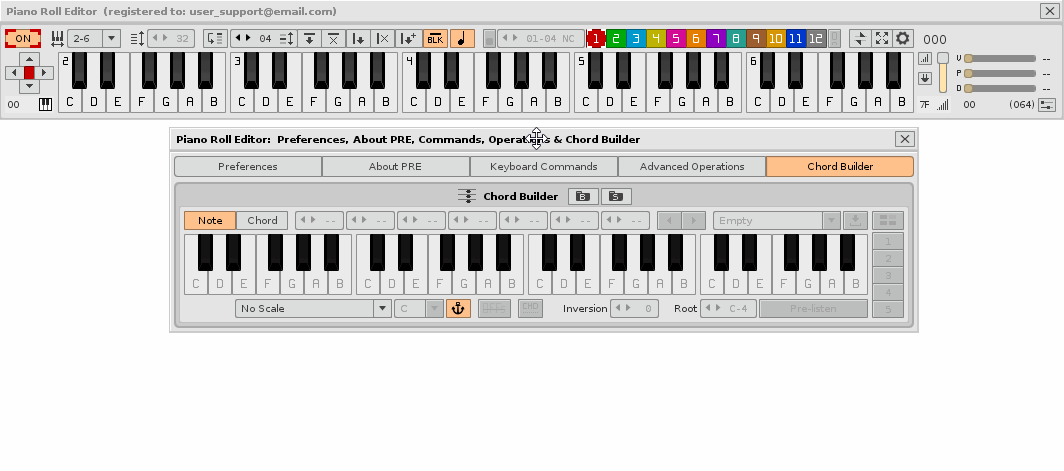
Chord Builder. Banks of chords in "Modify" mode. Modify a chord, rename it and save it in a slot.
120 chord slots are available for each bank. To modify and save a custom chord slot manually, follow the steps below:
- Pre-configure the desired chord. The distribution of the 7 notes, the scale and its tone (C- to B-), and the tonic note (C-0 to B-9) will also be saved.
- Change the switch to "Modify" to activate the "Modify" mode.
- Write a name that remembers the chord, with up to 20 characters. If the name is longer, it will be automatically trimmed. The "root" selector and the chord drop-down list can also rename automatically.
- Press any of the 120 buttons where you want to save the custom chord. This will save that chord.
- Ready. Change the switch to "Touch" to play your custom chord from the grid.
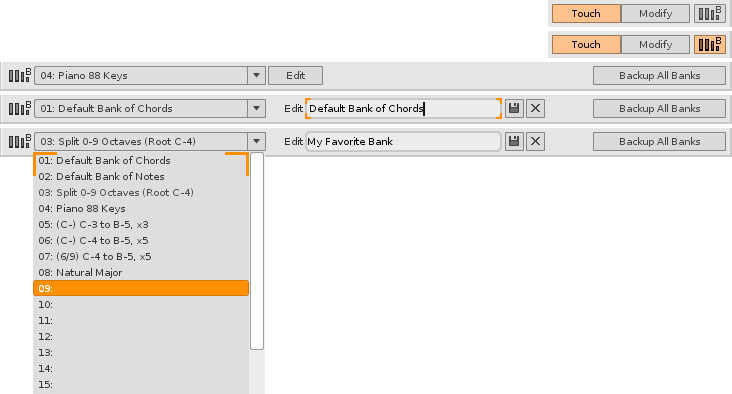
Chord Builder. Rename and save the selected bank.
There are 99 banks available. To manually save the selected bank, follow the steps below:
- First make sure you save at least one chord slot by following the steps above, if it is not already.
- Open the lower bank editing panel by pressing the "Banks" switch. The bottom panel will appear to select/rename the banks.
- Press the "Edit" switch to change the name of the bank.
- Enter a name and press the save button.
- Ready. You can use the left selector to change bank and rename it again.
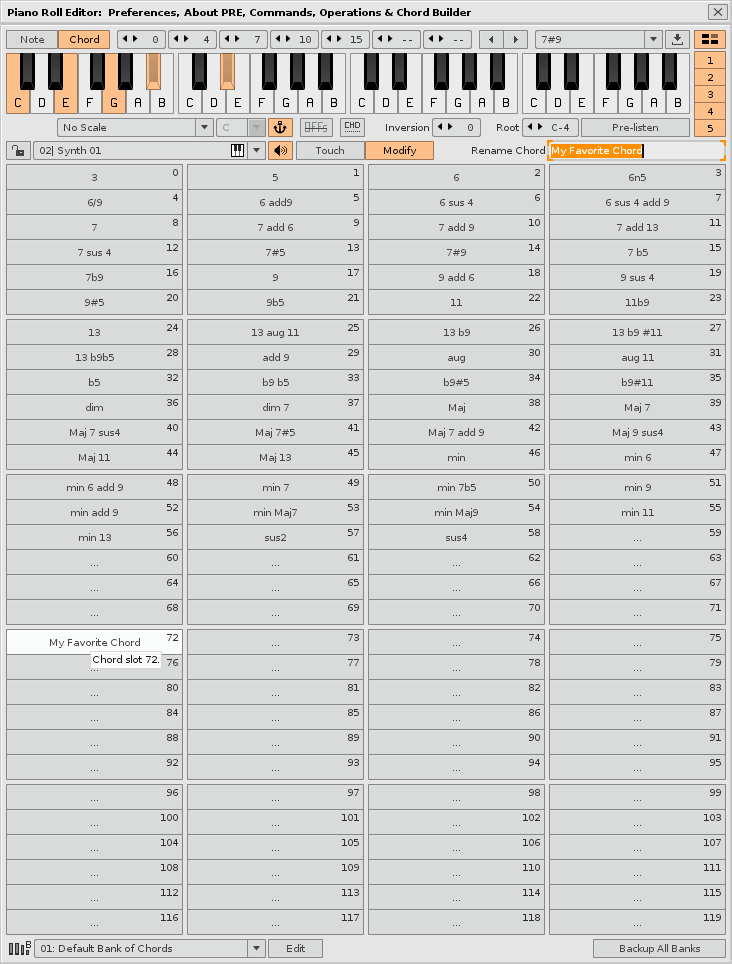
Chord Builder. Chord bank in "Modify" mode. All slots fully deployed.
Chord Builder is also completely MIDI mappable. You can use your MIDI controller (keyboard or pad) to control the Chord Builder through the MIDI input. Remember that you can map both Renoise, PRE and Chord Builder at the same time. Combine your physical controls to get the best control results. You can use the different MIDI channels for easier multiple control.
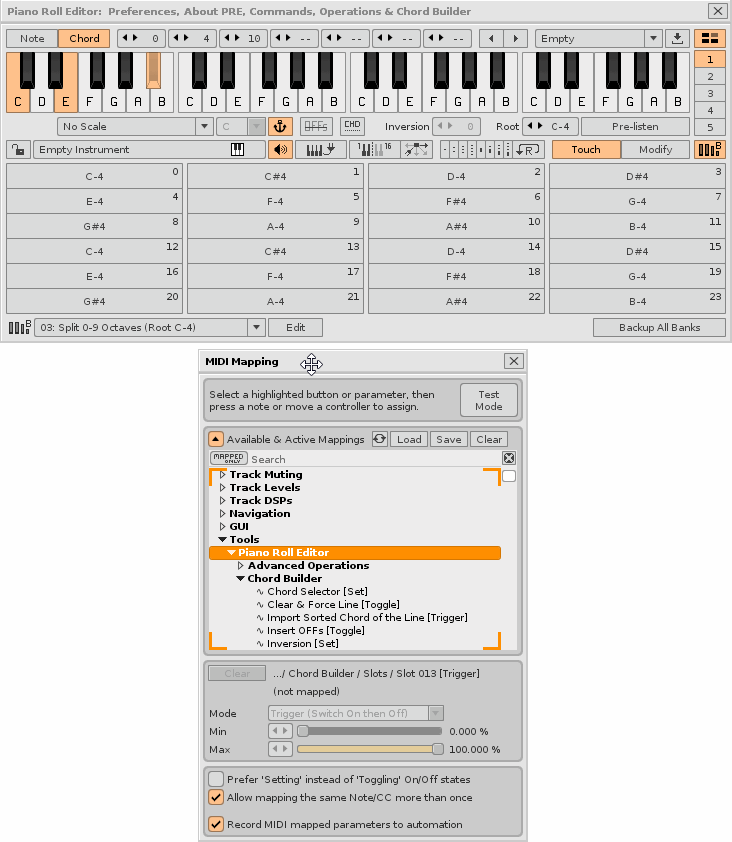
Chord Builder. Assigning the MIDI input for some controls.
To map the Chord Builder press [CTRL M] with Renoise in the foreground and navigate to the following address: "Tools/Piano Roll Editor/Chord Builder" or use all the controls in the Chord Builder window to link them with the MIDI input. Remember that you must have the OSC correctly configured so that everything works correctly.
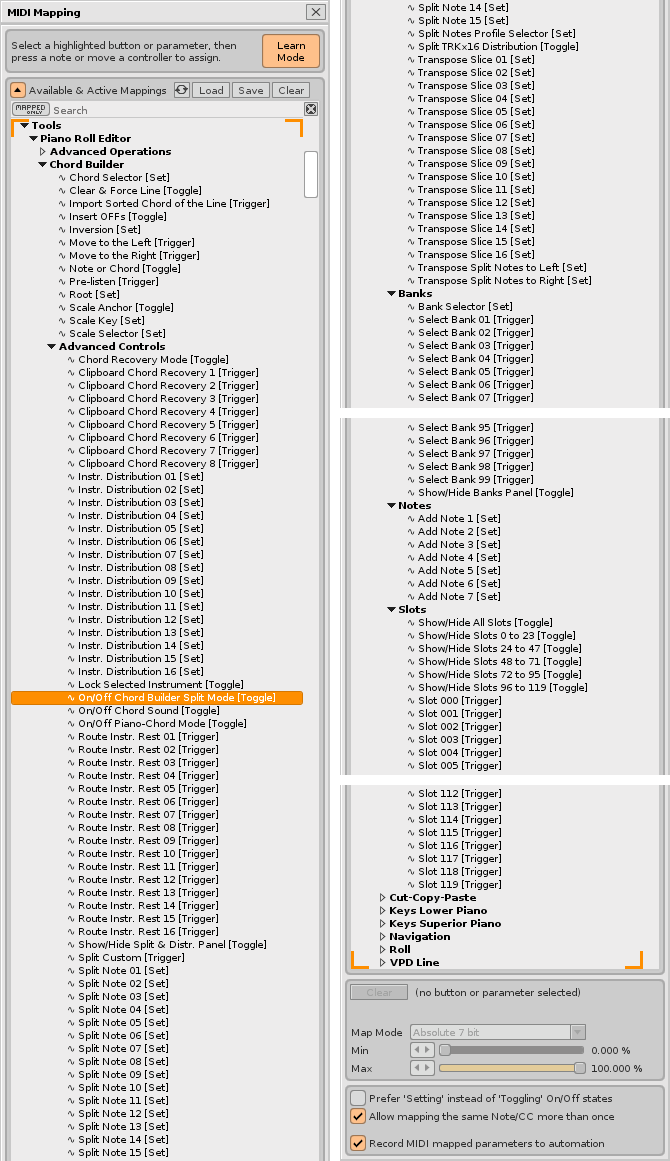
Chord Builder. Access to the Renoise MIDI input configuration. Press [CTRL M] with Renoise in the foreground.
10.6. Piano Chord Mode. Division to record on until 16 contiguous tracks. ▲
The Chord Buider also has two switches for two specific advanced uses: the chord triggering per key and the division of the octaves of an instrument (or several) to record your notes in up to 16 contiguous tracks. In addition, it also has 8 clipboards to save and reload the chord settings.
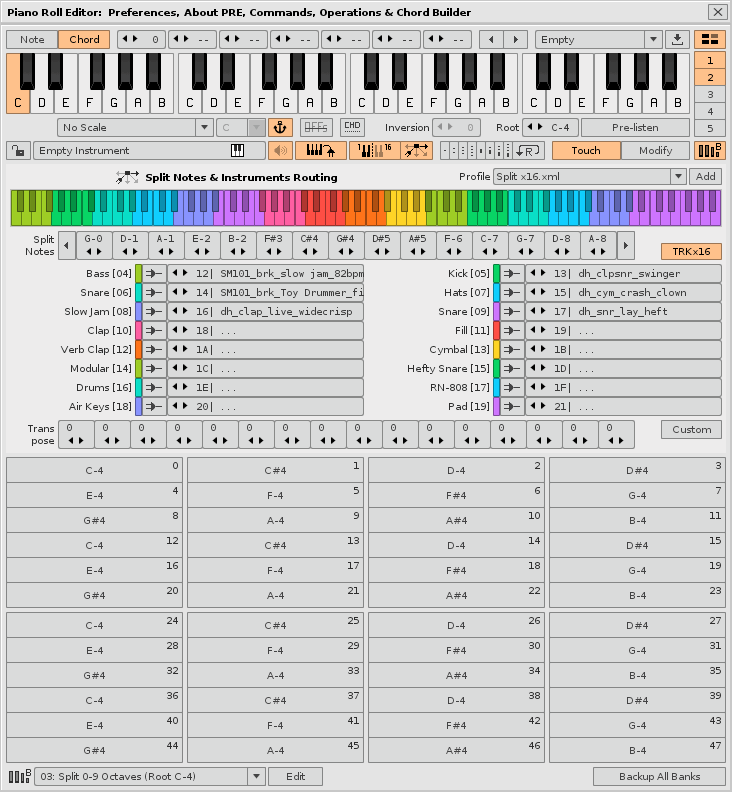
Chord Builder. General view with the "Piano Chord Mode" and "Chord Builder Split Mode" enabled.
Chord Builder has up to 8 temporary clipboards to save and load the set chord settings through the right switch. To save a chord, activate the right switch and it will light red. Then, press one of the 8 available clipboard slots to save the configuration. Once saved, deactivate the right switch again to be able to reload again any of them quickly.
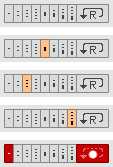
Chord Builder. Switch to save 8 clipboards.
The "Piano Chord Mode" switch has the ordered ability to associate each chord slot to a single key of the superior mirror piano, so that each key will trigger a specific chord or group of notes, valid between notes C-0 to B-9, that is, that covers the octaves 0 to 9, both inclusive. This allows you to configure up to 120 chords and their characteristics for maximum control. The composer will be able to record with great precision complex chords (or groups of notes) with a single finger of the hand (press a single key), taking advantage of the mapping of the MIDI input (mapping of the superior mirror piano).
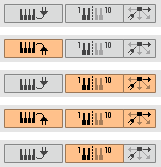
Chord Builder. Switches "Piano Chord Mode", "Chord Builder Split Mode".
The "Chord Builder Split Mode" switch enables 15 valueboxes of values (from C-0 to B-9) that allow you to divide the superior mirror piano and the pad of 120 chord slots into up to 16 groups or sections, so that each they record the notes in 1 track (switch in "Select") or in up to 16 contiguous tracks at the same time (switch in "TRKx16"). This allows you to use the same instrument or up to 16 specific instruments and to inject your notes into 1 or up to 16 contiguous tracks of notes, without moving from the selected track.
You can select a specific default profile or save custom profiles in the default container folder. The configuration of the 15 split notes, the routing of the 16 tracks, the transposition values of each slice and the state of the "TRKx16" switch will be saved in each profile. Set up and save the profile you want to use later.
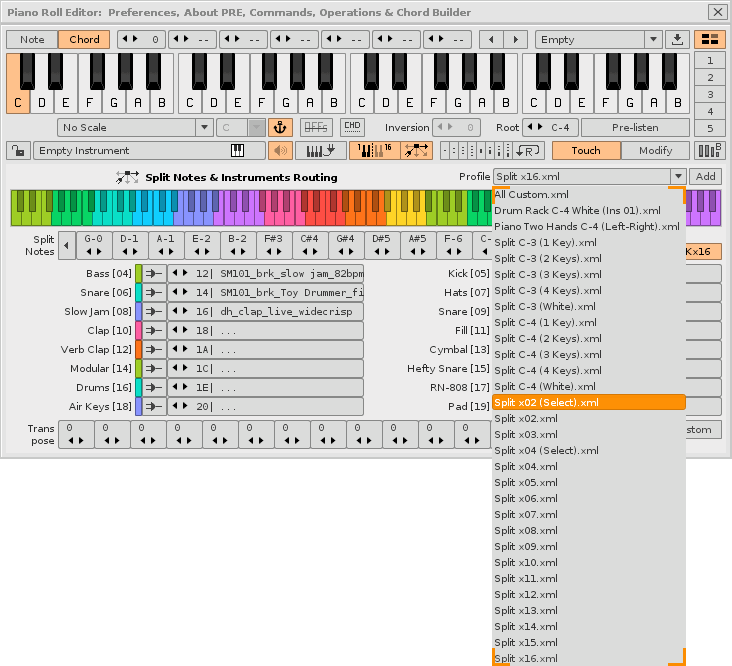
Chord Builder. Selection of the distribution of the slices.
This mode of operation will ignore tracks that are not of notes. Therefore, it is possible to slice the instrument in 2, 3 or until 16 parts, very useful for composite percussion instruments, to separate their sounds in adjacent tracks in the same recording, or for example, to divide a grand piano into 2 tracks (left hand and right hand). The drop-down list on the right allows you to select multiple quantities of slices or customize the 15 splits. An example of a distribution of 15 splits would be the following:
- Track 1: selected track. By default, C-0 to B-0. This is the reference track. (Split note 1: C-1)
- Track 2: selected track + 1. By default, C-1 a B-1. (Split note 2: C-2)
- Track 3: selected track + 2. By default, C-2 a B-2. (Split note 3: C-3)
- Track 4: selected track + 3. By default, C-3 a B-3. (Split note 4: C-4)
- Track 5: selected track + 4. By default, C-4 a B-4. (Split note 5: C-5)
- Track 6: selected track + 5. By default, C-5 a B-5. (Split note 6: C-6)
- Track 7: selected track + 6. By default, C-6 a B-6. (Split note 7: C-7)
- Track 8: selected track + 7. By default, C-7 a B-7. (Split note 8: C-8)
- Track 9: selected track + 8. By default, C-8 a B-8. (Split note 9: C-9)
- Track 10: selected track + 9. By default, C-9 a B-9.
It is advisable to use a group of until 10 son tracks, taking as "Track 1" the first track of the group, which is the reference track. In this way, it is possible to share a chain of DSP effects in the group, and control the 10 DSP effect chains of each track separately.
Chord Builder allows you to combine both switches making this tool very powerful. The composer can record complex chords of up to 7 notes on up to 16 contiguous tracks separately, using only one finger of each hand. This can be done from the MIDI input of the superior mirror piano or directly with the MIDI input of the 120-slot pad. Distribute the instruments, the tracks and the division of the note groups to trigger chords/percussion as you wish, even from the same MIDI device and the same MIDI channel.
If this way of operating is still not enough, you can even map your physical MIDI keyboard with half of the lower virtual piano to trigger loose notes and the other half with the superior mirror piano to trigger complex chords or groups of notes for percussion. All this will add many hours of fun to your musical compositions.
10.7. Take advantage of the MIDI input. Mapping of virtual pianos on several MIDI channels. ▲
Concentrating the attention on the 2 virtual pianos of the PRE, there are up to 3 ways to use the USB MIDI controller with piano, even at the same time...
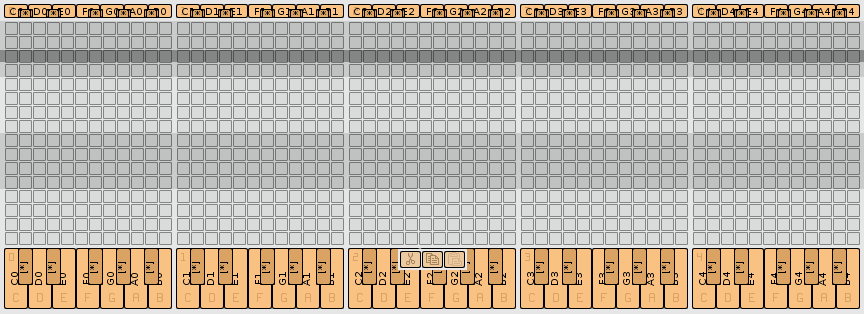
Mapping of the MIDI input for the superior mirror piano (above the roll) and the lower virtual piano (below the roll).
The first would be to simply select the MIDI device in the Renoise preferences, without doing anything else, so that the MIDI input will work directly through Renoise. In this case, PRE would not be mapped, so the virtual keys would not light up, but the piano roll would show the notes recorded with the MIDI input. But this would not take advantage of PRE capabilities or the Chord Builder module. The basic scheme would be:
- "composer → MIDI controller (channel 1) → Renoise".
The second would be to completely map the lower virtual piano of the PRE (that of the big keys), using for example the MIDI channel 2, leaving the MIDI channel 1 for the first case. This mapping would use OSC Server to command the MIDI commands from the PRE, so that the lower virtual piano keys would also light up. The basic scheme would be:
- "composer → MIDI controller (channel 2) → PRE tool (lower virtual piano, for individual notes) → OSC connection → Renoise".
The third would be to completely map the superior mirror piano of the PRE (that of the small keys), using for example the MIDI channel 3. This mapping would also use the OSC Server to command the MIDI commands from the PRE, allowing at the same time to play the lower virtual piano from the same MIDI controller, simply by changing the channel (or even using a second MIDI controller). This allows you to use the superior mirror piano to trigger chords (or groups of notes) from individual keys, and at the same time, the lower virtual piano to play notes naturally. The basic scheme would be:
- "composer → MIDI controller (channel 3) → PRE tool (superior mirror piano, for chords) → OSC connection → Renoise".
There are other ways to map to combine individual notes with chords. For example, mapping half of the piano of the MIDI controller to the lower virtual piano of the PRE and the other half to the superior mirror piano of the PRE, or altering complete octaves, may be useful in certain cases. Of course, after mapping everything, it is advisable to save the Renoise XRNM MIDI file for later compositions, so that this mapping procedure is only necessary once and will be valid for all our compositions, thus saving a lot of time.
Remember that once you can play the MIDI controller to record notes or chords or groups of notes from individual keys, you will need to have the PRE enabled on "ON", the "edit mode" of Renoise turned on and the OSC of the PRE and Renoise correctly configured. Finally, remember also that to play or record the chords or groups of notes you can control the volume of all these recorded notes by establishing a specific value or even its velocity through the sensitivity of the keys of your MIDI controller, according to point 6.2. MIDI Input. Velocity setting (volume).
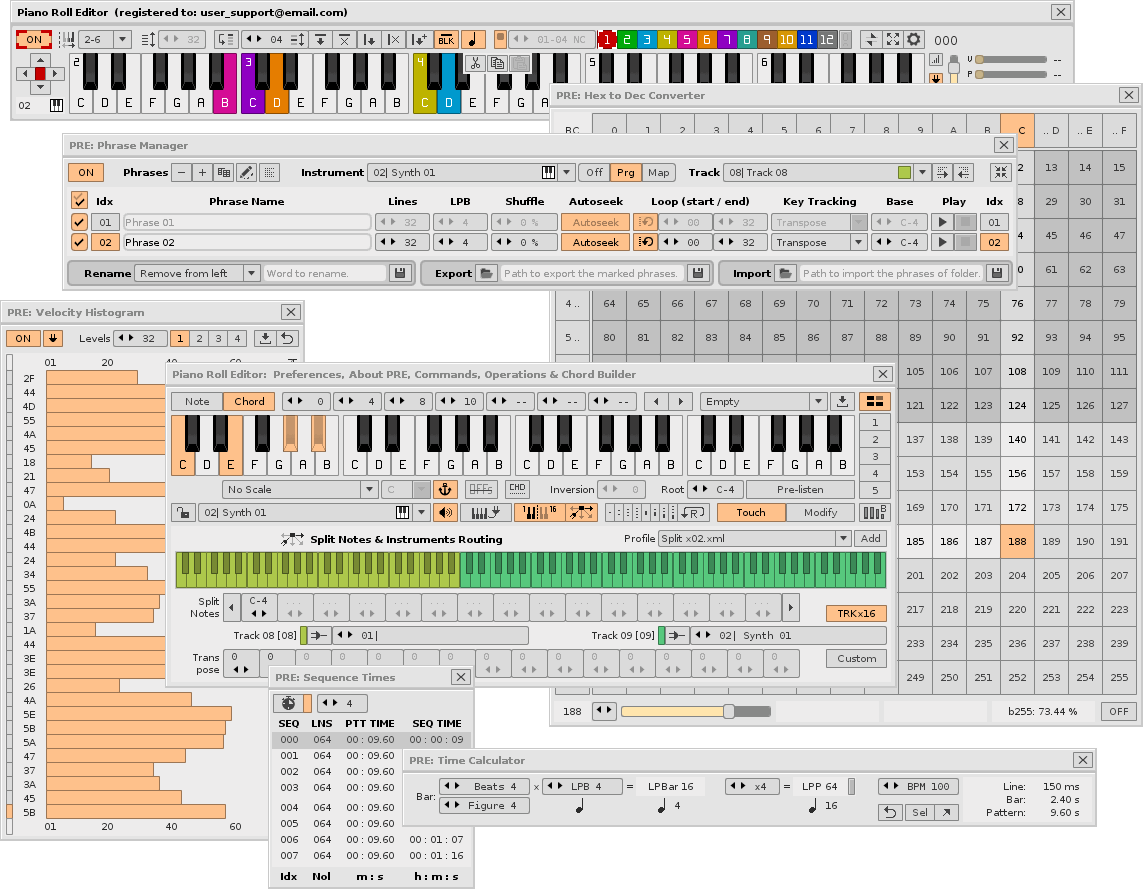
Piano Roll Editor. All your windows displayed.