An original tool for the Renoise DAW.

Piano Roll Studio User's Manual
Piano Roll Studio v4.0 build 475. October 2022
Created by: ulneiz (Spain)
This document contains over 30,000 words. Estimated reading time: 6 hours.
Index of Contents
- 1. What is the "Piano Roll Studio" or "PRS"?
- 2. The Renoise and Lua API. Previous Considerations
- 3. Graphical Interface I. The PRS Main Window
- 4. Graphical Interface II. The Preferences Window
- 4.1. The "Renoise Pre-Config" Panel
- 4.2. The "Preferences" Panel
- 4.2.1. OSC. Sound Config
- 4.2.2. GUI. Window Config
- 4.2.3. Note Block & Grid Options
- 4.2.4. Editing Options
- 4.2.5. Miscellaneous
- 4.2.6. Metronome Master Control
- 4.3. The "Themes. RGB Colors" Panel
- 4.4. The "Mouse and Keyboard Commands" Panel
- 4.5. The "MIDI Control" Panel
- 4.6. The "About Piano Roll Studio" Panel
- 5. The Note Block and the Note Off Block (or Note-Off)
- 6. Simple Editing of Individual Notes
- 6.1. Locate a Note. Capture the Length of a Note Block. Listen to a Note or Chord Block
- 6.2. Insert a Note Block. Define Note Block Length
- 6.3. Delete a Note Block
- 6.4. Transpose a Note Block: Modify its Pitch or Height
- 6.5. Move a Note Block: Modify its Line Position
- 6.6. Transpose and Translate a Note Block
- 6.7. Lengthen or shorten a Note Block (Insert a Note Off Block)
- 6.8. Stacked Insertion of Note Blocks. Free Pitch Change in Note Blocks
- 6.9. Position Line. Move the Grid Horizontally or Vertically
- 6.10. More Control: Create Macros for Additional Mouse Buttons
- 7. Chord Selection, Construction and Use
- 8. Advanced Notes Editing. Multiple Selection Modes
- 8.1. The Selection Modes. Drawing Diagonals with the Mouse Pointer
- 8.2. Selection Mode 1: General Edition: Cut/Copy/Paste, Drag, Delete, Continuous Paste and 8 Clipboards
- 8.3. Selection Mode 2: Group Selection and Transpose
- 8.4. Selection Mode 3: Extend or Shorten Note Blocks
- 8.5. Selection Mode 4: Inserting or Deleting Cells (Lines)
- 8.6. Selection Mode 5: Changing the Instrument Index and Notes Randomization
- 8.7. Selection Mode 6: Chord Operations
- 8.8. Selection Mode 7: Operations with Pattern-Tracks and Patterns
- 8.9. Selection Mode 8: Transport Operations: Play/Stop and Loop Line or Pattern Play
- 9. The Effects Parameter Editor
- 9.1. Column Types and Selector "V-P-D-A"
- 9.2. Line Location and Associated Note (If Exists)
- 9.3. Loop Zoom. Change the Vertical Size of the Parameter Editor
- 9.4. Insert a Quantity Bar and Change its Value
- 9.5. Modify a Contiguous range of Bars by Dragging
- 9.6. Delete a Quantity Bar and its Parameter
- 9.7. Delete a Contiguous range of Bars by Dragging
- 9.8. Modify a Contiguous Range of Bars By Dragging Only With Associated Notes
- 9.9. Modify a Contiguous range of Bars Dragging Only Without Associated Notes
- 9.10. Simultaneous Modification of the Next Bars from the Current Bar
Pay attention. Before you start, keep in mind that this User's Manual shows images of the tool window in a reduced size due to the pure issue of space and document layout. You, as a composer, will probably use a considerably larger window size on your image monitor and most likely, you will not use the tool window overlaid on Renoise. All moving images are in real time. Keep all of this in mind every time you view most images so you don't get the wrong idea from this tool...
1. What is the "Piano Roll Studio" or "PRS"?
1.1. Concept ▲
Completely programmed from scratch, the Piano Roll Studio, also known as PRS is a "customizable window tool" with multiple viewing and editing capabilities, focused on the extensive mouse use, exclusive to the DAW Renoise (64 bit, v3.4.2). PRS is a "classical piano roll" that concentrates its potential in controlling 8 important viewing and editing branches in parallel with Renoise:
- Note monitoring. The PRS allows you to view a complete Pattern-Track with differentiation of Note Columns or an entire Pattern (all existing Note Tracks) to visually understand the composition, using the track colors. It also allows Horizontal Zoom of 24 steps.
- Identification and location of notes and effect parameters. Visually, it is possible to easily jump between the Pattern Editor of Renoise and the Note Editor of the Piano Roll Studio or vice versa, to locate notes and parameters, without getting lost along the way.
- Complete Song Player. PRS allows you to load and play all the Note Blocks of the current, previous and subsequent pattern, allowing you to view all the tracks by layers and superimpose the selected one. This allows you to locate specific notes and jump directly to the Note Editor for editing.
- Complete Note Editor. PRS allows you to edit Note Blocks directly and quickly, individually or in groups, with simple or complex editing operations. Click, drag, stretch, shorten, transpose, translate, everything is possible, even preview notes or chords directly.
- Complete Effects Parameter Editor. PRS allows you to load, insert or edit any type of effect parameter, in the Volume, Pan, Delay, Sample Effects sub-columns or the Effects columns of the tracks. The Parameters Editor (lower panel) is directly linked to the Note Editor (upper Grid) with full correspondence between both. It even allows you to easily create or edit curves with
Click & drag . It also allows Vertical Zoom of 3 steps in loop. - Building and editing of chords through the Piano. PRS works extensively with chords, offering 60 different chords, with 4 slots of customizable chords up to 12 notes. Insert or edit chords as if you were only inserting a single note!
- Transposition Scales for note editing. PRS allows you to load and display any Transposition Scale of the instrument for the 10 octaves of the piano, working with both individual notes and chords.
- Magnificent control with a variety of peripherals. The editing and operation of the Piano Roll Studio can be controlled with an alphanumeric keyboard + mouse, with a MIDI controller + mouse, with an alphanumeric keyboard + MIDI controller + mouse. Additionally, the supported mouse (and its software) can use "macros" and "keystroke mapping" to increase direct control.

Piano Roll Studio. Notes Editing Mode
The Piano Roll Studio offers a classic design, well ordered, easy to understand and control considering its complexity. Fully customizable "on the fly", it has a familiar panel layout, with song progress playing horizontally. It is designed to hinder as little as possible due to its floating window character. Above is a Top Control Bar, below is a Ruler with markers and zoom capability. In the middle area, on the left, is the upright piano, accompanied by the right Grid to display and edit the Note Blocks. At the bottom is the Parameter Editor panel, accompanied by a left panel to navigate between Notes and Effects Columns and to be able to switch between parameters. PRS prioritizes the importance of using effect parameters, moving away from possible simple piano roll layouts, which are little more than note editors. The Parameter Editor is a key point of the program.
PRS is probably the best note and parameter editor with zoom capabilities ever built as a comprehensive external tool for Renoise. The Piano Roll Studio takes full advantage of the capabilities of the API of this DAW, and more importantly, respects the peculiarities of Renoise while being very minimally invasive. A piano roll for Renoise should never be conceived as a separate program. According to its creator, ulneiz, the Piano Roll Studio has been programmed largely to be able to obtain and use the Parameter Editor (that lower panel of the tool window).
The Piano Roll Studio gathers a large number of requests or wishes from a multitude of Renoise users in recent years who have always wanted a "classic" piano roll effective to use as a support in conjunction with Renoise to solve your most complex compositions. At the same time, its design and features are clear proof of ulneiz thinking. Strongly designed for use with the mouse, almost 95% of the Piano Roll Studio window surface can be interacted with by the mouse pointer (Click & wheel).
This new software, programmed from scratch and fully tested by ulneiz, has been in private development for more than 13 months, in parallel and coexisting with the development or maintenance of other tools, before finishing the first release version, version 1.0. The Piano Roll Studio brings great value and boost to Renoise and it turns out to be a great complement that also covers some shortcomings that this DAW has, more oriented to control using keyboard commands.
If you as a composer are looking for a serious piano roll to use alongside Renoise, the Piano Roll Studio is the perfect candidate. Combine both worlds (tracker + piano roll) to improve your workflow!
Pay attention. If you have come this far and do not yet have a Renoise License to use its full version, you can buy it here: Purchase a Renoise License. To use the full version of Piano Roll Studio it is recommended to use the full version of Renoise.
1.2. Differences between Renoise and the Piano Roll Studio ▲
Basically, to compose music with any DAW (Digital Audio Workstation) type software, two concepts are always handled: the "duration" (the time that the sound of a note lasts) and the "pitch" of the notes (how often they reproduce). Obviously, there are more concepts, but these two are the main axes of any composition, widely treated and referenced in music theory (see "rhythmic figure" and "height of a note").
Work Surface. In practice, this handling is controlled by working on a surface, defined by 2 dimensions, which can be described as coordinates on two axes. Understand "dimension" as the possibility of moving an object, of moving it around within it. An image monitor always offers a flat surface, which always returns images in two dimensions, width and height, even if the image it displays is 3-dimensional, like a film.

Renoise. Overview with a note and a volume value (see Pattern Editor, central panel)
In Renoise, specifically its Pattern Editor, it only handles 1 moving dimension, the "dimension of time", along the vertical axis. To change the pitch of the notes, simply type other characters, make a substitution, not a shift. In it, a note is defined by 3 digits, such as the note "C-4", a letter (the note), a hash mark or hyphen (whether it is sharp or not), and a number (its octave).
Substituting C for D, implies a transposition change, raising the pitch or height of the note, but without changing its position in the Pattern Editor. This way of representing data on a surface conditions its use, and also its understanding.

Piano Roll Studio. Overview with a Note Block and a Vertical Volume Bar
In the Piano Roll Studio, specifically in its Note Editor (the Grid surface), 2 mobile dimensions are handled, the "dimension of time" (horizontally), and the "dimension height" of the notes (vertically), as in any other piano roll of classical design, defining the duration of a note as a block, called "Note Block".
Dimensions of Time and Height. In the Piano Roll Studio, the dimension of time is managed along the horizontal axis, that is, when a note begins, how long it should last, and when it ends. On the other hand, on the vertical axis, which is equivalent to the path of the vertical left piano, the height dimension of the notes is handled. Vertically, changing the position of a Note Block involves changing its pitch. The composer can drag a Note Block horizontally or vertically. Dragging horizontally, or lengthening or shortening a note implies playing within the dimension of time, that is, changing the number of cells that its block adds up.
Concept, Design and Dependencies. Obviously, there are many differences between Renoise and the Piano Roll Studio, from the concept of Renoise "host" of static and closed source code versus the external "dependent program" of the PRS, up to the global definition of DAW (a software that not only edits notes or effect parameters, but does much more) versus a "slave window tool" which is built primarily as a data editor, basically notes and effect parameters. Renoise has the sound engine, while PRS uses the Open Sound Control network protocol to handle it (reproduce the sound of the notes), always externally.
Priority of Operation. In terms of performance, Renoise always takes precedence over any Lua tool. The Piano Roll Studio always works "in tow" of Renoise, but it works so fast that it works in near real time in most cases. For example, to edit a note, it will always be written first in the Renoise Pattern Editor and then reflected in the Piano Roll Studio Note Editor, although this edit note is made from the Piano Roll Studio.
Regarding the concept of window, Renoise will always be the main window, and the Piano Roll Studio should always be understood as the secondary window, a supporting work surface for Renoise.
The Piano Roll Studio is not integrated into the Renoise source code. It is a "third party" program that does not depend at all on the Renoise Development Team. However, it is designed to appear fully integrated.
The Renoise Pattern Editor, which is the essence of the tracker, plays the song vertically. Instead, the Piano Roll Studio plays the song horizontally. However, by controlling both at the same time, the composer will see the correspondence between both windows easily.
Piano Roll with horizontal progress. Why does a classical piano roll have the song playing horizontally and the piano playing vertically? Wouldn't it be more logical for the piano to be horizontal, as a musician plays it with both hands? This has a simple explanation, and does not depend on software programming. In fact, technically any programmer would care to design a piano roll arranged horizontally or vertically. The difficulty is exactly the same. The classical piano roll has the horizontal arrangement of the song playback by a mere necessity of the human body. The human being has a more open field of vision horizontally than vertically. Over the years, the trend has been to build increasingly panoramic picture monitors, as has happened with movie screens or televisions in the home. Panoramic implies greater dimension horizontally than vertically. Therefore, due to the condition of human vision, software such as a DAW, or a piano roll, tends to make the most of the horizontal dimension, making better use of the screen space. It is for this reason that classic piano rolls have horizontal distribution, allowing to offer more information about the dimension of time, that is, more pattern length or more information in the reproduction of the song.
However, in Renoise the opposite occurs, but also conditioned by the human being. A large part of human beings read horizontally, from left to right. To display the data, which is text that must be read, not a rectangle that has a size such as a Note Block, it is necessary that the pattern be arranged with its progression vertically. This allows a lot of data to be displayed at once, a multitude of vertically placed track patterns with lots of notes and effect parameters and amounts, text that can be edited directly. Using the Renoise Pattern Editor can be overwhelming at first. But a clear advantage of it is its ability to display a large amount of information at the same time.
Powerful Visualization. Finally, the Piano Roll Studio allows you to visualize the melodies and understand them almost without having to listen to them beforehand, because it not only orders where they are triggered or stopped, but also orders the notes in height, the pitch. It is not even necessary to know the timbre of the instrument to roughly understand the melody. This helps to quickly identify elements, find quirks or composition errors to quickly rectify, a misplaced note, or an out of place volume value. In contrast, Renoise can be a mess of jumbled notes across up to 12 Note Columns (mixed with other values), since it does not order the pitches of the notes in any position. This forces the composer to listen to the pattern beforehand to understand it easily, since it is visually somewhat complicated. In fact, this is the first barrier any composer must face when starting to learn Renoise. The Piano Roll Studio, without the need to edit with it, can be a great visualization tool for the composer, both for novice users and for expert composers.
1.3. Brief History and Background ▲
Pay attention. If you are not interested in this small section, you can ignore it and skip to the next one. Knowing the brief history and background of Piano Roll Studio can help you understand its context and the reason for creating this type of complementary software. You will find interesting information about things that the developer does not usually tell or about things that go unnoticed...
Shortly after Renoise (2002) was born, a small community of users arose little by little who unconditionally requested the inclusion of a piano roll, that is, to be able to combine the power of a tracker with the power of a piano roll, all in the same program, taking advantage of both when needed. In fact, this part of the Tracker Rey user community grew as piano rolls were added in other DAWs, leading to a dedicated Renoise forum, pinned, just for those interested in a piano roll. This forum remained permanent in the Renoise forums, with thousands of comments and visits, until these forums were migrated from the server a few months ago, missing things in the move. This means that for more than a decade a piano roll has been ordered for Renoise. It is not a new matter. For a reason it will be...
The creator of the Piano Roll Studio, ulneiz, knew Renoise, and this situation, practically since Renoise was born, but did not register in the forums until 2015. The forums have that, users come and go. This self-taught programmer started in the world of trackers with Impulse Tracker (1995), grew up with it, and is very clear about the concept of what a tracker is and everything it can cover. Since he registered in the forums, like a few other users, he has not stopped building tools for Renoise in an altruistic and self-taught way, some simple, others very complex, learning a lot along the way, both from the Lua language and from the API of Renoise, its advantages and also its limitations, always with the idea in mind of finishing building a piano roll as one of its most advanced tools, one more project. In fact, as a tool programmer, building a piano roll tool for Renoise is one of the most fun, lengthy and complicated tasks, a huge programming challenge. In short, what I was doing was using Renoise, specifically its API, which is what it is for.
Until then, there had been no serious piano roll projects for Renoise, but there were some other projects. In recent years, there have been attempts to program a piano roll for Renoise by some programmers around the world, but there have always been problems dealing with the API, leading to failure. In 2017 a private project was published by a programmer that was never released. A video appeared on YouTube with his progress. The development of all these projects is very interesting. However, a programmer has every right to create his tool for totally private use, and publish or not what he wants and how he wants. Using Renoise doesn't just mean composing music, but it allows to expand it by creating tools, it is something else that completes the circle. But certainly, in 2017 the Renoise API was not minimally prepared to use the mouse inside a piano roll. There were too many limitations. Fortunately, this changed with a new update (change from API 5 to API 6), which allowed combining keyboard commands with the click of the mouse. Although this was not the "ideal update" (the mouse cannot yet be controlled openly from the API), it did open the way for developing a piano roll already "in minimal condition" for use with the mouse.

Piano Roll Editor. The second piano roll created by ulneiz for Renoise (the first was never published).
The first version of the veteran Piano Roll Editor tool was created and published by ulneiz in October 2018. There was still no API update named above and while both the Renoise version that allowed scaling of the graphical interface was published. Yet another challenge for creating tools that support graphical scaling. Keep in mind that, to publish a tool of this caliber, there have been months of development before.
The "PRE" is an upright layout piano roll concept with lots of extras, thought to be able to display as much information as possible, sacrificing Note Blocks. This tool is the first serious attempt to bring a piano roll to the community, a public project for others to use. After more than 12 updates, this tool has received great support from a multitude of users, and many of them were not even registered in the forums before, curious. There's a whole world outside of the forums that Renoise also uses.

Piano Roll Studio. An original tool for Renoise. It is the third piano roll created by ulneiz for Renoise.
Later, another programmer openly published an interesting simple piano roll project in 2021. Previously, ulneiz was already privately developing the Piano Roll Studio since late 2020, behind closed doors, with totally new code, from scratch. I didn't want to reveal anything until the tool was "ready". This means that there is a clear interest from a part of the Renoise user community that there is a piano roll for this DAW, and certain programmers or software developers who are willing to create it, with hope that the Renoise API will continue to improve in order to better support this class of complex tools.
Meanwhile, there is also a small part of the user community that does not agree to involve a piano roll together with Renoise, even going to the extreme. It's obvious to think that the creators of Renoise have enough to waste their time keeping this software running and further optimizing what already exists. But it is one thing to integrate a piano roll into the heart of Renoise and quite another is an external tool created by third parties (other developers). An external tool, which uses the Lua language and the Renoise API (made to create tools), can never modify anything in the Renoise code. A tool can be installed or not, it is an "extension" that can contribute more things, another way of controlling. The union of a tracker like Renoise and a piano roll like the Piano Roll Studio is a very powerful ecosystem of control, visualization and editing.
All this about lovers and detractors of a piano roll for Renoise makes the fact of thinking about the "concept of a piano roll" something very interesting and involves a lot of criticism and discussions in the forums. A programmer can create tools for Renoise for multiple reasons: because they want to learn and experiment, or they want to have fun, or they want to boost their creativity, or they want to contribute useful things to the community and Renoise, or "just because it can"... Comparing a blank text file to a well-done and finished programming project can be very satisfying for any software developer who appreciates their work. The saddest thing is that some users do not value all these things, probably because they have never wanted to take a closer look at the beauty of the Moon. It is desirable that, after the existence of all these piano roll projects, which cost infinite patience and a lot of time to develop, each one with its own little story, they are useful and help composers to continue having fun in what they love the most, compose music with Renoise.
The Piano Roll Studio tool is, in short, the intelligent and evolved daughter of the Piano Roll Editor and sister of other previous ulneiz tools, with totally new DNA and cool with "integration and respect" as the coding base. It is the conjunction of different ideas of ulneiz and a multitude of requests by interested users, an attractive direct tool for visualization and mass editing that demonstrates the potential of the API + Lua and constantly combats the limitations of said API, always respecting the peculiarities of Renoise as far as possible.
Supported by the User Community. The PRS is a piece of software with valuable code created thanks to the direct and indirect support of a multitude of composers who in the past have used ulneiz tools for Renoise. Be very clear that, without this community support, this type of tool would not be possible (research, preliminary study, programming, testing, revision, writing and preparation of the user manual, its translation...).
1.4. Demo and Full Version; Installation and Access Instructions ▲
The PRS program is distributed in 64-bit XRNX format through a "Demo Version", free of charge, so that any user can test it. PRS is also available as a "Full Version", which requires a Custom User License.
- Piano Roll Studio. Demo Version. The demo version has exactly the same functionalities as the full version, but with limited trial time and a floating counter window. That is, it is not a shortened version but it is for a limited time. You will be able to test all its features, but it will only take a few minutes to do so. Once the stipulated time has elapsed, the tool will lock up. If you want to continue using the tool, get the Full Version.
- Piano Roll Studio. Full Version. The Demo Version uses the same installation package as the Full Version, but the Full Version is 100% functional, with no limitations. The Full Version of Piano Roll Studio only requires a Custom Use License that is installed manually. If you are interested, please contact the author "ulneiz" to obtain your Custom User License.
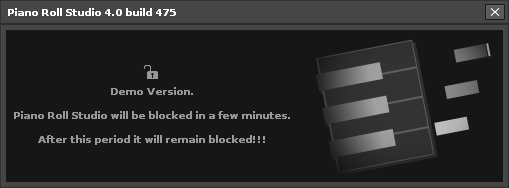
Initial floating window of the PRS Demo Version. It only shows once when you log in.
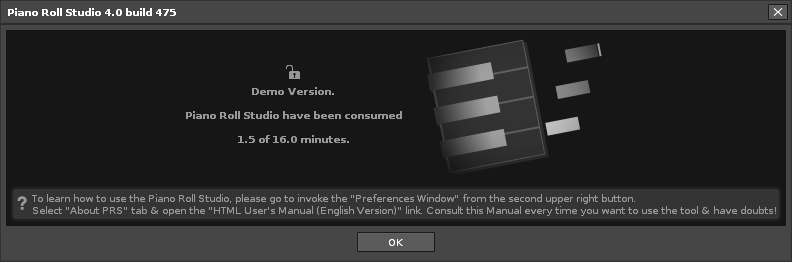
Example of a temporary floating window from the PRS Demo Version. It shows the limited time elapsed and various information.
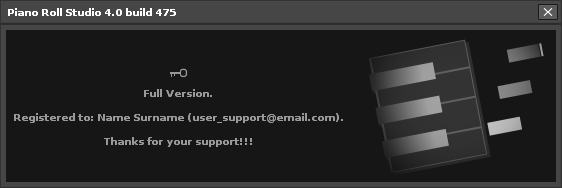
Initial floating window of the Full Version of the PRS. It only shows once when you log in.
Installation of the Piano Roll Studio. PRS is compatible with Renoise 3.4.2 64 bit (or higher or future). To install the PRS tool, it is installed like any other tool, by double-clicking on the "name_of_the_tool.rnsx" file or by dragging this file over the Renoise window. Please note that the installation folder is different depending on the operating system used (Windows, macOS, Linux). For example, on Windows or macOS, the address or installation path of the tool's root folder is as follows:
- Windows 10/11: "C:\Users\USER_NAME\AppData\Roaming\Renoise\V3.4.2\Scripts\tools\com.ulneiz.PianoRollStudio.xrnx\"
- macOS: "VOL_NAME/Users/USER_NAME/Library/Preferences/Renoise/V3.4.2/Scripts/tools/com.ulneiz.PianoRollStudio.xrnx/"
Access the root folder of Piano Roll Studio. After installing Piano Roll Studio, the composer can access the PRS root folder in 3 possible ways. This is useful if you want to activate the tool for the Full Version or directly access the text or reading files:
- From the Operating System. Use the file browser of the operating system and go directly to the path described above.
- From Renoise. Go to "Renoise: Tools / Tool Browser...", right click on "com.ulneiz.PianoRollStudio (Piano Roll Studio)" and go to "Reveal in Explorer..."
- From the Piano Roll Studio. Invoke the Preferences window (top button with the mechanical wheel), go to the "About PRS" tab and click on the "right official logo".
Caution! If you want to reinstall or update the PRS tool to a new version and you want to keep the last configuration of the tool, you can save your installed "preferences.xml" file in the root folder of the tool installation before to reinstall or update. Unless otherwise noted, you can restore this file after installation, simply by replacing it with the previously saved one.
Pay attention. Before continuing to read this User Manual, go to the root folder of the tool and carefully read the "Readme.txt" and "License.txt" files, which include very relevant information about the installation and use of the tool.
Access to the Piano Roll Studio. To invoke the tool you have 2 options, either from the top Renoise menu or from a keyboard command:
- To invoke the main PRS window from the Renoise menu Go to "Renoise: Tools / ∿ Piano Roll Studio...".
- To invoke the PRS tool from a keyboard command first go to "Renoise: Preferences / Keys: Tools / ∿ Piano Roll Studio" and assign a free, easy-to-remember keyboard command. In this way, you will be able to invoke or foreground the PRS window.
2. The Renoise and Lua API. Previous Considerations
2.1. Peculiarities of the Current API v6.1 ▲
Pay attention. If you are not interested in this small section, you can ignore it and skip to the next one. This section explains a few things related to the Renoise API, which will help you understand the importance of reconfiguring Renoise for best performance.
In Renoise, the API is a set of code instructions to be used with the Lua language to be able to expand Renoise with new functions triggered from drop-down lists or through windows floats with certain capacities, commonly called "tools". In this way, Renoise can "grow" thanks to the community of its users, by those brave who dare to program. Renoise is not only for musicians, but also for brave programmers! No tool can modify anything in the Renoise codebase.

However, the API was not originally intended for such complex window tools as an advanced piano roll, at least it seems so. A piano roll implies extensive mouse capability, which the API does not yet offer (differentiation between left, middle, right and wheel click, at least), and a nimble power to move objects with complete fluidity by building layers in a large window. Given these limitations, the current API generates certain "small problems" that the programmer of the tool cannot solve, even by programming certain "misuse tricks". Fortunately, in theory, the API will continue to be developed and it is likely to receive improvements in the future, perhaps aimed at being better able to handle complex and dynamic window tools.
- If you are interested here you have an API reference (if the link is not broken): Documentation of the Renoise API.
- If you want more information about the API (if the link is not broken): The Renoise API on github.com.

Renoise. "Scripting Terminal & Editor" window. Introduction to the API Guide.
Leaving aside the specific reasons, ulneiz found certain problems whose direct responsibility is the API itself (understand the current API at the time of preparing this User's Manual). This is good news and bad news. The good news is that it will not be necessary to update the Piano Roll Studio code to make it work better if the API is improved so that the GUI works more fluently (movement of objects). The Piano Roll Studio has highly optimized code. The bad news is that releasing a new version of Renoise tends to take too long, frustrating both the tool developer and Renoise users, that expect more from those tools, and they expect more from Renoise.
The Renoise API with Lua is capable of loading thousands of objects into a floating window reasonably quickly. However, it doesn't behave entirely smoothly if the window is considerably large when trying to move objects. Moving objects involves dragging buttons, moving sliders, turning knobs, displaying drop-down lists, navigating by moving text up or down, or the like.
The Renoise API seems to slow down if the tree of views is very large when moving objects with many of them visible. A well-optimized piano roll still requires the loading of hundreds of objects whose state is "visible".
On the other hand, the Renoise API, specifically some objects of the ViewBuilder, do not work very well with scales greater than 100%, they even work a little worse with scales other than 100%, 200% or 300%. In addition to having to adjust the rendering of images to be sharp, high scaling will generally negatively impact windowed tools with moving objects, even worse if the tool window is very large. Fortunately, recent versions of Piano Roll Studio are optimized so that this does not matter in the graphics performance.
Unlike Renoise, the Renoise API doesn't do well with textures. As long as it is a static floating window, that does not need to move anything inside it, the use of textures will not be a graphic performance problem. However, in dynamic tool windows, the use of textures has a very negative impact on the fluid movement of objects. A texture is a BMP format image that is overlaid with a layer to change the appearance. Unfortunately, this problem has no solution, being mandatory to disable the textures!
On the other hand, having the "tooltips" activated implies that the mouse is constantly tracking "something". This can slightly slow down the moving interface of a dynamic tool window, for example, while playing a song in the Piano Roll Studio while moving the mouse over it. Tooltips are another little API GUI issue as well. Fortunately, recent versions of Piano Roll Studio are optimized so that this does not matter in the graphics performance.
In fact, at least under Windows, Renoise's own window gets pretty bad with the floating windows of VSTi plugins, so much so that it is programmed so that the Renoise GUI stops if the user drags the plugin window with the mouse, resulting in total absurdity. The observant user will not understand why he can move a movie playing in another program with the mouse while using Renoise without the Renoise interface crashing, and instead the interface Renoise stops graphically when moving a window of a plugin, which is part of the Renoise software.

Official logo of the Lua programming language. "Moon" for friends...
In general, Lua is a very fast dependent programming language, ideal for extending Renoise externally with applications, even surprising ones, capable of object-oriented programming among other things. Lua is widely used in a multitude of programs and games. However, the Renoise API is still at 80% to be able to comfortably build and use tools as complex as an advanced classical piano roll. The programmer of the tool will never be able to do everything he wants.
- If you are interested here you have a Lua reference (if the link is not broken): www.lua. org.
Renoise is great but could still improve, albeit a bit complicated, probably because its code base is so expensive to change. It is not about reaching absolute perfection, it is about everything that already exists working very well, neat, fine. Renoise has certain design problems or lack of optimization, most of them related to the graphical interface, which condition the user experience mainly due to Renoise prioritizing processing sound versus graphics processing, which makes sense in a DAW. Although it has a really very light graphical interface, very easy to move, it overloads the processor to move it due to the process queues, neglecting the graphics performance of a dedicated graphics card. In the absence of optimizing some aspects of the graphical interface and the API itself, nowadays a serious DAW must be programmed to make the most of the central processor and also the processing capacity of the graphics card to free load on the CPU, and so on. to be able to dedicate the maximum capacity of the CPU to the sound processing, avoiding that the graphical fluency is compromised. Any strange behavior in the Renoise GUI can also influence the dynamic window tools.
Lastly, blaming the Renoise API as the center of all problems in building Lua tools is somewhat unfair, and should be understandable. At first, everything seems to point out that since its inception the API has not been designed to be able to build Lua tools of great caliber, very complex, with a multitude of objects, and mobiles. This has probably always been the case because, in reality, it is easy to think that no programmer would try to build something as complex as a tool like Piano Roll Studio. Let's cross our fingers and hope that the Renoise API will improve in the future to adequately create complex window tools, or even improve existing ones.
2.2. Configure Renoise for the Best Experience with PRS ▲
Fortunately, with some configuration tricks, in the Renoise preferences some small graphical problems derived from its API can be solved, or partly avoided with dynamic window tools (with objects that are can move inside). At Renoise, follow these steps to get the best sound and graphic use experience with the Piano Roll Studio:
- Disable "Mouse Warping" → Go to "Edit / Preferences / GUI / Global" and uncheck the box for "Mouse warping...". The Piano Roll Studio is programmed to use this specific setting. It is recommended to use a high precision mouse.
- Improve graphics performance:
- Disable textures → Go to "Edit / Preferences / Theme / Graphics" and set the "Textures" option to "None". The current API graphical interface performs worse when using textures. This is very important!
- Enable sound through OSC → Go to "Edit / Preferences / OSC" and check the box "Enable Server": Udp Protocol and Port 8000. Then go to the Preferences tab of the Piano Roll Studio and set the "Open Sound Control" option the same. OSC Server is necessary to play (sound) the notes of the Piano Roll Studio. Note editing is operated separately!
- Set the volume of the metronome → Go to "Help / Show the Preferences Folder..." and close Renoise. Open the "Config.xml" file. Inside it find the entry "MetronomeVolume", change the value between 0.0 and 1.0 and finally save the file. For example, use the value 0.4. You can change it if you find the metronome volume too loud or uncomfortable.
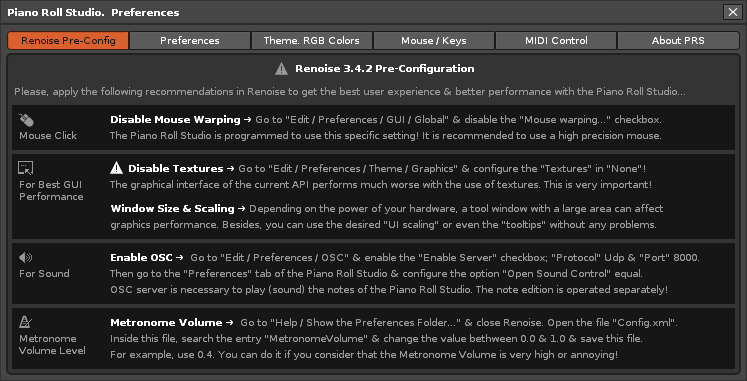
Piano Roll Studio Preferences Windows. View of the "Renoise Pre-Config" tab.
All this configuration information is also included within the Piano Roll Studio. Go to "Preferences / Renoise Pre-Config" for more information.
The Piano Roll Studio can display up to 10 octaves and up to 512 lines in a very large window and modify it "on the fly". However, the graphical interface of the API will work better, more fluently, if the window is smaller. For example, displaying 3 octaves and 96 lines is a good size.
High performance CPU and sound card. In addition to having a good sound card for audio reproduction (high quality, low latency...), so that the DAW Renoise, and therefore, any complex window tool works more fluently and fast it is recommended to use a high performance processor. At the moment, CPU performance is the key factor in achieving a smoother and more enjoyable user experience with Renoise and its dynamic window tools. When it comes to Renoise performance, the CPU is more important than the GPU.
2.3. Hardware requirements to get started: Mouse + Keyboard and Image Monitor ▲
Controlling the Piano Roll Studio requires no special additional hardware. Except for new versions, initially you only need an alphanumeric keyboard, a mouse and a suitable image monitor, in addition to the PC itself, obviously. As an alternative, the PRS allows you to replace the alphanumeric keyboard with a MIDI controller to be used in conjunction with the mouse.
- Alphanumeric keyboard for the left hand. It should have the keys
[SHIFT] [CTRL] [ALT] mainly, or their equivalents for MAC. It is also recommended that you have the[<] key and the function keys[F1] to[F12] mainly. The recommended layout is the[SHIFT] key above the[CTRL] key and the[<] key placed on the right side of the key[SHIFT] . In the PRS the[<] key can be customized by a different one. If the keyboard has the[Windows] key nearby, it is recommended to disable it if possible so that it does not bother.

Scheme of a QWERTY alphanumeric keyboard for Windows. Reference keys used in the PRS.
- MIDI controller for the left hand. In various scenarios it is possible to replace the alphanumeric keyboard with a MIDI controller. Therefore, the composer can control the Piano Roll Studio only using a MIDI controller and a mouse. As a priority, a MIDI pad with at least 16 pads is recommended, and as a secondary, at least 4 infinite-turn (or limited-turn) rotary knobs. There are many similar MIDI controllers, between MIDI pads and MIDI keyboards that also incorporate pads and rotary wheels. In any case, it is always recommended that the wheels rotate infinitely.
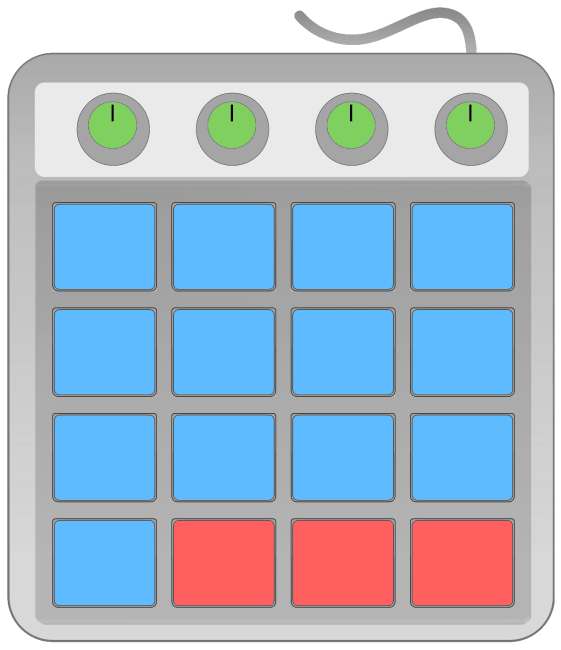
Scheme of a MIDI controller. Pad of 16 pads and knobs.
- Mouse for the right hand. It must have a rotating wheel, left click and a high precision optical sensor for the movement of the pointer, which is consistent with the image monitor and its resolution. It is not at all recommended to use a laptop pad to control the Piano Roll Studio, as it requires skillful use of the mouse pointer. The composer can choose to use a more advanced mouse, with additional buttons for assigning macros or for assigning keystrokes. The mouse is the most important peripheral for controlling the Piano Roll Studio.
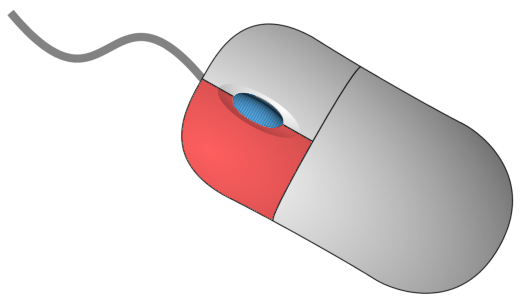
Scheme of an ambidextrous mouse. Left button and central wheel.
- Image monitor. Recommended Full HD resolution (1920 x 1080 pixels) or up to UWQHD, or even higher resolution. It can work on 14 or 15 "laptops, but it will probably require overlapping windows. Ideally, have 2 image monitors, a main one for the Renoise window and a secondary one for the Renoise window. strong> Piano Roll Studio, so that both windows are fully displayed without overlapping between them. There may be several recommended window layout schemes...

Scheme of a 24" widescreen monitor. Piano Roll Studio on the left. Renoise on the right.
Scheme of a 32" widescreen monitor. Piano Roll Studio in upper window (to be displayed). Renoise in lower window.

Scheme of a 24" widescreen monitor. Renoise full screen. PRS in floating overlay window (less recommended).

Scheme of two 27" widescreen monitors. PRS on the left monitor and Renoise on the right (highly recommended).

Scheme of two 34" widescreen monitors with VESA support. PRS on the upper monitor and Renoise on the lower one (more recommended).

Scheme of 24" + 34" widescreen monitors (1920x1080 + 3440x1440 pixels) with VESA support. Renoise separated into two windows. (more recommended).
To have a space reference with a FullHD monitor (1920 x 1080 pixels), the Piano Roll Studio will be able to display more than 4.5 octaves and up to 112 lines using Renoise > 100% graphical interface scaling, full screen and Horizontal Zoom equal to 0.
To have a space reference with a UWQHD monitor (3440 x 1440 pixels), the Piano Roll Studio will be able to display more than 6 octaves and up to 208 lines using Renoise > 100% graphical interface scaling, full screen and Horizontal Zoom equal to 0.
Control the PRS with only a mouse (with key remapping). On the other hand, editing through the Piano Roll Studio can only be controlled with a mouse (without keyboard), assigning
2.4. From when to learn Piano Roll Studio ▲
One of the first questions a composer must ask himself is whether his knowledge is at the right point to learn Piano Roll Studio. Understand "composer" as the person capable of composing some type of music, specifically using a DAW. In reality, a music composer is one capable of writing on a score directly from his mind (or in any other system that is invented), without even needing to listen to anything, he only needs a pencil and a paper. The best composers in history have this ability. The score is the universal method for all of us to understand each other. But here we will transfer the concept of composer as a person who is using a computer as his writing and experimentation tool.
Over the years, as the DAWs on the market evolve, they are more and more advanced at the same time that they are increasingly easier to understand by people who do not have a high knowledge of music theory. Therefore, there are some cases in which the composer will not even need to have extensive knowledge of music theory to control, at least, the most basic parts of a DAW, basically, that of placing some notes somewhere and making them sound. Despite these circumstances, it is always advisable to have at least some basic notions of music theory, so that you can understand certain concepts and defend yourself in certain situations against your musical composition.
On the other hand, composing is a mental matter of creativity and feelings, it is exciting, but it is not an easy task. To compose it is necessary to have a clear control of the rhythm, to control the time, to insert elements, and to have "a certain art" and good taste, mastering the style. There are good musicians who play a musical instrument perfectly, master the scores (write, correct, read, interpret...), but they are not capable of composing "attractive music" that transmits something within their genre. And the opposite can also happen. There may be people who do not know how to play musical instruments, but have mentally what is necessary, that taste, that ease, that mastery of rhythm, to compose that music that transmits, who already understand that music is not good or bad, but that it is adequate or not depending on what for.
The Piano Roll Studio is an extension of Renoise. Before starting to learn Piano Roll Studio, it is recommended that the composer know Renoise, its control and its parts, its peculiarities. After you know how to control Renoise minimally, you are ready to use the Piano Roll Studio. This is because the PRS is intended to be used in conjunction with the Renoise Pattern Editor. The composer must understand the information written in the Pattern Editor and its correspondence in the Piano Roll Studio.
The Piano Roll Studio as a Studio Complement. Similarly, the Piano Roll Studio can be a studio complement for the composer, helping him to better understand Renoise and what an advanced tracker is. A piano roll is quite familiar and easy to understand visually. It can be something of a visual translator of all the information in the Renoise Pattern Editor. The Piano Roll Studio can take away some composers' fear of using a tracker like Renoise, helping to overcome the first domain barrier of the Pattern Editor of Renoise.
The PRS is a "visualization and editing tool", which edits directly within the Renoise Pattern Editor. Therefore, it is recommended to learn Renoise and then Piano Roll Studio. You can even use both without having extensive knowledge of music theory, but it is always advisable to know this theory, the more the better. Finally, the composer's own art will make a difference or not.
In summary, first learn to control Renoise (it has an extensive User's Manual and help video tutorials), then learn to control Piano Roll Studio, and If possible, have a basic understanding of music theory first.
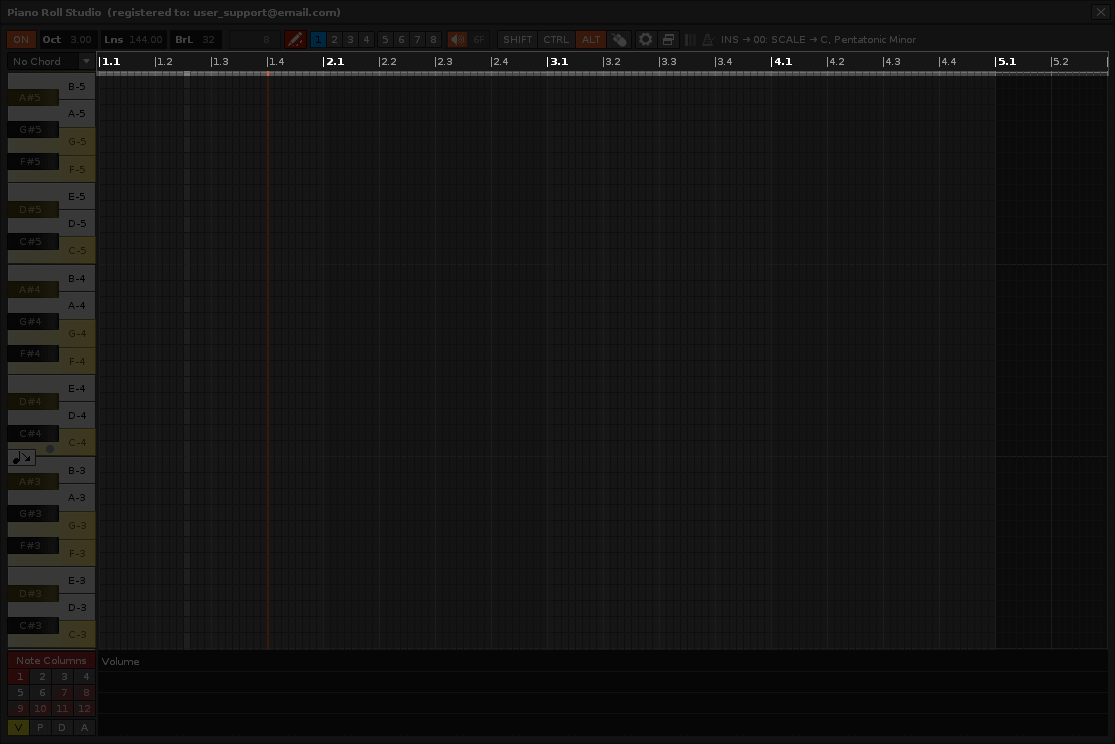
3. Graphical Interface I. The PRS Main Window
3.1. Top Control Bar ▲
Among other things, the Upper Control Bar allows you to configure the size of the window, switch between some editing options and display the main keyboard commands that are combined with the mouse click.
Piano Roll Studio. Location of the Top Control Bar.

Top Control Bar. Expanded view.

Top Control Bar. Compact view.

Off/ON switch. Allows you to turn the Piano Roll Studio on or off. When the status is on it will be continuously synchronized with the pattern editor, all the editing features being available. When off, the tool does not perform any trace operations.
Oct. The "Octave" value allows you to configure the number of octaves to display vertically in the window (works with the wheel). It allows to display between 0.01 and 10.00 octaves, with precision of two decimal places. When the value is 0.00 it will hide the entire Grid, showing only the Parameter Editor.
Lns. The "Lines" value allows you to configure the number of lines to display horizontally in the window (it works with the wheel). It allows to display between 32.00 and 512.00 lines. If the pattern is longer than this value, the PRS will automatically follow the progress by scrolling the Grid horizontally.
BrL. The "Bar Lines" value allows you to change the number of lines that represents in the Grid the width of the separating blocks that each bar (compass) spans during the pattern progression, between 0 and 256 (works with the wheel). It is possible to synchronize it or not with the bar. The value 0 will hide these split blocks.
Note Block Length
Switch of Note Editing Mode or Song Playback Mode
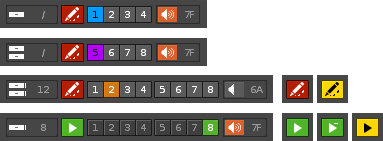
Switches 1 to 8 of Multiple Selection Modes
Volume Switch and its Value. Allows you to turn on or off the sound (OSC) that makes the notes sound and set the volume value, from 0 to 7F. The value 0 is equivalent to "Off".
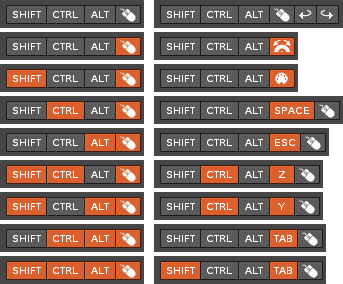
Display of SHIFT - CTRL - ALT - Mouse. It is a visual aid that shows keyboard combinations plus mouse click to execute editing operations. In the "Preferences / Mouse / Key Commands" panel all possible combinations are available depending on the panel or control surface that the composer is using at any given time. This button panel can also be controlled from the mouse itself, allowing to use all the PRS only with the mouse without the need to use the alphanumeric keyboard.

Preferences Panel Button
Maximize/Minimize/Restore Window Switch. Allows you to resize the window with several different settings. In the "Preferences / GUI. Window Config" Panel it is possible to customize the sizes of "Maximize" and "Restore" in "Custom Window":
[SHIFT F9] orSimple Click : Maximize/Restore the window according to the personalized configuration.[SHIFT F10] or[ALT] + Click : Minimize/Restore the window.[SHIFT F11] or[CTRL] + Click : Hide/Show the Piano Roll.[SHIFT F12] or[SHIFT + Click : Hide/Show the Parameter Editor.
Please pay attention to the following recommendation. To avoid overlapping windows if there is only one image monitor, you can place the PRS window above or to the left of the Renoise window and play with both Maximize / Restore sizes. Remember that you can set the values for "Oct" and "Lns" to within two decimal places and use Horizontal Zoom for the Piano Roll and Vertical Zoom for the Parameter Editor.
Additional Status Information. In addition, relevant information will appear in the right area of the top bar, usually about transport or certain operations (included text hover effect), as well as help icons.
3.2. The Dividing Ruler and the Horizontal Zoom ▲
The Dividing Ruler allows you to locate the elements within the Grid, that is, on which lines the notes start or end or where the Vertical Bars of the amounts of the effect parameters are located, or easily visually follow the beats of the beat. It also obeys several operations, both the change of the measure using
Piano Roll Studio. Location of the Dividing Ruler.
In the "Preferences / GUI. Window Config" panel it is possible to change the style of the Ruler through the "Ruler Type" in Dec (Decimal), Hex (Hexadecimal) or Bar (Compass). It is possible to customize whether or not the Ruler is synchronized with the metronome. The PRS also allows you to configure the metronome throughout the duration of the song through the "Master Metronome Control" panel, using two new effect parameters, since Renoise does not allow this feature.


The Dividing Ruler. Views in synchronized "bar" (compass), in decimal or in hexadecimal.
Change the Distribution of the Strip Markers. It is possible to combine the dividing rule with the LPB value to distribute the divided spaces in the Grid as required by the compositor. To change the space between markers use
The Horizontal Zoom from the Dividing Ruler. General control of the different width sizes.
Control the Horizontal Zoom. Rotate the
Direct navigation between Lines and Jumps. This feature is interesting because it allows you to scroll very quickly horizontally along the entire length of the pattern to be able to review it, among all 512 lines. This is useful if the pattern uses a large number of editable lines or the PRS window is very small in width. For scrolling, click
Track Navigation. The Ruler also allows you to navigate between adjacent tracks by pressing

Piano Roll Studio. Ruler Controls.
3.3. The Left Virtual Piano ▲
The Left Virtual Piano, arranged vertically, can display up to 10 octaves (120 keys) and has a multitude of functions, such as visual aid, loading and editing of chords or changing transposition scales, among others...
Visual aid. The keys will light green when any Note Blocks are entered or tested on the Grid. They will be marked in orange for the chosen chord or in yellow for the transpose scales.

Piano Roll Studio. Location of the Left Virtual Piano.
Chord Loading and Editing. The piano allows you to load chords from the top drop-down menu. The chord keys will light orange, marked starting with the root key customizable "●" (the one with a circle as a marker). A total of 61 different predefined chords are included. Also, the "Custom X" chords can be customized.
Change of Transposition Scales. The piano also allows you to switch between all the transpose scales of the selected instrument, by pressing
Readjust the Transposition of a Pattern-Track. When selecting a Transposition Scale, a button will appear superimposed on the piano that allows you to readjust the pitch of the existing Note Blocks of the instrument within said Scale.

Left Virtual Piano. Display of more than 5 octaves, chord selection and change of transpose scales.
Chord "Custom 1" to "Custom 4" Editable. In addition, the "Custom X" Chord allows you to customize a chord between 1 and 12 notes with
Octave/Note Displacement. It is also possible to raise or lower the pitch of the octaves by turning the
Preview Notes/Chords. Notes or chords can be previewed by pressing any piano key with the mouse pointer with
Sequence, Instrument and Program Navigation. You can also navigate between the song sequence with

Piano Roll Studio. Left Piano Controls.
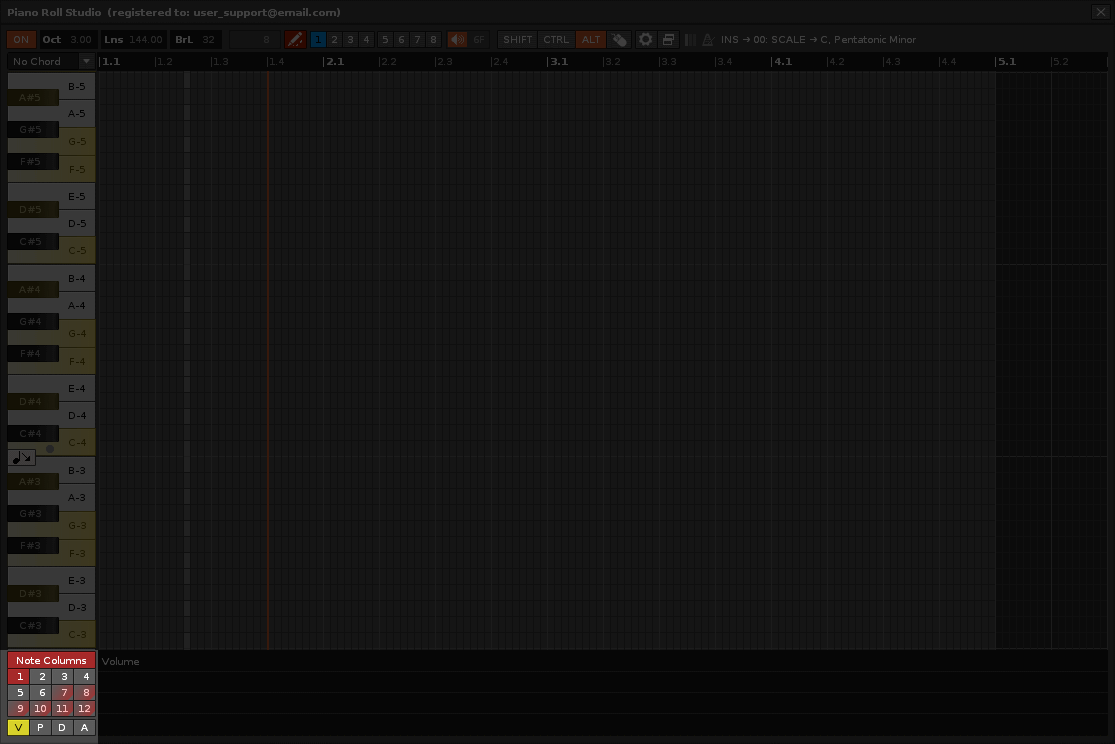
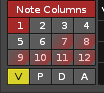
3.4. Columns Navigator and Parameter Selector. Amount Randomization ▲
The Column Navigator is made up of two alternate button panels, the Notes Columns Panel, with 12 buttons, and the Effects Columns Panel, with 1 + 8 buttons. In addition to showing the number corresponding to the selected Notes / Effects Column with the same color as the track, they allow you to navigate between the 12 Note Columns and the 8 Effects Columns, as well as open or hide them (with
Piano Roll Studio. Location of the Column and Line Navigator and Parameter Selector.
To switch between the Note Columns and Effect Columns navigation panels do a
Notes Columns Navigator. First Note Column selected, with 6 visible.
The 1 to 12 buttons (or 1 to 8). The buttons 1 to 12 also serve as a visual aid. They allow the composer to detect where any Note Block is located by
V-P-D-A Multicolor Switches. Below the Note Columns panel are the V-P-D-A Multi-Color Switches, which represent the 4 sub-columns for volume, pan, delay, and sample effects on the note track. Each switch contains all the parameters in its category and will change color accordingly. With the

Effects Column Browser. First column selected with 2 visible.
Multicolor Track Effects Switch. Below the Effects Columns panel is the Track Effects Switch for all effects on any type of track, accompanied by a legend. With the
In general, using the switches it is possible to switch between Effect Columns with a
In the same way, if a Vertical Bar of quantity is selected with a
The Piano Roll Studio offers an agile and efficient alternative to easily manipulate any type of parameter and its quantity using the mouse, filling in some of Renoise's shortcomings. Now the composer can change any type of parameter and its quantity easily directly from the mouse or create straight, curved, stepped or random paths using the Vertical Quantity Bars.

Randomization Panel of Effect Amount.
Randomization Panel of Effect Amount. From the selected line onwards it is possible to randomize the amounts of the chosen parameter within a certain configurable range. This allows you to experiment for multiple results quickly, especially useful with some specific parameters. In addition, it is possible to convert the amount, usually hexadecimal, to a value in percent.
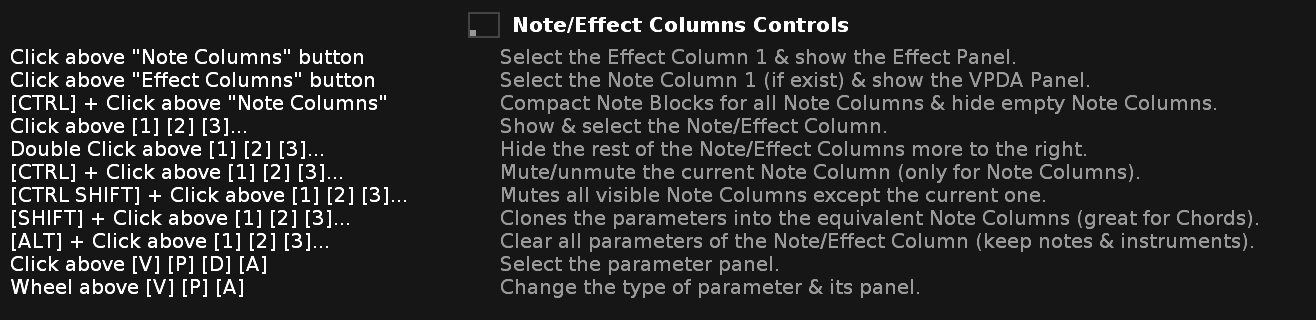
Piano Roll Studio. Note/Effect Columns Controls.
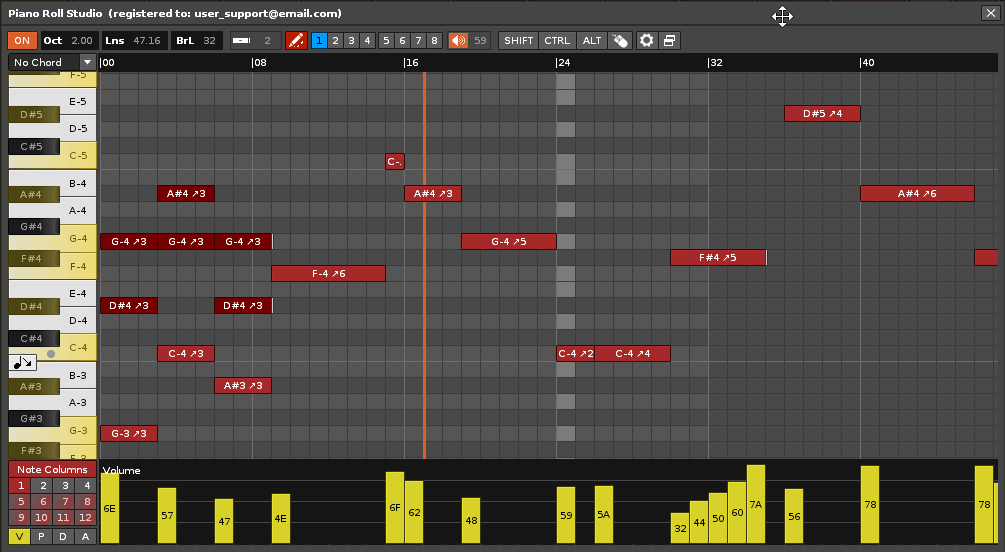
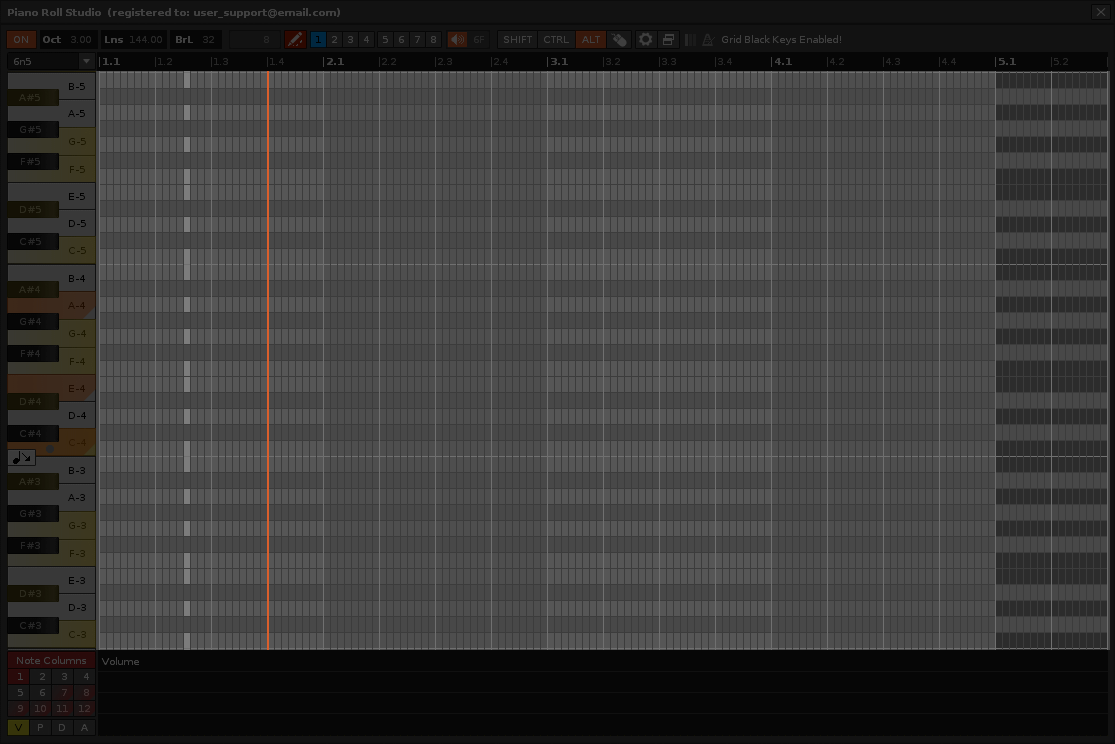
3.5. The Grid: The Note Editor ▲
The Roll Grid is the most complex part of the Piano Roll Studio, as it makes up the entire Note Editor and requires a certain learning curve to master, basically combining keyboard commands.
Piano Roll Studio. Note Editor location.
The composer can use Renoise in the usual way and jump to the Note Editor of the Piano Roll Studio when he deems appropriate or vice versa, or simply use the Grid as a visual aid editing the notes from the Renoise Pattern Editor. In this way, the Piano Roll Studio is not an invasive tool. It allows the composer to use what they prefer to edit or view at any time. The fact that Piano Roll Studio is installed or even turned on does not at all prevent the composer from being able to use the Renoise Pattern Editor as usual, even with the Piano Roll Studio window in the foreground.
Note Editor. View of the empty Grid, with the play marker and cursor separated.
The Grid can display 10 different elements keeping in mind the Note Blocks:
- Separation Blocks according to the BrL value. The background of the Grid shows two blocks of continuously alternating and successive color tones that differentiate what each bar covers according to the progression of each pattern. The BrL value is the number of lines the bar occupies. If the Ruler is synced to the metronome, it will also sync to the BrL value automatically.
- Editable Cells. They are the smaller squares, which together make up the base of the grid. These cells are displayed in a lighter color tone to differentiate them from Non-Editable Cells.
- Vertical Separation Dividers. They are used to divide the progress of the pattern in the Grid equally, showing vertical lines of different colors superimposed on the Grid. The width of the divider is the number of cells it occupies, which is equal to the LPB value if the Ruler is in sync with the metronome. To modify the spacing use
ALT + Wheel on the Ruler. LPB value is the Lines Per Beat. The number of beats define the bar duration. - Horizontal Separation Dividers. They are used to divide into parts equally the octaves of the piano in the Grid, showing horizontal lines of different colors superimposed on the Grid. The height of each divider is always equal to 12 notes (an octave).
- Horizontal Black Markers. They mark all the "black keys" horizontally going through the entire Grid. To show/hide them use
[CTRL 1] . - Status Information for Multiple Selection Modes or Position. It indicates 4 possible operations and their diagonal tracing for a moment when the Selection Mode is changed. It will always appear in the upper left. It is also possible to show the Position in the Song (index of: sequence, track and instrument, and their names).
- Cursor position. It is a horizontally scrolling, one-cell wide "upright virtual piano" that allows for a "cleaner" visual appearance of the entire Grid. This "piano cursor" is equivalent to the Renoise Pattern Editor cursor, but spans the entire height of the Grid, all 120 notes. This cursor may disappear when the song is played back.
- Song Playback Marker. It is a vertical thin line with horizontal scrolling, which can change color depending on whether you are playing the current pattern or not. This line will always mark the beginning of a line or cell.
- Non-Editable Cells. Generally, these contiguous cells are displayed in a darker shade to visually identify them to the right of the Grid (depending on the customizable-looking theme). They are the same as the hidden lines at the end of a pattern. A pattern always has 512 lines, but usually only a smaller number of initial editable lines are shown, such as 64. On these non-editable cells the next pattern-track can be shown superimposed to offer visual continuity of the track's progress.
Pay attention to this recommendation. For convenience when editing Note Blocks, do not use patterns with a large number of editable lines. For example, 32, 48, 64, 96, or even 128 are the most common acceptable amounts. Using a higher number of lines per pattern usually equates to constant horizontal shifts in the Grid and greater editing complexity due to dealing with high information.
Basically, the Grid displays Note Blocks through two modes, the "Note Edit Mode" (allows you to edit notes) or the "Song Playback Mode" (does not allow you to edit notes) and will scroll automatically horizontally when needed. To change mode go to the corresponding switch in the Upper Control Bar or press

PRS with Note Editor displayed. View of the Notes Edit Mode from line 0.
Pay attention. It is necessary to differentiate 3 concepts to understand data groups, easy to visualize in the Renoise Matrix panel. On the one hand, there is the pattern (horizontal visual tracing), which can have up to 512 lines and covers all tracks. On the other hand, there is the track (vertical visual tracing), which encompasses all the patterns in the sequence. Finally, there is the pattern-track, which is equivalent to a single slot in the Matrix panel. It is the intersection between pattern and track.
The Notes Editing Mode. It will only allow the current pattern-track to be displayed, with editing capability (the pattern-track is equivalent to a single slot in the Matrix panel). The Note Blocks of the selected Note Column will be displayed with the track color, while the rest of the Note Blocks will be displayed with a slightly darker color tone, clearly differentiating the notes of the selected Note Column.
The Song Playback Mode. Allows you to view the entire pattern (all tracks of the pattern) by overlaying Note Blocks, obeying various levels of priority by overlapping layers and using the colors of the note tracks. This makes it easy to locate and identify a note on a given instrument with the mouse, play it with the mouse (requires OSC), and then isolate its surroundings (its track) by switching to Note Edit Mode.
Locate → Isolate → Edit → Test. By combining both modes, the composer will be able to fully visualize the song and navigate and identify elements throughout it safely, without fear of accidentally modifying anything, and edit in a millimeter way and with total control when necessary. The philosophy followed is always the same: Locate → Isolate → Edit → Test.

PRS with Note Editor displayed. View of Notes Playback Mode from line 0.
Grid Cells and their Correspondence with Parameters. The Grid is made up of a total of 61,440 exactly the same square cells, called "Grid cells," the equivalent of 120 notes per 512 lines. The mouse pointer has one precision per cell. This means that it will react every time it jumps from a cell, exceeding its square perimeter. This representation system allows to calculate Note Blocks by number of cells and use a direct vertical correspondence with the Parameter Editor, thanks to the distribution of editable Vertical Bars of amounts for the effect parameters, each one of them with the same width as a Grid cell. The Parameter Editor is an essential part of the Piano Roll Studio and it must have full correspondence with the Grid of the roll, that is, with the Note Editor placed on top of it.
Criteria for Overlapping Note Blocks in Note Editing Mode. The first priority level is the Note Blocks of the current Note Column, which will always predominate over the other blocks. The second priority level is the Note Blocks in the leftmost Note Columns of the Pattern Editor. The Note Editing Mode will only be able to display up to 12 Note Blocks per line, due to a peculiarity of Renoise (in a note track there are only up to 12 Note Columns).
Criteria for Overlapping Note Blocks in Song Playback Mode. In addition to preserving the priority levels from the previous mode, the Song Playback Mode has the Note Blocks of the current note track as first priority. The second priority level is that Note Blocks of note tracks that are closer to the current track predominate than those that are further away. The third priority level is that the tracks to the left of the current track predominate.
Pay attention to this recommendation. When using instruments, it is recommended that you only use one instrument per track if possible. That is, each track must have a single instrument, thus being the most logical and coherent. Similarly, using the same instrument on multiple tracks is no problem if there is no other Renoise limitation that suggests otherwise (such as using DSP effect chains for instrument samples from the Sampler or using Plugins). Using only one instrument per track ensures not to saturate the Note Columns of the track while facilitating the identification of the instruments through the Piano Roll Studio Note Editor. In summary,
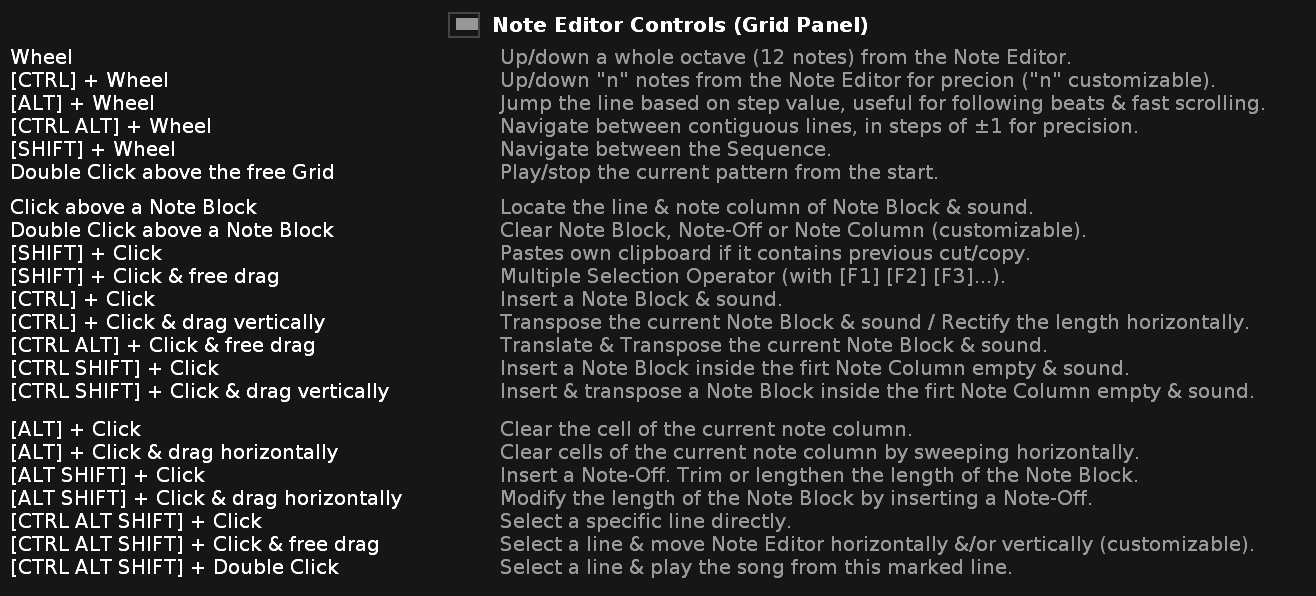
Piano Roll Studio. Note Editor Controls (Grid Panel).
3.6. The Lower Panel: The Effects Parameter Editor ▲
The Effects Parameter Editor is the starting point of Piano Roll Studio. In fact, this bottom panel was the first part of the PRS that was designed and programmed. Basically, it is a panel with 3 horizontal dividers to mark 5 percentages (0%, 25%, 50%, 75% and 100%) to be able to add or remove bars of amounts for effect parameters.

Piano Roll Studio. Location of the Effects Parameter Editor.
Most effect parameters have a direct affinity for the beginning of each note. Therefore, it is difficult to separate these "Quantity Vertical Bars" from the Note Blocks. In other words, it is common to create Note Blocks and then their effect parameters, and not the other way around. Therefore, amounts and their effect parameters are dependent on Note Blocks in most cases.
Pay attention to this recommendation. When you're composing, be sure to first arrange the Note Blocks properly as a first step, setting the effect parameters aside. When you are sure you are done with the Note Block layout, you can edit the effect parameters as a second step. So, first edit the Note Blocks, and then edit the Vertical Bars for amounts of the effect parameters.
Use Any Type of Parameter, No Exception. One of the main unique features of Renoise is its ability to run effect parameters within tracks. In this sense it is clearly superior to other DAWs. The PRS Effects Parameter Editor honors this great feature, since it allows loading any type of effect parameter and its quantity, both in the volume, pan, delay, sample effect columns. o Effects columns of the tracks. Each type of parameter is given a different color, so it is easy to identify them. In the same way, you can work within any type of track, whether it be note tracks, group tracks, send tracks, or the master track.
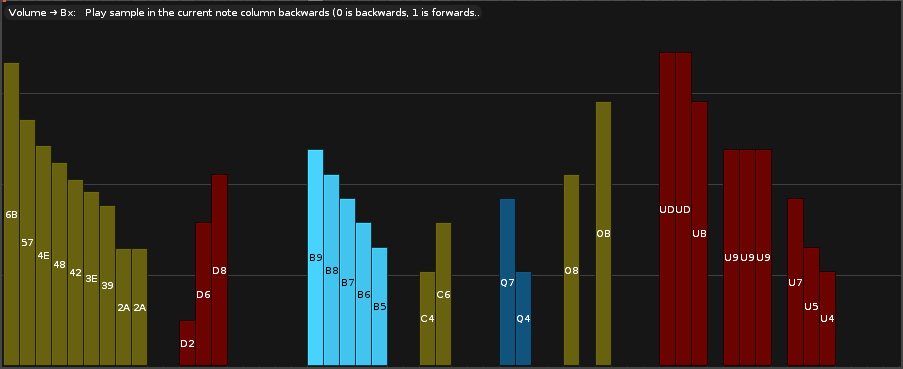
The Vertical Quantity Bar. The Vertical Bars that appear in the Effects Parameters Editor contain 2 parts, the "parameter name" and its "amount" in the center of the Bar, as well as showing a different color for each type of parameter. The name of the parameter is one or two digits, usually one or two letters, accompanying the quantity, which can also be one or two digits in hexadecimal notation. Thus, the larger the amount, the longer the Bar will be. Each parameter uses a specific quantity range, as designed by Renoise. The composer should use each parameter appropriately.
Three panel sizes. The Effects Parameters Editor offers 3 levels of vertical zoom by pressing


Effects Parameters Editor with 3 Zoom levels. "Demo" views of the volume panel.
The volume panel inserts the Vertical Bars of the amounts of each type of parameter by drawing with the mouse pointer from bottom to top.
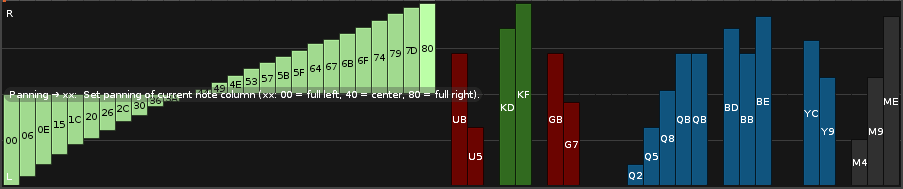
Effects Parameter Editor. "Demo" view of the panning panel.
The panning panel is the most complex, allowing to insert Vertical Bars of amounts from a central axis for L and R, or from bottom to top according to the previously chosen parameter.
Effects Parameter Editor. "Demo" view of delay panel.
The delay panel is the reverse of the volume panel and is an excellent tool for "humanizing notes". Insert the Vertical Bars of the delay amount by drawing with the mouse pointer from top to bottom. This panel only accepts the amount of delay. It is very good at displaying all Note Blocks in the selected Note Column that have delay, whose Delay Bar will usually be at the head or bottom of each Note Block (at the start or at Note-Off). In this way, it is very easy to find the agreement of these values with the Renoise Pattern Editor, respecting its design.

Effects Parameter Editor. "Demo" views of the sample effects and track effects panels.
The sample effects and track effects panels behave similar to the volume panel, but offer more effect parameters. Note that the attached images show a "demo" Bar distribution. Obviously, a song would never have these layouts.
Highlighting of the Bars of the Same Type of Parameter. When a Bar is selected, all bars of the same type will be highlighted with the same vivid color, coloring the rest of the bars with darker colors. This makes it easy to identify amounts of the same type of parameter.
Detection of Note Blocks and Creation of Bar Curves. The Effects Parameter Editor can detect Note Blocks and act accordingly, for example by inserting a Vertical Bar of quantity only at the head of each Note Block, or only in the corresponding cells where a note does not start. On the other hand, this editor allows you to quickly create or delete bar curves by clicking and dragging, being a magnificent support tool for Renoise.
Description of the Parameter at All Times. By doing
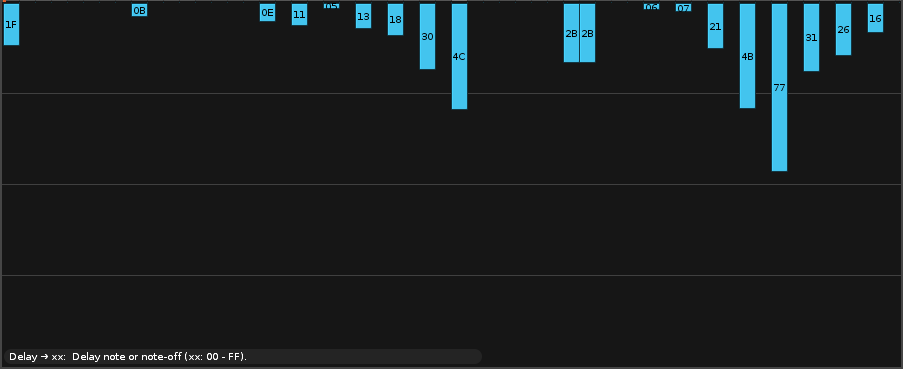
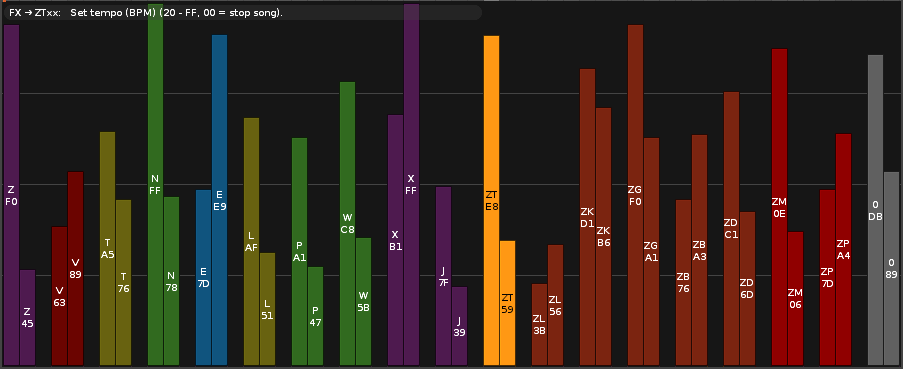
New ZMxx and ZPxx Metronome Parameters. The Piano Roll Studio offers the possibility of controlling the metronome throughout the duration of the song through these two new parameters: ZMxx (Beats Per Bar) and ZPxx (Lines Per Beat). Go to "Preferences / Master Metronome Control" for more information. It is especially useful for changing time signature by changing patterns when necessary, when the composer is making live recordings, for example with a MIDI keyboard. Some musical styles require this utility, such as rock or heavy music or orchestral music, very common in original soundtracks. These parameters are not included in Renoise. This is an exclusive feature of the Piano Roll Studio.
Caution! Renoise can allow inserting "invalid" effect parameters into the Effects Columns of tracks. There is no problem. If there are these parameters written in a pattern, they will simply be ignored. The new ZMxx and ZPxx parameters will only work if the Piano Roll Studio is installed and running.

Piano Roll Studio. Parameter Editor Controls (Bottom Panel).
4. Graphical Interface II. The Preferences Window
The Preferences Window contains several tabs with different panels, both for information and for configuration and control. To invoke it or bring it to the fore, press the corresponding button in the Upper Control Bar.
4.1. The "Renoise Pre-Config" Panel ▲
Please follow the following configuration recommendations for this panel to obtain the best user experience and highest performance with the Piano Roll Studio.

Piano Roll Studio. Preferences Window. General view of the "Renoise Pre-Config" panel.
To better understand this panel, read the section 2.1. Peculiarities of the Current API v6.1 and the section 2.2. Configure Renoise for the Best PRS Experience. They explain in detail why a minimum previous configuration is necessary to obtain better results of use and higher graphics performance.
4.2. The "Preferences" Panel ▲
The Preferences Panel contains all the Piano Roll Studio configuration options. These options are distributed according to their type in 6 categories, separating the sound, the graphical interface and the edition, among others.

Piano Roll Studio. Preferences Window. General view of the "Preferences" panel.
Each category can be minimized using the checkbox at the top right. This is useful in case you need a floating window that takes up little space while you are constantly reconfiguring the PRS.
4.2.1. OSC. Sound Config ▲
The "Open Sound Control" or OSC is a network communication protocol to connect synthesizers, computers and other compatible multimedia devices, available since 2002. It was created as a successor to the MIDI control protocol because it is more powerful than this. A Lua tool for Renoise can use the OSC protocol in a custom way to be able to control the sound, among other things, specifically with two operations, trigger or stop notes, even edit (record notes) in the Editor of Renoise patterns when edit mode is activated, thanks to these two operations.
- If you are interested here is a reference on the Open Sound Control (if the link is not broken): OpenSoundControl Website.
For the Piano Roll Studio to sound, that is, to emit the sounds of the notes, it is necessary to turn on the "OSC Server" in Renoise, and configure the PRS in the same way so that both programs "understand each other", since it is not Plug & Play. Thus, the PRS will be able to send messages to Renoise using this protocol and Renoise will interpret them.

Renoise. Preferences / OSC window (see "Enable Server").
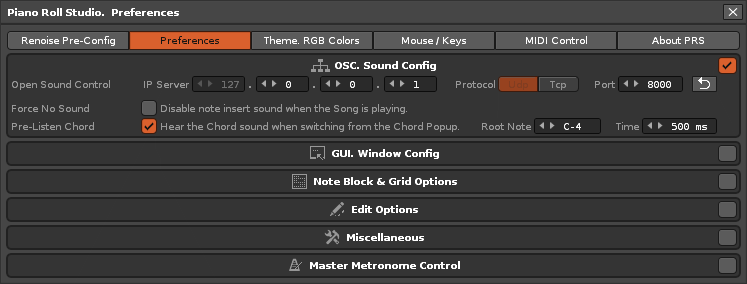
Piano Roll Studio. Preferences Panel. Category of "OSC. Sound Config".
Turn on the OSC for Sound. For the sound to work properly, follow the next two steps:
- Go to "Renoise: Edit / Preferences / OSC" and check the "Enable Server" box. Use the "Udp" protocol and the "8000" port. Here you can observe the incoming messages and see if it really works or not. These incoming messages are usually 2:
- /renoise/trigger/note_on (4 arguments). It will start the sound of a note with a specific volume.
- /renoise/trigger/note_off (3 arguments). It will stop the sound of a note.
- Go to "Piano Roll Studio: Preferences / OSC. Sound Config" and make sure to use the same Port "8000". The PRS will always use the Udp protocol, which is faster and more accurate. Also, you can change the IP address to connect to Renoise, usually 127.0.0.1. Generally, you should never change this address.
Initially, the Piano Roll Studio is preconfigured to easily start using the OSC. You will only have to carry out the first step, only turning on the "OSC Server" box that Renoise has by default turned off for security reasons. Note that the OSC will also not work if the PRS is turned off. If you want to know more about the Open Sound Control, please read the Renoise User's Manual.
Caution! If for some specific "uncontrolled" reason, the Piano Roll Studio does not produce sound even if it is properly configured (Renoise does not receive incoming messages), there is probably a specific problem with the Port used, probably caused by the Operating System itself or for another reason that the user does not control. To solve this, try changing the Port in both steps, for example with "8001". In 99.90% of the cases, you should never have the need to change the value of the Port. Another solution could be to restart the Operating System. It should work again without changing the Port.
Additionally, you can force the sound to turn off by playing notes while the song is playing or prevent chords from playing when loaded into the Virtual Left Piano. By default, both options are set to make everything ring.
Pay attention. The Piano Roll Studio can play the sound of the notes when entering Note Blocks or transposing these blocks within the Grid, or playing the notes in the Left Virtual Piano or even the chords. However, the PRS treats all note editing separately, without depending on OSC. This allows more control for the programmer. When the composer is editing notes from the Piano Roll Studio, the Renoise Pattern Editor will always remain in edit mode off (red frame).
4.2.2. GUI. Window Config ▲
The Piano Roll Studio has a great variety of options to customize the graphical interface, configure the window, or certain information values. In this way, the composer will be able to solve certain adjustments according to his needs. In general, in this panel all the available options have a sufficient description to understand them. These are usually changed via a check box or multi-position switch, or by changing a certain value. However, the Piano Roll Studio will never ask you to restart the tool or to restart Renoise. All changes are direct, "on the fly".
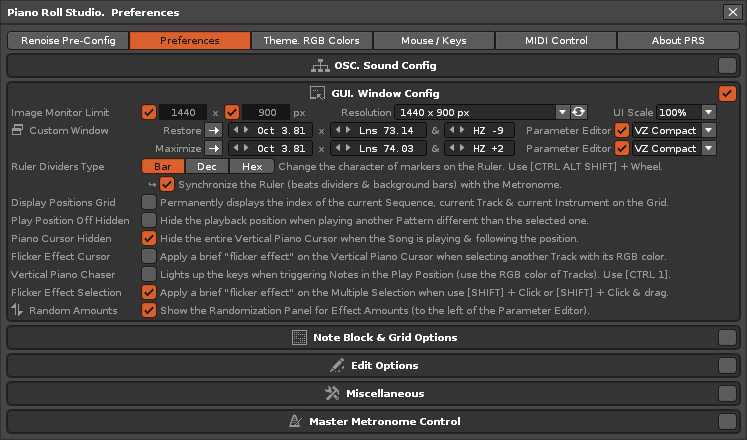
Piano Roll Studio. Preferences Panel. Category of "GUI. Window Config".
There are several customization settings for the graphical interface, each one linked to a specific graphical element. It is possible to customize the size of the window to restore / maximize (number of octaves, number of lines), the division markers of the Ruler, hide certain elements, modify some graphic effect, change the musical notation of the notes directly (in Block Note and piano), extensively modify the information of the Note Block or even add more notes to the Grid belonging to another pattern-track, be it the next or another, among other settings. Some of the settings are as follows...

Piano Roll Studio. Screen Resolution popup to limit the window.
Image Monitor Limit. Allows you to limit the width and height of the PRS window to fit the image monitor used, with pixel precision. To do this, also set the "UI Scale" value equivalent to the one used in Renoise.
Custom Window. It is possible to configure two window sizes to "Maximize" (large size) or "Restore" (small size), setting the window surface with the value of Oct (height), the value of Lns (width) and the "HZ" value of the Horizontal Zoom. Furthermore, it is possible to configure the 3 Zoom levels of the Effects Parameter Editor for each size. To switch between these two sizes, press the right switch on the Top Control Bar. Maximize or Restore is useful to adjust the size of the window millimeter according to the size of the monitor, or to dock windows without overlapping them.
Pay attention to this recommendation. If you only use an image monitor, you can place the Piano Roll Studio window to the left of the Renoise window, or above it, by setting the status of " Restore "so that both windows do not overlap. With "Maximize" you can display the entire Piano Roll Studio window so that it occupies the entire image monitor at specific moments.
Ruler Dividers Type. Allows you to change the markers of the Division Strip in "Dec" (Decimal), Hex (Hexadecimal) and in Bar (Compass). In Dec or Hex it will show the values equivalent to the lines of the pattern. In Bar it will show the beats of the compass, always marking the first beat with the strongest text in bold. In Bar, it will automatically sync to Renoise 's metronome. Still, the composer can modify it manually with

Piano Roll Studio. Vertical Piano Chaser working during Song Playback.
Vertical Piano Chaser. Allows the keys of the Vertical Piano to light up according to the Playback Position Line, that is, when the Notes of the pattern are triggered (use the RGB color of the Tracks). Use
4.2.3. Note Block & Grid Options ▲
It is possible to configure or customize the information displayed in the grid, as well as the information in the note block.

Piano Roll Studio. Preferences Panel. Category of "Note Block & Grid Options".
Musical Notation. By means of this double position switch, the PRS allows you to switch "on the fly" between the musical notation "English" (C, D, E, F, G, A, B) and the musical notation "Neo -Latin "(Do, Re, Mi, Fa, Sol, La, Si). This affects all Note Blocks and also the names of the Left Virtual Piano keys. The PRS does not need to be restarted to switch between these two options.
Note Block Info. This 7-position switch allows you to change the information displayed in each Note Block. It is very useful as background information for studying composition. It will also help the composer to be more orderly. Use
- Note. The Note Block will appear only with the name of the note, such as [C-4] or [Do-4].
- + Ins Idx. The Note Block will appear with the note name, plus the instrument index with two hexadecimal digits, such as [C-4 0A] or [Do-4 0A]. In this case, the index of the instrument is 0A.
- + NC Idx. The Note Block will appear with the name of the note, plus a slash "|" and the index of the Note Column with one or two digits in decimal, such as [C-4 | 1] or [Do-4 | 1]. In this case, the Note Column where the note is deposited is 1.
- + Cells. This option is very useful for calculating durations. The Note Block will appear with the name of the note, plus a slanted "↗" arrow and the number of cells it occupies, such as [C-4 ↗7] or [Do-4 ↗7]. In this case, the Note Block occupies 7 cells, equivalent to the length of 7 lines. If the Note Block has a delay value, it will not modify its number of cells, respecting the Renoise design, which requires going somewhere to change the value precisely. The composer will need to refer to the delay panel of the Effects Parameter Editor to see or precisely edit the delay values of the notes.
- Ins Nme. The Note Block will only display the name of the instrument. For the instrument name to appear, the note must have an associated instrument index, otherwise it will appear without a name. This can also be useful for locating notes without an associated instrument. In any case, the Note Block will appear empty (..) if there is no name in the instrument.
- Trk Nme. The Note Block will only display the name of the note track. In either case, the Note Block will appear empty if there is no name in the note track.
- Empty (≡). Simply, the Note Block will appear empty without any information, only the ≡ symbol.
Pay attention. If a note does not have an associated instrument index, Renoise will read the instrument index of the immediately higher note to make this note sound. Keep this detail in mind in your compositions.
In the Ins Nme or Trk Nme options, a symbolic icon will appear in the right status area of the Upper Control Bar, allowing you to easily differentiate between both options.
Show Note-Off Block. Allows you to view the Note-Off (right edge of the Note Block) for the Note Editing Mode. The Song Playback Mode always omits Note-Offs.
Group in Song Play. Allows you to display only the tracks of the Parent Group in Song Playback Mode. This option visually isolates all Note Blocks that are within a Group. Use
Note Edition Grid. "Previous" allows you to hide/show the continuous note blocks of the previous pattern-track in the current pattern-track. "Next" allows you to hide/show the next pattern-track (Next Pattern) superimposed on non-editable cells in the Grid or to superimpose the current track on another manually selected one (Overlay Track), to use it as a reference or as a "Ghost Track" .
Song Playback Grid . "Previous" allows you to hide/show the continuous note blocks of the previous pattern in the current pattern (all tracks). "Next" allows you to hide/show the next pattern overlaid on non-editable cells in the Grid. This option may slightly impact graphics performance during pattern switching if adjacent patterns are large and full of data. Use "Delay Time" for this case, allowing the current pattern to be "loaded earlier".
4.2.4. Editing Options ▲
Like the previous category, the Piano Roll Studio offers some customizable editing options. Depending on the settings, certain editing functions will do one thing, the opposite, or a different operation. The options that require further explanation are detailed below...
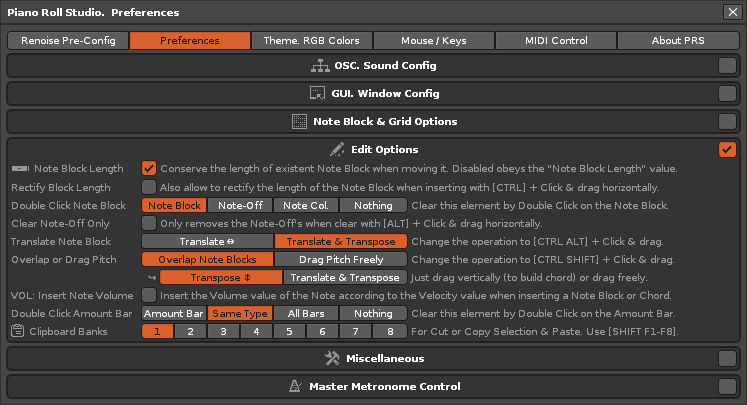
Piano Roll Studio. Preferences Panel. Category of "Edit Options".
- Note Block Length. By activating this option, you can drag the Note Blocks without modifying the original number of cells when the Note Block Length value is greater than or equal to 1. It will not be necessary to configure the Note Block Length in division mode (value "0" or "/").
- Double Click Note Block. Allows you to configure the delete action of double clicking on any note block in the Note Editor Grid.
- Clear Note-Off Only. This activated option allows to delete only the Note-Offs from the Note Column selected, with
[ALT] + Click with drag , without deleting the notes. Only with[ALT] + Single click , without dragging, it also allows to delete the notes. It is agile for quickly clearing Note-Offs, for example when using percussion, continuous notes, or instruments whose notes do not require turning off. - Overlap Note Blocks. Select this option to "overlap" Note Blocks on adjacent Note Columns (offers two options: "Transpose" to drag the Note Blocks vertically or "Transpose & Translate" to drag them freely). Among other things this is useful for building chords manually or simply using more Note Columns to deposit notes.
- Drag Pitch Freely. Select this other option to transpose existing Note Blocks using
[CTRL SHIFT] + Click & drag . This operation does not insert new Blocks or move them horizontally or modify their durations, it only transposes the existing ones when dragging the pointer locates each Head of the Note Block (it only changes the value of the note). This is very useful for experimenting with melodies with the same trigger positions and rhythmic figures. - Double Click Amount Bar. Allows you to configure the double click erase action on any amount bar in the Effects Parameters panel.
- Clipboard Banks. The Piano Roll Studio offers up to 8 clipboards for use with cut/copy and paste. To change it directly use
[SHIFT F1] to[SHIFT F8] . These clipboards even work between different songs loaded in the same Renoise session. Therefore, the composer will be able to translate specific pattern-track data from one song to another in the same session.
4.2.5. Miscellaneous ▲
Miscellaneous is made up of a varied group of configuration and control options, some of which are directly linked to Renoise, that is, so that something in it changes.
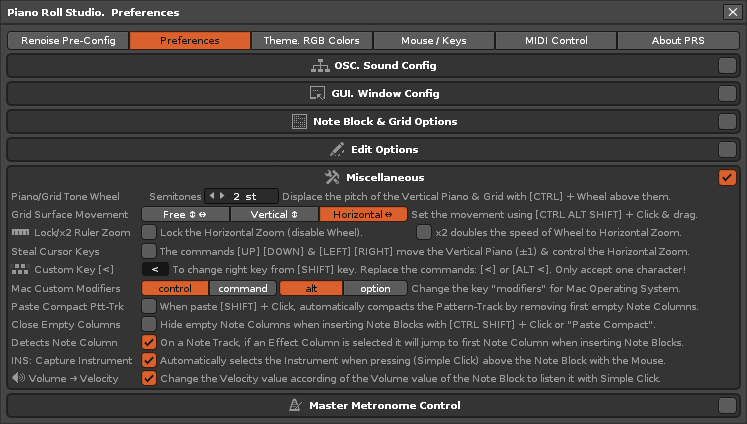
Piano Roll Studio. Preferences Panel. Category of "Miscellaneous"
- Piano/Grid Tone Wheel. When you rotate the
Wheel of the mouse above the Left Virtual Piano or above the Grid, you can move a whole octave up or down. For greater precision, by pressing[CTRL] + Wheel it is possible to control the shift per note (semitones). Change the value between 1 and 11 here to set the shift in semitones up or down (2 semitones by default). Both cases will move the plane and the grid vertically. - Grid Surface Movement. The PRS offers 3 ways to control the scrolling of the Grid directly within it with
[CTRL ALT SHIFT] + Click & drag freely. By default it is in "Horizontal" scrolling only. But switch to "Vertical" scrolling, or both with "Free". - Custom Key [<]. There are different layouts of alphanumeric QWERTY keyboards, with the characters arranged differently. This option allows you to assign the key located to the right of the SHIFT key for greater comfort with your left hand. If your keyboard doesn't have the "<" character on the right side of the SHIFT key, you can change it here. It is recommended not to use the keys assigned by Renoise to play notes or other operations, such as turning the metronome on/off and so on.
- Mac Custom Modifiers. Allows you to switch between the alt/option and control/command commands for Windows, Linux and Mac Operating Systems. For example, if on your Mac the
[ALT] or[CTRL] commands and their possible combinations do not work, you can change them here to[OPTION] and[COMMAND] respectively. The command equivalents are: - Windows: shift - control - alt
- Linux: shift - control - alt
- Macintosh: shift - command - option
- Close Empty Note Columns. This activated option will scan all open Note Columns of the entire note track looking for those that are empty. It is useful to compact tracks, to show only Note Columns with data. It will work with
[CTRL SHIFT] + Single click or when pasting with[SHIFT] + Single click with the option "Paste Compact Ptt-Trk" activated. - Volume → Velocity. With this option activated, the Note Blocks (their sound) will be played with the volume of the block when
Simple Click on it, capturing it previously. If you want to force insert a certain volume from the volume value of the Upper Control Bar, deactivate this option to avoid this capture, in addition to activating the option "VOL: Insert Note Volume".
Caution. If you activate the "Close Empty Note Columns" option, keep in mind that it will analyze the entire track, that is, all the lines of all the patterns on that track. This operation can be very tedious (it can lead to a noticeable delay when playing) if you have patterns with many notes with a multitude of Open Note Columns, with many patterns, and with patterns with many lines. In general, with projects with few patterns, their execution is practically instantaneous. A pattern can have up to 512 lines and up to 12 note columns, and a track can have up to 1000 patterns.
4.2.6. Metronome Master Control ▲
If something is worth betting on this type of sophisticated tools, it is because of this type of detail. The Piano Roll Studio allows you to control the metronome settings from this panel, a feature incomprehensibly not available in Renoise. For example, you can change the meter of a measure (the hit sounds of the metronome) from 4/4 to 6/8 or 3/2... when changing patterns in the sequence, and change or not the number of lines that it will last every hit. To do this, it is necessary that the PRS is turned "ON" and that the "Metronome Update" option is activated (a symbolic icon will appear on the right of the Upper Control Bar). This allows 2 new parameters to be tracked, which are inserted into the Master Track's Effect Columns: ZMxx for "Beat Per Bar" (the numerator of the measure) and ZPxx for "Lines Per Beat" (the number of lines a beat will last).
All of this allows the composer to prepare empty patterns with different measures as required before continuously recording them live, for example, with a MIDI instrument. In fact, you can prepare each pattern, or a part of it with a different time signature. After recording, you can still check that all the notes are in the proper rhythm according to their time signature. Be patient, controlling beat changes requires some practice on the part of the musician. For this reason, musical style aside, most songs never change time signature throughout their duration. However, in Renoise this can be a very interesting and recommended feature.
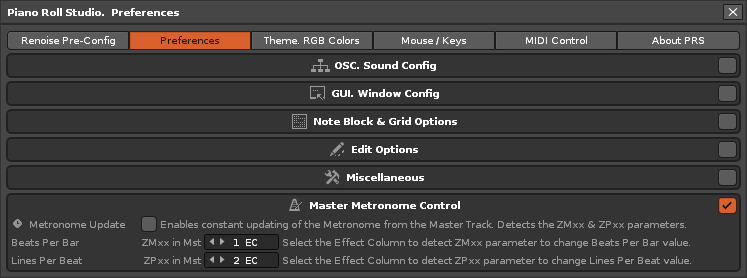
Piano Roll Studio. Preferences Panel. Category of "Master Metronome Control"
Each of the new ZMxx and ZPxx parameters can be inserted in a specific Effect Column of the 8 available on the master track, configurable, by default in the 1 and 2. You can also configure both parameters to be deposited in the first Effects Column, using the values 1 and 1, provided they are written on different lines, or in the Effects Column 8 if you use the rest of the columns to other things.

Effects Parameter Editor. With ZMxx and ZPxx parameters inserted.
From the Effects Parameters Editor you can directly insert these two new parameters, whose Vertical Bars of amounts will appear in red. If the destination Master Track and Effect Column is not previously selected, it will be automatically selected when the amounts are inserted.
The detection of the parameters is instantaneous, very fast. Typically, the metronome settings are changed to change the time signature at the beginning of the pattern. If the composer needs very high precision when song playback is fast, he can change the metronome immediately before changing patterns, that is, make the changes at the end of the previous pattern, and then repeat them at the beginning of the current pattern, so when you play this pattern it will also detect the change.
Also, if you use these parameters, it is recommended that you use them throughout the entire song to control the metronome at any time, for example, to work when you jump abruptly between non-contiguous patterns in the song sequence.
In any case, you can combine these new parameters with the existing ZTxx (controls the BPM value) and ZLxx (controls the LPB value) in Renoise. The advantage of the new ZPxx parameter for "Lines Per Beat" if the value is greater than 0 is that it will modify the metronome, but it will not modify the song's playback speed, as caused by the ZLxx for "Lines Per Beat".

Renoise. Song Options / Metronome window (see "Beats per bar" and "Lines per beat").
You can visually check the update of these two values ("Beat Per Bar" and "Lines Per Beat"). To do this, go to "Renoise: Song / Song Options / Metronome". You will notice that in Renoise these two values are not automatable. Beats Per Bar has a range from 1 to 16 (ZM01 .. ZM0F, up to ZM10 in hexadecimal). On the other hand, the value 0 in Lines Per Beat (ZP00) will take the value of the LPB in Renoise. The rest of the values will also be two digits in hexadecimal.
Caution! Keep in mind that the range of Beat Per Bar is from 0 to 256 values, which adds up to a total of 257 values. Therefore, the maximum available value is ZPFF, which is equal to 255. That is, the value 256 is not achievable because it would increase to 3 digits. This is an extreme case, but it won't be a problem, because in most cases no composer will use such a high value.
4.3. The "Themes. RGB Colors" Panel ▲
The Piano Roll Studio also accepts themes to customize the appearance of the Note Editor, both the Left Virtual Piano and the Grid. The rest of the surface follows the visual aspect of the Renoise theme.

Piano Roll Studio. "Theme. RGB Colors" Panel.
To change the theme, it is recommended to first set the Renoise theme in a previous session (Go to "Renoise: Preferences / Theme", change the theme and restart Renoise). Once you have the Renoise skin theme set up, you can move on...
To change the subject in the PRS, do
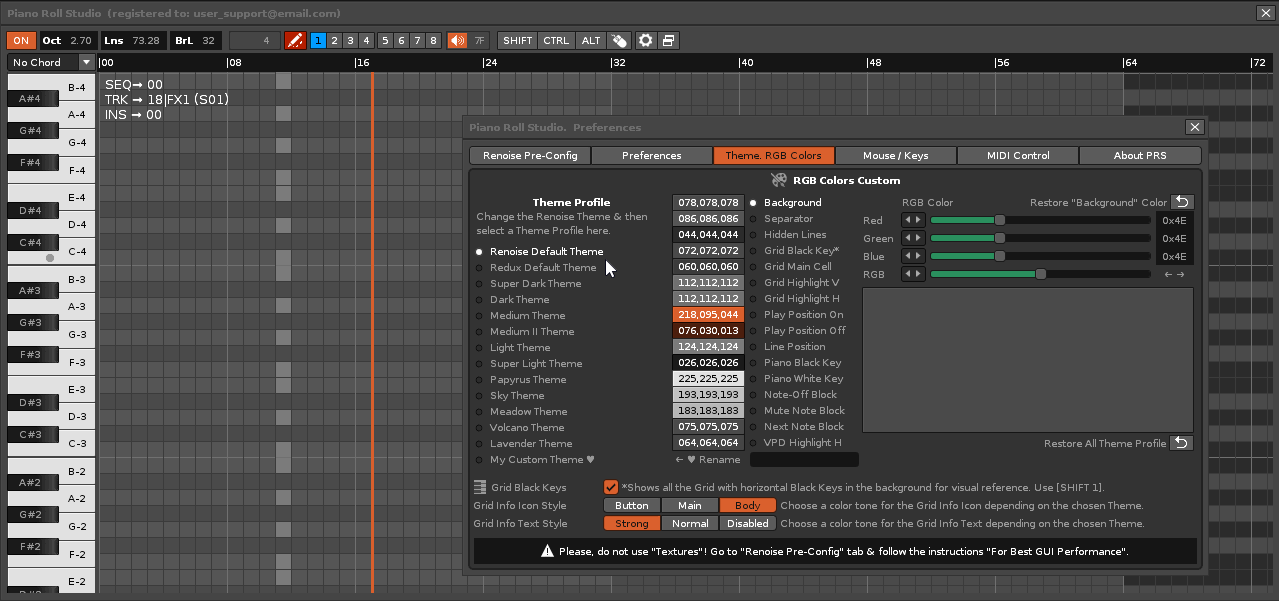
Piano Roll Studio. "Theme. RGB Colors" Panel. Switch between themes and RGB color options.
The Renoise Default Theme is suitable for the Renoise default theme. The Coloful Theme is an example of a bluish theme. The composer will be able to customize any theme from the list on the right, switching between more than 10 RGB color values. If you want to have a custom theme to your liking, it is recommended that you customize the "Coloful Theme".
All changes to all themes are automatically saved "on the fly" in the tool for subsequent sessions.
Customizing the theme to change the look is a great way to integrate PRS with Renoise. In this way, the Piano Roll Studio looks like an internal part of Renoise, despite being an external tool. Enjoy the colors according to your tastes and needs!
4.4. The "Mouse and Keyboard Commands" Panel ▲
The following panel offers a magnificent classified summary of all the keyboard commands that act together with the mouse to execute operations in the Piano Roll Studio, both for editing (editing notes, parameters... ) as navigation (move between lines, columns, tracks, sequence, patterns, instruments, VSTi programs, chords, transposition scales...) or transport (operations related to song playback: play from the beginning of the pattern, play from line, stop, line loop, pattern loop...).
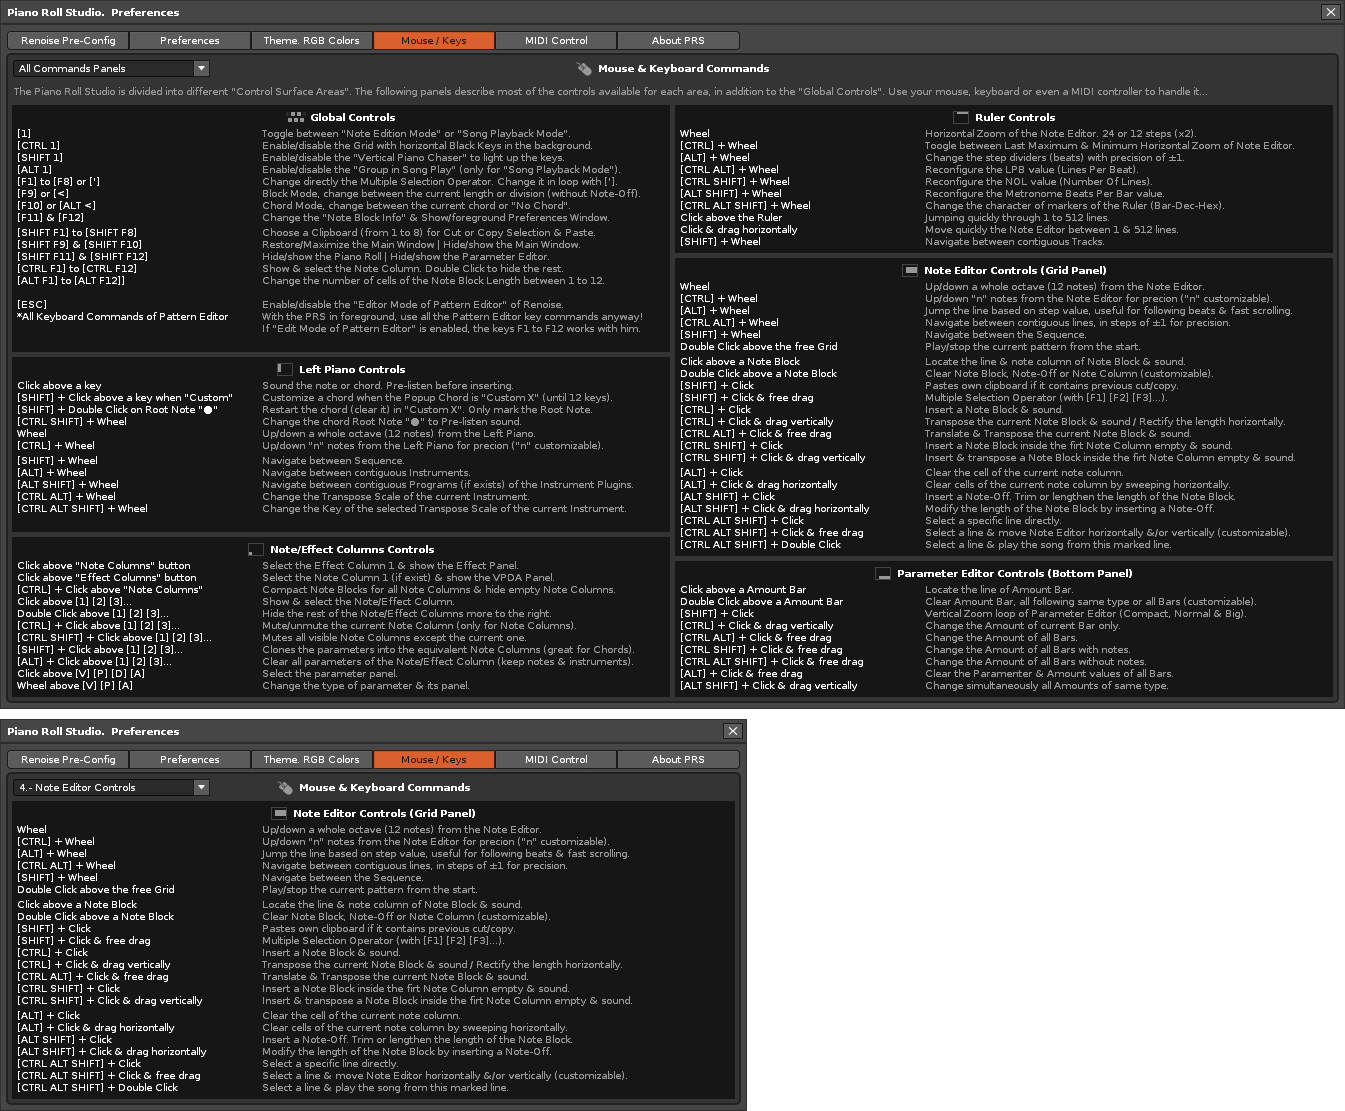
Piano Roll Studio. "Mouse & Keyboard Commands" Panel.
The "Global Controls" commands are general. On the other hand, the PRS is divided into 5 zones according to the surface to be controlled, similar to how Renoise behaves. However, here it is common to use keyboard commands combined with mouse clicks (click, drag, wheel...). Use the dropdown list or click the title icons for each panel to isolate it.
Pay attention. The Piano Roll Studio also allows you to use all the keyboard commands of the Renoise Pattern Editor, even if the Piano Roll Studio window is in first plane. To do this press
If the composer learns all these commands, he will master Piano Roll Studio. In fact, if you already know the Renoise control and have mastered other piano rolls and already have a basic understanding of music theory, you can ignore much of this User's Manual and just concentrate on learning how to use all of these. commands with the mouse.
4.5. The "MIDI Control" Panel ▲
Basically, the following panel allows you to replace the USB alphanumeric keyboard with a USB MIDI pad / USB MIDI controller that has 16 pads. Even with just 4 pads it would be enough for basic control. Additionally, it is also possible to use 4 infinite turn knobs (recommended) or limited turn. This makes it possible to control the Piano Roll Studio only with a MIDI controller and the mouse, without using the alphanumeric keyboard. It can be useful in various scenarios. For the first time, you will be able to use Renoise to "compose millimeter" without an alphanumeric keyboard. It also allows you to save space on the table or combine the MIDI controller with the alphanumeric keyboard and mouse. Use the peripherals that interest you at all times.
Therefore, the composer can click & hold on a pad, such as "PAD 15" for
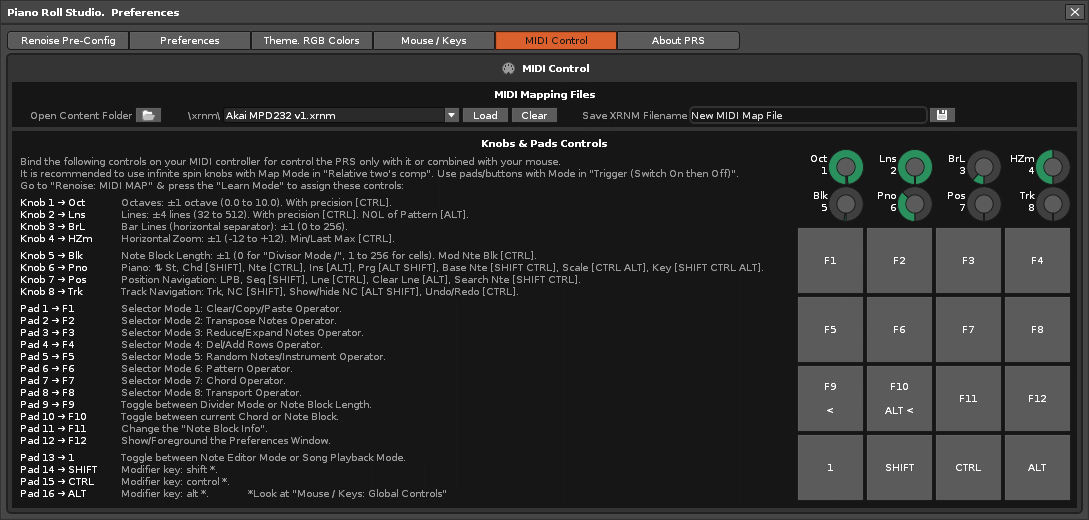
Piano Roll Studio. "MIDI Control" panel.
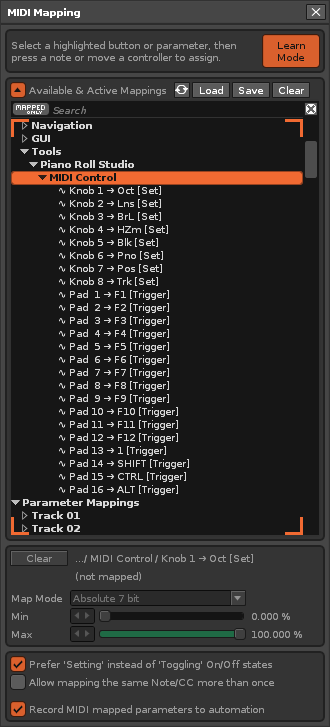
Renoise. "MIDI Mapping" window.
To link all the control knobs, both the rotary knobs and the square pads, go to "Renoise / MIDI MAP" and press "Learn Mode". Then click on each control knob to assign, in the same way you assign with Renoise or use the available list.

Renoise. "MIDI Mapping" window. Mapping of Knob 1 and Pad 1.
4.6. The "About Piano Roll Studio" Panel ▲
There isn't much to say here. If you want to know specific information about the tool, when it was created, who built it, the version used or how to contact the author, this is the appropriate panel...
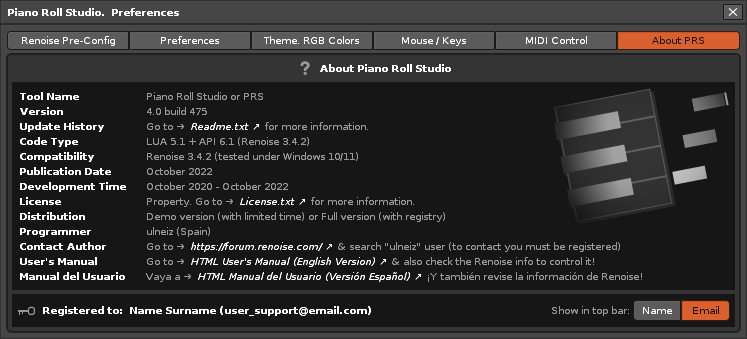
Piano Roll Studio. Panel of "About Piano Roll Studio".
On the other hand, here you will have access to the Renoise forums to contact the author and also to the Piano Roll Studio user manuals, available in English and in Spanish.
5. The Note Block and the Note Off Block (or Note-Off)
5.1. Note Block Parts and Control: Head, Body and Foot ▲
The Note Block is the representation of a note with its duration, painted in the color of the note track that contains it. It is always displayed from left to right. It is equivalent to the rhythmic figure of a note in a musical score. The duration is determined by the number of cells (or lines) that the rectangle adds up to. If it only occupies one cell, the Note Block will be a square, the smallest size of the Note Block.
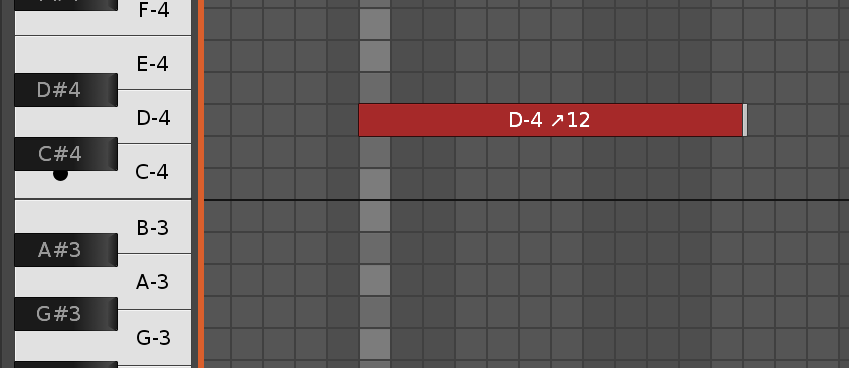
Note Editor, partial view. 12-cell D-4 Note Block with Note-Off.
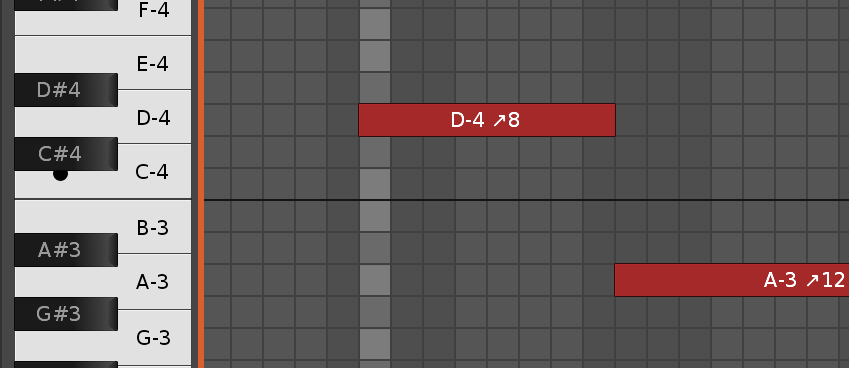
Piano Roll Studio. Partial view. 8-cell Note Block D-4 without Note-Off, with Next Note Block A-3.
In the Piano Roll Studio the Note Block is divided into 3 parts, Head, Body and Foot, and it is convenient to differentiate them:
- Note Block Head. The head is always the first cell to the left of the block, its most important part. Not only will it mark on which line the note is deposited in the Renoise pattern editor, but it will also serve to transpose or translate the entire Note Block in place, or even a whole chord with all its Blocks of Grades. Therefore, if you need to transpose or translate the Note Block, you should always point the mouse pointer over the first cell of the block to operate from it.
- Note Block Body. The body is the rest of the cells of the block, except the first. If a block only occupies one cell, it has no body. Throughout the body, with the mouse pointer it can be divided into more notes keeping the initial duration of the block or insert other blocks with different durations, that is, with a different number of cells. This design is interesting because it allows the composer to do a multitude of operations directly on the Note Block, without previously changing any switches elsewhere. Everything is very direct.
- Note Block Foot. The foot is the cell that stops or turns off the sound of the Note Block, that is, where the note off or "Note-Off" is deposited. Note Blocks may or may not have footing. A Note Block can stop the sound of the previous note (see sample property NNA). Also, for convenience, the end of the pattern will cut the length of a Note Block that does not have a foot inside that pattern.

Sectional representation of Head, Body and Foot. 12-cell D-4 Note Block with Note-Off.
5.2. The Note Off Block or "Note-Off" ▲
The Note Off Block or "Note-Off" corresponds to the foot of a Note Block, if there is a note previously. It is represented by a thin block of white by default (customizable color according to the aspect theme used), which always marks the end of the Note Block, occupying the initial portion of a Grid cell. It may or may not contain a delay value.
If a note does not previously exist, the "loose" Note-Offs (without an associated note) will not be represented in the Grid. Note Off or "Note-Off" serves to stop its associated note.

Note Off Block or "Note-Off".
In general, the Piano Roll Studio Note Editor automatically corrects where the Note-Offs should go according to the needs of each Note Block, so that their duration is preserved. This also allows you to automatically correct loose Note-Offs when necessary.
Pay close attention now. The duration of a note does not always obey the duration of a Note Block (number of cells it occupies). Playback of a Note Block may come to an end and the note may continue to sound. The Note Block is a simple representation of the duration of that note, using a geometric figure, a rectangle or a square. However, Renoise is more complex and complete. It prioritizes the sample settings on your native instruments by setting the "New Note Action" or NNA ("New Note Action") property, with 3 different ways of reacting to the playback of a previous note when the previous note is played. next: "Cut" (instantly cuts the sound of the previous note, silencing it immediately), "Note-Off" (stops the sound of the previous note by activating the release elements of the instrument) or "Continue" (allows the playback of consecutive notes (same Note Column) in a polyphonic way, without breaks). Please read the Renoise User's Manual for more information on the NNA property and the Note-Off concept.
6. Simple Editing of Individual Notes
To start editing notes, the composer can use the Renoise Pattern Editor directly or the Piano Roll Studio Note Editor, as appropriate:
- Use the Pattern Editor. If you directly use the Renoise Pattern Editor to edit, the PRS Note Editor will update its status instantly if it is "ON", displaying Note Blocks edited accordingly.
- Use the Note Editor. On the other hand, if you use the PRS Note Editor, you are actually editing first in the Pattern Editor, and then the Note Editor and the PRS Parameter Editor will update instantly.
Regardless of the editor used, the composer will be doing the same, editing notes, and in the same way with the effect parameters, using a very powerful combination of editors (tracker + piano roll). Each publisher will provide you with a variety of benefits. Use them as you see fit. To learn more about the Piano Roll Studio keyboard commands, go to the summary information panel under "Preferences / Mouse / Key Commands".
Pay attention. The Piano Roll Studio window allows you to use all the keyboard commands of the Renoise Pattern Editor (except the function keys
The deal with Undo and Redo. Among the available keyboard commands the composer can use
The main simple editing operations of the PRS Note Editor are detailed below. Compact 1-octave, 32-line moving images are also shown to help understand the steps together with Renoise, to check what happens there. Keep in mind that the window size you are using from the PRS is likely to be much larger, such as 3 octaves and 96 lines, and you have it placed elsewhere.
6.1. Locate a Note. Capture the Length of a Note Block. Listen to a Note Block ▲
A
Locate a Note. Make
Pay attention. The Note Editor distinguishes between two color tones depending on where the notes are deposited. All Note Blocks within the current Note Column will have the exact same color as the current note track. The rest of the Note Blocks will have the same color but with a slightly darker tone. In this way, it is very easy to see which notes belong to the same Note Column that contains the Note Block that is being located or edited at all times.
Capture the Length of a Note Block. Like locating a note,

Note Editor. Location and capture of length of several Note Blocks with simple Click.
Listen to a Note Block or Chord. Make

Note Editor. Preview a Note Block with Click & hold.
This last operation will also reproduce the corresponding chord sound if there is a selected chord on the Virtual Left Piano. Therefore, on the Note Block you can preview notes or chords.
Also note that the PRS Note Editor will also reproduce the note / chord sound if you perform a transpose operation (vertical tracing shift).
Pay attention. Remember that, for sound reproduction, you must have the OSC activated and linked correctly. Go to 4.2.1. OSC. Sound Settings for more information.
6.2. Insert a Note Block. Define Note Block Length ▲
Define the Length of a Note Block. Go to the Upper Controls Bar and change the value "Note Block Length" between 1 and 256 to previously change the number of cells that will occupy the Note Block that will be inserted later (this will allow inserting the Note with an associated Note-Off ). If the value is 0, the "Note Block Division Mode" will be activated (it does not insert Note-Off), displaying a forward slash "/". The Note Block Division Mode allows a multi-cell Note Block to be sliced into several smaller blocks that together will occupy the same length (same number of cells) as the original Note Block.
Remember that prior to inserting a Note Block, you can capture the length of another existing Note Block with the operation "Capture the Length of a Note Block".
Insert a Note Block. To insert a Note Block, first visually locate a starting cell on the Grid, with the line position and pitch you need. Then
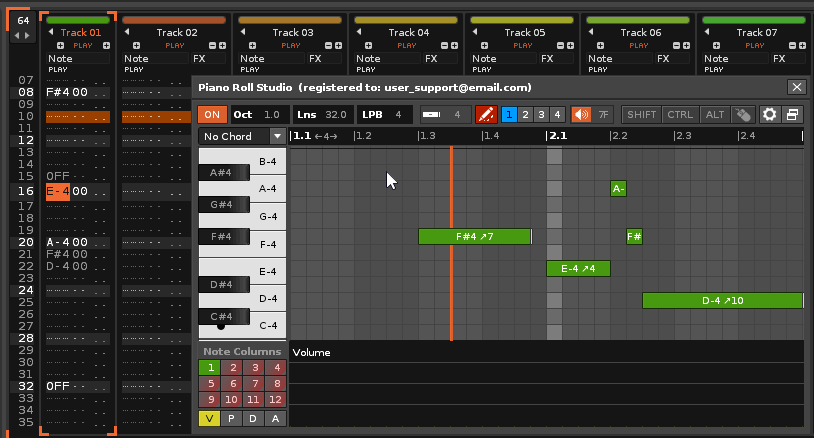
Note Editor. Direct insertion of a Note Block (Note + Note-Off)
You can insert a Note Block from any cell, even if you place it above the body of a pre-existing Note Block. The insertion of the Note Block can be deposited on any other Note Block, replacing it completely, or sectioning it.
Division Mode: Divide or "Chop" a Note Block. With simple insertion it is possible to divide, split or "slice" an original Note Block, using the Split Mode. To do this, first change the Note Block Length value to 0 to activate Split Mode, or press the
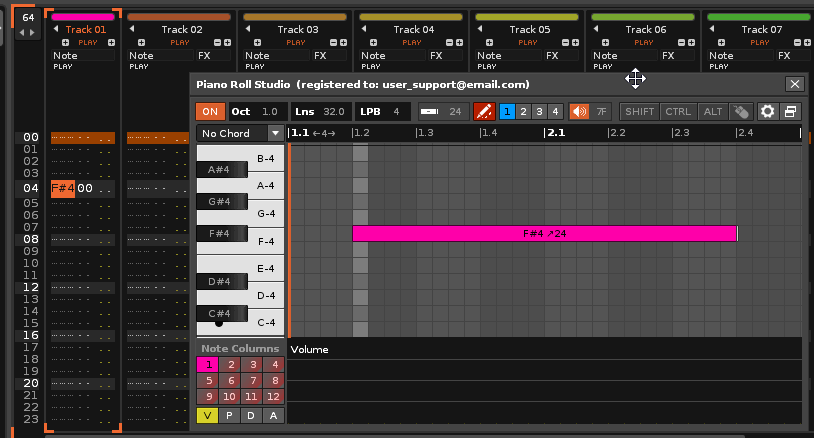
Note Editor. Direct division of an existing Note Block (includes transpositions).
6.3. Delete a Note Block ▲
Simple Deletion of a Note Block. To delete a Note Block go to Head and do
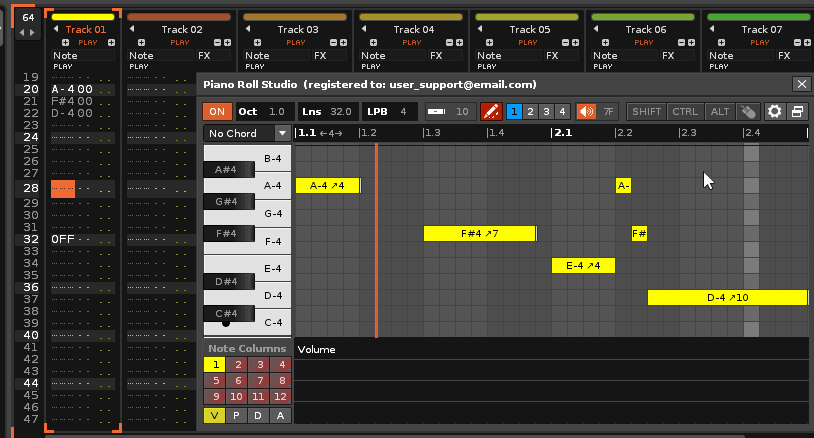
Note Editor. Simple deletion of a Note Block and multiple deletion with dragging.
Multiple Deletion of Cells with Drag. It is also possible to erase at once with a soft sweep a multitude of notes or Note-Offs deposited in the current Note Column. To do this,
Delete only Note-Offs with Drag. With the above operation it is possible to erase only the Note-Offs with a sweep. To do this go to "Preferences / Edit Options" and check the box for the "Clear Note-Off Only" option. Then execute the "Multiple Delete Cells with Drag" operation. When this box is checked, it will also be possible to delete only the note at the top of the Note Block without deleting its Note-Off associated with
6.4. Transpose a Note Block: Modify its Pitch or Height ▲
The Piano Roll Studio edit cursor is made up of a Vertical Bar one cell wide that runs through the 120 available notes (10 octaves), representing a mobile upright piano with black and white keys. You can use this cursor as a reference to transpose a Note Block. Transposing involves changing the pitch or pitch of the note, that is, the frequency with which it is played. Do not confuse the "transpose" operation (vertical plot, height) with the "translate" operation (horizontal plot, time).
Transpose a Note Block. To transpose a Note Block press
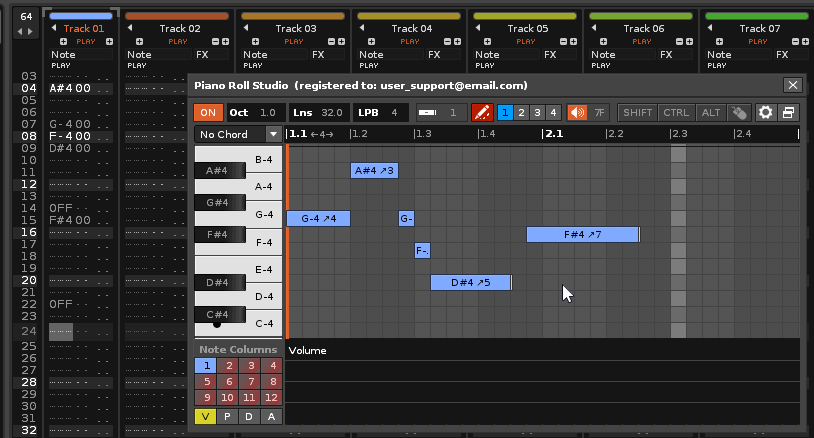
Note Editor. Transpose a Note Block.
Transposing a Note Block involves moving it vertically through the available 10 octaves. The Transposing a Note Block or Chord also works with Instrument Transpose Scales.
Remember that, if necessary, it is possible to move the Grid vertically with octave jumps by turning the
6.5. Move a Note Block: Modify its Line Position ▲
A pattern is always made up of 512 lines. Usually, only the first ones are editable according to the established pattern length (number of lines, value set at the top left of the pattern in the Renoise Pattern Editor). You can translate a Note Block along the editable lines of the pattern. If the length of the line block exceeds the limit of editable lines in the pattern, the block will be shortened automatically.
Move a Note Block. To move a Note Block, above its Head press
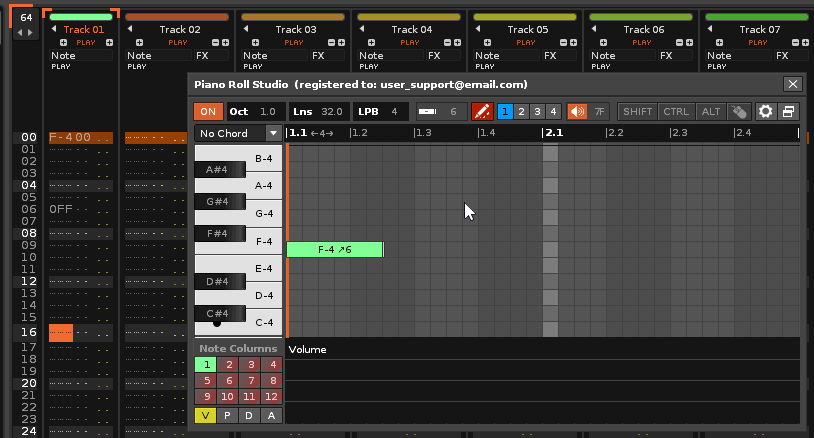
Note Editor. Translation of a Note Block.
6.6. Transpose and Translate a Note Block ▲
Actually, this operation is very similar to the previous one...
Transpose and Translate a Note Block. To transpose and translate a Note Block press
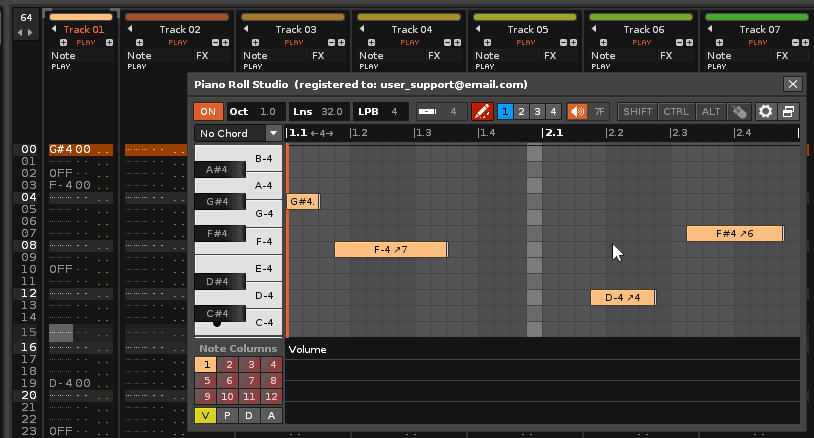
Note Editor. Translation of a Note Block with transposition and shortening of contiguous Note Blocks.
By moving a Note Block horizontally, it can shorten or shift any Note Block before or after it in the same Note Column, even if it is not of the same pitch. In this way, it is possible to free up space around the Note Block in motion.
This operation requires more attention, since you can edit other contiguous Note Blocks than the one in motion. Even with this operation, it is possible to sweep several Note Blocks in a row or even the entire current Note Column. This operation is considered partially destructive.
6.7. Lengthen or shorten a Note Block (Insert a Note Off Block) ▲
Lengthening means adding more cells within a Note Block, and shortening means the opposite. The minimum number of cells in a Note Block is 1, while the maximum is 256, or the maximum that delimits the length (number of lines) of the current pattern. It is possible to lengthen or shorten a Note Block to the right or to the left of it.
Lengthen/Shorten a Note Block on the Right. To modify the length to the right of the Note Block press
For this operation you can also not drag. Simply press

Note Editor. Grinding the length of the Note Block to the right.
Extend/Shorten a Note Block to the Left. To modify the length to the left of the Note Block first activate the Division Mode "/" (Note Block Length=0 or press
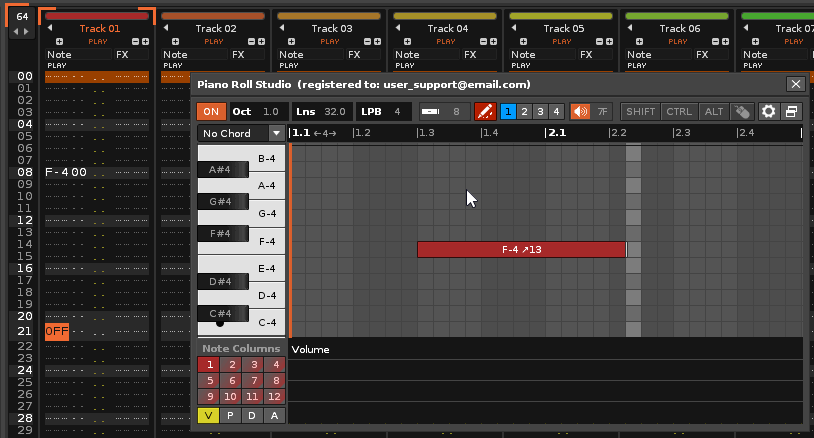
Note Editor. Rectified the length of the Note Block from the left.
Keep in mind that in both operations you can modify adjoining notes that are in the same Note Column.
6.8. Stacked Insertion of Note Blocks. Free Pitch Change in Note Blocks ▲
Renoise has up to 12 Columns of Notes on the note track to insert notes on the same line. Therefore, the Piano Roll Studio accepts up to 12 Note Blocks stacked or overlaid on the same line of the note track. Furthermore, when inserting overlapping Note Blocks, the PRS Note Editor injects them respecting their lengths in a staggered manner, so that it prioritizes the free Note Columns that are further to the left. Therefore, this operation automatically stacks the Note blocks in the leftmost Note Columns as possible.
Stacked or Overlapping Note Blocks Insertion. First go to "Preferences / Edit Options" and select the "Overlap Note Blocks" option. To overlap, stack or stagger Note Blocks press
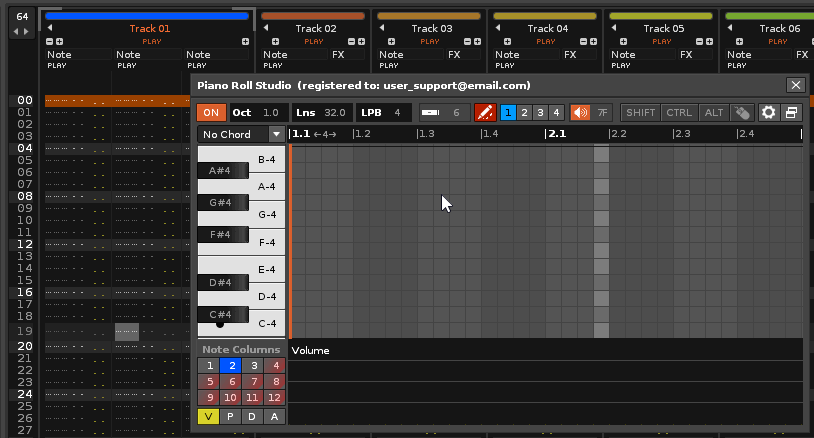
Note Editor. Stacking Note Blocks.
Among other things, this operation allows you to easily build chords by stacking notes. However, the Piano Roll Studio has a more streamlined way of inserting chords as if you were only inserting a single note. With this other direct chord insertion method, "Note Block Layered or Stacked Insertion" also works.
Pay attention. A good trick to start editing notes in an orderly way in an empty pattern is to carry out this operation at least once on the first line (the first cell), with
Change the Pitch of Note Blocks Freely. First go to "Preferences / Edit Options" and select the "Drag Pitch Freely" option. To transpose existing Note Blocks freely

Note Editor. Change the pitch of existing Note Blocks with free dragging.
Note that this last operation uses a base melody from Note Blocks that have already been composed previously. By changing only the pitch of each Note Block, it can preserve the duration of each Block, as well as its trigger and stop position. You can solve continuous strokes by experimenting with melodies even while the pattern is looping. These types of operations are unique, not available in Renoise. Take advantage and experiment with the Piano Roll Studio to be even more creative!
6.9. Position Line. Move the Grid Horizontal or Vertically ▲
In the Note Editor the cursor can also be used to mark a reference position within the pattern. In addition, to allow visualizing the transposition of a note thanks to the mobile piano, the cursor will always mark the current editing position in the pattern, in addition to being able to mark the head of each Note Block.
Position Line with the Cursor. To mark a position with the cursor or reposition it on the pattern, press
To move the Grid there are 3 possibilities. Go to "Preferences / Miscellaneous" and change the "Grid Surface Movement" option. You can move the Grid horizontally, vertically, or both at the same time.
Move the Grid Horizontally or Vertically. To move the Grid press
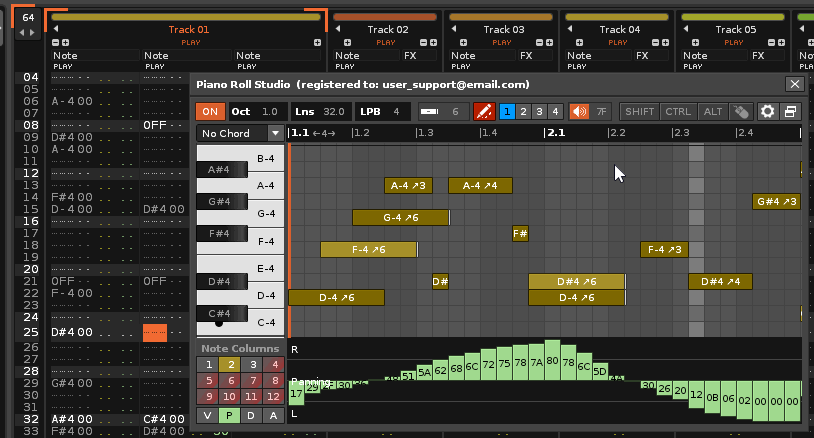
Note Editor. Grid horizontal displacement.
Remember that you can also vertically shift the entire Grid or the Left Virtual Piano via the
6.10. More Control: Create Macros for Additional Mouse Buttons ▲
Remember that to control the Piano Roll Studio you can use an alphanumeric keyboard + mouse, a MIDI controller + mouse, or an alphanumeric keyboard + mouse + MIDI controller.
"The Click": Press and Release. Macro Assignment. Mice with additional buttons, such as some gamer mice, can remap their buttons via macros recorded through software to execute specific commands. A macro is the execution of the sequence of different controls, both the keyboard and the mouse itself. On the other hand, a mouse button, usually referred to as "Click", has 2 positions, press and release. At each position a different macro can be executed, a macro to click and another macro to drop.
Thanks to this feature and the design of the PRS it is possible to get a tactical advantage to further improve the workflow, both for the Note Editor and the Parameter Editor. Let's see an example...
Create Mouse Macros to Move the Grid Vertically. The following example uses the Corsair iCUE4 software and the Corsair Saber RGB PRO Champions Series mouse, using an additional button, the "Back" and recording two macros. The composer may use a similar software system plus hardware from another brand. The steps to follow are the following:
- Open the iCUE4 program, select the "Saber RGB PRO Champions Series" mouse device and select the "Key Assignements" panel.
- Go to the "Macro" panel and in "General" enable the option "Record: Mouse Clicks".
- Record the first "click" macro with the following series of actions (all click): LCtrl - LAlt - LShift - 20 ms - LClick. Make sure to set a delay of about 20 milliseconds before clicking the mouse. After saving you can edit the result.
- Go to the first macro and under "Advanced", set the "Action Trigger" option to "On Keypress" for the action of pressing.
- Record a second macro to "drop" inverse to the previous one, with the following series (all drop): LClick - 20 ms - LShift - LAlt - LCtrl. Remember to include the corresponding delay. If you prefer, instead of recording you can clone the above macro and edit it inverted.
- Go to the second macro and under "Advanced", set the "Action Trigger" option to "On Release" for the drop action.
- Go to the first macro and in "Advanced" add the second macro in "Second Assignement". This will allow you to assign the two macros to the same mouse button so that they work on "press" and then "release".
- Assign the first macro to the desired mouse button, in this case the "Key Back", which corresponds to a button on the left side of the mouse. You can repeat the steps above for other button assignments.
- Go to Piano Roll Studio, "Preferences / Miscellaneous" and change the "Grid Suface Movement" option to "Vertical".
- All set.
Corsair iCUE4 software for mouse. Example of macro configuration to control orders with single Click in the PRS.
Now, with the Back button of the mouse you can move the Piano Roll Studio Grid vertically directly, simply with
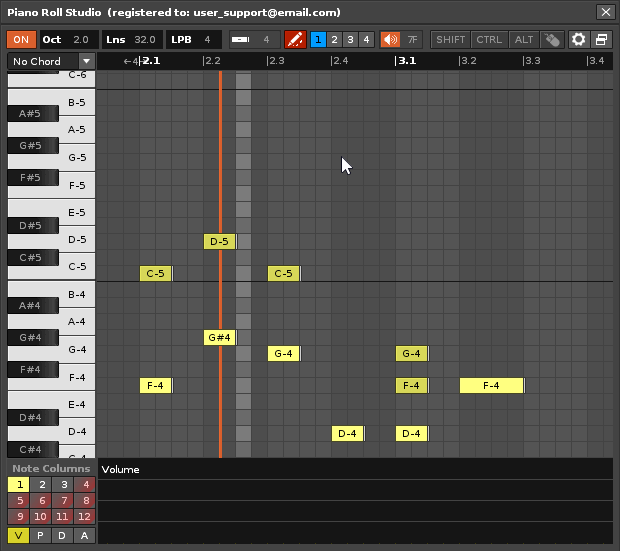
Note Editor. Vertical displazament using single click mouse macros.
You can do a similar procedure with other macros (other command combinations) to execute other Note Editor commands. Ultimately, you can use a typical gamer mouse, or similar mouse, with extra buttons to control certain additional commands directly, without pressing keyboard commands. Macros can be used at the same time in combination with the alphanumeric keyboard without any conflict. For example, you can press and hold the
Remember that the Californian brand Corsair is only a recommended example. The iCUE unifying program version 4 is great and valuable software. On the market there are many brands with mice that include software for macros, among other functions, and that also allow keystroke assignment: Corsair, Razer, Logitech, Roccat, SteelSeries, Mars Gaming, Trust Gaming, Krom, Ozone Gaming, Genius, Cougar...
Use Mouse Keystroke Mapping. An option similar to macros is the "keystroke assignment" or "Keystroke". Using the mouse software, you can use an additional mouse button to assign an alphanumeric keyboard key to it, for example, assign the
7. Chord Selection, Construction and Use
In the Piano Roll Studio selecting and subsequently inserting a chord implies injecting several parallel Note Blocks of different pitch with the same length, but from a single operation, equivalent to the simple insert operation a single Note Block. In this way, manipulating the chord within the Grid is practically identical to manipulating a Note Block, whether to insert, transpose, translate, or even play. In the PRS a chord can be formed between 2 and 7 Note Blocks, although it is strictly considered from 3 notes in music theory.
7.1. Chord Selection ▲
Above the Left Virtual Piano is the chord drop-down menu. It contains up to 60 chords with their identifiable names. Also, the first 4 chords, called "Custom X", are customizable. The circle in the C-4 key is a visual mobile reference for the start of any chord.
Selecting a Chord. Go to the Chord Menu and select the desired chord. To do this, you can turn the
Change Chord Preview on Selection. You can customize the sound of the chord by selecting it by changing its root note (default C-4) and its playing duration (default 500 ms). To do this go to "Preferences / OSC. Sound Config" and change both values in "Pre-Listen Chord".

Left Virtual Piano. Selection of a 3-note chord, with sound reproduction. Maj: C-, E-, G-
7.2. Customizing a Chord ▲
The "Custom X" chord is customizable. From the C-4 key it is possible to add or remove up to 6 more keys to configure the number of notes of the chord (between 1 and 7 in total). Keep in mind that the octave of the note does not matter, only the height of the notes: C, D, E...
Customization of the "Custom X" Chord. Go to the Chord Dropdown Menu and select "Custom X". On the Left Virtual Piano make
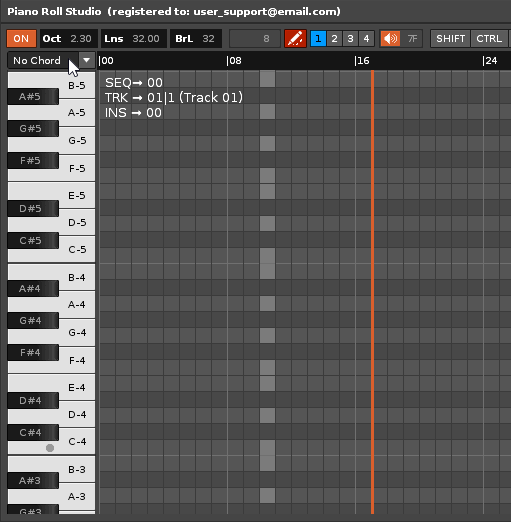
Left Virtual Piano. Customizing a chord.
7.3. Inserting and Editing Chords ▲
When the chord drop-down menu has a chord selected (other than "No Chord"), the Note Editor will always write the selected chord at insertion time. It will also reproduce the full sound of the chord as long as you

Note Editor. Insertion of several chords at different pitches.
Insertion of a New Chord. To insert a previously selected chord do
Edit an already written Chord. You can translate or transpose a chord just as you edit a single Note Block. However, if you intend to edit a single Note Block that is part of the chord, you must treat it as a single Note Block, by switching to "No Chord" in the Chord Dropdown Menu. For a fast workflow, the keyboard shortcut
Lengthen or Shorten an Already Written Chord. On the other hand, if you intend to change the length of all Note Blocks of the chord after inserting it, simply modify only the tonic note length of the already inserted chord, treating it as a single Note Block and overwrite the chord again. complete.
In short, inserting and editing chords is very similar to inserting and editing individual Note Blocks. It will be common to edit individual Note Blocks and entire chords at the same time.
8. Advanced Notes Editing. Multiple Selection Modes
8.1. The Selection Modes. Drawing Diagonals with the Mouse Pointer ▲
The Multiple Selection Modes are an original and exclusive feature of the Piano Roll Studio. They are used to make diagonal strokes through the selection areas with the mouse pointer on the Grid, so that the completion of each stroke allows a specific operation to be performed. There are up to 8 Selection Modes, each with 4 diagonal selection lines and a different color for easier identification. You can combine several Selection Modes to solve several different sequential operations and also combine them with simple Note Block editing. All this allows a great editing capacity.
Steps to Use Selection Modes. The steps to operate are basically two, first choose the mode and then draw the selection:
- In the Upper Control Bar choose a Selection Mode from buttons 1 to 8. In the upper left corner of the Grid, explanatory information about the 4 diagonal lines and their corresponding operation will appear momentarily.
- Draw a diagonal with
[SHIFT] + Click & drag on the Grid. Diagonal strokes can be 4: ↗ ↘ ↙ ↖. In total, up to 32+5 different operations can be executed.

Top Control Bar. Multiple Selection Modes and explanatory information about the traces.
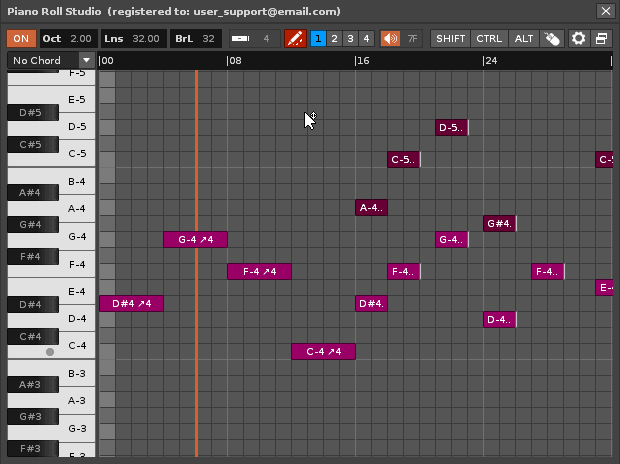
Note Editor. Plotting diagonals for various operations with 2 Modes.
Execute or Cancel the Operation with Blink Effect. Each operation will be executed when you release the mouse
Since you can use the usual keyboard commands at any time, you can take advantage of Undo and Redo's
Pay attention. Remember that precision is cell. The diagonal must be drawn within at least one cell, or by selecting the required number of cells. For certain paths it is advisable to select several cells when drawing the diagonal for greater agility and accuracy.
8.2. Selection Mode 1: General Edition: Cut/Copy/Paste, Drag, Delete, Continuous Paste and 8 Clipboards ▲
- Use of up to 8 Selectable Clipboard Banks. To Cut or Copy the PRS can use up to 8 individual Clipboard Banks for data storage. Press
[SHIFT F1] to[SHIFT F8] to change it. The Clipboard Banks selector is also accessible in the "Preferences/Edit Options/Clipboard Banks" panel. This is especially useful for saving groups of different Note Blocks separately for reuse later. In addition, all clipboards will save the information in the same Renoise session and can be used in several loads of different songs. Each clipboard saves Note Blocks and their positions for each Note Column for later use. - ↗ Continuous Pasting of the Selection. Make this stroke ↗ with
[SHIFT] + Click & drag to continuously paste the selection of one or more Note Blocks until the pattern is complete, without using the clipboard. This is an overlay operation. For a clean continuous paste, pre-erase in the paste area. - ↘ Copy Selection to Clipboard. Make this stroke ↘ with
[SHIFT] + Click & drag to copy the selection of one or more Note Blocks to the clipboard already selected. - ↙ Cut Selection to Clipboard. Make this stroke ↙ with
[SHIFT] + Click & drag to cut the selection. It is the same operation as the previous one, but also removes the selection. - Paste the Clipboard. To paste the used clipboard, do
[SHIFT] + Single Click , without dragging, from the desired cell, taking as reference the first Note Block of the selection. It is even possible to hold[SHIFT] for quick Cut/Copy and Paste. - ↖ Delete Selection. Make this stroke ↖ with
[SHIFT] + Click & drag to delete the selection. This operation is an alternative to[ALT] + Click & drag , because it removes all Note Blocks within the selection, regardless of the Note Columns where they are written. - ↘ Drag the selection. There are 2 operations (select & move). It is first necessary to make this stroke ↘ with
[SHIFT] + Click & drag and immediately doSingle Click again to establish the permanent selection. This actually results in a selection being stroked with a double click at the end of the stroke. Then[SHIFT] + Click & drag over the selection to move it around on the Grid. This is especially useful for moving a small selection. You can even move the selection between patterns or between tracks, changing the location as an intermediate operation before moving the selection.

Note Editor. Multiple Selection Mode 1 (blue). Two operations of continuous paste.
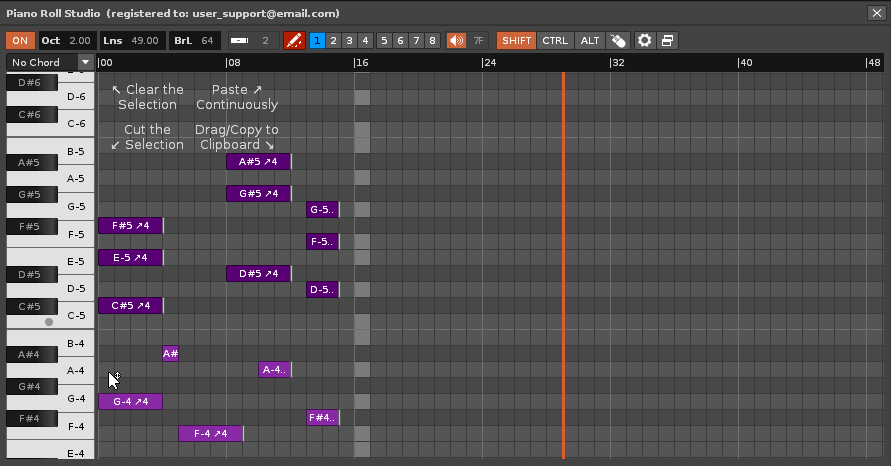
Note Editor. Multiple Selection Mode 1 (blue). Copy & paste operations. Cut & paste operations.

Note Editor. Multiple Selection Mode 1 (blue). Delete the selection.

Note Editor. Multiple Selection Mode 1 (blue). Operations of marking the permanent selection and moving it.
8.3. Selection Mode 2: Group Selection and Transposition ▲
- ↗ First Select in All Notes Columns. All Note Blocks within the selection are marked in orange.
- ↘ First Select Solo in Current Note Column. Only Note Blocks in the current Note Column within the selection are marked in orange.
- ↙ After Transpose Selection Up. It will raise all the selected Note Blocks equally.
- ↖ After Transpose Selection Down. Contrary to the previous operation. It will tone down all the selected Note Blocks equally.
- Uncheck Selected Note Blocks. To unmark all Note Blocks in orange make
[SHIFT] + Single Click on any empty cell. If you change the Selection Mode they will also be unchecked.
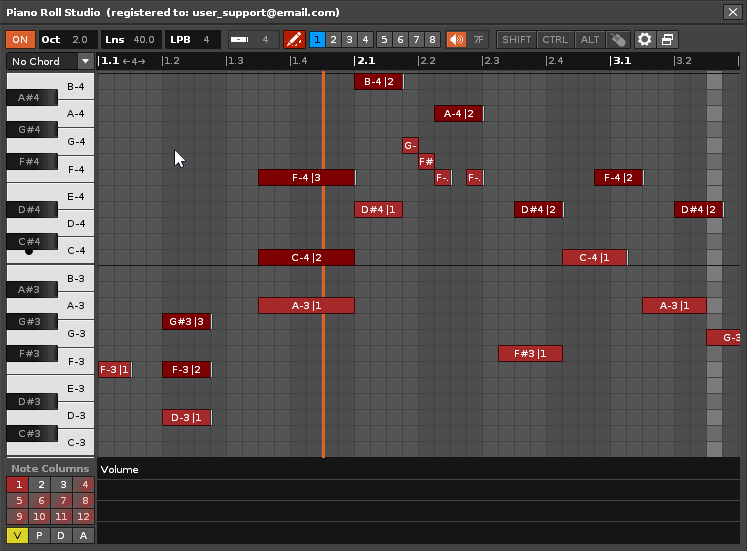
Note Editor. Multiple Selection Mode 2 (orange). Transpose two different selections.
8.4. Selection Mode 3: Lengthen or Shorten Note Blocks ▲
- ↗ First Select in All Notes Columns. All Note Blocks within the selection are marked in yellow.
- ↘ Then Extend Note Blocks. Select horizontally a specified number "n" of cells (vertical will be ignored). Note Blocks will grow that number "n" of cells, as well as the empty spaces between Note Blocks.
- ↙ Then Shorten Note Blocks. Contrary to the previous operation. Select horizontally a specified number "n" of cells (vertical will be ignored). Note Blocks will reduce that number "n" of cells, as well as the empty spaces between Note Blocks.
- ↖ First Select Solo in Current Note Column. Only Note Blocks in the current Note Column within the selection are marked in yellow.
- Uncheck Selected Note Blocks. To unmark all Note Blocks in yellow make
[SHIFT] + Single Click on any empty cell. If you change the Selection Mode they will also be unchecked.

Note Editor. Multiple Selection Mode 3 (yellow). Extend and shorten selection Note Blocks.
8.5. Selection Mode 4: Inserting or Deleting Cells (Lines) ▲
These operations can include or remove empty cells or even lengthen or shorten Note Blocks along their Body. In this way, it is possible to move Note Blocks in groups or add gaps of several cells in intermediate areas.
- ↗ Include Cells in All Note Columns. Select horizontally a number "n" of cells determined from the desired cell to include (the vertical will be ignored). The entire Grid will shift "n" cells to the right.
- ↘ Include Cells in Current Note Column. Select horizontally a number "n" of cells determined from the desired cell to include (the vertical will be ignored). Only the current Note Column will shift "n" cells to the right.
- ↙ Remove Cells in Current Note Column. Select horizontally a number "n" of cells determined from the desired cell to remove (the vertical will be ignored). Only the current Note Column will shift "n" cells to the left. It can also be used to delete the entire current Note Column, spanning all 120 notes regardless of vertical selection.
- ↖ Remove Cells in All Note Columns. Select horizontally a number "n" of cells determined from the desired cell to remove (the vertical will be ignored). The entire Grid will shift "n" cells to the left. It can also be used to delete the entire current pattern-track, spanning all 120 notes regardless of vertical selection.
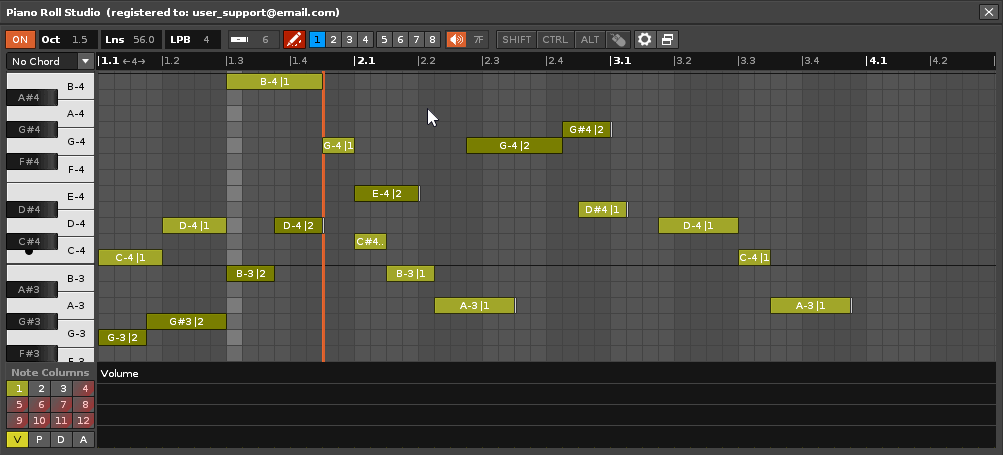
Note Editor. Multiple Selection Mode 4 (red). Inserting and deleting cells.
8.6. Selection Mode 5: Changing the Instrument Index and Note Randomization ▲
The diagonal tracing to the right allows you to change the instrument index of the Note Blocks. Remember that it is recommended that the instrument always be routed to a single track, even though there may be multiple instruments on a single track.
The diagonal tracing to the left allows the Note Blocks to be randomized. This is very useful for quick experimentation with tones. You can also unlock the composer if you are in an uninspired moment. Randomize several times and test the results until you find one that suits you.
- ↗ Change Instrument in Selection for All Note Columns. First choose an Instrument from the Renoise Instrument Box. Then make your selection from the Grid.
- ↘ Change the Instrument in the Selection Only for the Current Note Column. First choose an Instrument from the Renoise Instrument Box. Then make your selection from the Grid.
- ↙ Randomize Note Blocks in Selection for Current Note Column Only. The vertical selection defines the pitch range of the notes to randomize.
- ↖ Randomize Note Blocks in Selection for All Note Columns. The vertical selection defines the pitch range of the notes to randomize.
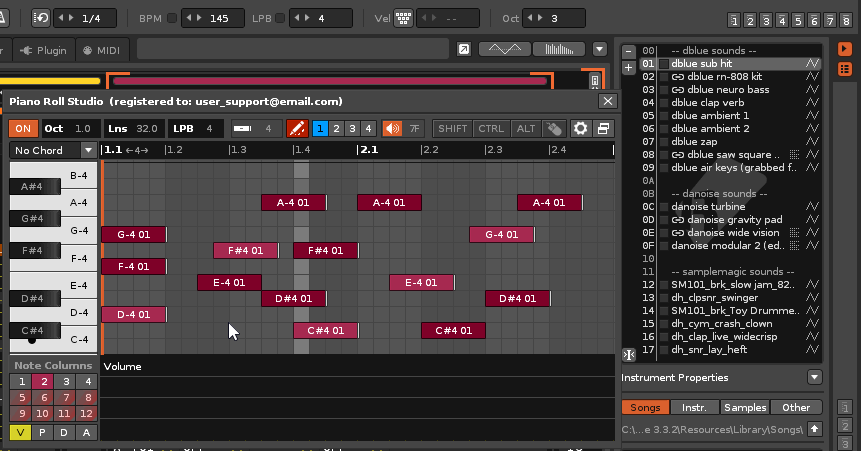
Note Editor. Multiple Selection Mode 5 (purple). Change of instrument in the selection.
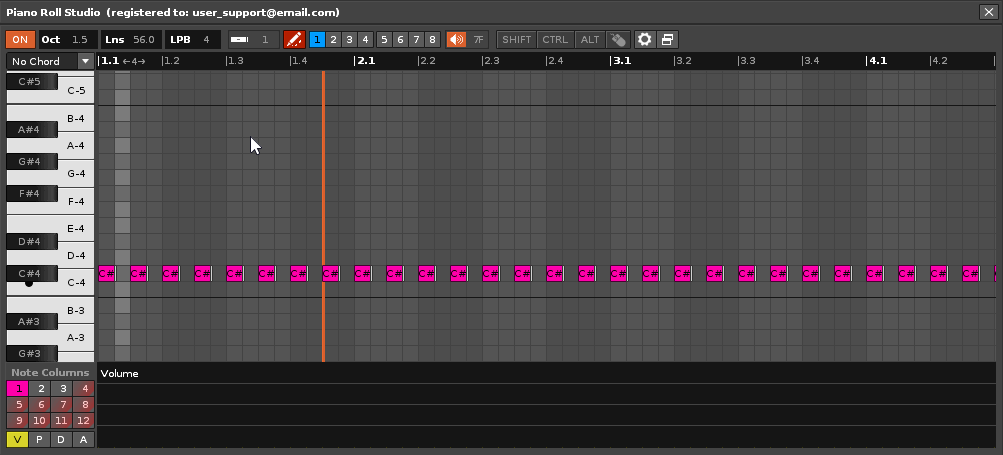
Note Editor. Multiple Selection Mode 5 (purple). Randomization of the Note Blocks of the selection.
The Note Block Randomization also works with the instrument's Transpose Scales. First select a Scale and then randomize the Note Blocks always within it.
8.7. Selection Mode 6: Chord Operations ▲
- ↗ Detect Chord in Selection. Allows you to determine if the selected chord is one of those available in the Chord Dropdown List. If so, it will automatically select it.
- ↘ Convert Current Note Column to Chord in Selection. First compose a Note Column with "base notes". Then make your selection on the Grid. This is very fast for creating chord sequences.
- ↙ Convert All to Current Note Column. This stroke is the reverse of the previous one. Allows you to destroy chords to recover only the Note Column with "base notes". By combining these last two strokes it is very easy to quickly change the chords to test them.
- ↖ Insert Chord Progression. Lets you add chords cumulatively from left to right from the first cell to the end of the pattern. The horizontal will mark the number of cells in the Note Blocks that make up the chord. The vertical will be ignored.

Note Editor. Multiple Selection Mode 6 (brown). Convert the Note Blocks of the selection into the current chord.

Note Editor. Multiple Selection Mode 6 (brown). Create progressions of the current chord with the selection.
8.8. Selection Mode 7: Operations with Pattern-Tracks and Patterns ▲
The diagonal tracing to the right allows you to operate with the entire pattern, whether to erase, delete or clone. This is similar to working inside the Renoise Matrix panel, but execution is resolved by a selection.
The left diagonal treatment allows to operate only the current pattern-track, both for deleting or cloning. Obviously, as it is a slot in the Matrix panel, it cannot be removed, since it is a part of the pattern.
Pay attention. Do not confuse "clear" with "delete". The action of "clear" implies removing elements from inside a container, such as a pattern, or a clue pattern. The action of "delete" implies removing the container completely, that is, in in this case the entire pattern. Therefore, it is not possible to "delete" a pattern-track (a slot within Renoise's Matrix panel).
- ↗ Clear or Delete the Pattern. To "clear" the elements inserted within the pattern, select a single vertical slot. To "delete" the entire pattern select two or more vertical slots. In both cases the horizontal will be ignored.
- ↘ Clone a Complete Pattern. Select one or more slots vertically. The operation clones the current pattern as many times as vertical slots you select. In addition, the first cloned pattern is selected, which will be the one next to the current one in the song sequence. The horizontal will be ignored.
- ↙ Clone a Pattern-Track. Similar to the previous operation, select one or more vertical slots. The operation first creates new patterns and clones the current pattern-track as many times as vertically grooves you select. In addition, the first cloned pattern is selected, which will be the one next to the current one in the song sequence. The horizontal will be ignored.
- ↖ Delete the Pattern-Track. This is the most direct operation to erase only the current pattern-track. Select one or more slots vertically. This operation is the same as deleting a slot in the Renoise Matrix panel.
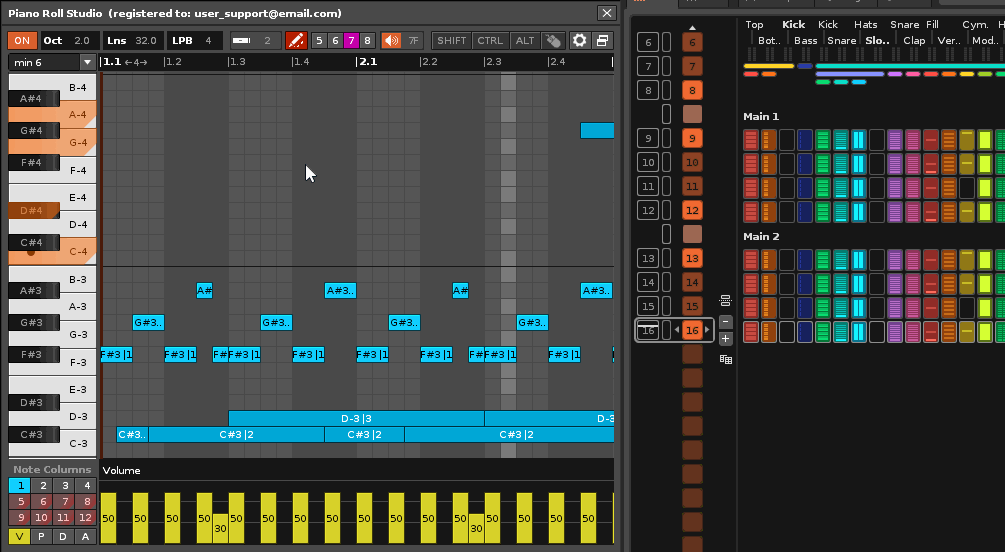
Note Editor. Multiple Selection Mode 7 (pink). Sequential multiple cloning of the current pattern.
8.9. Selection Mode 8: Transport Operations: Line or Pattern Loop Play/Stop and Play ▲
In addition to all the editing operations, this is the only Multi Select Mode dedicated to transport. With these strokes you can solve interesting operations, such as the song playback from the beginning of the pattern, its stop, playback from the current line or starting slot, loop playback of several lines, very interesting to try listening to specific pieces of pattern, as well as loop playback of the entire pattern. All of these operations are very useful in both the Note Editing Mode and the Song Playback Mode. In the latter mode, be sure to resolve selection strokes above empty slots. In fact, all these diagonal strokes can be resolved within a single empty slot, but it is always easier to cover more.
- ↗ Playback or Stop the Pattern. If the song is stopped, it will play from the beginning of the pattern. If the song is playing, it will just stop. The vertical is ignored.
- ↘ Play From The Line. This selection stroke reproduces the pattern from the start of the selected line or starting slot. The vertical will be ignored.
- ↙ Repeat the Selection. This operation is very interesting because it allows you to loop selections of lines in a millimeter way, something not possible since Renoise. Also, it is very easy with the selection stroke. Select the start line to the desired end line for loop playback. You can stop with the first operation. The vertical will be ignored.
- ↖ Loop Repeat the Entire Pattern. This selection stroke loops the pattern from the beginning. The vertical will be ignored.
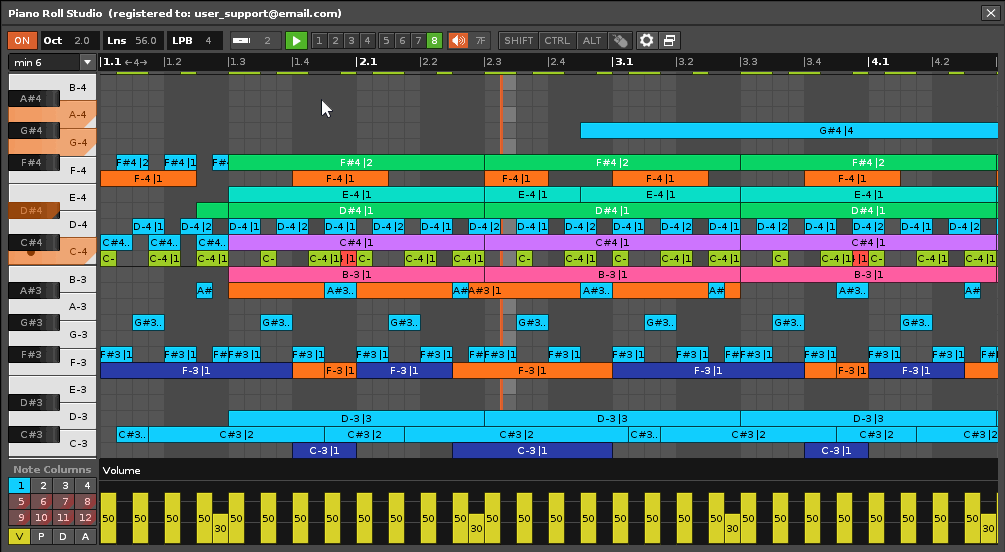
Note Editor. Multiple Selection Mode 8 (green). Play from line or start and stop.
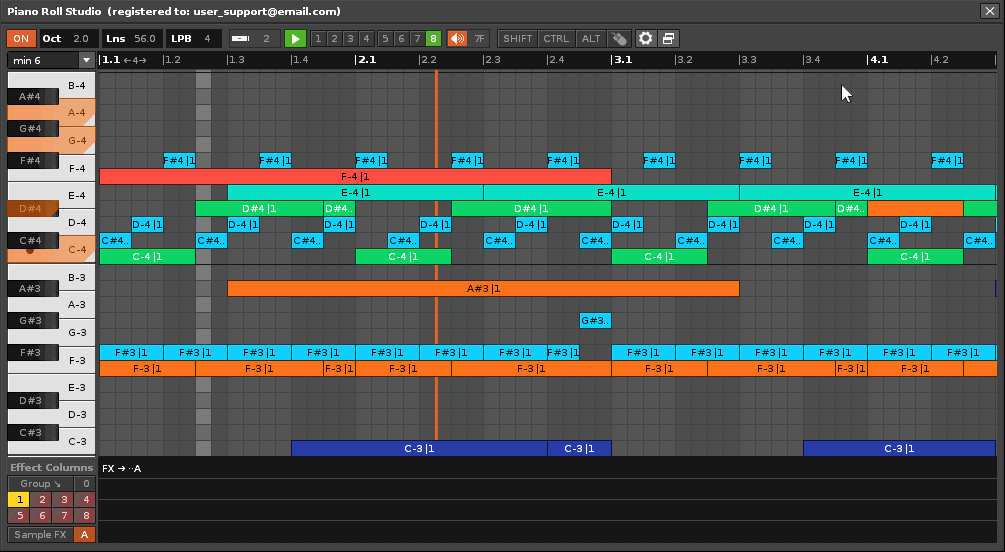
Note Editor. Multiple Selection Mode 8 (green). Looping the selection.
9. The Effects Parameter Editor
The Effects Parameter Editor is a crucial part of the Piano Roll Studio. This lower editing panel is so important that without it the PRS would hardly make sense. Once the composer composes the notes, placing the Note Blocks as desired, he can use the Parameter Editor to nuance them with effects or use other types of effects that affect other elements. Generally, it is a good idea to compose the notes first and then add the effect parameters, not the other way around. If you are from another DAW, you will be amazed at how much you can do with the effect parameters. Precisely here lies the great power of a tracker and, probably, it has the greatest complexity.
Show only the Effects Parameter Editor. The Piano Roll Studio can be set with "Oct" to 0 to hide the entire Note Editor. Practically, this turns the PRS into a single panel, the one corresponding to the Effects Parameters Editor, so that it can only be used to manipulate any type of effect parameter and use Renoise > directly to edit notes. This feature adds more flexibility when using Piano Roll Studio. If you don't want to use the Note Editor Grid for composing for whatever reason, you can just use the Effects Parameter Editor in a more compact window. Convert the Piano Roll Studio into a single Parameter Editor for the mouse!
The Effects Parameter Editor supports all effect parameters and their Renoise amounts. Its main advantage is that you can change the parameters and their amounts very directly with the mouse, a feature that is not possible in Renoise, since it is more intended to be used with keyboard commands. In addition, it allows editing by generating curves or linear shapes of any type by means of strokes with the mouse applying them in different ways, considerably increasing the work flow. Currently, the Effect Parameter Editor is most likely the best tool out there for analyzing, editing or correcting effect parameters directly with the mouse.
Types of Effects Parameters. There are basically 6 variations of effect parameters according to the column where they are going to be deposited. This is an intrinsic feature of Renoise, limited to 2 or 2 + 2 digits with certain nuances. All of them are controllable from PRS:
- xx. Two-digit quantity without associated letter. It is the typical one for volume, pan, delay...
- Ax. Parameter of a letter and quantity of a single digit number. They can be deposited in the volume and panning columns.
- _Axx. Single letter parameter and quantity of a two digit number. They are deposited in the Effects Columns of the track.
- _Axy. Parameter of a single letter and two separate amounts of a single-digit number each. They are deposited in the Effects Columns of the track.
- ABxx. Two-letter parameter and quantity of a two-digit number. They belong to the global parameters of the tracker. They are deposited in the Effects Columns of the track.
- xyzz. These are three amounts of two one-digit numbers and another two-digit quantity. They are used to automate the parameters of the devices in the effects chain for each track. They are deposited in the Effects Columns of the track.
Monitoring of Effects Parameters and their Amounts. Like the Note Editor when monitoring Note Blocks, the Effect Parameter Editor allows you to monitor the effect parameters and their amounts using Vertical Bars that generate separate colored bar graphs that usually have their correlation with Blocks. of Notes. This is a considerable visual aid when dealing with effect parameters from Renoise, which can display a large number of accumulated values with some difficulty to read or interpret within the Pattern Editor.
The composer will be able to load old songs already composed and will be able to see or analyze them "from another perspective", thanks to the Note Editor and also thanks to the Effects Parameters Editor. It is very likely that, by using the Effects Parameter Editor, the composer will begin to better understand the effect parameters and each of their peculiarities. The Piano Roll Studio makes things easier when you start to compose more complex songs.
9.1. Column Types and Selector "V-P-D-A" ▲
There are up to 5 different types of columns to deposit effect parameters in the Renoise Pattern Editor, also controllable from PRS. Click
From the V-P-D-A Selector it is possible to choose the type of effect panel. Each effect panel allows you to insert and edit a variety of specific effects, representing the amounts of each parameter using Vertical Bars classified by color.
"V" switch for Volume Column. In "Note Columns" do
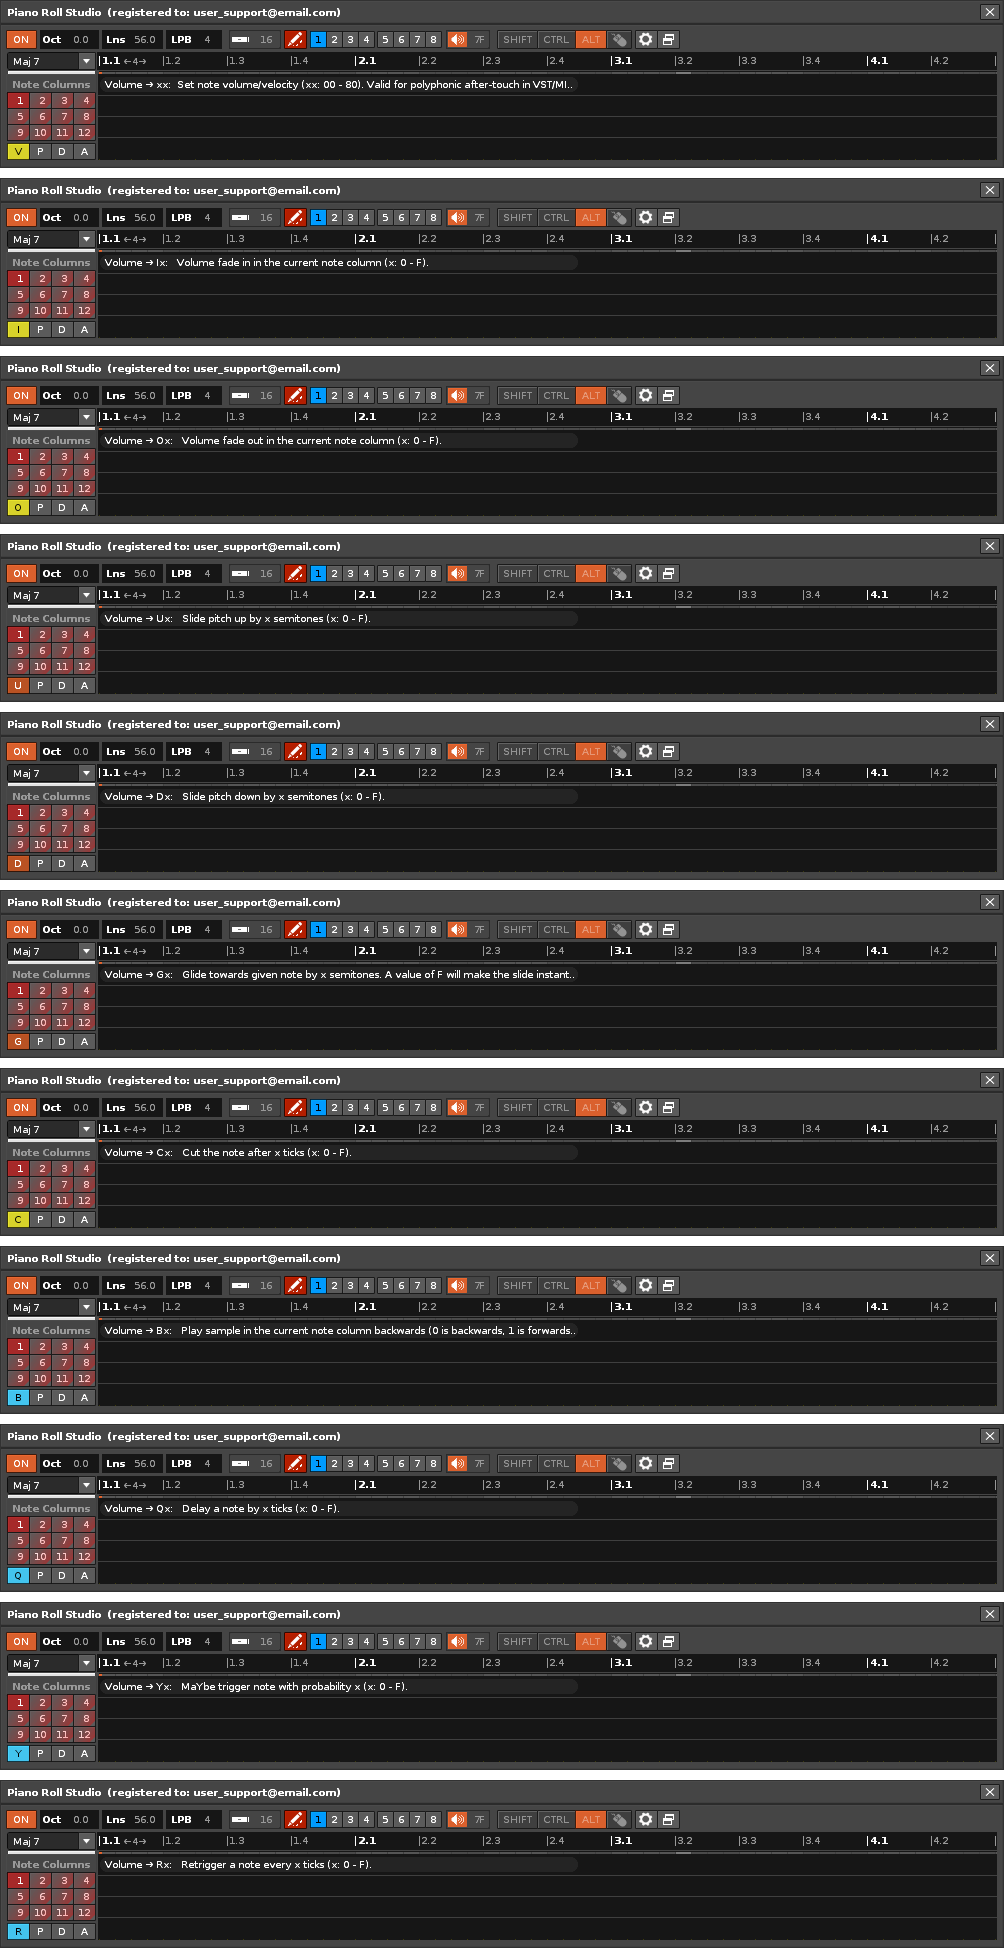
Effects Parameter Editor. Volume panel.
Switch "P" for panning Column. In "Note Columns" do
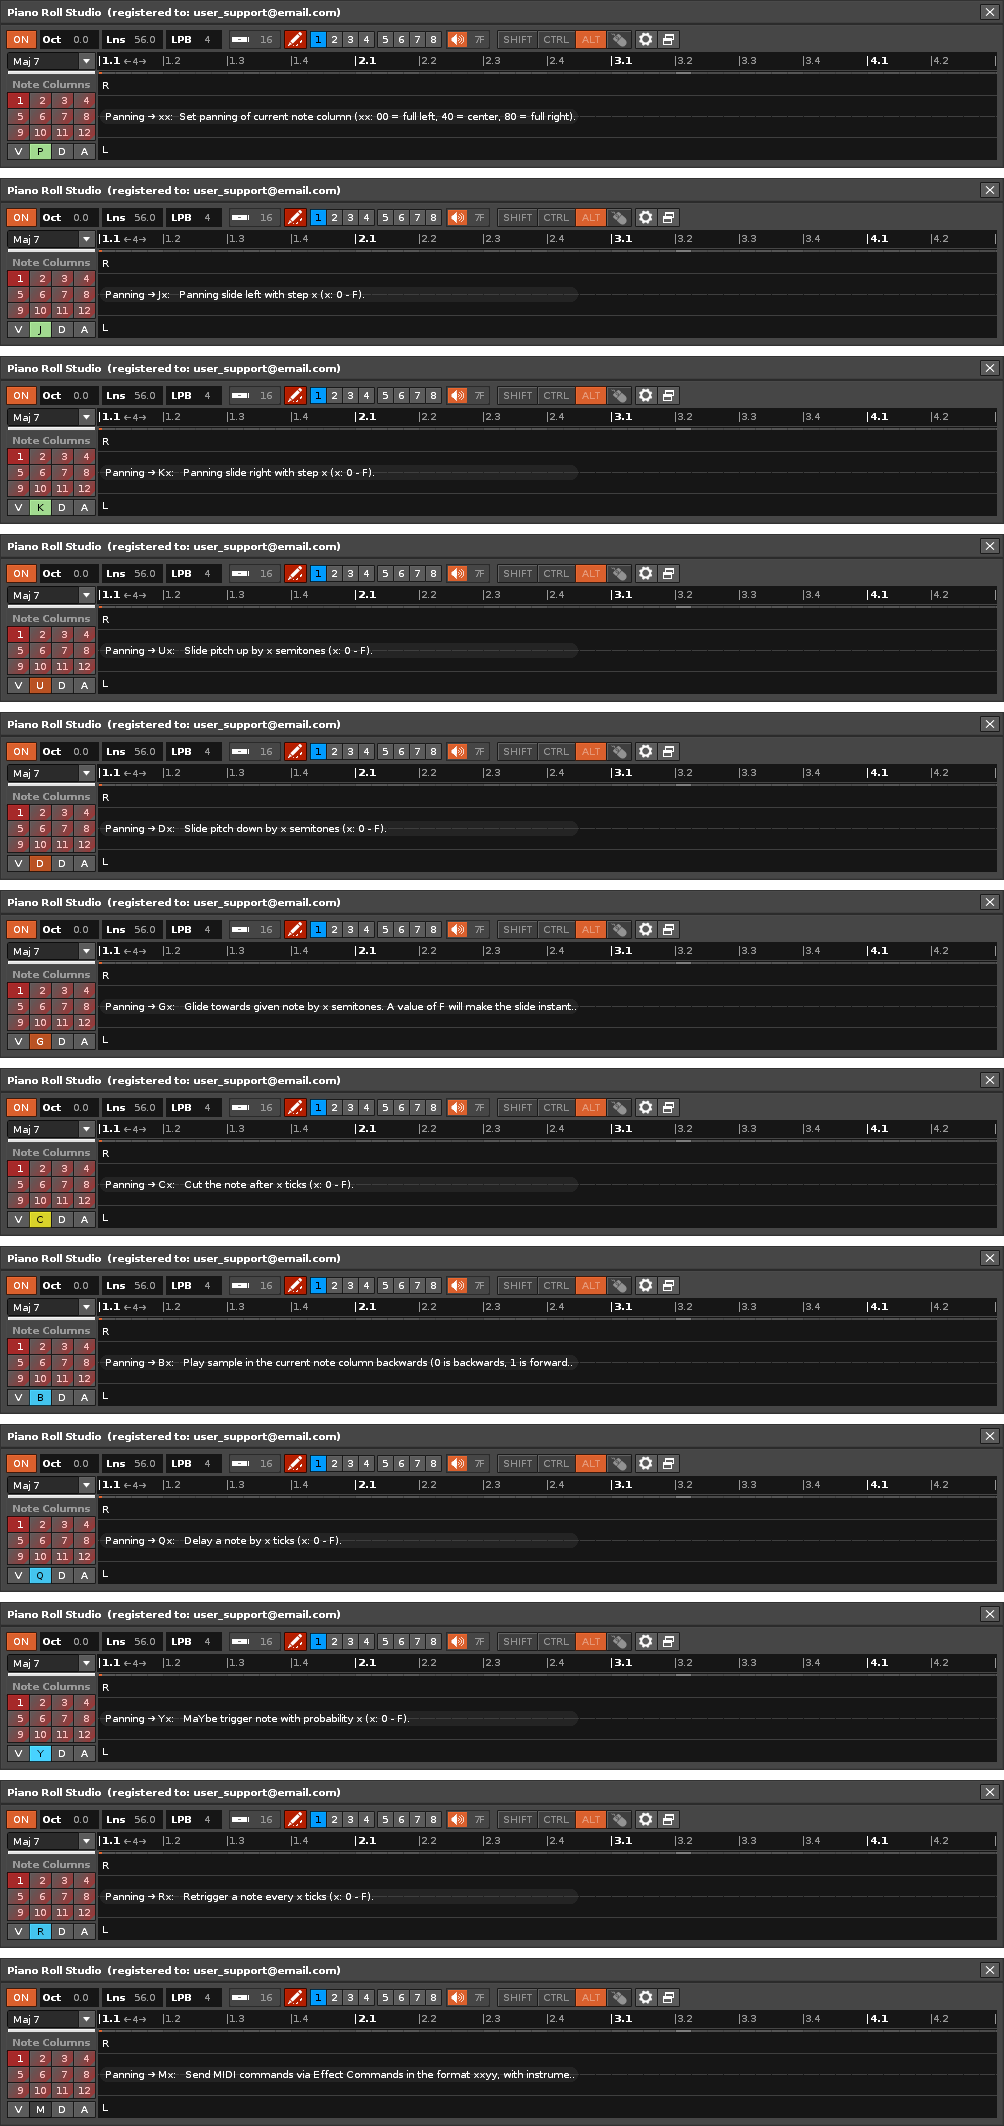
Effects Parameter Editor. panning panel.
Switch "D" for Delay Column. In "Note Columns" do

Effects Parameter Editor. Delay panel. Lne & Dly panel (see left, bottom)
- Line & Delay Panel (Lne & Dly). This panel temporarily appears on the left when the composer mackers a
Simple click on any existing Delay Bar. It shows the duration in milliseconds of the line (according to the BPM and LPB values), as well as the exact duration in milliseconds of the Bar delay amount, which is displayed as a two-digit hexadecimal amount.
This panel, in addition to giving you a more accurate idea of all the small durations, allows you to readjust the track's negative delay value more precisely to resynchronize it with the rest of the tracks. Remember that on a track with delayed notes you can offset your delay value from -100 to +100 ms.
Switch "A" for Sample Effects Column. In "Note Columns" do
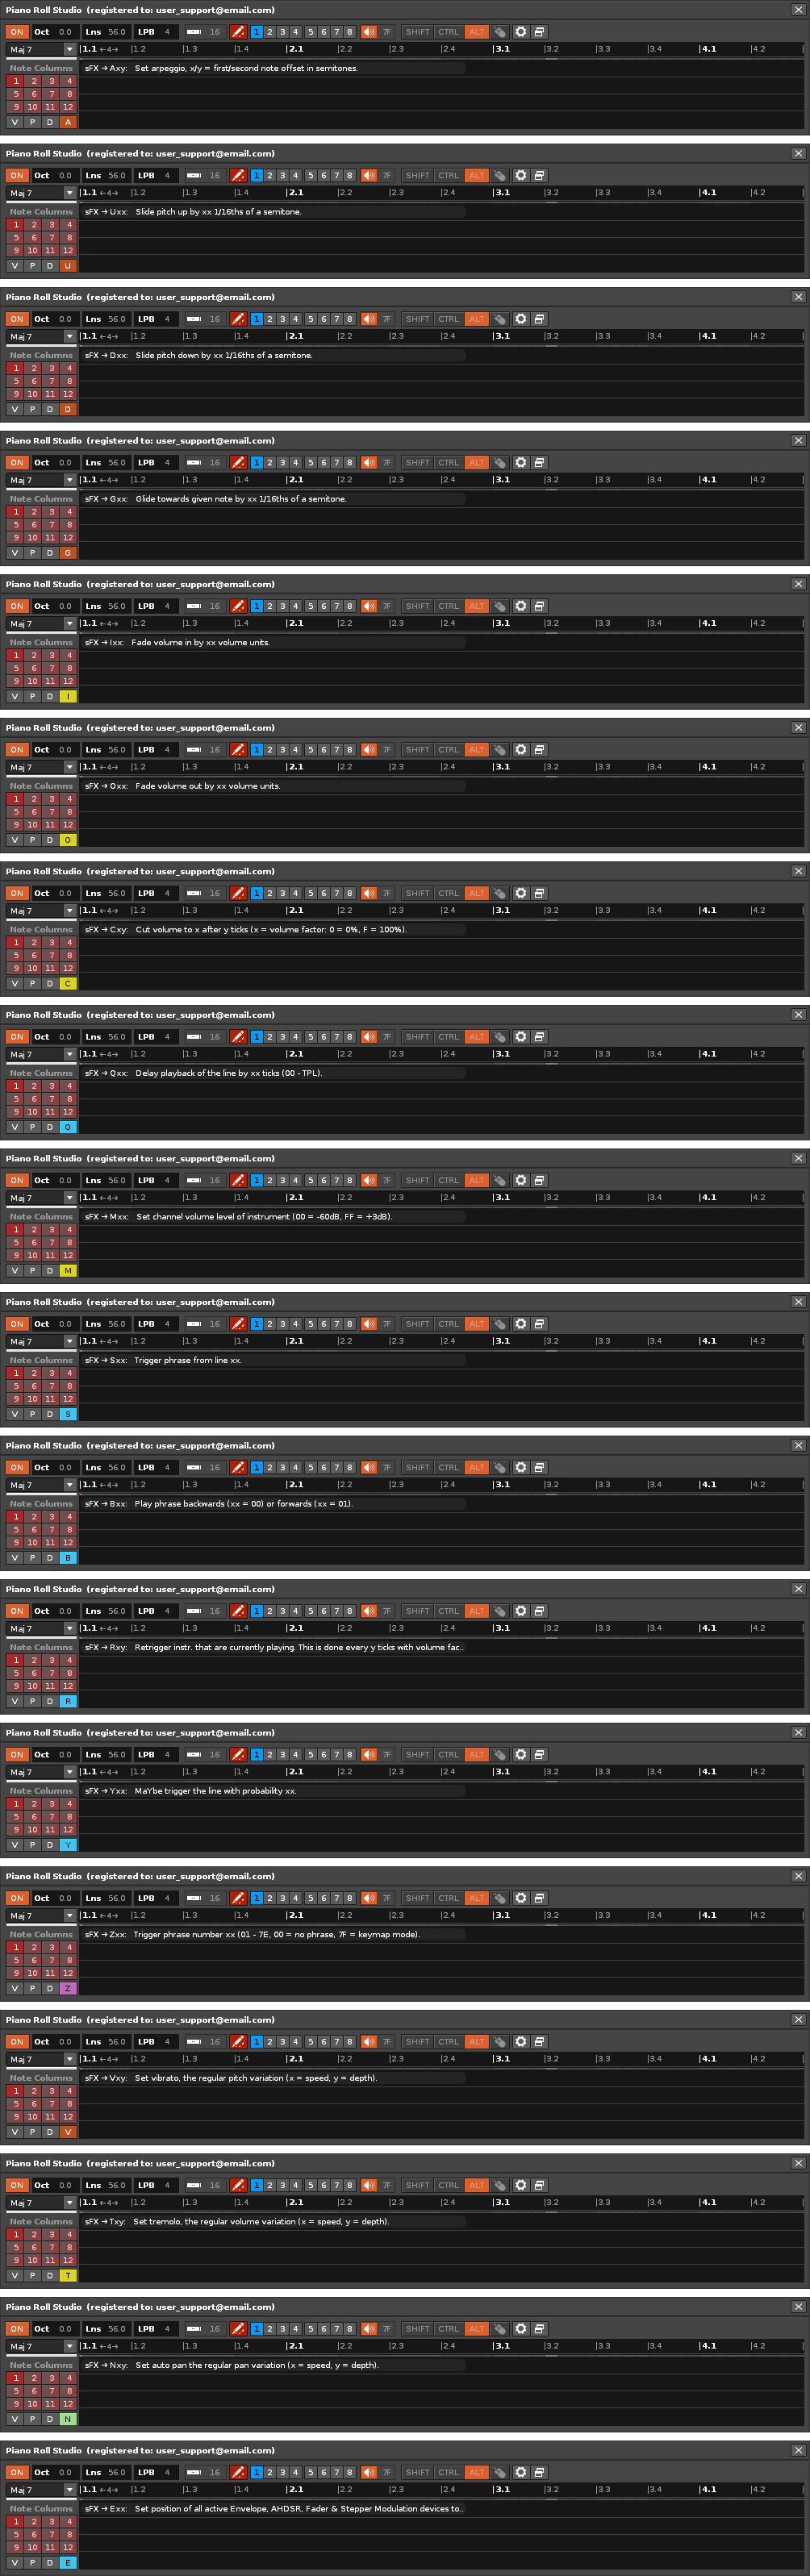
Effects Parameter Editor. Sample Effects panel.
Switch "A" for Track Effects Column. In "Effect Columns", to select the desired parameter, turn the

Effects Parameter Editor. Track Effects panel.
9.2. Location of Line and Associated Note (If Exists) ▲
From the Effects Parameters Editor it is possible to directly locate the line where the parameter is deposited, as well as its associated Note Block, if it exists. To do this, make
Once the line is located when selecting the Bar, you can modify its quantity with
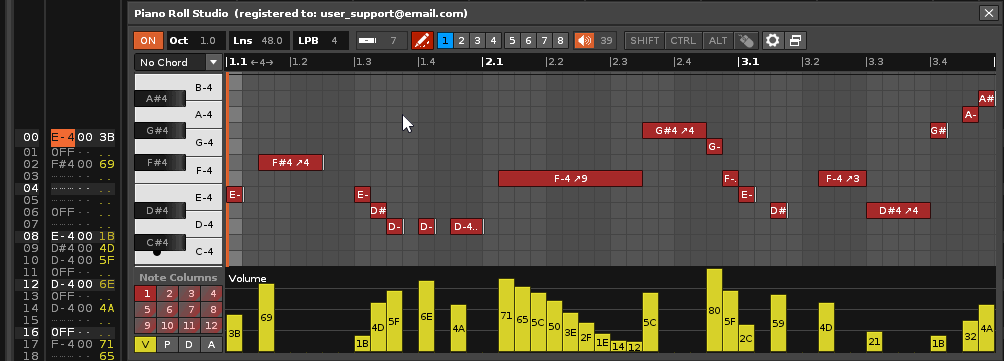
Effects Parameter Editor. Location of the line of a Vertical Bar, its associated Note Block and its subsequent editing.
You can do something similar from the Note Editor. Remember that when locating and playing a Note Block with a
9.3. Loop Zoom. Change the Vertical Size of the Parameter Editor ▲
The Effects Parameter Editor has Vertical Zoom in three sizes, compact, medium and large. To loop it, just do
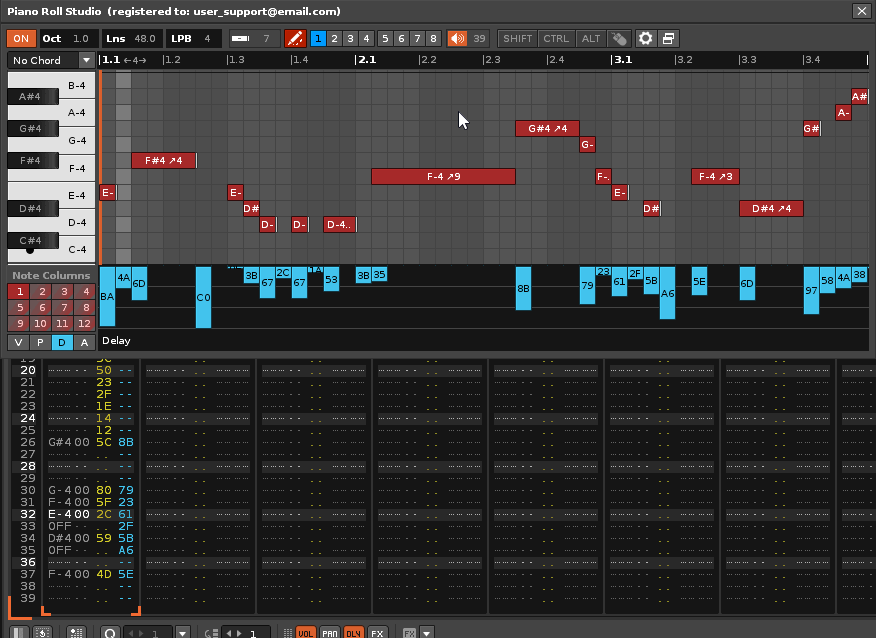
Effects Parameter Editor. Looping vertical zoom in 3 sizes, compact, medium and large.
The effect parameter quantity ranges can vary from 16, 128, or up to 256 values (values typically displayed in one- or two-digit hexadecimal depending on the parameter). A large panel size is good for parameters whose quantity range is very high. At 100% GUI scaling, the compact size has a height resolution of less than 90 pixels. This means that you will not be able to use all the values of amounts of a parameter whose range is from 0 to 255, even a smaller range, from 0 to 127. It would only reach from 0 to 89 in a linear way, without jumps. The medium size is exactly twice the compact size, left over for a quantity range of 0 to 127 values. The large size has a vertical resolution greater than 256 pixels, more than enough to cover the highest range, that of 0 to 255. Remember that 255 is equivalent to FF in hexadecimal, the maximum value to hold two digits, a key peculiarity in Renoise.
Speaking of quantity ranges, this is a good time to remember why infinity rotary wheels are recommended for MIDI controllers. The limited turn knobs, like the faders, typically have a range of 0 to 127 values. That is, they cannot go through the entire range from 0 to 255 or a higher range without making jumps in values, losing resolution (in "relative mode" it would operate from value 0 jumping to value 2, from 2 to 4 and so on). In "absolute mode" they can cycle seamlessly from 0 to 127 values, a total of 128 values due to their rotation limitation. An infinite turn knob can reach any range without skipping in its absolute mode. Whenever shopping for a MIDI controller, keep these details in mind, as there are plenty of "cheap" MIDI controllers on the market with limited-turn rotary knobs, which are not suitable for controlling large ranges of amounts.
Pay attention to this recommendation. If you are going to constantly use the Effects Parameter Editor or are going to draw complex curves with a multitude of Vertical Bars, it is recommended to use a large panel size. In this way, you get maximum precision. Similarly, if you are going to use a lot of small values, it is also recommended to use the large size of the panel so that the Vertical Bars are larger. You can use the compact size of the panel whenever you need to take up less window space.
9.4. Insert a Quantity Bar and Change its Value ▲
First choose the desired parameter. Later, to insert or modify a Vertical Bar on the panel, make

Effects Parameter Editor. Insert and modify a Vertical Quantity Bar.
Note that, in any insertion case, if the target column is not visible, the Effects Parameter Editor itself takes care of making it visible. For example, if you are going to insert a Vertical Volume Bar and the volume column is hidden, it will automatically make it visible when the Vertical Bar is deposited.
To continuously modify an amount, make
If the quantity is one digit, its numerical range can be 16 values, that is, from 0 to F in hexadecimal. In this specific case, you can also remove the Vertical Bar with
If the quantity is two digits, its numerical range can be 129 or 256 values, that is, from 00 to 80 or from 00 to FF in hexadecimal.
Pay attention. Remember that each effect parameter accepts a certain range of values. If in doubt, please read the Renoise User's Manual carefully, where it refers more extensively to the effect parameters and their valid amounts.
9.5. Modify a Contiguous range of Bars by Dragging ▲
To insert or modify several continuous Vertical Bars make

Effects Parameter Editor. Creation of a Linear Panning Curve.
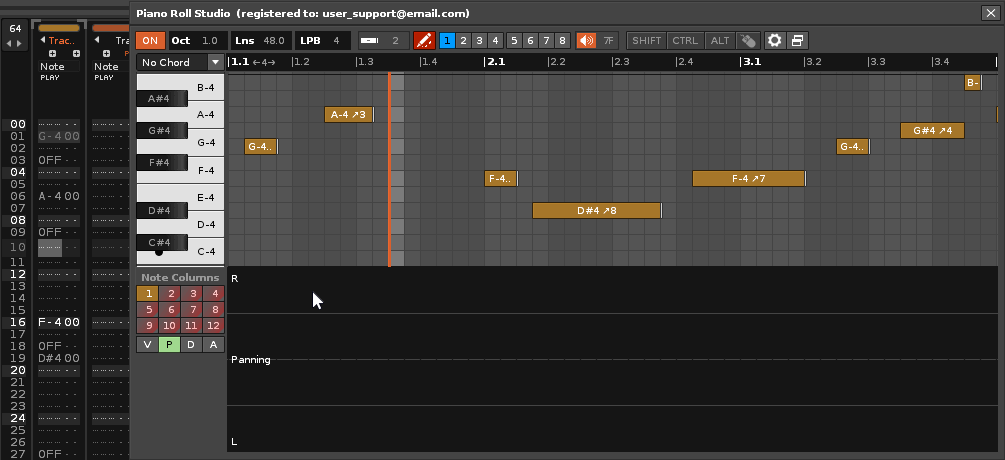
Effects Parameter Editor. Example of continuous sweep of a curved volume trace (effect parameter "Mxx").
9.6. Delete a Quantity Bar and its Parameter ▲
To remove or delete a Vertical Bar do

Effects Parameter Editor. Elimination of individual Vertical Bars.
9.7. Delete a Contiguous range of Bars by Dragging ▲
To remove a continuous range of Vertical Bars do

Effects Parameter Editor. Selective elimination of two contiguous ranges of separate Vertical Bars.
Keep in mind that
9.8. Modify a Contiguous Range of Bars By Dragging Only With Associated Notes ▲
The Effects Parameter Editor is able to detect the Head and Foot of the Note Blocks in the Current Note Column, that is, distinguish these Grid Cells from the rest. This allows you to insert or modify Vertical Bars only on lines that have a note for most parameters or where they have a note or a Note-Off, as is the case with the delay effect. This is especially useful for inserting effect parameters by sweeping only where there are notes, often used for volume, pan, or even delay bars. This type of link is called "vertical bars affinity with the position of the notes".
To insert or modify Vertical Bars "with affinity", only in the lines where there are deposited notes do
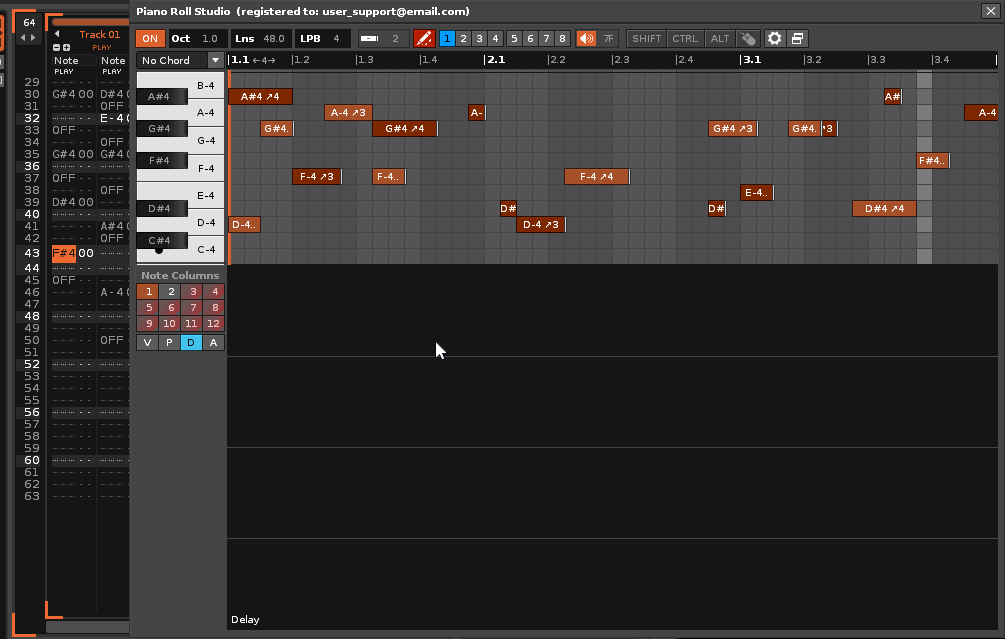
Effects Parameter Editor. Example of inserting Delay Bars only in Notes (and in Note-Offs).
In the above "affinity" example you can see a "humanization effect" applied to the entire Note Column, so that the triggering and stopping of each note does not sound "so squared". Note that no amount exceeds 25%. This is especially handy for sweeping delay values. Use this case as an example for all the other effect parameters you can think of.
If you want to eliminate these recently inserted Delay Bars, do
The affinity of the Vertical Amount Bars to the position of the notes also works with the effect parameters deposited in the Track's Effects Columns. In this case, the Effects Parameter Editor will analyze all Note Columns that have notes.
Pay attention. Keep in mind that all these kinds of edit sweeps are considered a single operation, one step. For example, if you sweep to insert 20 Vertical Bars and then use the
9.9. Modify a Contiguous Range of Bars By Dragging Only Without Associated Notes ▲
This operation is the opposite of the previous section. That is, it is possible to insert or modify or delete Vertical Bars only in the lines where there are no notes. It can be especially useful for quick cleaning tasks, for example.
To insert or modify Vertical Bars "without affinity" only in the lines where there are no notes deposited, do
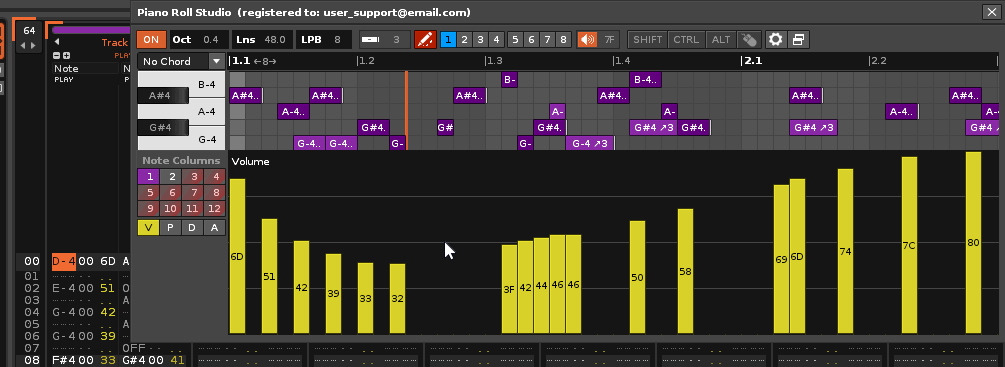
Effects Parameter Editor. Modification and elimination of contiguous range not associated with Notes.
This operation also allows you to eliminate the Vertical Bars. Make
9.10. Simultaneous Modification of the Next Bars from the Current Bar ▲
Another interesting operation is to be able to modify all the Vertical Bars of a Note Column equally. In fact, the Effects Parameter Editor operates from the current line to the end of the pattern, so you can make progressions to scale values as you go through the sequence of lines to the right.
To simultaneously modify the following Vertical Bars
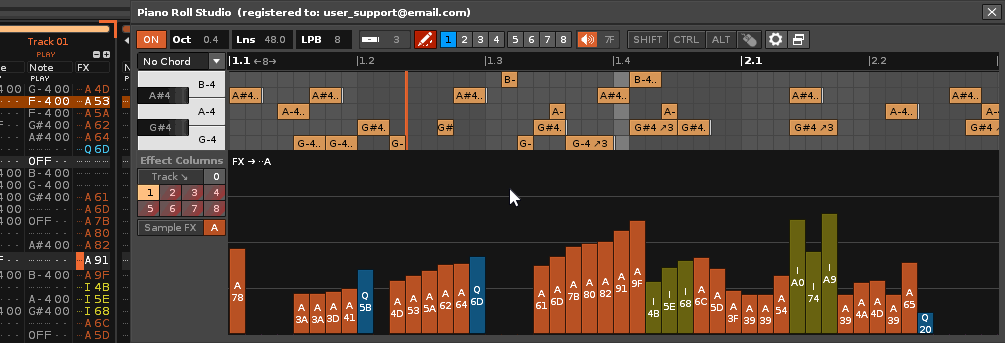
Effects Parameter Editor. Simultaneous progressive modification from different Bars.
In this case, if the quantity exceeds the limits of the valid range, that Vertical Bar will remain in the limit quantity, without eliminating it. For example, this also allows all Vertical Bars to be lowered to 0 and then raised with the same value for all of them. This is a nice workflow trick to insert the same value into several existing separate Vertical Bars.