Piano Roll Studio v7.0 Build 1005. July 2025.
Independent Code Programmer, Designer & Writer: ulneiz
This document contains more than 32.000 words. Estimated reading time: 4 hours.
Welcome to the User Manual for
For Composers. This User Manual is aimed at advanced music composers, beginners, apprentices or autodidacts that use
Appearance & Style. In the upper bar of the main title of this documentation are 12 Color Styles and 2 Display modes (Light and Dark) to customize the visual aspect, which is automatically saved for the next consultation session. The own
Navigation. The navigation panel on the left has the Content Index, broken down into different classified chapters. You can move with the mouse wheel between them soft and quickly, use the displacement bars or jump directly to any chapter by clicking or clicking on the corresponding title. The corresponding current chapter will be marked automatically. For comfort and space, manually configure your full screen browser (press {F11}).
Direct Search. If you need to look for any term or group of words, there is a Search Bar fixed to find it quickly. The search execution will mark throughout the document all the coincidences found. Recharge your browser (press {F5}) to clean the search.
The

The
The
- Notes Monitoring. It is possible to visualize a complete Pattern-Track with differentiation of columns of notes or an entire Pattern (all existing notes) to visually understand the composition, using track colors. Additionally, you can also show the current pattern and the following pattern at the same time.
- Identification and Location of Notes and Effect Parameters. Visually, it is possible to easily jump between the Renoise patterns editor and the Piano Roll Studio or Vice versa Piano Editor, to locate notes and parameters, without getting lost along the way.
- Complete Song Player. Load and reproduce all the note blocks of the current, previous and posterior pattern, allowing to visualize all layers by layers and overlap the selected. This allows you to locate concrete notes and jump directly to the notes editor to edit it.
- Complete Note Editor. It allows you to edit note blocks directly and quickly, both individually or in groups, with simple or complex editing operations. Click, drag, stretch, shorten, transpose, translate, randomize with probability, everything is possible, even prelisten notes or chords directly. It also allows you to display the track to be edited in isolation, all other background tracks, group tracks, or compare the current track with another "ghost track".
- Full Effect Parameter Editor. It is possible to load, insert or edit any type of effect parameter, in volume subcolumns, panorama, delay, sample effects or the columns of effects of the tracks. The parameter editor (lower panel) is directly linked to the notes (upper grid) editor with total correspondence between them. It even allows to create or edit curves with click and drag, as well as solving visual delay micro-adjustments of note block. It also allows 3-step vertical zoom in loop.
- Wide Zoom Capacity and Resizable Surface. It offers centralized horizontal zoom and central vertical zoom, both for the grid, as well as vertical zoom for the lower panel of the parameter editor. In addition, it allows to configure and customize up to 4 image monitor profiles, as well as the manual modification of the window size through the perimeter frame (lower corner, right corner, and lower right diagonal).
- High Control and Management of Pattern-Tracks. With the usefulness of Pattern-Track Manager it is possible to classify and save patterns-pista for subsequent use in any song project or to share with other composers. This revolutionizes the management of the patterns.
- Construction and Editing of Chords Through Piano. It works extensively with chords, offering over 70 different preset chords, plus four customizable chord slots for up to 12 notes. Insert or edit chords or groups of notes as if you were just inserting or editing a single note!
- Transposition Scales for Note Editing. It allows loading and showing any transposition scale of the instrument for the 10 octaves of the piano, working with both individual and chord notes.
- Magnificent Control with a Variety of Peripherals. The edition and handling of the Piano Roll Studio can be controlled with alphanumeric keyboard + mouse, with MIDI + mouse controller, with alphanumeric keyboard + MIDI controller + mouse or even only using the mouse. In addition, the compatible mouse (and its software) can use the "macros" and "key pulsation allocation" to increase direct control.
- Facilitates Writing in Score. Thanks to the note blocks, the piano and the grid, it is easier to detect the notes, their height and their duration to write the rhythmic figures in the musical score.

Programming with API + Lua.
The Piano Roll Studio as a Super Tool. The
Conceptually, the
The Fusion of Renoise + Piano Roll Studio. Unifying the use of the best tracker with the best piano roll translates into getting a greater workflow in addition to a better composition understanding. While
Below are more than 130 important concepts and short descriptions on the Sound Physics, as well as Musical Production and Theory, essential technology and concepts that cover from physical devices to the processes within the Musical Production Software. Of course, there are many more concepts, but here you will find the most important. Understanding them will bring you a broad domain for musical production and what to do with it. Before studying concepts of musical theory, it is advisable to understand concepts of sound physics and important parts of the composition software.
If you'd like to learn more, click the "Show Content" button below...
- Sound Source (Emitter): It is any object or device that produces sound waves, such as the vibration of an object, a musical instrument or a speaker.
- Channel: Medium or path through which the sound signal is transmitted, such as air, cables, or digital transmission systems.
- Receiver: Device that receives the sound signal, such as headphones, speakers or human ear.
- Analog Sound (or audio) Wave: Physical (mechanical) vibration that travels through a necessary physical environment (such as air) and that we perceive with our ears along with other senses. It is characterized by its bell, frequency and intensity. The vacuum (absence of matter) does not allow to transmit sound. It should not be confused with the "electromagnetic wave", such as light or radio, which does not require a means to spread and can travel in a vacuum.
- Sound Ringer: Sound quality that allows you to distinguish it from other sounds, even if they have the same height and volume. It is related to the characteristics of the sound source.
- Sound Frequency: The number of vibrations (cycles) in every second of a sound wave, measured in Hertz (Hz). The lowest frequencies correspond to serious sounds, and the highest to acute sounds.
- Frequency Cycle: It is a complete cycle of a sound wave, from a starting point (as the lowest level) until it returns to that same point, completing an oscillation. It is measured in Hertz (Hz).
- Harmonics of a Wave: They are additional frequencies that accompany a fundamental frequency in a sound. These frequencies are whole multiples of the base frequency and contribute to the quality and timbre of the sound, giving it its unique character.
- Fundamental Frequency of a Sound: It is its lowest frequency and corresponds to the main tone we perceive. It is the basis on which harmonics are generated that enrich the sound. In a spectrum analyzer it usually appears as the thickest or of greater presence and higher peak. The
PRS also allows visualizing the fundamental frequency of each note composed in the grid and in the left virtual piano. - Sound Speed: The speed with which a sound wave spreads in a medium, depending on factors such as temperature and medium density.
- Sound Tone: High frequencies correspond to acute sounds, medium frequencies, middle sounds and low sounds. The most problematic range in composition usually concentrates on medium frequencies, where there is greater saturation.
- Human Audible Frequency Range: The human ear is able to generally perceive from 20 Hz to 20,000 Hz (20 kHz). The older, less perception of the highest frequencies and the two ears may not perceive exactly the same.
- Sound Dynamics: Indicates the intensity variations of the gradual or sudden sound sound, such as "forte" (strong) or "piano" (soft). It allows to contribute expressiveness of different emotions to shape music.
- Sound Intensity: The amount of energy in a sound wave, perceived as the volume or "strength" of sound. It is measured in decibels (dB).
Renoise use the logarithmic scale to measure it. - Audio Saturation: Saturation is the process in which an audio signal reaches its maximum amplitude limit, causing distortion and compression, which can give a warm or aggressive effect to sound.
- Audio Compression: Compression is an audio process that reduces the difference between the softest and strongest parts of a signal, controlling the volume and avoiding excessive peaks, resulting in a more balanced sound.
- Cut or Signal Cut (clipping): It is the phenomenon that occurs when an audio signal exceeds the maximum limit that a system can handle, causing abrupt distortion and wave cutting, which generates unwanted noise or sounds.
- Audio Distortion: It is the unwanted alteration of an audio signal, which can be caused by saturation, clipping or excessive processing, resulting in a change in the tone or quality of sound.
- Sound Digitalization: Sound in a DAW is not handled as a continuous wave, but rather is converted into a series of discrete values through a process called sampling, which involves sampling frequency (horizontal axis) and bit resolution (vertical axis). It is represented graphically as a continuous succession of points on a surface defined by the axes described above.
- Sampling Frequency of a Sound Wave: The number of times per second that is measured (or "shows") the amplitude of the sound wave. It is measured in Hertz (Hz), and common sampling frequencies are 44.1 KHz (used in CD) and 48 kHz (used in video). The higher the sampling frequency, the more precise the representation of the original wave is, but also increases the amount of data that must be processed.
- Bit Resolution of a Sound Wave (Quantification): Define how precision each wave has in terms of its amplitude (a binary value is assigned to each sample to be able to process it). For example, in a 16 -bit system, each sample can take one of 65,536 possible values (2^16). The greater the resolution, the greater the ability to capture fine details in the sound.
- Digital Sound Wave. It is a discreet and quantified representation of an analog sound wave, which has been converted to digital format through a process called sampling and quantification.
- DAW (Digital Audio Workstation). Software used for the creation, recording, editing, mixing and production of digital audio (allows the process of converting continuous (analog) waves into digital signals). It allows to work with audio and MIDI tracks (a type of digital signal that controls sounds) in a digital environment. It makes it possible to record sounds, apply effects, edit and mix multiple audio tracks, and produce musical or sound projects. DAWs popular examples are Ableton Live, Pro Tools, Logic Pro, FL Studio, Cubase, Studio One.
Renoise belongs to the low DAWs group based on a tracker, specifically the best of them. - In Phase (or Enter Phase): It occurs when two audio signals with the same frequency and phase are combined and reinforced, producing a stronger and more clear sound. It means that they are aligned or coincident.
- Gap (or Exit Phase): It occurs when two signals with the same frequency have opposite phases, which can cancel or reduce the sound when combined. It means that the two waves are aligned in the opposite manner; That is why when they join are canceled.
- Phase Meter or Viewer: A phase meter shows the relationship between two audio signals, indicating whether they are in phase (reinforcing) or out of phase (possibly canceling) when combined, which is important to avoid problems of interference or sound loss.
- Volume: The perception of a sound's intensity. Although related to intensity, volume refers more to how we perceive it, not the amount of energy.
- Gain: It is the level of amplification of an audio signal. Control the volume or intensity of the signal in a sound system, affecting its amplitude before being processed or reproduced.
- Panorama: Spatial distribution of sound in the stereo field, determining the location of the sounds between the left and right channels.
- Level or Volume Meter: It is the VU bar (volume unit) or peak meter, which shows the intensity of the audio signal in real time. It appears on effects of effects or in the mixer.
- Sound Energy: The energy transported by the sound waves through a medium, determined by its amplitude and frequency.
- Sinusoidal Wave: It is a gentle and regular wave, which represents a pure tone with constant frequency and without harmonics.
- Amplitude: It is the measure of the "strength" or "intensity" of a sound wave. It is related to the volume of sound; A greater amplitude, greater volume.
- Wave Length: Distance between two consecutive points of a wave, as a crest, which determines the tone of the sound.
- Sound Pressure: Variation of air pressure caused by a sound wave, perceived as volume. It is measured in Pascals (PA).
- Transitory: They are the rapid and short changes in the sound, such as the attack peaks of an instrument to be touched. They are important in the perception of dynamics and bell.
- Neutral Line: It is the imaginary line that represents the resting state of a sound wave, without pressure variations. Sounds are displacements upward or downward from this line.
- Pulse Speed: It is the speed with which the pulses are repeated in a musical rhythm, determined by the tempo. It is measured in pulses per minute (BPM).
- Spectrum Analyzer: Tool that visualizes the frequencies present in an audio signal, showing its distribution in the frequency range.
- Spectrogram: A visual representation of the frequencies of a sound over time. Show how the spectral content of a signal changes.
- Linear Curves: They are curves in which the change between two points is constant, represented by a straight line.
- Logarithmic Curves: They are curves in which the change decreases progressively, following a logarithmic scale.
- Exponential Curves: They are curves where change increases or decreases rapidly, showing accelerated growth or decay.
- Randomly: It is the process of incorporating elements of chance or unpredictability in musical creation, allowing certain parts of the composition, such as rhythm, notes or dynamics, to be determined randomly, instead of following a fixed structure.
- Humanize: To make something more natural or closer to human behavior, such as adjusting a sound or musical performance so that it sounds less mechanical and more expressive or realistic.
- Octave: It is the interval between two notes whose frequency is double or half of the frequency of the first. The notes within an eighth sound like similar, but at different heights.
- Piano: Musical instrument of percussed strings, in which the keys are pressed to vibrate strings. It covers 88 keys (7 octaves and 3+1 keys) and serves as a representative instrument for composition.
Renoise shows a 10 octave virtual piano (120 notes). - Pulsation Velocity: It refers to the speed in which the piano keys (or similar instrument) are pressed. In the piano, there are several names from the Italian:
- Piano (p): Soft, it is touched with little force.
- Forte (f): Strong, it touches more strongly.
- Mezzo Piano (mp): Moderately soft, a little stronger than the piano.
- Mezzo Forte (mf): Moderately strong, a little softer than the forte.
- Fortissimo (ff): Muy fuerte, se toca con gran intensidad.
- Pianissimo (pp): Very soft, it touches very delicately.
- Sforzando (sfz): A sudden blow and accentuated in a note or chord.
- USB Alphanumeric Keyboard: Input device similar to a computer keyboard, which connects by USB. It is used to control music software or write data. You must have a writing section and a number.
- USB Mouse: Input device that connects to the computer through a USB port. It is used to interact with musical software and move objects in the graphic interface.
- USB Keyboard or Pad MIDI: A controller that connects to the computer using USB and sends MIDI signals to control virtual instruments or musical software.
- Record Audio Track Music: The digital recording of audio tracks refers to the real sound capture (such as voice, instruments, etc.) and then being edited, processed and mixed.
Renoise has a method to use a long lasting sample such as an entire and synchronized digital sound track, and even allows you to chop a sample to shoot them along different points. - Record Music Using MIDI: The creation of MIDI tracks is a process that allows you to generate music using MIDI data (Musical Instrument Digital Interface) instead of recording real audio. The MIDI does not contain sounds in itself, but instructions that tell virtual instruments or hardware what notes touch, when, for how long, with what intensity, etc.
- Digital Synthesizer: It is an electronic instrument that generates and modifies sounds by digital signal processing. Use mathematical algorithms and processors to create tones and textures, imitating instruments or creating new sounds.
- Study Monitors: High quality speakers designed to offer precise reproduction of sound. They are essential in musical production to mix and master precisely. They have their equivalents in the "study headphones".
- Acoustic Room Insulation: A technique to prevent sound from escaping or entering a room. Materials such as double walls and sealing windows and doors are used to prevent sound transmission.
- Sala Acoustic Conditioning: The process of modifying the acoustic characteristics of a room to improve the sound quality. This includes absorbent panels and diffusers to control reverberation and echoes.
- Resonance: Phenomenon in which an object vibrates at the same frequency as an incident sound wave, amplifying the sound.
- Reflection: When a sound wave bounces when finding a surface, creating an echo or reverberation.
- Absorption: Reduction of sound energy when a wave encounters a material that converts it into heat.
- Diffraction: Capacity of sound waves of surrounding obstacles or going through openings.
- Interference: When two sound waves combine, producing a reinforcement (constructive) or cancellation (destructive).
- Room Reverberation: It is the effect produced by the reflection of sound on the surfaces of a room, creating a diffuse echo that prolongs the sound.
- Mono or Stereo Output: Mono output transmits the same sound through a single channel, while stereo output transmits two channels (left and right) to create a sense of space and direction in the sound.
- Surround Sound 5.1: Audio system that uses six channels (5 speakers and a subwoofer) to create an enveloping sound experience. Commonly used in cinema and domestic audio systems. There are broader technologies such as Dolby Atmos.
Renoise allows to reproduce on 5.1 channels, but only rendering in stereo or 2.0 channels. It is possible to render the 6 tracks and try to join them through another software, such asAudacity . - Sound Effects: Audio manipulations that alter the original sound, such as reverb, delay, distortion, among others, to change their character or add emotion.
- Dry or Humid Sound: "Dry" is understood as a sample of recorded or reproduced as is, naturally without including any sound effect. "Wet" refers to the opposite, a sound recorded or reproduced with effects, such as reverberation or an autotune.
- Autotune or Tone Corrector: It is a sound processing effect that automatically corrects the tone of the notes sung by a vocalist, refining them according to their algorithm and indirectly aims to hide song errors. The result may seem more perfect in terms of tuning, but can add a feeling of "robotic voice" that can be clearly perceived. Little professional singers can abuse this type of corrector effect, usually due to lack of vocal training.
- Retardation: It is the time it takes for a signal to reach its destination, as in the effects of delay sound processing or latency in that audio processing.
- Sidechain: Mechanism used in production and mixing in which the signal of a sound or instrument controls the compression of another, creating dynamics or "pumping" effects. An example, the hype or the box stands out by temporarily reducing the volume of other instruments, such as synthesizers or low, when the hype rings.
- Sound Routing: Process of directing an audio signal from a source (such as a microphone or instrument) to a destination (such as a mixer, effects or exit).
- Sound Synthesis: Process of generating artificially sounds through electronic or digital techniques, creating sound waves from sources such as oscillators or samples.
- Sample (SAMPLE): A fragment of recorded sound of a certain duration that is used in musical production. Samples can be instruments, voices or other sounds.
- VST Instrument: A virtual instrument complement that is loaded in a digital audio work station (DAW) using the VST plugin. Simulates real instruments or create new sounds.
- VST Effect: A complement used in a DAW to process audio, such as reverb, compression or equalization. Add sound effects to an engraved track.
- Automatización: The process of adjusting parameters such as volume, panorama or effects dynamically over time inside a track in a DAW, to create changes in music automatically.
- Musical Production: It is the process of creating, recording, organizing and mixing music, from composition to mastering. It implies the use of software, instruments, effects and recording techniques to achieve a final work that can be reproduced and distributed.
- Production Process: Stage in the creation of a song or musical piece in which the clues are recorded, fixed and produced. Includes composition, recording and editing.
- Mixing Process: Stage in which all recorded clues are adjusted and balanced, modifying the volume, the panorama and the effects to achieve a coherent mixture.
- Mastering Process: Last phase of musical production, where the final mixture is optimized to ensure that it sounds good in all reproduction systems. It implies equalization, compression and preparation for distribution.
- Sound Render: The process of exporting an audio project, such as a mixture or a final production, to an audio file, usually in WAV (without compression) or FLAC (with compression without quality losses). It is the conversion of audio information in a file format.
- WAV, FLAC, MP3...: They are audio file formats, which in musical production derive from a render of a song. WAV is a file without loss and without compression, which usually occupies a lot of space (megabytes) on the hard drive. Flac is similar, but with lossless compression. MP3 also compresses the sound but eliminating frequencies with quality losses. There are a wide variety of audio file formats. Taps are usually used to share online for their lower weight.
- Graphic Interface: The visual part of a musical production software that allows users to interact with the system. It includes elements such as buttons, sliding bars and graphics.
- Sound Interface: Hardware device that allows to connect audio sources (microphones, instruments) to the computer and handle audio entry and output, providing better quality than the integrated sound card.
- Musical Notation: It is the graphic system used to represent musical sounds by symbols, such as English notation (c, d, e...) or neo-Latin notation (do, re, mi...).
- Musical note (tone or frequency): They are the basic units of sound in music, represented by lyrics (C, D, E, F, G, A, B or Do, Re, Mi, Fa, Sol, La, Si). Each has a specific frequency.
- Diapason: It is an instrument used to produce a constant reference frequency, usually 440 Hz (the note LA4), which serves to refine other musical instruments.
- Note Block: In a piano roll it is rectangular graphic representation of duration equivalent to the rhythmic figure and its derivatives.
- Grid and Cell: The grid is a two -dimensional mesh -shaped surface composed of cells, which compares the duration with the tone of the notes. The cell represents a height or tone position (from C-0 to B9) and the smallest duration in the grid (equivalent to the duration of a pattern line).
- Sequence and Song. In
Renoise the sequence, of linear order, is the organization in which the patterns are placed throughout the reproduction of a song. The sequence consists of pattern slots with variable index. - Pattern. In
Renoise the pattern is made up of a group of vertical clues (from 1 to 1000). Each is a consequence of lines (from 1 to 512) with note columns and effect columns. They serve to distribute notes, parameters and amounts of effects. The pattern editor shows a complete pattern, including the master track, and shipping tracks. - Track. In
Renoise is a main column with subcolumns of notes and effects that cover the entire duration of the song and is sectioned by the number of patterns that make it up. Accept track effects chains. - Patron-Pista. It is the intersection between pattern and track, equivalent to a square groove inside the patterns matrix editor. It is equivalent to the piece of track shown by the pattern editor to be edited.
- Track Effects Chain. It is the sequence or orderly chain of different devices of accumulated effects that, as "links", process the entrance signal of a track to return it by the exit by adding these effects. The order influences the result depending on the specific effect.
- Scale: A sequence of notes organized in an ascending or descending order. The most common are the largest and minor scale.
- The Chromatic Scale: A musical scale that includes all notes (white and black) in an eighth, that is, all possible semitones.
- Natural and Altered Notes: The natives correspond to the white keys, the altered are the black keys, derived from the natives ("sustained", with upper semitone or "bemol", with a semitone lower than their reference note).
- Third interval: The distance of three notes on a scale is key to the formation of chords. It may be greater or lesser.
- Chord: A set of three or more notes touched at the same time, which form a harmony. The most common chords are higher, lower, decreased and augmented. The "triad" is a good example of three chord with tonic, third, and fifth.
- Doble Acorde: A chord that is formed by two notes in the same interval or a repetition of the same notes.
- Cadence: A chord progression that marks the end of a musical phrase or a section. Cadences can be strong (final) or weak (intermediate).
- Duration: What takes to reproduce something sound, be it a note, groups of them, or even what it takes a song in total. In music, duration is usually measured in pulses, and these are usually grouped into bars to slice time.
- Rhythm: The pattern of duration of the notes and silences in a musical piece. It is related to time and metric.
- Metrics: The organization of the bars in music. It is defined by the number of times in each compass (for example, 4/4, 3/4, 6/8).
- Compass: It is a musical measure that divides a piece into equal time sections. Each compass contains a specific amount of pulses. The musical piece can be divided into different measures and changing tempo, as can happen in the original sound bands.
- Tempo: The speed of music, which is measured in pulses per minute (BPM). It can be fast, slow, moderate, etc.
- Synchronization: In general, match sounds with each other or among other events. For example, in original soundtracks or video clips, music is synchronized with what happens in the images already filmed, playing with the tempo and intensity to adapt the music to the feelings required in the film or video clip. Synchronization is one of the most complex tasks within the composition and musical production. Elite composers with great capabilities belong to the world oforiginal sound bands. Currently, there is nothing more complicated than composing and synchronizing a complex soundtrack for a high -budget film, a triple art in itself (composition, mood, synchronization).
- Transmission of Feelings. Any musical work is usually intended to convey feelings as something fundamental. That is, change the mood of the listener. However, the human being is very complex and each listener can react differently, or not even react to the stimuli received when listening to music. The music is learned, and then feels.
- Melody: A sequence of notes that are perceived as a coherent unit. It is the most recognizable part of a song.
- Harmony: The accompaniment of a melody, created by chords that are touched at the same time as the melody.
- Tension and Resolution: The relationship between chords that create a sense of waiting (tension) and the release of that wait (resolution).
- Tonality (tone): The tonal center of a musical piece, based on a key note (such as Do, Re, Mi, etc.). The tone defines whether music is greater or less.
- Major and Minor Tones: The greatest has a generally cheerful or brilliant character, based on a larger scale. With the child it is sad or melancholic, based on a smaller scale.
- Transposition: The process of changing the tone of a piece, that is, moving one or several notes to a new height or even an entire track.
- Tremolo: A rapid variation in the volume of a note, creating a fluctuating effect in the intensity of the sound. It is used to add dynamics and tension to music.
- Vibrato: A small variation in the height of a note to give it expression, achieved by varying the frequency subtle.
- Pizzicato: Technique in which string musicians play the strings with their fingers, instead of with the arch.
- Staccato: A style of touching the notes shortly and separately.
- Reason: A brief melodic or rhythmic unit that is repeated or varied throughout a piece.
- Arpegio: The execution of the notes of an chord sequentially, instead of simultaneous.
- Counterpoint: The technique of combining two or more independent melodic lines to form a harmonious composition.
- Stringing: The process of refining the instruments in a specific hue or to play together, so that the notes sound harmonic and agreed.
- Sample Modulation: Volume change (amplitude), tone (frequency) or panorama (stereo and enveloping field) inside a musical piece. It can be soft or abrupt, and is used to add variety and emotion.
- AHDSR (Modulation Settings): Attack, maintenance, decay, sustained and release. They are modulation adjustments that vary the volume throughout the sound duration.
- Pentagram and Deide: A set of five horizontal lines on which musical notes are written. Acute are 2 united pentagrams with a key.
- Rhythmic Figure (Duration): The graphic representation of the duration of a note or silence in a musical piece (round, white, black, eighth, semicorchea, fusa, semifusa). It is equivalent to the duration of a "note block".
- Shot and Stop of a Sound or Note. It means the moment of start and the moment of detention of the production of a sound. It means that the sound lasts (how long it sounds). Defines or equivalent to the rhythmic figure in a musical score.
- Silence: It is the absence of sound, represented in musical notation by a symbol that indicates the duration of rest in one piece.
- Height: The perception of whether a sound is serious or acute, determined by the vibration frequency of the sound wave.
- Treble Clef: It is a key used mainly for high notes, such as voice, violin or piano, representing note G in the second line of the pentagram.
- Fa or Do Clef: There are two keys used for more serious notes, such as bass or cello or for the left hand of the piano, representing the note F in the fourth line of the deide, or C in fourth or third line.
- Phase: In electronic music, it is the temporal displacement between two sound signals. It can also refer to the concept of the phases of a composition.
- Symphony: A long musical work, usually written for orchestra, consisting of several movements.
- Improvisation: The spontaneous creation of music without prior preparation, where the musician invents melodies, rhythms or harmonies in real time.
- Electronic and Experimental Music: Electronic music uses technology to create sounds and compositions. Experimental music explores new forms and sounds, breaking traditional conventions.
- Original Soundtrack: It is music created specifically for a film, series, video game, or audiovisual project, designed to complement the narrative and emotions of the work.
- Vocal Music: It is one in which the human voice is the main instrument, either accompanied by instrumental music or a capella. It can include different styles and genres, such as choral song, opera or popular music.
How to Understand Musical Composition and Problem Solving. When the human being perceives a sound a sequence of things occurs, and it is necessary to understand them to start. There is the emitter or sound source that causes a sound. What we understand as sound is nothing more than a mechanical vibration of a body, it is a longitudinal sound wave of a certain frequency (or frequency groups in reality) that travels through a channel, a medium, usually the air more directly since the human being is surrounded by it in the earth's crust (theMiddle molecules range forward and backward in the same direction of wave propagation) and finally reaches our ears, directly or even indirect because these vibrations can bounce in other material objects and redirect them back towards our human body. If there is no channel, the human body would not have any "method of perception" to detect that sound.
The "healthy" human being has two ears, and does not have to perceive the same as the other (this can depend on multiple factors and have to have a certain awareness of it, since it is the sense of greater definition). So, the sound is caused somewhere and the human body can perceive it, thanks to its sense of hearing. But in addition, it can perceive it thanks to the sense of touch in leather, muscles and bones (especially low frequencies), through bone hearing (concreously through the bones of the skull), or even through vestibular sense (perception of balance, especially for very intense vibrations). Each way of perceiving has a definition of the particular sound, and the mixture of all this can make the human body feel in a particular way. This is where magic is created! So, listening does not imply only using the auditory sense, that this would be a vague belief of what really happens here, but the human body is much more complex than that and allows you to perceive and feel, in different ways the sounds of your environment, so that it can alter your mood.
Continuing that journey and focusing on the meaning of human hearing, the most widely defined and understood, each ear has an eardrum, which is struck by sound vibrations, transmitting the sound to the ossicles of the middle ear (the hammer, anvil, and stirrup), amplifying it and finally transmitting it to the inner ear, where the oval window of the cochlea (the organ of Corti, which contains sensory cells called hair cells) is located. The hair cells convert this received sound vibration into an electrical signal through the fluid in the cochlea. This signal is then quickly sent to the human brain via the auditory nerve, and ultimately interpreted by the brain as "sound." Thus, a sound vibration wave is ultimately converted into an electrical signal that is interpreted by the brain.
Well, practically everything that is necessary to learn from the physics of sound, the related features of the human being (sense of the ear, touch...), of the musical theory and of its own limits, it is directly related to all this, of what happens with that journey of the sound, of that mixture of several sounds, until how they are interpreted by a person, their particular human conditions and capacities and even its environment. So, a musical composition program such as a DAW or a utility such as a piano roll has many features or peculiarities derived from what was explained above.
In addition to all this, there is a peculiarity of the human being that is directly related to feeling, how is capable of experiencing music, which turns out to be a fairly particular feature of each person. We all feel differently, we have different tastes, and value things differently, even music. In addition to those features of taste and feeling of music, they can be reinforced with music education, to understand music, which is linked or strong markedmente with the experiences you've lived. What you've experienced will shape your tastes! Although this topic is more abstract and difficult to pin down, it's essential to at least understand that it exists and is there, since it ultimately determines what we experience when we listen to music, which, after all, is the main motivation for creating it.
There are different methods to explain how to encompass knowledge for composition. However, despite existing hundreds of related concepts, most of them can basically classify in 3 groups or "dimensions" that clearly come from the main factors that define a sound, as if conceptually we would like to fill in the 3 exposed faces of a three-dimensional cube. It's a concrete way of explaining it.
- The Time Dimension. It covers concepts such as the minute, the second, the tempo, compass, pulse, duration, rhythm, rhythmic figure, note block, shot and stop... Any concept that has to do with positioning, modifying or alter briefly the duration of a sound belong to this group.
- The Frequency Dimension. Referred to the bell, height and scale in a score, note, acute, medium, serious, vibrato, transposition, tone, harmonic, the lines and spaces of a pentagram, Fa Clef, phase, fingerboard, saturation, etc. Any concept that has to do with pointing out or modifying frequencies somehow belong to this group.
- The Intensity Dimension. It is related to concepts such as volume, panning, amplitude, neutral line, normalization, compression, pulse velocity, clipping, AHDR, sample modulation, tremolo ,acoustic room conditioning, etc. Any concept related to the intensity of sound or any effect that affects it belongs to this group.

These "3 dimensions" are clearly reflected in the graphical interface of the main window of the
Keep in mind that graphic representation in
How to understand and solve problems in musical production? In short, the composer can assimilate all the concepts by directly linking them to these three big groups or dimensions. Some of these concepts may belong to several groups, but this learning and retention methodology of "new concept learned, put it in a dimension", allows to better classify and understand the processes of production and completion of a musical project. In general, every time it coolsIn any modification of something in your project, you are pointing to one of these three groups or several of them. In this way, if you are in trouble, you will usually only solve them according to the concepts of the group or dimension to which this problem belongs.
For example, if you have problems in medium or phase frequencies (too much intensity, or too much weakness in some section), you may correct saturation problems on other tracks (too many equivalent frequencies of different sounds reproducing at the same time or that contrast); It is in the Frequency Dimension. Or if you have volume perception problems (sounds sound stronger than others when all strong sound), you must meet normalization, or compression, or even correction in AHDR or panorama; It is in the Intensity Dimension. Another more ambiguous example, if you use traps in the wall/roof/soil to absorb sound reflections, is decreasing or eliminating the intensity of the signal that their ears will finally receive, by eliminating part of the sound mixed in air vibrations; Here is also in the Intensity Dimension. Finally, another abstract example, if you want the listener to change his mood with his composition, will have to use more accelerated or slower sounds as necessary; It is in the Time Dimension.
"Squaring" the brain encompassing or classifying all the concepts of sound physics and musical theory in these 3 large groups or dimensions will allow the composer greater understanding in its complex composition, obtaining faster solutions to the mishaps it may face. Note that, if any of the three dimensions is not present, it is impossible to reproduce sound: if the duration does not exist, nothing can be reproduced, if frequencies are reproduced outside the audible spectrum HumaNo, nothing can be reproduced, and if there is no intensity in sounds or even intensity is too low, there is no reproduction of sound. What sounds so obvious, can guide the composer in all music production processes. Basically, if you have any problem, ask yourself what dimension you are failing...
The following "Summary Scheme" shows the general workflow of work in a DAW, specifically for
- Creation of Instruments and Their Organization:
└─▶ Native instruments with samples, (notes distribution, modulation, effects, phrases).
└─▶ Complement instruments (configuration, libraries, aka).
└─▶ Settings and assignments of MIDI inputs. - Sound Capture (Analog to Digital):
└─▶ Analog sound input (microphone, instruments).
└─▶ Conversion A/D (sampling and quantification). - Previous Sequence and Track Organization:
└─▶ Time adjustments, compass, tone and pattern resolution (minimum line or cell duration).
└─▶ Previous allocation of patterns in the sequence.
└─▶ Definition and prior organization of the tracks. - Live Recording and Note Editing:
└─▶ Live note capture on tracks (play/interpret from MIDI keyboard/pad) and adjust delays or quantization.
└─▶ Direct creation of notes (recording not live from alphanumeric or mouse keyboard).
└─▶ Composition and editing of notes and pattern analysis (Piano Roll Studio ). - Audio Processing on Tracks, Groups and Shipments:
└─▶ Regrouping on group and shipping tracks for purposes.
└─▶ Effect application (EQ, compression, reverb, etc.).
└─▶ Automation (dynamic adjustments). - Audio Mixing:
└─▶ Level adjustment and panning.
└─▶ General review and adjustment of the mixture. - Final Masterization:
└─▶ Equalization and final adjustment.
└─▶ Compression and limitation.
└─▶ Final volume adjustment. - Render and Export:
└─▶ Final render mixture.
└─▶ Export as WAV format file (raw).
└─▶ Format conversion (FLAC (lossless compression), MP3 (high compression with losses).
In general, the
In general, artists or composers who intend to be professionals or semiprofesionals have particular traits of behavior, skills, creativity and a certain public image, directed and usually "facade", fulfilling a "character inventing". In addition, they can plug in some risk environments with their advantages and disadvantages. It is essential to know in advance the world to which they will be subjected to be able to achieve benefits and flee from the possible problems.
An "pro" artist will face his own image and his own falsehood if he had it (facade-person), to mass relations, distribution of times for dedication, a very high competitiveness, envy and hostile environments, in addition to allocating resources to their own public relations and advertising. It is often claimed that being a professional artist is usually very sacrificed, but any job is. So being an artist is not as special as it might seem, unless it reachesTo penetrate a large mass of people in realist, healthy and positive way.
If you want to know more, press the following "Show Content" button...
- Internet Sites to Share Musical Creations. They are usually specialized web pages to share artistic or other content indirectly or directly for the receiver: YouTube, Spotify, Apple Music, Soundcloud, Instagram, Tiktok, Facebook, Twitter, Deezer, Tidal, Bandcamp, Audiomack, Mixcloud, Reverbnation, Patreon, Vimeo, Beatport, Beatport, Beatport, Beatport, Beatport, Beatport, Beatport, Beatport, Beatport, Beatport Distrokid, Last.FM, Jamendo, 8Tracks, Onlyfans... Some mix the concept of artistic content platform with the social network.
- Social Networks to Share Content. Digital platforms to share content between companies, individuals or celebrities, both public and personal/private. The content can be very variable and interesting in some cases, although it abounds entertainment content that is not useful beyond this purpose. The networks are focused on obtaining and accumulation of user data and advertising for platforms, moving a lot of money and blatantly generating addiction. They can lead to anxiety, depression, aiSocial lab, lack of privacy, misinformation, cyberbullying, fear of missing something and mental health problems, even in very extreme cases reaching suicide. They can be used directly to advertise creative and positive content for society, but their use can be antiproductive to the artist for the large amount of loss of time and derivatives described above. Some most important social networks, designed to create dependence: Facebook, Instagram, Twitter, Tiktok, IUtube, LinkedIn, Pinterest, Snapchat, Reddit, WhatsApp, Telegram, Discord, Tumblr, Wechat, Vero, Periscope, Clubhouse, Flickr, Tiktok, Patreon...
- Centralized Music Distributors. There are websites dedicated to managing a comprehensive network of content platforms for distributing digital music. Artists are allowed to create an account, usually for an annual fee, where they can choose these platforms (as long as they are willing to offer them) and configure playlists, individual songs, or entire albums for completely centralized distribution, maintaining copyright and receiving the full royalties generated. This allows for broad expansion across networks with less work. It's a more convenient way to promote your musical work compared to the previous two points, unlike relying on a record label (although some of these distributors may have been promoted by a record label). If you're interested, carefully study what each digital music distribution platform offers before choosing one, also considering its origin (there are probably several of these platforms in your country). Some examples are: From the US: SymphonicMS, DistroKid, CD Baby, TuneCore, Label Engine. From Denmark: DANMARK Music Group. From the United Kingdom: Ditto Music, UnchainedMusic.io. From Sweden: Record Union, Spinnup, Amuse. From Germany: United Music. From the Netherlands: Stem. From Austria: Rebeat. From France: Believe Digital. From Italy: Optimale Distribution. From Spain: Altafonte, Rimas Music, PopUp Music, Mushroom Pillow, Sonido Muchacho.
- Dependency of the SM. The artist must understand that social networks are not his home, but a temporary channel, and not get carried away by the rules imposed by these networks (creates fast content that if I punish you with a mathematical algorithm that one of our programmers wrote to squeeze and fuck you). Social networks are excellent to be able to show the artist's content, self -publishing and generating followers, but every individual must be very aware of what place is and what is subjected to,always having the ability to migrate with all its content to another place if necessary.
- The Emerging Artist and His Common Problems. It is that individual who intends to achieve fame, money and recognition thanks to the creation of artistic content, such as painting or music, is still in the process of achieving such fame, money and recognition, but is obtaining certain positive results for his career. The 4 most common problems that suffer: lack of visibility and recognition, financial difficulties and lack of resources, lack of a network of contacts and professional support, and the high competition that hasce the same and that is increasingly globalized. Often this profile loses its time to want to obtain rapid recognition leaving aside the "creation of finished artistic content". Many emerging artists end up failing for this reason, not finishing much of their work, because for example, they vitiate in the networks.
- Independent Artist or "Indie". Artists or bands that are outside the circuit of the great recordings and that produce and distribute their music autonomously. In the digital age, many artists can record and distribute their music independently without great resources, taking advantage of self -promotion tools through social networks and digital distribution services. Equipate with a decent house study, produce there and move with online strategy.
- The Role of "Follower" or "Fan" for an Artist. The artist's opposite face is the follower/fan (Fan comes from "fanatic"). It is usually a person who admires for some reason the artist and may seek to support him, he may buy his albums, going to his concerts, expanding content in the RR.SS. Or even moral support... However, a follower means little for an artist, at least for that artist who has many followers. Unfortunately and with exceptions, the fan is nothing more than a number to add, or a lumpmore under the stage. It may only be reduced to a source of income. It is usually included in a group of people who do not know (other fans). Therefore, the relationship between artist and fan is usually virtually nil. However, the artist can obtain many benefits when accumulating a large number of followers. This also causes the artist not to value or be aware of the importance of a fan, and that for the artist to lose a fan or win another can reach the end ofDo not matter at all. It is such a beautiful and sad matter at the same time and will depend directly on the carism and honesty of the artist. It is possible to think that an artist plays a role, represents a "created character" that is nothing more than an idyllic exaggeration and a shield, and really only cares about his closest circle and his dependence on other artists or technicians so that he can complete his work. This led to the extreme can be even very radical, causing the art for the artist toUsecica really does not have binding link with fans and it is only about obtaining a high sum of money, or more recognition. Hence, for an artist, there is no individual fan with whom to deal with, but that they are all in a group of fans and will always go to them in the plural (my fans), which is a good strategy not to establish any link with them (save the distances). This kind of exhibition can cause strong deficiencies in the artistHuman relations of direct contact, further accentuating their ego and focusing their attention almost always in itself, obtaining a false belief that it can replace people with others and that there will always be more in the tail. But that tail can end at some point. That is why it is essential to understand these situations and know how to treat them with professionalism. Many artists end up failing because they have not worked "human closeness."
- Precautions and Tips for the Artist. The artist's public exhibition forces him to take care of his image and content. Next we will see several behavioral tips that any artist should keep in mind, regardless of its media impact.
- Protect your Artistic Content. Beyond protecting the intellectual property content as a final product, it is necessary to store all the content created in several safe copies outside the Internet. The artist must protect at all costs his content with a vision of the future. Sharing its content in the networks does not guarantee that in the future they continue to exist. Some of the social networks or content platforms are condemned to disappear at some point. The artist must have the "ability to move" to another siteIf necessary.
- Exquisite Mime in Followers. On the other hand, it is due to the exquisite care of their followers and the absolute respect and understanding towards them. Many artists fail directly because they do not have a good deal with their followers and think that they owe them nothing (they can even confuse love and absolute appreciation with harassHe wants certain things beyond my art...). A clear example is to have a profile on the social network where the interactions with the followers are with hardly any substance (no conversations are created, only icons, or individual words are shared that denote lack of interest, only search for likes, many "like" and increase in a number), generating in the follower or fan frustration, detachment and a feeling of abandonment, little treatment or even bad treatment, deriving in a disproportionate sensationFrom "You are the one who follows me but I owe you anything... but follow me, and if you do not follow me, because as you are more in the tail." Unfortunately, there are many artist profiles with this behavior, both in the virtual world in networks, and in real life, which is worse. So it is extremely important to adequate deal with followers.
- Care and Updated Contact Elaboration. Being active and current is an almost obligatory facet for any artist. To be able to distribute any content generalized, it is common to require contacts, both notes with the desire to measure and especially experienced. Having a clear contact list to whom to resort to any matter that has to do with expanding the art produced is fundamental. This issue is very important, since many artists have a remarkable talent, but they can lack a workor deep with their contacts, moving away from possible launching platforms, production, collaboration, distribution, and care of events.
- Artist Levels, Their Scope and Talent. It is "relatively simple" for an artist, unlike non -artists, getting followers quite quickly. Unfortunately, an artist who does not grow, with 5,000-10,000 followers in one or several social networks is like a "music fan" beyond their skills and has not yet managed to earn the seal of "emerging artist" with certain results, for belonging to such a competitive and saturated guild and that can be very frustrating and exhausting for himself andeven for his followers (today "anyone" with certain knowledge can make songs). In this way, artists can be classified as: "amateur artists" (without clear objectives, they simply love art and want to produce it), "emerging artists" (with certain results and media impact, being able to act even of openings) and "consecrated artists" (with a regular highlight). This classification has nothing to do with the artist's intrinsic talent. To meKnot there are low profile artists who are superior in talent to already consecrated artists. Fame is not directly related to talent.
- Scope and Projection Throughout the Race. Many artists throw their towel for not reaching a high number in networks, but not everything depends on a number. Not reaching a fork between 10,000 to 100,000 followers in a social network is usually considered that it is outside the media impact. However, in the artistic world there are many more things apart from social networks and followers or fans, such as live performances in medium concerts or small rooms and direct and real treatment with human beings, a magnificent areaIca to "leave their mark." In short, it is as important to create quality artistic content such as marketing to boost the world. Without a broad and careful list of followers, an artist is condemned to fail as such, referring in turn in the lack of "created artistic content", which is the worst of all. These profiles are usually artists who, throughout their career, have been 10 or 15 years and have not even been able to reach 50,000 followers in the same network. This today could be considered a failure for any artist who points high, since getting followers for the artist is relatively simple, as noted before.
- The Double Face of Obtaining Many Followers. The Community and Media Manager. Artists often use the number of followers as a claim to achieve greater successes in their professional relationships. Directly, they use followers for their own benefit. The more followers, it is usually easier to sign more actions or hiring contracts, etc. However, obtaining many followers away the artist from themselves, becoming an unusual situation for independent artists, and although it seems otherwise, Ultimately, it becomes unattractive to followers or fans. In these cases, it's advisable to hire a Community Manager, who can interact with followers after prior notice (so that followers know they're not contacting the artist directly, but rather their manager). If the artist is emerging or established, they usually also have a Media Manager, who handles strategic issues for the artist more behind closed doors. In any case, no manager or agent can ever impersonate the artist "in secret", even if he has the explicit permission of the artist, since, to deal with a follower, fan or even client without them knowing, he can have an impact on a disastrous image for the artist to be discovered and even cause negative opinion on the Internet. Some artists hide in their agents and use them to get away from the followers, because deep down they just want them to join in a number. After all, they see it as a businessTo earn money, not to relate. This issue is very delicate, it will not be the first time that an artist is canceled by his and a half followers destroyed his artistic career for his bad praxis, not only because of the bad treatment of followers, but for making little or nothing ethical habits or having too controversial behaviors.
- Avoid "Bad Image". Protecting the content and protecting and pampering followers is fundamental, talking directly to them, proposing things and not cheating using a community manager as an undercover substitute (a unfortunately common practice, since, if the follower loses direct contact with the artist knowingly, he loses his interest), since it is often a long -term career, and it is not convenient to leave "bad image." Many artists lead a double life, artistic and personal, and others carryn a triple life, artistic, staff, and another of doubtful approval (caused by excess of a varied nature). Does this mean that most artists are false or deceive people? This is a very ambiguous question, but it will depend on the honesty of each artist. There are humble and authentic artists, but unfortunately, it is a world that facilitates being the opposite.
- Avoid Vices and Face Them. Flee from drugs, alcohol, tobacco and vices in general. Artists can suffer a lot of stress and surround themselves in unhealthy environments that directly or indirectly invite them to fall into bad customs. Having clear goals and prohibiting at all costs falling into these vices is essential to not have problems in artistic creation or even in collaborations with third parties, maintaining a healthy and close image of a good example for society. For example, smoking is one of the peowith things that a singer can do, however, many singers smoke, for derivatives of anxiety, depression, fears or social pressure. There are many examples throughout the history of consecrated artists who died soon for having a life too accelerated or having access to certain unhealthy customs that require a lot of money.
- Enemy of Egocentrism, Pathological Narcissism, Classism and Accept Self-Criticism. On the other hand, abandoning egocentrism and being humble (many artists are self -centered and "they have it too believed," they are narcissistic, and are not able to protect or value others, they only value themselves), abandon the being a classist person who does not value human beings equally and seek to relate to individuals of a certain social status, and deal with the "personal brand" or "personal brand." (The role of "showbiz", show businesses) can be proBlemas for the artist, who is usually the first to deny them, confusing his own facade with reality. It is very common that, having access to many human beings, the artist himself believes that he is a superior being, projecting an unpleasant image as an example for society. Empathy, generosity and humility should be the pillars of any artist. Unfortunately, it is very difficult to conserve these features within an artistic world full of skills, envy, interestsof third parties, luxuries, excesses, low values and lack of honor.
- Avoid Sect Behavior. Some artists, more than one who would expect, behave as if they belonged to a sect, only accepting and approaching people of their same condition (other artists), and despising, rejecting and ignoring other types of individuals, by the desire to continue measuring at all costs abandoning their natural social character, moving away from their character as a natural person. This kind of artists get too carried away by the desire to want fame, money and recognition, but they neglect too muchThe relationships, both family, friends or even their own followers. They usually use other artists to upload more position and then leave them thrown away or replace them with others once they don't add more. This behavior can solve rapid recognition problems, but in the long run they become a clear general acceptance problem (ill-view artists because they use people).
- Avoid Being too Activist With "Fashion Things". Roding your artistic aura of certain dogmas, political, religious theme or beliefs such as feminism or being always opportunistic creating content with what is fashionable, it can be a way of life in itself that some artists can use blatantly to position them face dThe poles, and the artist here always ends up losing a large part of his audience (the opposite pole to the one he thinks belongs at a given time). Defending certain causes is fine, but with moderation, since it is interested in reaching the maximum in audience. Smart artists focus on "their product" looking for timeless content (which does not go out of style, which is how pasta is gained) and do not get into this type of issues because they can influence their own image too much and end these processesperdiendo alcance.
- Ethics and Honesty in Artistic Production and the Impact of AI. Competitive pressure from other artists can easily lead to an addiction to "cheating." Copying music, lyrics, or appropriating the talent of others as your own (hiring someone to do your work and then adding your name, or pretending to be a superior artist by naming your band after yourself when in reality you'd be nothing without it because you're incapable of producing anything individually), or even abusing "covers" (using songs that aren't your own to take advantage of the popularity of the songs themselves rather than the artist's limited popularity) is a common practice in the music industry as well. Unfortunately, powerful companies only favor certain artists, and for those who don't, it's impossible to compete without cheating. Beating a cheater without cheating is truly complicated. This is one of the most frustrating and sensitive issues because it completely violates ethics in the music industry (in today's music market, there are a multitude of timeless plagiarisms that are commercial successes, and yet there they are). In addition, now with the rise of artificial intelligence, it will be easier to "cheat." Artists must find a method to be able to demonstrate to the world that the content they create is real and original. And it is that artists will also begin to compete against AI, as is already in other professions, where companies with a lot of money have all to win.
- The Legacy as a Final Goal. Beyond obtaining money and being able to live from it, which would already be a decent and legitimate goal for the artist, in the end there is always that desire for recognition, which leads to the legacy he leaves in society. Finish songs, video clips, participate in important projects and other artistic content may not leave a mark at a specific time, but over the years you can become something much appreciated for people. Nowadays there are too many artists "creating a brunette inInternet ", pieces of content destined to disappear. It is time to seriously rethink these things, because time is limited and consumed. Do you want to be an artist who is remembered? With short videos and likes you will not get it, yes if you manage to finish a good complete job and allow and achieve that you have reach to be seen. Do you really make art!
- How to Detect a Good Artist? In the world of musical creation it could be affirmed that there are several levels of artist. However, there is only one type of artist really, it is like a final goal. The rest are "potential artists." An artist who only sings, only does that, sing (stands out in one thing, and now). An artist who only mixes songs, only does that, mix. Some of these works have much more media impact (fame) than others, but not in art are less or more important. For example, in a rock band, eliminate the bass, or to the battery and observe the result. All members have the same importance. The truth is that a singer if only sings would be nobody because he needs a tank of professionals behind him to do the rest of the work, such as writing lyrics (which are the messages), producing the music, etc. The true artist is one who in his style of music is able to solve virtually all processes to finish a product, or to the Unless they need very little help. In short, someone who knows how to do practically everything and does it well. The artists who have made an impact throughout history are those who demonstrate multiple talents at once, do everything well, and if they lack something, they invest their time in improving it, not wasting time trying to gain fame in other ways (as often happens with those who want to achieve fame on social media or appear in magazines showing their private relationships; you will become famous on social media or on programs from gossip, but not as an artist for your work). How you do it will define you. There is no more.
- The Current Situation of Musical Artists. Although this might seem subjective, today demonstrates a lack of art and criticism in itself that implores truly talented people who know how to do things well, of listeners who know how to listen and an industry that bets on this type of artists and eliminates from the circuit those that do not contribute anything positive for society. The current decline is present in most areas (in popular music, in original soundtracks, in films, in the sculpture and painting...), where the haste, strong and even inappropriate messages and the training of true professionals who do not join the fashion car and that focus on finishing their products in the best possible way, that music is a message and matters what it is, how it occurs and its reach. Unfortunately, there are thousands of daily songs released, a lotIad in this world so competitive and unfair, full of contacts and influences, where the lack of values and certain purely economic interests is prevail, instead of true talent. These "artists" will pass the game without leaving a relevant legacy (they generated rapid consumption content that does not go anywhere). In past times there have been very powerful artists with brilliant minds, capable of generating really good products, which endure. Currently, there are also, but barely they haven't seen each other, they have lost the north. It is necessary to reorient both artists and educate people to value what consumes and catapult those who truly deserve it. They say that art or even politics are a reflection of society. Well there is...
To be able to use and control the
Minimum Requirements for Renoise and Piano Roll Studio:
- Windows 10/11 or higher, 64 bits.
- AMD or Intel processor (any CPU based on X86 will serve).
- 2 GB of RAM.
- Sound card compatible with Directx.
- Graphics card and monitor that support 1024x600 in color of 16 bits or higher.
- USB alphanumeric keyboard and USB mouse.
Recommended Requirements for Renoise and Piano Roll Studio:
- Windows 11 or higher, 64 bits, or the latest versions of Mac or Linux.
- AMD or Intel Multicore processor (the higher performance and quantity of threads the better).
- 4 GB of RAM (minimum for 64-bit operating systems). More and RAM is recommended if it is required to load many libraries for instruments.
- Sound card with Asio support (low latency, only registered version).
- Graphics and monitor card at least 1920x1080 pixels in color of 32 bit or higher resolution. It is even recommended to use several image monitors.
- USB MIDI keyboard (facilitates the entry of notes). A keyboard of at least 32 keys, an ideal of 88 is recommended.
- SSD type data storage units or high performance higher technology for reading and writing.
USB Alphanumeric Keyboard. A USB alphanumeric keyboard is required to control the DAW and the
High Performance USB Mouse. For the skillful control of
USB MIDI Keyboard/Pad. In addition, it is highly advisable
Image Monitors. The
Central Processor and Sound Card. In addition to the peripherals described above, for a good workflow and high performance it is very important to have a high-performance central processor and a sound card with Asio capacity, at least. Using at least this type of hardware will guarantee good performance for software in general.
To have broad and comfortable control of the
In general, there is a direct relationship between the high workflow and the high control surface to visualize the software. The more space the composer has in his image monitors, the easier it will be to control the software and vice versa. A good practice is to avoid as far as possible the use of overlapping windows (that one lid to another partial or completely).
Use of a Single Image Monitor. At a minimum, a 24" to 27" monitor with 1920x1080 pixel resolution is recommended, so that two windows can be placed side by side to avoid overlapping windows.

Use of Two or More Image Monitors.
- Two Monitors in Parallel. In this case it is recommended that they be of the same resolution, at least in the high dimension. This case can be the most common. A substitute for this configuration would be a single very large panoramic monitor.
- Two Overlapping Monitors. In this case, two monitors of different sizes and resolutions can be used. When stacking a monitor, it's common to remove the stand, invert it 180 degrees, and somehow embed it on top of the other monitor.
- Two Separate Monitors. In this case you can use a laptop and another external secondary monitor, for example. This scenario is common for composers who require mobility, hence the use of a laptop. If the composer is right-handed and uses a dedicated mouse, it may be more appropriate to place the monitor to the right of the laptop, right in front of the mouse.
- Three Monitors in Parallel. In this case, it is recommended that they be of the same resolution, at least in the height dimension, and they can be more square monitors.
- Three Monitors, Two in Parallel and One Superimposed. Visually they would form an "L", where the two parallels should at least have the same dimension in height.
- Four Monitors, Three Parallel Monitors and Another Superimposed. Visually, they would form an inverted "T." In this case, it's recommended that the parallel monitors have the same resolution, at least in height. The overlapping monitor is inverted 180° with the stand removed.
- Four Monitors, Superimposed Two by Two. Visually they would form a 2x2 square. This distribution would be the most extreme and it would be recommended that all monitors be the same.


Some composers use a single portable computer in their home in their home, because they require mobility to use this computer elsewhere. However, if the composer spends many hours in his study, it is highly advisable to use a powerful desktop computer with several image monitors, and the better the better.
Usually, the use of a laptop limits the workflow, not only by having a "uncomfortable" compact keyboard for the skillful use of keyboard commands, but for using a small screen, a little practical touch pad to control the mouse pointer, or little space for the mobility of a dedicated mouse. Serious composers or artists in general should take their work environment seriously and flee as far as possible of laptops, which are suitableFor mobility, but not for usual use for composition.
The faster solves each operation, and at the same time, the less operations need to solve them, the better workflow will obtain; It will be more efficient. Using adequate software and hardware for specific use is essential not to hinder or delay the termination of said work.
It can also be because it is employed hardware that makes it make more operations or later in solving the steps (such as view problems). The latter is common when laptops, small monitors, slow computers, low performance mouse or an unpant measured MIDI keyboard are used.
A serious and professional composer needs to use their brain to focus on the composition itself and always have their hardware (peripherals) ready. Any distraction from poor or slow control of their hardware/software can disrupt their mental focus and even cause them to miss out on good, recent ideas!
Remember: you'll need to have your mind as clear as possible to concentrate throughout all production; the fewer distractions the mind has to solve all the processes, the better.
Before to install the
If you have any questions or suggestion, you can directly contact the developer ulneiz, which is an independent programmer who does not depend on the development of
The
If you need to request any characteristic or change on this software, please put in direct contact with the developer. For more details about the license, please access "Piano Roll Studio: Preferences / About PRS / License".
The program
- Piano Roll Studio. Demonstration Version. The demonstration version has exactly the same functionalities as the Full Version, but with limited trial time and a floating window window. That is, it is not a cut version but of limited time. You can try all its characteristics, but you will only have a few minutes to do it. Once the stipulated time has elapsed the tool will be blocked. If you want to continue using the tool, get the Full Version.
- Piano Roll Studio. Full Version. The demonstration version uses the same installation package as the Full Version, but the Full Version is 100% functional, without limitations. The Full Version of
Piano Roll Studio only requires a personalized use license that is installed manually. If you are interested, contact the author ulneiz to obtain your custom user license.


- Microsoft Windows 10/11: "C:\Users\USER_NAME\AppData\Roaming\Renoise\V3.5.0\Scripts\tools\com.ulneiz.PianoRollStudio.xrnx\".
- Apple macOS: "VOL_NAME/Users/USER_NAME/Library/Preferences/Renoise/V3.5.0/Scripts/tools/com.ulneiz.PianoRollStudio.xrnx/".
- Linux: "/home/USER_NAME/.renoise/V3.5.0/Scripts/tools/com.ulneiz.PianoRollStudio.xrnx/".
Access the Root Folder of Piano Roll Studio. After installing the Piano Roll Studio, the composer can access the root folder of PRS in 3 possible ways. This is useful if you want to activate the Full Version tool or directly access text or reading files:
- From the Operating System. Use the operating system's file browser and navigate directly to the path described above.
- From Renoise. Vaya a "Renoise: Tools / Tool Browser...", right click on "com.ulneiz.PianoRollStudio (Piano Roll Studio)" and access "reveal in explorer..."
- From the Piano Roll Studio. Invoke the Preferences Window (top button with the mechanical wheel), go to the "About PRS" tab and click on the "Official Logo" on the right.
Unless otherwise indicated, this file can be restored after the installation, simply replacing it with the previously saved.
To invoke the window of
- With the Mouse. To invoke the main window of the
PRS from the menu ofRenoise go to "Renoise: Tools / ∿ Piano Roll Studio...". - With the Alphanumeric Keyboard. To invoke the tool
PRS from a keyboard command go first to "Renoise: Preferences / Keys: Tools / ∿ Piano Roll Studio" and assign a free keyboard command easy to remember. In this way, the window of thePRS . It is advisable to assign the {SHIFT}{<} command.To close the window ofPRS in itPRS the {SHIFT}{<} is already predetermined, thus using the same command to invoke or close the window. It is possible to change the symbol "<" for another in "Piano Roll Studio: Preferences / Miscellanea" in case the symbol "<" is not to the right of the {SHIFT} key. This "<" symbol is used by thePRS for multiple operations, for strategically close to the {SHIFT}, {CTRL} and {ALT} on some alphanumeric keyboards. - With a USB MIDI Controller. To invoke/close the main window of the
PRS is possible to map a link in "Renoise: MIDI Mapping / Global Mappings / Tools / Piano Roll Studio / ∿ Invoke / Close PRS Window [Trigger]". To do this, use a button or a pad. This access is especially useful for using the windowPRS full screen ifRenoise is also full screen, so that the point of placement of the window in the image monitor is always the upper left corner.
Every time a new version of the
To know all the changes in the development of the
The
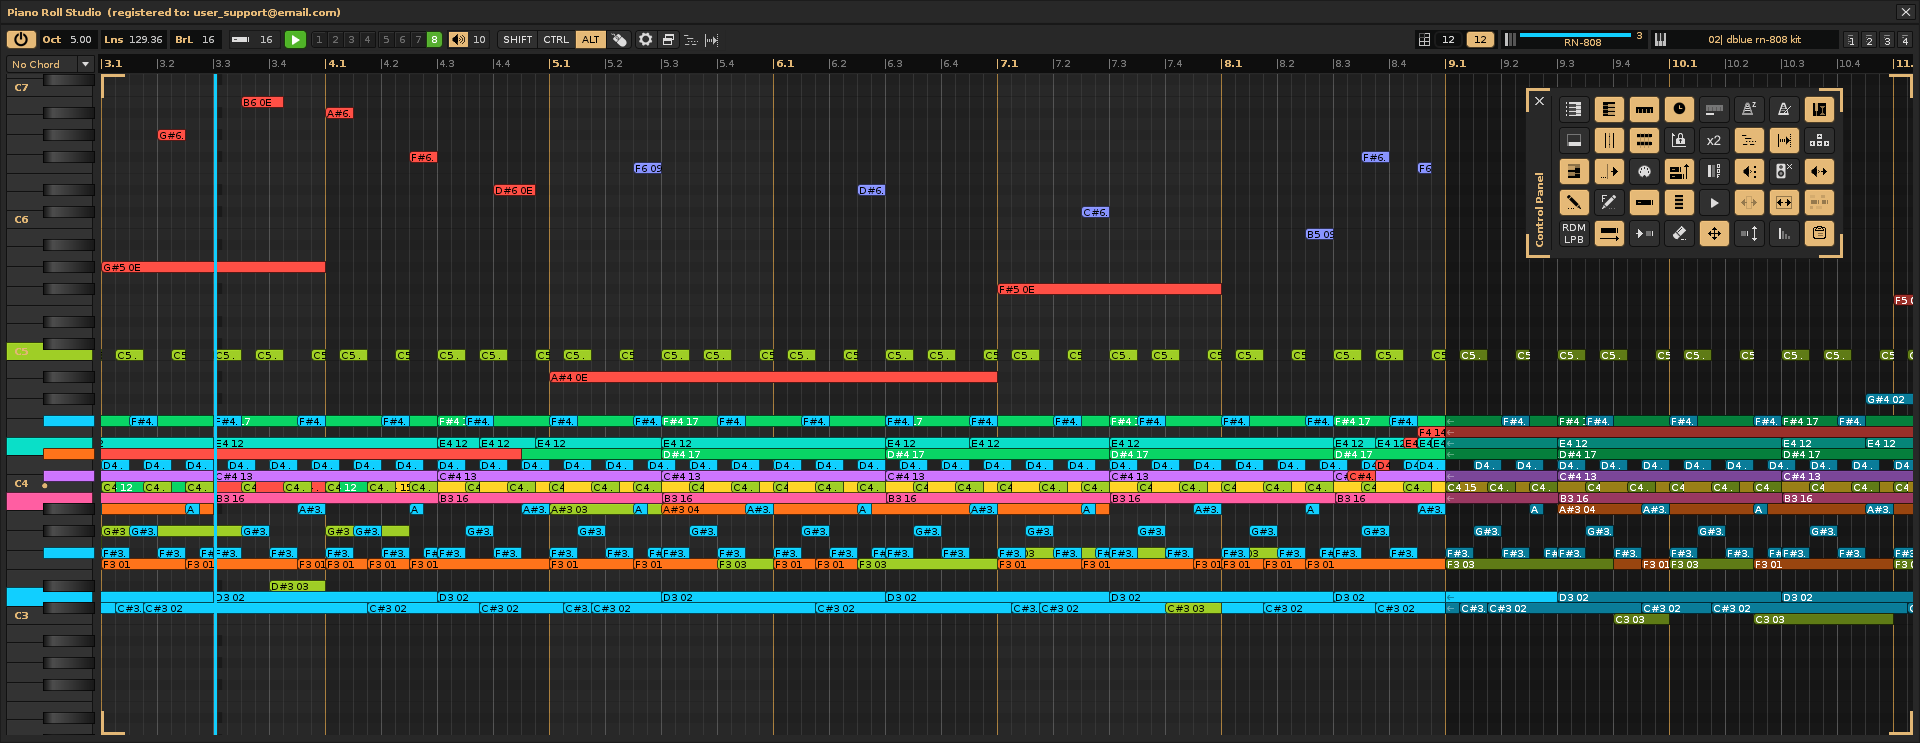
- The Title Bar. Displays the tool's title and the name of the registered licensed user. This bar allows you to drag and drop the window.
- The Top Control Bar. In essence, it concentrates access to basic size, edition/reproduction/manager controls, selection operators, note block choice, commands, position and window profiles. This bar also hides the powerful and customizable patterns manager.
- The Vertical Piano. Monitor the reproduced notes, chords, transposition scales. Among other things, it allows change of centralized or eighth vertical zoom, mirror mode or placement to the right of the grid.
- The Ruler. To control the times, you can show bars and pulses, line position in decimal or hexadecimal and even marked loop. It allows to change the compass, number of lines, the LPB value, the centralized horizontal zoom, among other things.
- The Grid (Note Editor). It acts as a Note Block editor or player with centralized vertical zooming or multiple bidirectional scrolling capabilities, along with multiple mouse interaction capabilities. It displays a complete pattern track (up to 512 lines) for editing, or a complete pattern (or even the next pattern up to 512 lines combined) with all tracks for playback. All the design of
PRS is focused on the grid, being the most important control area. - The Note/Effect Columns and Parameter Navigator. It allows to navigate between note columns, effects and acts as an effect parameter selector, to use them with the effect parameters editor. It has a lower panel for randomization and curves and line calculation capacity.
- The Effect Parameter Panel. With vertical zoom capacity, this panel allows you to directly draw vertical bars of amounts, even with affinity to the notes. This panel is an agile control reinforcement towards all effects of effects of the pattern editor
Renoise . This panel allows you to control amounts of volume, pan, delay and a large number of applicable sound effects, including exclusive effects ZMxx and ZPxx for the control of the metronome. - The Perimeter Frame. The right, bottom, and diagonal (bottom right) corners allow you to resize the window with the mouse.
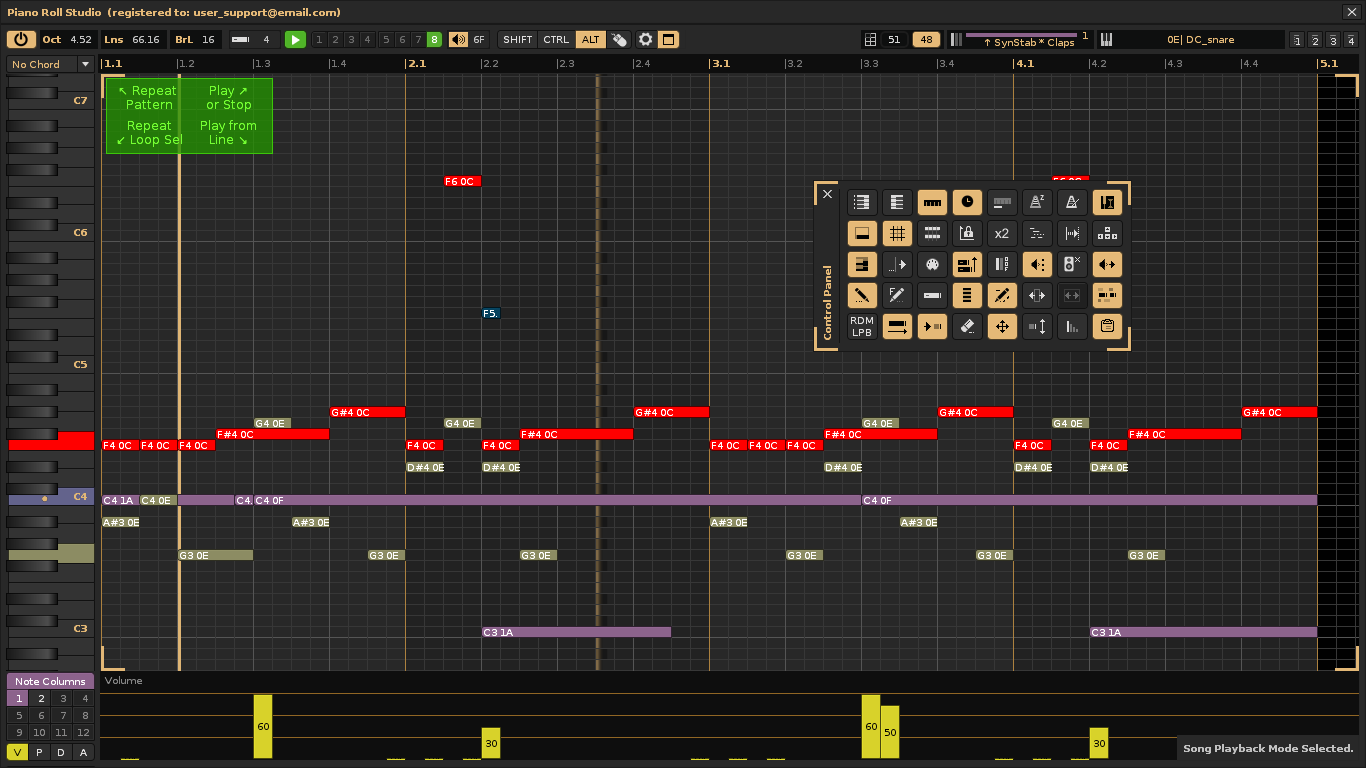
In addition, this window is adaptable in size and allows different jobs; It is actually as if it were 5 tools in one. All this together with their strong capacities for manipulation and creation of chords, as well as the management and direct insertion of complete patterns-pistals make the
Five Specific Use Modes. The main window of
- Use 1: As a Horizontal Compass Marker. Displaying only the bar marker as a time signature or line position marker, hiding the grid and effect parameter editor. It can be positioned above the main window of
Renoise , occupying very little vertical space. It is a good complement to control the times. - Use 2: As a Notes Player and Locator. With song playback mode enabled, you can locate note blocks using the track-by-track layering and note-by-note column stacking system. It also offers two horizontal scrolling modes: scrolling the playback marker with the static grid or automatically scrolling the entire grid.
- Use 3: As a Powerful Editor for Note Blocks and Parameters. The grid and the parameter editor have vertical concordance, allowing to manipulate the blocks or bars directly, both with simple editing methods or advanced editions.
- Use 4: Only as a Notes Editor. It's possible to hide the parameter editor, using the entire available area of the image monitor to fill the grid. This allows for convenient editing on large surfaces.
- Use 5: Only as an Effect Parameter Editor. You can also hide just the grid. In this mode the
PRS becomes only an edition panel of effects of effects and amounts, an excellent complement for when it is only necessary to attend to the effects of effects of the pattern editor ofRenoise .

From left to right, all parts of the upper control bar are classified. This bar can adapt to the width of the window to appear more compact, hiding some elements and will always occupy the same vertical dimension. Remember that this bar also contains hidden the patterns manager. Keep the mouse pointer still for a moment on each control will appear a text sandwich with additional description information, as well as the comKeyboard or keyboard and more mouses associated.
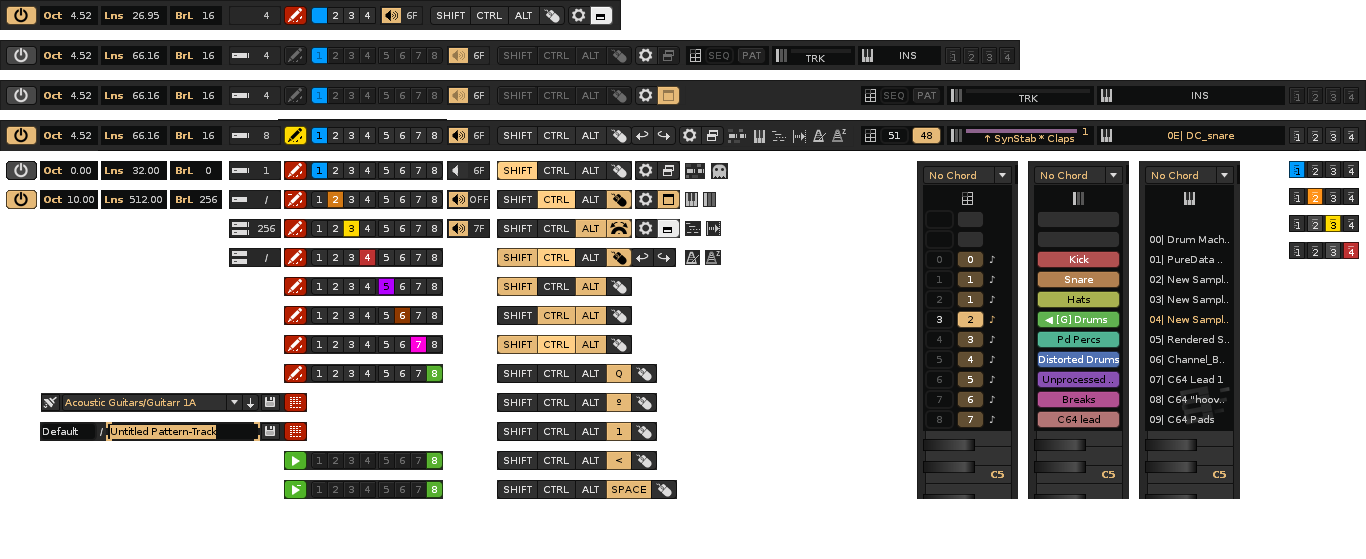
OFF and ON Switch. When the switch is "OFF" the window is not doing anything, it is simply loaded in memory. When in "ON" it means that the window is synchronized with the events of
Oct _ _._ _ Lns _ _._ _ Brl _ _._ _ Oct, Lns and Brl Values. The value of Oct (Octaves) It limits the vertical dimension of the window and shows the number of octaves of 0 (hidden grid) to 10 (shows the grid for 120 notes). The value of Lns (Lines) partially limits the horizontal dimension of the window and shows the number of pattern lines or cells, between 32 and 512 lines. The value of BrL (Lines bar) Shows alternate background separators to better distinguish the bars, determining the number of lines per compass, from 0 to 256. If modifies the dimensions of the window these values will automatically change and their ranges will depend on the size of the window limited by the profile of monitor used and the established zoom.
Note / Chord Block Selector and Number of Cells Number. With two modes for both, the "note block mode" with value between 1 and 256 represents the note (or chord) with its relationship with a note off, so that they can be edited as a united element, a unique block with shot and stop that occupies a number of cells determined by the value. The "division mode" or value 0 (or also "/") has no associated note off in the edition, only manipulates individual notes, so that a note block can easily section. InThis case, by inserting a note block, the shot is defined, but not stopped. Press the {>} command (or your personalized sign) or {F9} to change mode. Use the commands {ALT}{F1} a {ALT}{F12} to change the number of cells of the note or chord.
Note Edition Mode, Pattern-Track Manager, Song Playback Mode and Isolate Each Group Mode. This switch toggles/displays between all of these modes. Note Edition Mode (red) allows you to directly manipulate note blocks with a wide variety of commands and operators. Song Playback Mode (green) only allows editing with the {CTRL}{SHIFT}+ Wheel command, only for transposing note blocks or chords. The surgical Isolate Each Group Mode (red/green) only shows the note blocks from tracks that are within a parent group, making it easy to work/separate by groups to detect notes. To switch between Editon or Playback Mode, Single Click on the switch or use the command {1}. To switch directly to Solo Each Group mode, press {ALT}{SHIFT}{1}. To use the
1
2
3
4
5
6
7
8
Selection Operators and Clipboard Selector Switches. The eight colored selection operators are a unique feature of the
Turn On/Off Volume. Volume Value. The volume switch deactivates or activates the sound produced by the mouse action on the note block in the grid or on the vertical piano, or produced by the MIDI input (use of a keyboard or PAD MIDI). The volume value ranges from 0 (OFF) to 7F (maximum level). It is the value that can be added in volume when inserting a block of note or chord.
SHIFT
CTRL
ALT
SHIFT
CMD
OPT
Modifying Command Switch Monitoring. These switches are illuminated by pressing their corresponding keys from the alphanumeric keyboard, the usual ones for the Microsoft or Linux Windows Operating System {SHIFT}, {CTRL}, {ALT} or the specific modifiers commands for the Apple Mac Operating System {SHIFT}, {CMD}, {OPT} that are customizable. These commands can be maintained directly to control the entire
Q
º
1
<
SPACE
Monitoring of Other Commands. Some commands are strategic, such as {º} (metronome), {1}, {<} (typical of the
Mouse Switch Monitoring for Buttons and Wheel. When using the left, central and right buttons, the mouse switch will light. When using the wheel, this switch will show a wheel and light up. Do Simple Click on the mouse switch to show and thus be able to use the undo and remake buttons with the mouse. Do Double-Click to deactivate all modifiers that are marked.
Preferences Window Button. Press Simple Click or press {F12} on this button to invoke or put the preferences window in the foreground.
Window Area Switch. It shows the maximized, minimized states or modified window. It serves to modify the window size or hide certain panels. Press Simple Click or {SHIFT}{F9} for the compact or maximized window profile modes. Press {ALT} + Simple Click or {SHIFT}{F10} to minimize or restore the window. Press {CTRL} + Simple Clic or {SHIFT}{F11} to hide or show the grid. Press {SHIFT} + Simple Click or {SHIFT}{F12} to hide or show the parameter editor.
State Icons. They indicate the loading of all tracks or ghost track in note edition mode, the instrument name and track name in the note block, the mode of grid displacement, the mode of following the reproduction of the song, the sound of the metronome and the activation to record the parameters ZMxx and ZPxx in the pattern editor of
SEQ TRK INS Sequence, Track and Instrument Navigators. They allow visualizing and changing the position in the sequence, track and instrument. The sequence navigator shows the sequence and pattern indices. It also allows you to change the pattern index with the command {ALT} + Wheel. The track navigator shows the name of the current track, its color and the note or effect column index. The instrument navigator shows the index and its name. Do Double Click in any of them to jump to index 0 or Rotate Wheel to navigate. This will display the navigation panel on the upright piano..
1 2 3 4 Monitor Profile Switches. Simply click on the switches or press {CTRL}{ALT}{F1}, {CTRL}{ALT}{F2}, {CTRL}{ALT}{F3}, {CTRL}{ALT}{F4} to change directly. The four available profiles can be reconfigured in "Piano Roll Studio / Preferences / GUI & Sound".

The Pattern-Track Manager is a powerful, fully integrated add-on utility that allows you to share, save, and reuse custom Pattern Tracks for different song projects. The manager is hidden in the top control bar. To show or hide it again, Rotate Wheel on the note editor switch. The new controls will appear to the right. This is only available in note edition mode (it won't work in playback mode).
The Pattern-Track are saved as XML files, compatible only with the

Pattern-Track XML files are text documents that can even be edited manually, as long as their hierarchy is preserved. It's also possible to manually reorganize files and folders within a level.
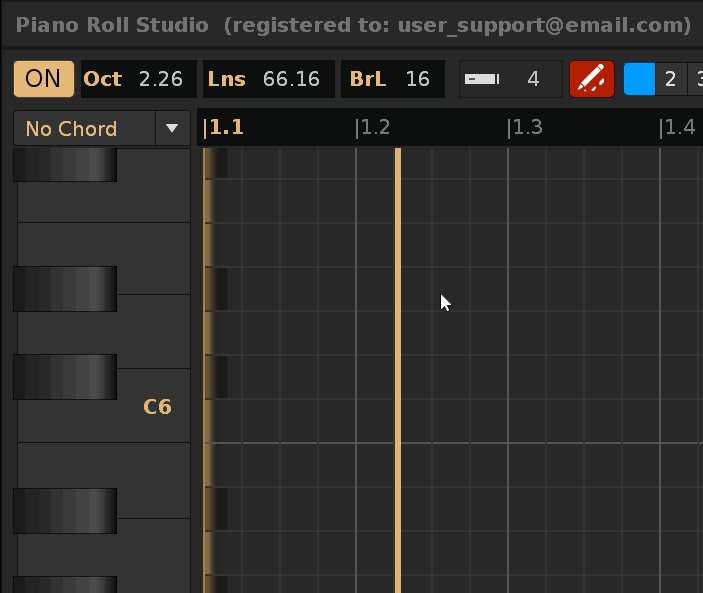
Delete Pattern-Track Button. Previously select the pattern-track from the drop-down list. Use this button to erase it. This will eliminate it from your container folder.
Insert Pattern-Track Button. Pre-select the Pattern-Track from the drop-down list. Use this button to delete it. This will insert it into the note editor (grid). You can insert it directly from the drop-down list for quick rehearsals. To do this, press and hold {SHIFT} + Rotate Wheel on the drop-down list. This is useful if you want to try several patterns of the same type on the flight.
Save Pattern-Track Button. Press this button will open two text boxes, one for the name of the top-level folder and another for the name of the editable file. Rotate Wheel over the first text box, and you'll be able to browse through all the folder names already categorized by type. If you type a new name, a new one-level container folder will be automatically added. The
Selection operators are an exclusive feature of the
With a little skill, the composer will gain much broader, direct, and faster control for more complex operations, from copying, pasting, cloning, transposing, inserting or removing cells, randomizing notes, assigning instruments, creating new patterns, manipulating chords, among others, in addition to transport operations, such as playing, stopping, partial pattern looping, or full pattern looping. All in all, it is an arsenal that enables more capabilities than those offered by the pattern editor or sequence matrix of


All eight operators are available for note edition mode. If you switch to playback mode, only Selection Operator 8, intended for transport operations, will be available.
To draw a diagonal click and keep {SHIFT} + Simple Click & Drag. The area will be displayed with the corresponding color, with cell precision, and a simple description will appear in the lower information bar, so that before executing the operation it will have its reference. Once cover the desired area, release the click before letting go {SHIFT}. In doing so it will execute the associated function. If you release {SHIFT} the area will be marked, but will not execute its function, so you can also use the selection simply to mark a non-modifiable area. ForCompletely cancel the marked area you can press any selection operators button in the upper control bar.
1Selection Operator 1 (blue). For clone, copy, paste, cut, clear, drag & random functions. This operator is usually the most used.
Clone ↗ Allows infinity cloned (∞), to cover all the lines of the pattern from the selection or change from 1 to 9 the amount of cloning. To change the quantity press {SHIFT}{1} to {SHIFT}{9}, or press {SHIFT}{0} to recover the amount of infinity.
Drag ↗ ↘ ↙ ↖ is a special operation. Trace a selection area by drawing any diagonal line with {SHIFT} + Right Click & Drag; this will highlight the selection. To drag the selection, press and hold {SHIFT} + Right Click & Drag over the selection area, over the cell you consider the reference cell for moving the set. This will allow you to strategically move the note blocks to another position.
Random ↗ ↘ ↙ ↖ with Insertion Probability is another special operation. Again, trace a selection area by drawing any diagonal line with {SHIFT} + Right Click & Drag; this will highlight the selection. Now press {CTRL 1} to {CTRL 9} or {CTRL 0} to insert note blocks with a probability ranging from 10% to 100% in a step-by-step manner (customizable). Pressing {SHIFT CTRL} + Wheel over the note block length value will change the length of all note blocks within the area as a whole (i.e., move existing note-Offs).

Cut ↙ or Copy ↘ and Paste. Once you have done the cutting line ↙ or copy ↘, do {SHIFT} + Simple click on the desired cell. When you release the click, take the glue, taking as a reference the first note block. Remember that you have up to 8 independent clipboard to deposit copied. Paste allows to superpose/rewrite note blocks or stack note blocks to build multiple chords (there is an option to change it from the grid Control Panel).
Delete ↖. When executing the deletion function, not only delete groups of blocks of complete notes, but also allows to surgically delete the two-way note block. That is, if you select the head of the note block, you will also automatically delete your associated note off if it exists (it is not necessary to cover the entire note block). But you can also erase only the point note Off if you only select the cell off cell, but without covering the head of the blockEU of note. For example, the latter is especially useful to correct the final part of a surgical chord, such as deleting 3 desired contiguous note Offs from a 5 note blocks.
2Selection Operator 2 (orange). For group transposition functions, both for the current note column and for all note columns. This operator will pre-mark in orange the note blocks that can be transposed. Remember that transposing only involves moving vertically.
3Selection Operator 3 (yellow). For group stretch/shorten functions, both for the current note column and for all note columns. This operator will pre-mark in yellow the note blocks that can be retouched. However, the pre-selection area limits how far the note blocks can be stretched horizontally, so you can preserve the adjacent composition. Make a very wide selection beforehand to be able to stretch the marked blocks significantly. This is particularly useful for small corrections in groups of note blocks.
4Selection Operator 4 (red). For functions of inserting/removing lines, both of current note column and of all note columns. Especially useful to remove or add empty spaces.
5Selection Operator 5 (purple). For randomization or change of instrument functions, both current note column and all note columns. Randomizing allows you to change the height (frequency) of the note blocks preserving the rhythmic figures (number of cells of each note block). The change of the instrument index in the selected notes is useful for closing patterns and changing the notes to another instrument to experiment. Remember that it is advisable to use a single instrument in CAda Track, although I can use several, and not use the same instrument on different tracks, although it can do it if it does not use sample effects on the native instrument.
6Selection Operator 6 (brown). For special functions of chord manipulation.
The strokes ↘ ↙ allow the selected chorde of the vertical piano on the blocks of initial notes, or conversely, eliminating the chords leaving only the initial notes blocks. Especially useful if you want to easily change a large group of chords for another chord formed with more or less notes.
Detect/steal a chord ↗ allows you to select in the vertical piano, if it exists, the chord that covers the selection area, to be able to reuse it later. If the chord does not exist, and has selected one of the 4 customizable chords and is empty, the chord of the selection area will "steal" and load it in the personalized chord, to be able to reuse it later. This guarantees a sway of data between the grid and the drop-down list of vertical piano chords.
Insert chord progression ↖ Add the chord by defining the number of cells and height in width, and also accumulates it along the pattern at the same height. This is especially useful for subsequently transposing the height of the chords individually to create variations in progressions.
7Selection Operator 7 (magenta). For specific functions of patterns-patterns or patterns.
To clean the entire pattern ↗ only select a cell. This will erase the data, but not the pattern in the sequence slot. To suppress the entire pattern ↗ Select more than one cell, which will modify the sequence by eliminating it.
Cloned operations ↘ ↙ ↙permit to determine the number of cloned according to the number of cells selected vertically. For example, if you trace 20 cells in vertical, you will clone 20 times accumulated the current track pattern or pattern. This speeds up the cloning or insertion of empty patterns with the same number of lines.
8Selection Operator 8 (green). For typical transport functions. These allow you to play or loop the entire pattern from the beginning, stop playback, play from the first selection line, or create a selection-specific playback loop.
The selection loop operator ↙ will draw a permanent green marker over the top dividing ruler, spanning the range of cells (lines) of the loop. To remove this loop in live playback, just do Simple Click on the green marker of the ruler, and this will disappear. This frees the reproduction of the loop without altering it (reproduction follows its course).
Under the upper control bar is always the dividing ruler, aligned at all times with the lower grid. You can mark by line position, or instead per compass sequence, with your number of pulses. It allows establishing partial pattern loop and horizontal zoom, among other direct adjustments, such as determining the number of pattern lines or configuring the number of pulses of the metronome.

Marker by Line and Compass. The "line marker" sequentially marks the line position in jumps according to the value of LPB (Lines Per Beat) and can be shown in decimal or hexadecimal. The "compass marker" shows the consecutive compasses and their pulses. For example, a first 4/4 compass would look like this: 1.1 - 1.2 - 1.3 - 1.4. The first value indicates the compass number, and the second value the pulse number within this compass. The second compass would be 2.1 - 2.2 - 2.3 - 2.4, and so on. This help markerTo better identify the rhythm both in the
Partial Repeat Loop Marker in Green. It allows visually establishing the initial and final limit of the loop within the pattern, that is, the range of lines that will be reproduced repeatedly from the pattern. To establish the loop use the Selection Operator 8, with Diagonal de Trazo ↙. To release it (eliminate it) during reproduction Simple Click on the green marker. By stopping reproduction with Double-Click on the grid, the loop will also be removed.
Centralized Horizontal Zoom Control/Jumping. To control the zoom Rotate Wheel on the ruler in the desired position and the zoom will focus from that position. This allows to expand the desired area. You can combine it with horizontal displacement. The zoom can be easily expanded from the start of the pattern, since it has some affinity with the first lines, allowing the beginning of the grid to fit perfectly. If the zoom is blocked, Rotate Wheel will perform jumps by pulses (steps).
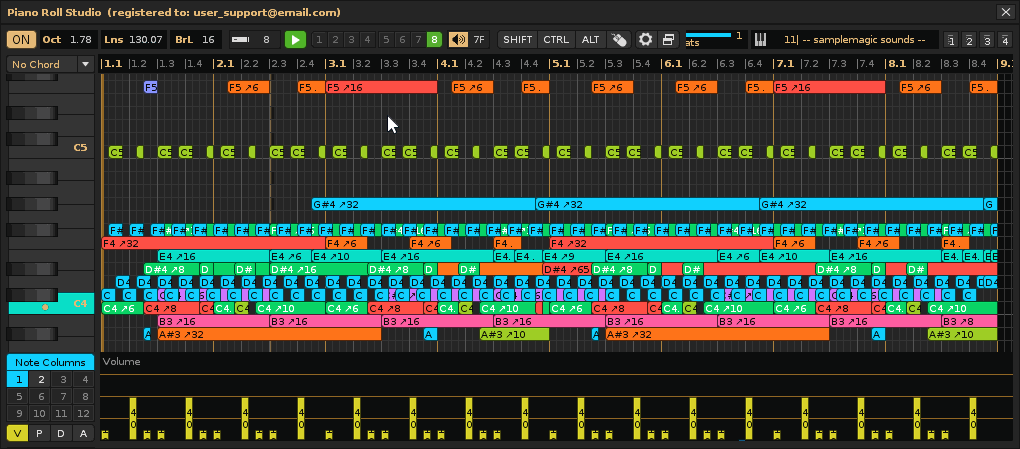
Direct Displacement Between Start and End of Pattern. This feature is very useful to have more skilled control if the horizontal zoom occupied by the pattern exceeds the horizontal size of the grid. Make {CTRL} + Up Wheel on the rulerr to displace the initial framing of the grid from the first pattern line. Make {CTRL} + Down Wheel on the ruler to displace the final framework of the grid until the last line of the employer.
Place the Desired Cell in the Initial Position. This is useful for navigating between bars, in case the zoom is too large or the pattern is too large to fit completely within the width of the window. To do this, click Middle Click on the ruler in the desired cell. This will position it at the beginning.
Place the Entire Grid in the Initial Position Without Affecting the Zoom. Restart the pattern position (set the first line in the initial position). To do this Left Double-Click. It is common to combine this control with the previous control to navigate between bars.
Adapt the Grid to the Number of Pattern Lines. This control allows you to easily show the entire pattern so that the entire grid occupies as much as possible. To do this Right Double-Click about the ruler. This will also place the grid in its initial position.
The rest of the ruler commands are available in "Piano Roll Studio: Preferences / Mouse & Keys".

The Vertical Piano is always aligned with the grid. It displays the notes being played, the notes that form loaded chords, and the keys that are part of the current instrument's transposition scales. From it, you can scroll vertically between octaves or between "n" semitones (customizable). It can visually display the notes in each key, in both English and Neo-Latin notation, as well as the frequency of each note. In addition, the piano can turn around (Mirror Piano) or place it to the right of the grid.

Load Custom or Predefined Chords with Listening. Change Your Root Note. Above the piano is the chord drop-down menu. Selecting or moving (transposing) a chord will cause it to sound. The first four are customizable, and the rest are preset, with their abbreviated names, full names, and the notes they comprise. To customize a chord, press {SHIFT} + Simple Click in ascending order over the keys above the root note. This will add the notes to the chord. Do the same for the notes already added to remove them from the chord. To transpose the root note, press {CTRL}{SHIFT} + Wheel. This will displace the entire chord. Remember that you can pre-chish the chord before entering the grid or even capture it to reuse it when creating progressions.

Establish the Transposition Scale. Correct Already Composed Notes. A transposition scale defines the concrete keys that can be used from an instrument. If you need to change the transposition scale according to the style of music and instrument you use press {CTRL}{ALT} + Wheel. Remember that each instrument has its own transposition scale. You can also change the scale reference key with {CTRL}{ALT}{SHIFT} + Wheel.
Displacement by "n" Semitones/Jump Through Octaves.Rotate Wheel For "n" scroll semitones. Use {CTRL} + Wheel to solve the jumps by octaves. If the vertical zoom of the grid is blocked these two commands will be invested.
The rest of the vertical piano commands are available in "Piano Roll Studio: Preferences / Mouse & Keys". Note that there are also commands intended for navigation, such as navigation through the linear sequence of the song.

No Chord ▼Chords Drop Down Menu. "No Chord" Play and edit a single note on the grid. Selecting any chord from the menu will play and edit the entire chord on the grid as if it were a single note. Chord editing and progression generation is one of the most powerful features of the
Scale Corrector Button. When establishing an instrument transposition scale, if there is any compound note on the grid outside the scale, this button will correctly correct it. The correction of each note always transposes it down to place it on scale.
● Root Note. The circular marker indicates the key that corresponds to the root note to define the chord. The root note is always the lowest-frequency note forming the chord, which usually corresponds to a natural note (white keys), unaltered (sharp).
The Grid is the largest and most important area of the
Note that the grid is surrounded by three areas: the dividing ruler up, the vertical to the left (or right) piano and panel of effect parameters of effects and their amounts below. These three areas work at the service of the grid and are at all times aligned and synchronized with it, forming a whole set for visualization and editing.

Selection Area. On the grid, it corresponds to the area that is marked in colors according to the use of the 8 selection operators that, as you know, is invoked with {SHIFT} + Click & Drag.
Direct Control Panel. On the grid, this orderly panel shows several switches that act as direct access to a large number of varied options of the preferences window, and at the same time allows to see a general state of the configuration, thanks to its detailed iconography. To invoke it on the click grid Right Click. This will display the panel on the right and lower side of the mouse pointer as much as possible.
Note Blocks. They are superimposed on the grid and show the equivalent of the rhythmic figure (horizontal length, with or without associated note decay) and the note (position in pitch). Thanks to this order, it's easy to read the melodies and compositions in general before even listening to them.
Centralized Vertical Zoom Control/Jump by "n" Semitones. To control the zoom Rotate Wheel on the grid in the desired position and the zoom will focus from that position. This allows to expand the desired area. You can combine it with the vertical displacement by "n" semitones of the vertical piano or by clicking {CTRL} + Wheel on the grid. If the vertical zoom is blocked, it is replaced by the displacement by "n" semitones.
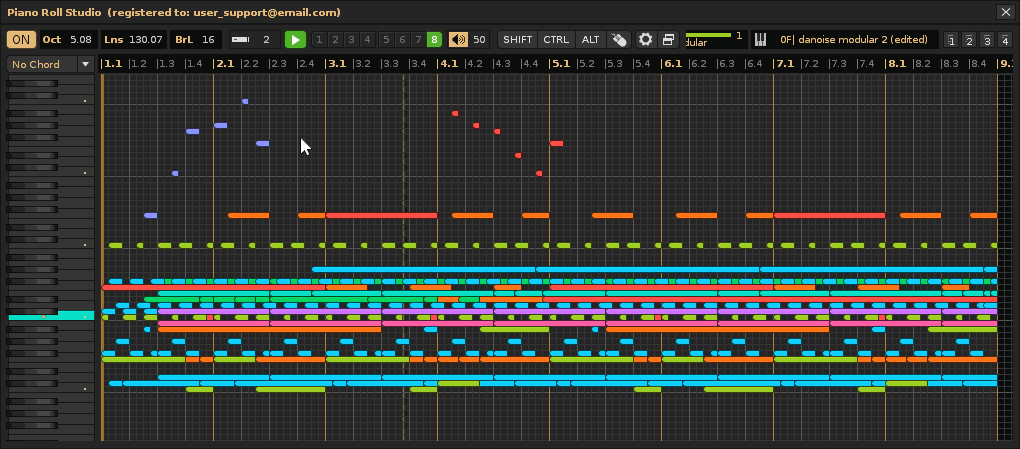
Insert a Note Block. Choose a cell to insert a note block, taking as reference the dividing ruler and the vertical piano or cursor piano. To do this, press {CTRL} + Simple Click over it. The notehead will be triggered at this cell position during song playback. If you want to insert a chord, select one from the chord drop-down menu and use chord mode.
Transpose the Note Block or Chord with the Wheel. In addition to the commands that involve Click & Drag in order to edit, there is a specific operation to be able to transpose (change tone) the note blocks or the complete chords detected (if the chord mode is activated). To do this, press {CTRL}{SHIFT} + Wheel, after placing the cursor piano on the head of the reference note block. This editing operation is the only one to be able to edit in the mode of reproduction of the song, since this mode is "protected" against the edition.
All grid commands are available in"Piano Roll Studio: Preferences / Mouse & Keys". Whenever you have doubts about some command, you can consult this type of descriptive command tables. The grid has a wide variety of controls, with its combinations of keyboard and mouse commands. Simply try each of them and familiarize yourself in their control, since most work similarly. That is, if you know how to control a couple, it will be easy to understand the rest.

The note block is defined as a unique element within the
Durations in a Song and its Parts. In the total duration of a song the smallest part is a "line" (or cell). The lines are grouped into "pulses", these pulses are grouped into "compass". A certain number of bars will add a "pattern." The sequence of several patterns adds the total duration of a "song". Throughout the song we establish note blocks, which have a certain strategic duration. This is complicated since the duration of the line can vary throughout the reproduction of the CAnation, as well as vary the pulses, types of bars, as well as the durations of each pattern (variation of the number of lines of these. Although

Definition of Note Block. A note block defines the beginning and end of a sound associated with an instrument, which will be reproduced at a given time over the duration of a song, therefore, it has "a position." The note block has 5 characteristics, basically defined by a sequence of cells that specify its duration:
- Head. It corresponds to the first cell of the note block. To differentiate it, it has the corners of the right rounded. This cell allows you to move the entire block. Indicates the shot of the note (from the beginning of this cell).
- Body. They are the rest of cells that make up the note block. If it has 4 cells, 3 will correspond to the body. These cells can be sectioned with the division mode, so that a note block can be sectioned in smaller ones.
- Foot. It corresponds to the last cell that includes a note off (only visible in the editing mode, and can also be hidden). It is usually marked by a small white vertical rectangle. Indicates the note stop (from the beginning of this cell). Note that both the "head" and the "foot" can include the delay parameter.
- Color. The note block takes the color of its containing track. Additionally, it will take on a slightly lighter color in the current note column compared to the rest. This makes it easier to identify which notes are part of a particular note column, distinguishing them from the rest.
- Text. Within the note block appears descriptive information of different types:
- Nte/Hz: Indicates the name of the note. For example, C3, C#3 or D3, D#3. The # indicates an altered (sustained) note. Or where appropriate, replacing the name of the note with its frequency. For example, 440 Hz (corresponds to the A4). Then the note block looks like this: [C3__________] or so [440 Hz__________]. To the right of the name more information may appear...
- Phrase Idx: This option accompanies Nte/Hz and +Ins IDX and includes, if exists, the phrase index in two digit hexadecimal linked to the note and preceded by the symbol ⌥. Then the note block is seen as follows: [C3 ⌥05 __________] or [C3 0A ⌥05 ________]. This is very useful to directly examine notes that shoot phrases, both in the "program" mode and in the "Keymap" mode.
- +Ins Idx: It also includes the instrument index in two-digit hexadecimal. For example, 0A. The note block then looks like this: [C3 0A__________].
- +NC Idx: Include the index of the note column to which the note block belongs, preceded by a bar | For example, 03 would be the third note column. Then the note block looks like this: [C3 | 03 __________].
- +Cells: Includes the number of cells that adds the note block, in two digits in decimal, preceded by an arrow ↗. This facilitates calculating the rhythmic figure it represents. For example, in a 4/4 compass in which a pulse is 4 cells, a rhythmic "black" figure would be a 4 cell note block. Then the note block looks like this: [C3 ↗04 __________].
- Ins Nme: Replaces all the information with the name of the instrument. An icon will appear in the upper bar to indicate it. For example, the note block looks like this: [Cymbal__________].
- Trk Nme: Replaces all the information with the name of the track. An icon will appear in the upper bar to indicate it. For example, the note block looks like this: [Track 01__________].
- ≡: Replaces all the information with the symbol of three lines of the hamburger. It serves to clean the content, but at the same time it facilitates where all the heads of the notes fall. This visually facilitates the differentiation of all blocks.
- Empty: With absence of information. The note block does not show text. The
PRS allows you to clear the entire grid of information, even removing grid dividers or the background. Empty note blocks allow for very clean visual demonstrations of playback when creating very complex compositions.
- Nte/Hz: Indicates the name of the note. For example, C3, C#3 or D3, D#3. The # indicates an altered (sustained) note. Or where appropriate, replacing the name of the note with its frequency. For example, 440 Hz (corresponds to the A4). Then the note block looks like this: [C3__________] or so [440 Hz__________]. To the right of the name more information may appear...
Definition of Chord. Strictly, a chord is the set of 2 or more note blocks that are written in consecutive note columns, therefore, they will sound at the same time, so that the lowest frequency note block is the root or reference note of the chord. Its joint sound has a harmonic connotation and generally receive a name according to the separation of the notes that compose it. For example, the chord (A4 - C5 - E5 - F# 5) corresponds to an "min 6" chord (minor 6: c d# g a).
The root or reference note allows you to manipulate the entire chord as if it were a single note. It is the starting point that also allows you to define the tonality of the whole. That is, you can move, chop, increase or decrease the number of cells, capture the chord in the grid, create progressions of the same chord, etc., as if you were only working with a block of notes. Note that the
Identifying Chords on the Grid. Chords are defined by the number of semitones separating the notes they comprise. Thus, a chord is not defined by the name of the notes, but by the separation between them. This means that a single chord can span virtually all the notes in the 10 octaves and still be the same chord. Typically, and for simplicity, the root note is usually a natural note, but it is not limited to natural notes (the root note can also be an altered note, although this can be a little more complex to control, memorize, or play).
In addition, remember that
The
- Note Track. It has up to 12 note columns and up to 8 effect columns. The only type of track that allows you to deposit notes.
- Group Track. It only has up to 8 effect columns. For grouping note tracks or group tracks.
- Send Track. It only has up to 8 effect columns. This allows you to set up new effects that affect other note tracks or group tracks linked to it, acting as a bridge between them and the master track.
- Master track. It only has up to 8 effect columns. It receives all signals from the remaining tracks for final mastering.
Switching Between Note Columns and Effect Columns. It automatically detects what type of track it is. If it is a notes it is possible to change between note columns and effect columns, in order to edit the content surgically. Press with Simple Click the "Note Columns" switch to switch to the effect columns or press with Simple Click the "Effect Columns" switch to change to note columns. Under this switch appears a button to navigate between the 12 columns of note or the 8 effect columns.
Open a Certain Nnumber of Columns. Select Column. For example, press directly with Simple Click button 8. This will open 8 columns in the current track and select it. To select a specific column, click Simple Click on the desired number button. This will not close the rest of the columns that are open. Note that, in the upper bar, in the track navigator, the selected column number will appear, whether of note or effect.
Directly Close a Certain Number of Columns. For example, press directly with Double-Click on button 3. This will close all columns of number greater than 3 and select this column.
Clone Existing Parameters in Other Note Columns. To do this, press {SHIFT} + Simple Click on the button number of the reference column that contains the parameters (and their amounts) that you want to clone. It will automatically detect the rest of the column note that they have the same structure of notes and clone these parameters. This is especially useful for clone parameters after generating chords based on a note column containing the root notes of each chord, for example, using selection operator 6 with diagonal ↘.
Stack Notes Between Note Columns to Compact Them. To do this, press {CTRL} + Simple Click in the "Note Columns" switch to stack as far as possible all the notes of the visible note columns of the pattern. Press {SHIFT} + Simple Click in the "Note Columns" switch if you want to do the same for the entire track (this operation is somewhat more aggressive, since it analyzes the entire track).
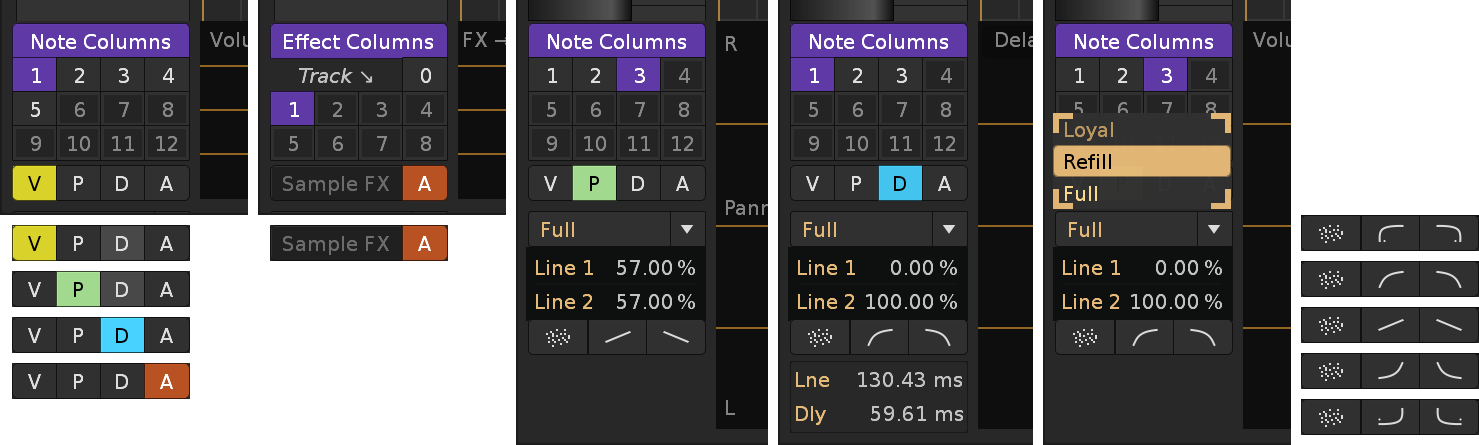
Change the Parameter Type [V-P-D-A]. Use the V-P-D-A button pad to switch between the different types of parameters for each section that are usable within the pattern editor of
Selection of Affinity Curves Specific to Amount: "Loyal", "Refill" y "Full". Use the drop-down menu to change the affinity between "Loyal", "Refill" and "Full". "Loyal" only acts in the curve on the quantity bars of the chosen parameter (without adding anything new). "Refill" fills the missing amounts in the chosen parameter curve. "Full" acts on all amounts, regardless of the chosen parameter. For example, "Loyal" is very good to change amounts of volume that affect only loose notes.
Pre-Set Curve Range Limits. Go to the parameter editor and do Simple Click on an amount bar to establish it. Now do Double-Click on "LNE 1" to capture the initial limit (the line number and % of this amount). Repeat these steps for the final limit, doing it on "LNE 2". This establishes the limits of the lines and their amounts less and greater in %. Rotate Wheel on the start or end line value if you want to correct your assigned % value.
Create Straight, Logarithmic, Exponential or Random Curves. Humanization. Following the steps above, Rotate Wheel on the curve buttons to be able to change them. Once you set the curve type, click Simple Click on the curve or randomization button. This will generate the curve according to the previously established limits for lines and % amounts. Remember that you have five curve types and their inverses available, in addition to randomization. For example, controlled randomization, with a very small % range, can be very useful for humanizing the triggering and stopping of notes with the "D" delay parameter. It can also be useful for "perfecting" the triggering and stopping of notes that make up chords in different note columns.
Line and Delay Calculation. Seleccione el panel de Delay con el botón "D". Haga Simple Click on a delay amount bar to establish it. This operation will show a small lower temporal panel that indicates the time in milliseconds that lasts an entire line (LNE) and the time in milliseconds that lasts the established quantity bar (Dly). This allows a more thorough control of time control. Remember that the duration of a line depends on the BPM values (tempo: beats per minute) and LPB (Lines Per Beat).
All Note/effect column navigator commands are available in "Piano Roll Studio: Preferences / Mouse & Keys".
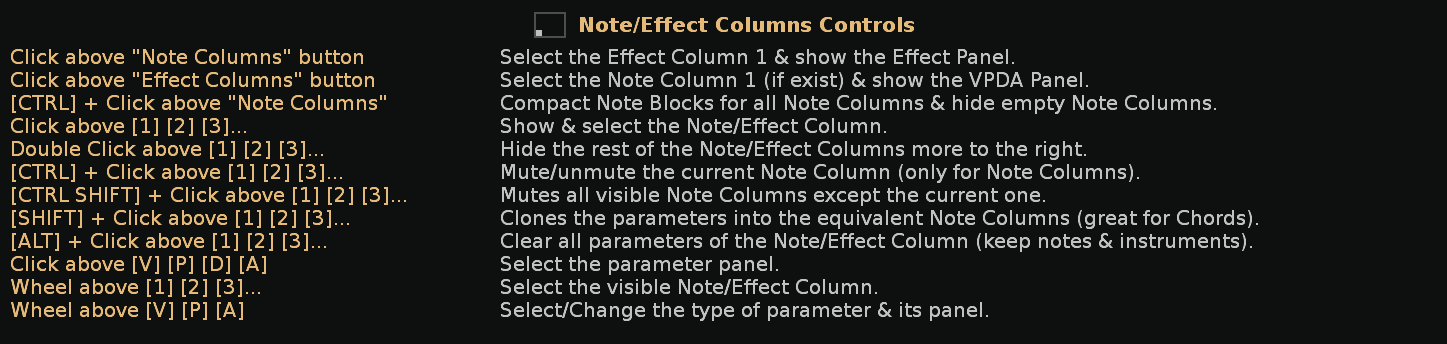
The Effect Parameter Editor Panel consists of five subpanels: Volume [V], Pan [P], Delay [D], Sample [A] for the note columns, and Track [A] for the effect columns. It's easy to manipulate effect amounts using vertical amount bars.
Prior Knowledge of Available Effect Parameters. Before using this editor, you should understand the purpose of each effect parameter. If you make a parameter selection from the [V-P-D-A] button bar, a detailed description of what that parameter does will briefly appear in the parameter editor panel. Keep in mind that using the "amount" value has a different effect on each parameter. Some parameters are 2-digit hexadecimal, or consist of 2+2 digits, for the parameter value (one letter, two letters, or a hexadecimal value) and for the amount value (in hexadecimal). Remember that there is also an xyzz automation parameter for each of the available track device parameters.


Set the Parameter Editor's Vertical Zoom. Rotate Wheel on the editor panel to change the vertical zoom slowly. {CTRL} + Rotate Wheel to do it more quickly. Or press {SHIFT} + Single Click on the editor panel to directly toggle between minimum vertical zoom, medium vertical zoom, or maximum vertical zoom.
Insert a Amount Bar of the Chosen Parameter. Once you have established the type of parameter, make {CTRL} + Click & Drag Vertically on the desired line in the parameter editor panel. This will drop the parameter and modify its quantity. Remember that each parameter has a specific quantity range associated with it, and depending on the type, you'll drag it from top to bottom or bottom to top.
All of the effects parameter editor commands are available in "Piano Roll Studio: Preferences / Mouse & Keys". Some commands are similar to the Note Editor of Grid. Try each one out and familiarize yourself with how they work. You'll find the Parameter Editor to be a powerful way to manipulate parameter amounts more quickly and surgically, even in the ensemble.

In the lower right corner of the

The Direct Control Panel is a compact window that can be invoked over the grid. It displays several switches that act as shortcuts to a wide variety of options in the preferences window, while also providing an overview of the configuration status thanks to its detailed iconography. To invoke it, press Right Click on the grid. This will expand the panel to the right and below the mouse pointer as much as possible.
Most of these are configuration options, although there are some that aren't in the preferences panel, such as Tracks Off, which, as the name suggests, turns off all other tracks to play only the current track, or the shortcuts to Metronome Sound or Follow the Player's Position.
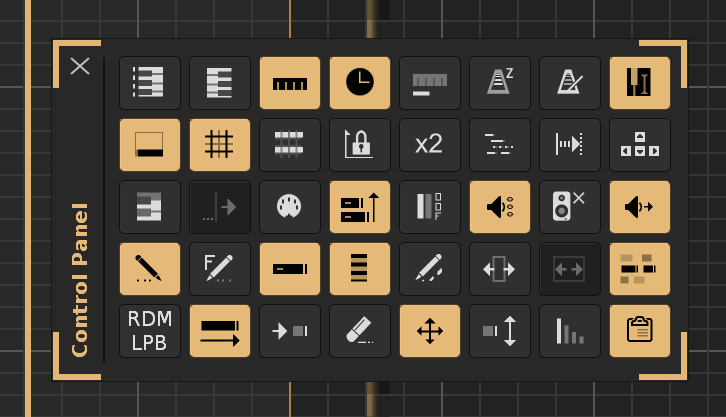
*Also use the mouse wheel to switch between the different available settings for each option...
Vertical Piano L↔R. Positions the upright piano to the left or right of the grid.
Mirror Piano. Flips the upright piano without changing the key height.
Ruler Dividers Type. Switch between decimal line markers and beat markers.
Syncronize the Ruler. Always synchronize the ruler and grid with the song playback.
* Idx Positions Grid. Displays a panel above the grid with the sequence/pattern, track, and instrument index.
Metronome Update (ZMxx, ZPxx). Allows you to track the ZMxx and ZPxx parameters on the master track to change the metronome settings.
Metronome Sound. Activates the metronome sound. The volume can be controlled in "Renoise: Song / Song Options / Metronome".
Capture Instrument. Automatically selects the instrument by Single Clicking on the note block with the mouse.
Parameter Editor. Displays the bottom panel of the parameter editor for quantity bars.
* Grid Dividers. Allows you to hide horizontal dividers or the entire grid.
Grid Black Keys. Shows black key markers on the grid.
Lock V/H Zoom. Locks vertical and horizontal zoom.
Doubles the Speed V/H Zoom. Doubles the speed of vertical and horizontal zoom. Zoom must not be locked.
Scrolling Grid Mode. Enables grid scrolling during playback. If disabled, the playback line will scroll.
Follow the Player's Position. Enables tracking during song playback. Combines with Scrolling Grid Mode.
Steal Cursor Keys. The [UP] [DOWN] and [LEFT] [RIGHT] commands move the Vertical Piano and control the Horizontal Zoom.
Piano Chaser Mode. Lights up the upright piano keys based on the trigger of the notes played in the pattern, based on the track color.
Lights the Player Position. Lights up the moving playback grid line based on the trigger of the notes, based on the track color. You need to enable Piano Chaser Mode.
Piano MIDI In Mode. Lights up the upright piano keys based on the linked MIDI input. You must set the selected device in the preferences.
Paste Stack Ptt-Trk. Allows you to stack notes (stacking based on availability in empty note columns). Useful for creating group chords from root notes.
Tracks Off. Turns off all other tracks to isolate the sound from the current track.
Pre-Listen Chord. Allows you to preview chord notes when loading them or pressing keys on the upright piano.
Force No Sound. Mutes notes when tapping note blocks while the song is playing.
Volume → Velocity. Change the velocity value based on the volume value of the note block to preview it with Single Click.
* Musical Notation. Switch between English notation (C, D...), neo-latin (Do, Re...) and note frequency (440 Hz).
Notation Style. Name only the C notes of the upright piano or all the notes.
* Note Block Info. Switch between the different information states displayed by the note blocks.
* Piano Cursor Style. Switch between the 3 different styles of the moving piano cursor: Piano, Pipeline, Classic, or None (to hide it).
Isolate Each Group. Only the tracks that belong to the parent group are shown.
Note Edition Grid. Allows you to also display the gaps of the previous pattern and the adjacent next pattern in the grid for edit mode (current track only).
Song Playback Grid. Allows you to also display the gaps of the previous pattern and the adjacent next pattern in the grid for song playback mode (for all tracks).
* Show Other Tracks (or Ghost Track). Note blocks from other tracks appear in the background of the grid for reference.
* Random Note Block Step (RDM). Set the insertion of note blocks into the note column in steps (1 to 128). Use a % probability.
Note Block Length. Preserves the length of the note block (its number of cells) when moving or transposing it.
Rectify Length of Note Block. It also allows you to change the length of the note block when inserting and dragging.
Clear Note-Off Only. Allows you to erase only the note Offs without affecting the rest of the notes.
Translate/Traspose Note Block. Switches between shifting or shifting and transposing the note block when inserting it with shifting.
Overlap/Drag Pitch. Change the stacked insert mode, between overlapping note blocks or quickly modifying their pitch without changing their length when dragging (preserves the rhythmic figure, only modifies the pitch).
Insert Note Volume. Also adds the volume value when inserting note blocks, according to the value set in the top controls bar.
* Clipboard Banks. It allows to change among the 8 clipboard banks to work with the copied one.
Below are all the subpanels available within the preferences window. You can either Single Click on the top horizontal tab button or Rotate Wheel on it to switch to the desired subpanel in sequence. Each option is automatically saved for future sessions.
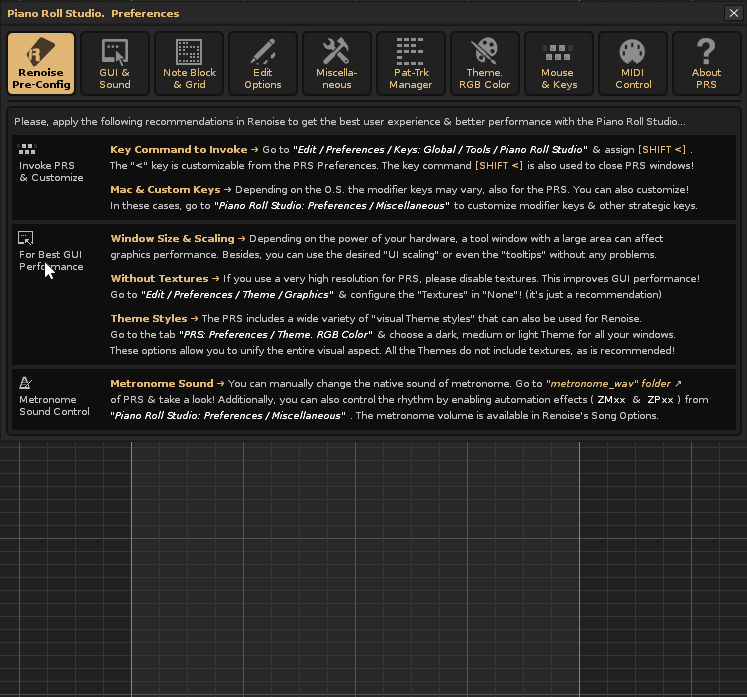
Read the following recommendations for pre-configuring of this subpanel before using
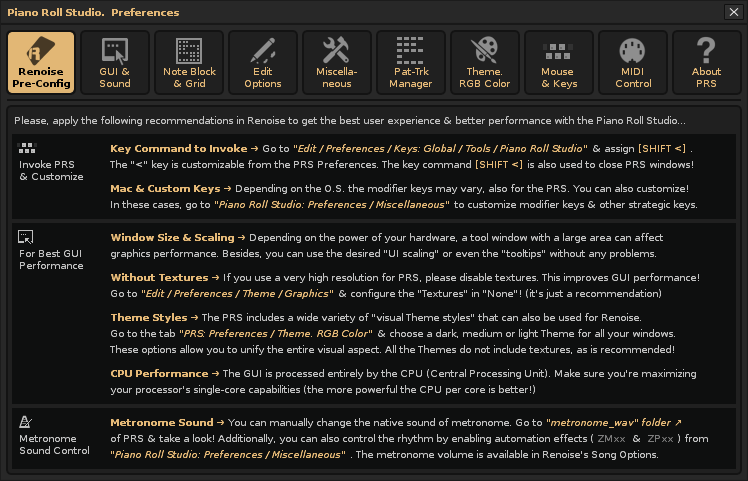
The following subpanel displays the main options related to the graphical interface and sound settings. Remember that the most frequently used ones can be accessed directly from the grid Control Panel.


This subpanel contains the note block options and how they are displayed on the grid. It also has a small utility ("Bar Calculator") to calculate the appropriate pattern resolution based on the smallest rhythmic figure to use.

The options of edition expand the range of controls for inserting or editing note blocks. It can also insert volume bars and change clipboard slots, up to 8.

Miscellaneous groups a variety of general options, including zoom lock controls, custom commands, metronome update control, and more.


The following filters allow complete control over the insertion data from the pattern-track XML files, which can be sorted and saved. You can access the root folder from the button, and remember to control its management from the top bar.
This is the theme profile editor subpanel, available in dark, medium, or light styles. It has a wide variety of color themes, each customizable, usually with a prominent color. The


Different areas of
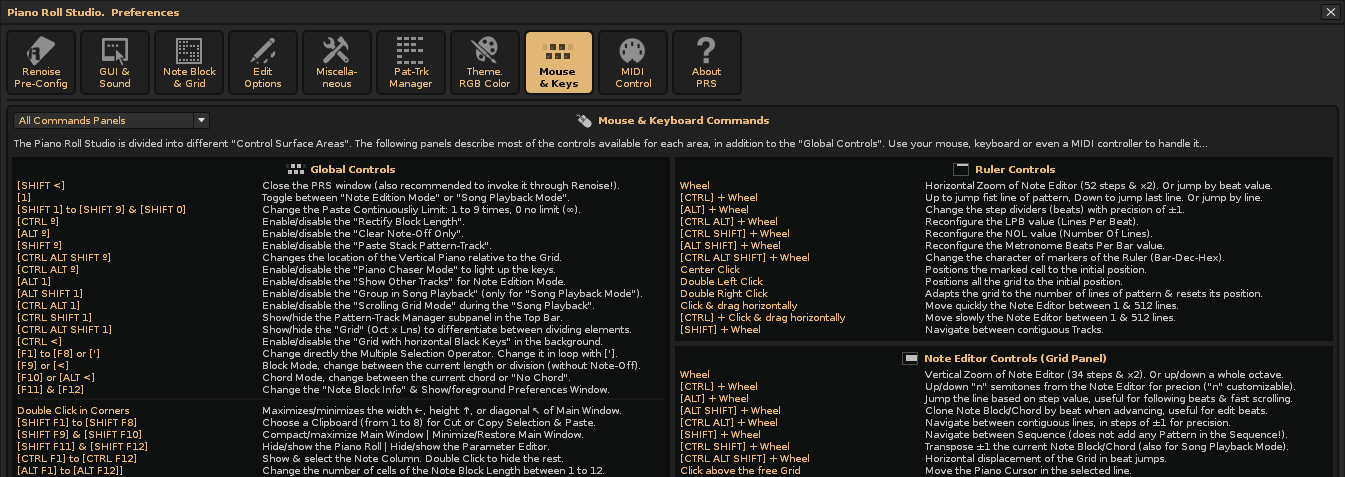
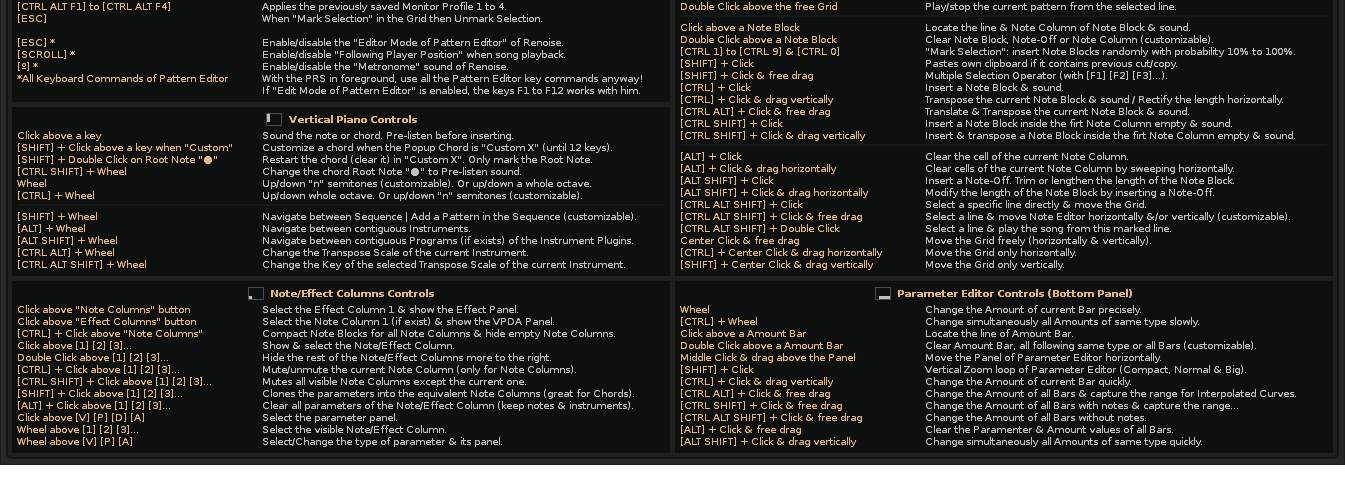
The main controls of the

Relevant information about the

The "simple composition" covers simple editing operations that, generally, only affect a note block, within the notes editor and generally form the bulk of the first phase in the musical composition. That is, how to edit blocks of individual notes inside the grid, be it in the creation phase, capturing a mental idea, or modifying something already created. For the edition remember that you must keep in mind at all times that a note block has three parts: head, bodyo y pie. Each part will react differently to mouse editing actions.
It is common for the composer to repeat these types of operations continuously during the editing of a pattern-track and can combine or alternate them with "advanced composition" operations.
The majority of command combinations operations with mouse actions are reflected in the top control bar. There you can "read" those commands at the time of executing a specific edition operation. In addition, it is also possible to execute the editions only using the mouse, without the need for an alphanumeric keyboard.
Previous Step 1: Grid Configuration (Ruler, BPM, LPB, NOL, Zoom...). Before you start composing notes, you should complete the following preliminary steps to prepare your patterns and grid:
- Set up the Dividing Ruler. As recommended, set the ruler to the per-bar time signature to display the beats. This will help you keep track of the rhythm while composing.
- Establish the Initial Pattern Resolution. Previously configure a certain number of empty patterns to initiate the composition in the sequence, using an appropriate number of line number (for this you can use the calculator included in "Piano Roll Studio: Preferences / Note Block & Grid / Bar Calculator" which allows you to calculate the minimum resolution of the first pattern according to the rhythmic figure of shortest duration you want to use).
- Duplicate the Initial Pattern (Increase the Sequence). Once you set the number of pattern lines (its resolution), you can duplicate this initial empty pattern several times to create more sequence length for your song.
- Set the tempo in the BPM and LPB values. Also, check the BPM and LPB values in
Renoise to adapt the playback speed to the musical style you are using. - Set V/H Zoom. Also, be sure to use the appropriate vertical and horizontal zoom settings for the
PRS window size to input note blocks and edit them easily. - Mostra los "Bloques de Notas Fantasma".. Finalmente, en el Modo de Edición de Notas puede trabajar de 4 formas:
- Shows "Ghost Note Blocks." Finally, in Note Edition Mode, you can work in four ways:
- Shows only the current track. This is typical for a clean environment, with no reference to Ghost Note Blocks ("Show Other Tracks" disabled).
- Also shows all other tracks. This allows the composer to locate you in the overall musical composition during editing ("Show Other Tracks" enabled).
- Also shows tracks in the same group. This allows you to categorize tracks into groups for less visual clutter, ideal if you use many tracks with notes ("Show Other Tracks" and "Isolate Each Group" enabled).
- Also shows a "Ghost Track" as a reference. Allows you to visually compare the current track with a specific track of your choice ("Show Other Tracks" and "Ghost Track" on).
Previous Step 2: Change the Descriptive Information of the Note Block. Depending on what you want to do, it's a good idea to determine what information your note blocks will display. To start, it's a good idea to set the "Note Block Info" option to +Ins Idx, which will display the note name, octave, and instrument index in hexadecimal. In this case, the note block looks like this: [C3 0A__________]. If you want more extensive control over the rhythmic figures (the number of cells each note block occupies), use +Cells, which would look like this: [C3 ↗04__________].
Previous Step 3: Select Grid Edit Mode. The "edit mode" (red switch) allows you to edit note blocks directly. Editing doesn't even need to be enabled in the pattern editor.
Simple Edition 1: Insert a Note Block into the Grid. First establish a number of cells in the upper bar (for example: 4). Choose an empty cell in the grid. For this, it will guide the vertical divisors that mark the pulses and heights of the notes of the vertical piano and the mobile cursor piano. Finally, press {CTRL} + Simple Click on the cell to insert the note block (in this cell the head of the note block will be inserted, that is, its shot).

Simple Edition 2: Insert a Note Block with Volume. First activate the volume insertion from the Control Panel, in addition to showing the parameter editing panel to visualize the quantity bars. Establish a volume value in the upper bar. Choose an empty cell in the grid and press {CTRL} + Simple Click on the cell to insert the note block with volume value.
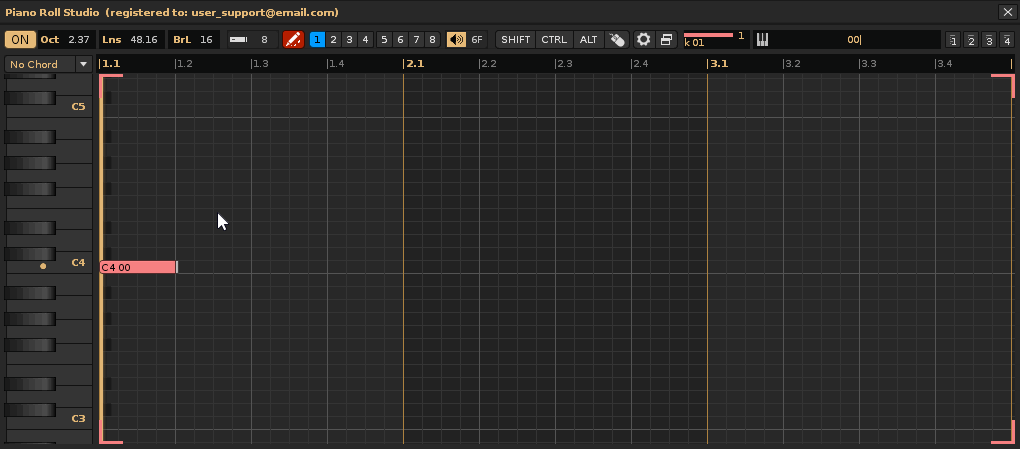
Simple Edition 3: Insert a Note Block and Modify its Length. Go to the Control Panel and activate the block length modification (this will allow inserting a single cell length cell note block). Choose an empty cell in the grid and press {CTRL} + Simple Click and Drag Vertically to place the height of the block and Drag Horizontally to change the length of the note block (the number of cells that make it up).

Simple Edition 4: Stacking One Note Block on Top of Another. First, locate a note block and note which column it's in (you can see its index in the track navigator in the top bar). To stack note blocks above the located note block, they'll need to be inserted into adjacent note columns so as not to overwrite each other. To do this, select an empty cell higher than the grid and press {CTRL}{SHIFT} + Simple Click. Repeat this command to stack more note blocks. While stacking note blocks, you can also drag them to move or transpose them. This command claims to insert the note blocks into the most empty left note column inside the track. This is also useful for making sure to start inserting the notes always in the first note column, whenever possible.

Simple Edition 5: Insert and Transpose a Note Block. Always make sure to select the desired note column first. Select an empty cell in the grid and press {CTRL} + Click & Drag Vertically to change it to the desired height.

Simple Edition 6: Insert and Move/Transpose a Note Block. Choose an empty cell in the grid and press {CTRL}{ALT} + Click & Drag Freely to insert and move the note block. Here, the movable note block has priority over adjacent blocks, allowing it to modify them as much as possible during movements.

Simple Edition 7: Move/Transpose an Existing Note Block. Choose a note block on the grid and tap on its head {CTRL} + Click & Drag Vertically to transpose that block of note without modifying its length or press on its head {CTRL}{ALT} + Click & Drag Freely to move and transpose it. Here, the movable note block has priority over the adjacent blocks, capable of modifying them as much as possible during movements.

Simple Edition 8: Transpose an Existing Note Block with the Wheel. Place the piano cursor over the position of the note head to be transposed. Press {CTRL}{SHIFT} + Rotate Wheel to change the pitch of that note block. This operation is also allowed in song playback mode, allowing you to make small pitch corrections.

Simple Edition 9: Lengthen/Shorten a Note Block. Go to the footer of the desired note block and press {SHIFT}{ALT} + Click & Drag Horizontally to change the length of the note block. In fact, you don't need to position the mouse pointer exactly at the footer of the note block, since the moving piano cursor is the real control. This means you can do this at any height.
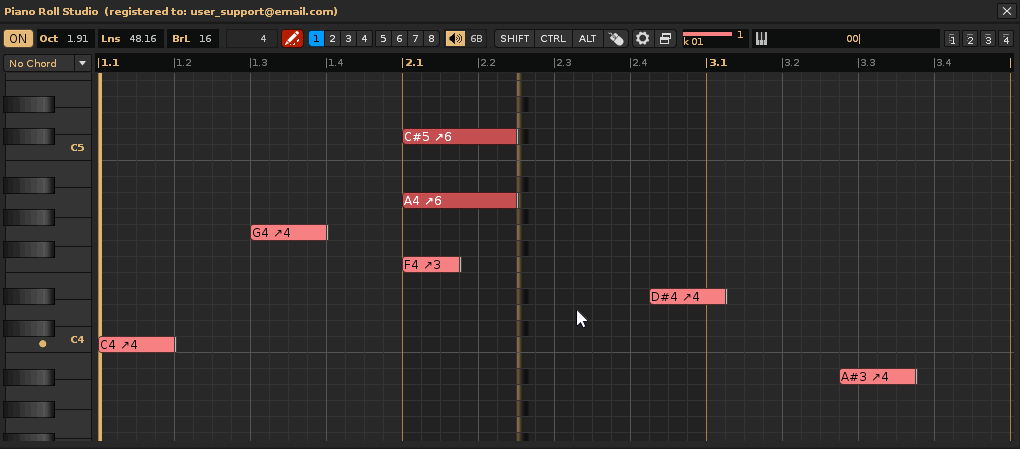
Simple Edition 10: Remove Note Off. Go to the footer of a note block where the note Off is and press {ALT} + Click & Drag Horizontally to remove it. Again, it's not necessary to position the mouse pointer exactly at the foot of the note block, as the moving piano cursor is the one that really controls it. This operation only removes the foot, i.e., the note Off, freeing up the width of the note block, which will take up the maximum available space, until the end of the pattern or until the next note block is found.

Simple Edition 11: Delete the Note Block. Go to the head of the desired note block and press {ALT} + Click & Drag Horizontally to delete it. Again, it's not necessary to position the mouse pointer exactly at the head of the note block, as the moving piano cursor is the one that really controls it. This operation deletes the entire note block, that is, both the note and its associated note-off, if one exists.

Simple Edition 12: Modify the Pitch of Existing Note Blocks with Drag. This operation is somewhat special because it allows you to modify only the pitch of the note blocks with a single mouse drag. To do this, first activate "Drag Pitch Freely" mode. Also, first deactivate the block length modification if it is activated (if it remains activated, the operation will not allow the pitch of the notes to be modified, placing them all at the pitch of the first note). Next, press {CTRL}{SHIFT} + Click & Drag Freely along the pattern path to "draw" or "trace" the melody, preserving the lengths of the note blocks (the rhythmic figures they represent). Composing melodies is often compared to the colors and strokes of a painting. This is a good tool for simulating this.

Simple Edition 13: Splitting a Note Block into Smaller Blocks and Modifying Their Pitch. This other operation is very useful for solving a technique of establishing the simple foundations of a melodic structure with long notes and then nuanced them with shorter notes to apply greater complexity to the melodies. To do this, activate the split mode (type / or 0 in the cell number value in the top bar). This allows you to insert notes without any associated note breaks. Therefore, a long note can be split into smaller ones simply by inserting more notes "slicing" over the body of an existing long note. Simply press {CTRL} + Single Click on the desired cell in that body to cut at that part and start a new note. Additionally, Drag Vertically will allow you to change the pitch for each new note block insertion. Repeat this operation as many times as necessary to establish the final melody.

Simple Edition 14: Capture an Existing Note Block and Reuse It. Another very useful operation for playing between different note block lengths is to reuse the length of existing note blocks, so you don't need to change the cell count value in the top bar. To do this, simply click on the note block with the desired length. This simple operation captures the length of the block. Next, press {CTRL} + Single Click on the desired empty cell to insert another note block of the same length. Repeat these steps as many times as necessary to complete the composition. This is also helpful to understand that we are using specific "rhythmic figures" at all times.

Simple Edition 15: Overwrite an Existing Note Block with One of a Different Length. This operation is more of a "derivative trick." If you want to change the length of an existing note block to another, you can do so by modifying the position of its associated note-off (Edit 9), or by placing the new note block at a higher pitch and lowering it to the same pitch. Press {CTRL} + Single Click above the existing note block at the same position on the notehead and Drag Vertically downwards to replace it with the new note block at the same pitch.
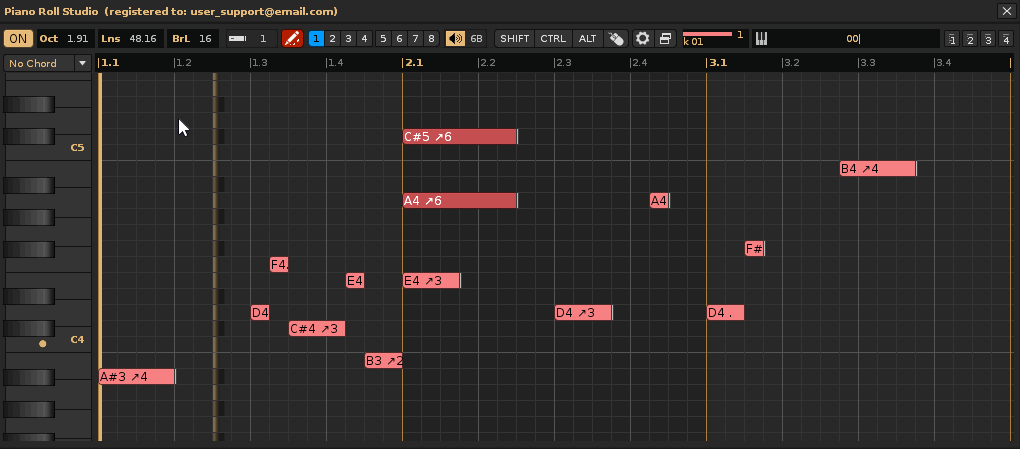
Simple Edition 16: Perform Any Edit Using Only the Mouse. All of the above operations can be performed using only the mouse, without using an alphanumeric keypad. To do this, go to the top bar and Single Click on the [SHIFT] [CTRL] [ALT] switches to turn them on (or off) depending on the operation you want to perform. This will keep each command activated. From there, perform the desired editing operation on the grid. You can resolve any of the simple edits seen previously with this method. To reset all three switches to off, Double-Click on the mouse symbol button. Additionally, Single Click on this button will display the two undo and redo buttons equivalent to the {CTRL}{Z} and {CTRL}{Y} commands.

Advanced composition encompasses complex editing operations that typically affect more than one note block at a time within the note editor. This includes editing note blocks in groups within the grid. In these cases, selection, copying, pasting, cloning, group editing, manipulating chords, chord progressions, etc., are common operations that even affect multiple note columns at once.
Always keep in mind that
Previous Steps 1, 2, and 3. Remember to also complete previous steps 1, 2, and 3 from the previous chapter to perform this type of complex advanced composition editing.
Previous Step 4: Switching Clipboards. The
Previous Step 5: Maintaining Multiple Steps in a Single Operation. When using selection operators, you can hold down {SHIFT} at any time for the following operations, and all steps will be considered part of a single operation. This affects the undo and redo queues, the {CTRL}{Z} and {CTRL}{Y} commands. If you want to separate the steps into separate operations for these queues, release and press {SHIFT} again at the beginning of each step.
Advanced Editing 1: Permanently Highlight and Hide Selection (cancel a Selection Operation). You can use selection in all selection operators simply to highlight something, without actually doing anything. To "highlight" a selection, press {SHIFT} + Click & Drag Diagonally (any ↗ ↘ ↙ ↖) to create a selection. Then release {SHIFT} before releasing the mouse click, otherwise the corresponding operation will be executed (releasing {SHIFT} beforehand unhide the operation). This will leave the selection highlighted on the grid. To unhighlight the selection, simply click the operator button in the top bar or press {ESC}.

Advanced Editing 2: Cut and Paste Selection. Use the selection operator 1 (blue). To "cut," press {SHIFT} + Click & Drag Diagonally ↙ across the desired note blocks. This cuts (deletes) the selection and copies it to the current clipboard (the flashing number in the 1-8 button bar on the top control bar). To "paste," press {SHIFT} + Single Click on the desired cell. This will paste the clipboard, placing the first note block in the selected cell, maintaining the block layout.

Advanced Editing 3: Copy and Paste Selection. Use the selection operator 1 (blue). To copy, press {SHIFT} + Click & Drag Diagonally ↘ across the desired note blocks. This copies (without deleting) the selection to the current clipboard (the flashing number in the 1-8 button bar on the top control bar). To paste, press {SHIFT} + Single Click on the desired cell. This will paste the clipboard, placing the first note block in the chosen cell, maintaining the block layout.

Advanced Editing 4: Drag Selection. Use the selection operator 1 (blue). Draw a selection area by tracing any diagonal by pressing and holding {SHIFT} + Right Click & Drag; this will highlight the selection. To drag the selection, press and hold {SHIFT} + Right Click & Drag over the selection area, over the cell you consider the reference cell to move the set. Note that you can always hold {SHIFT} and all the steps will be considered a single operation for the undo/redo queues.
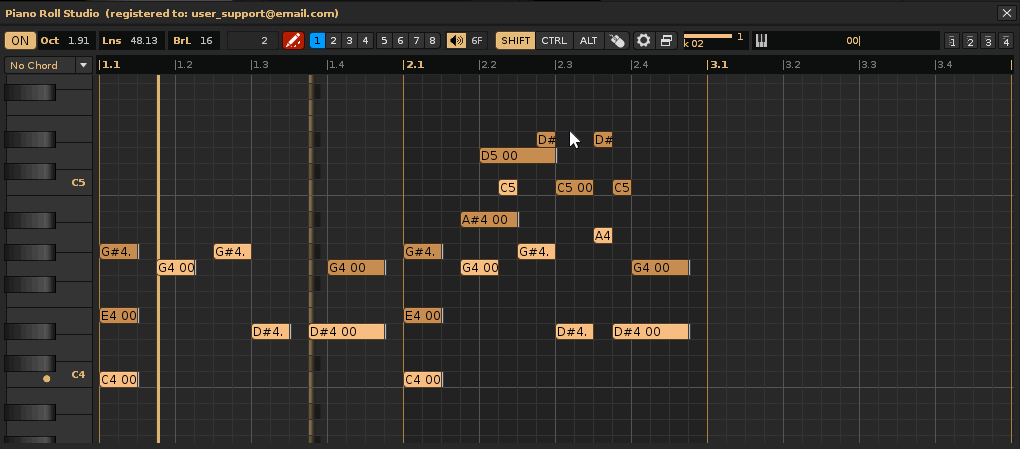
Advanced Editing 5: Randomize Selection by Inserting Note Block with Probability. Use the selection operator 1 (blue). Again, to "select" first draw a selection area by tracing any diagonal with {SHIFT} + Single Right Click and Drag; this marks the selection for randomization within it. To "randomize" the selection press {CTRL}{1} to {CTRL}{9} or {CTRL}{0} to insert with probability from 10% to 90% or 100%. The probability works on each note block according to the set "step". To set the step go to "Piano Roll Studio / Preferences / Edit Options / Random Note Block" o go to Control Panel. By default, the step of RDM is the LPB value. Remember that you can also insert the volume value and set the note block length value. To modify the length of all note blocks in the highlighted selection, go to the "Note Block Length" value box in the top bar and press {CTRL}{SHIFT} + Rotate Wheel.

Advanced Editing 6: Clone Infinite Selection Until Entire Pattern Is Covered. Use the selection operator 1 (blue). For infinite cloning (∞) of the entire pattern, it is recommended to first view the entire pattern. To do this, if necessary, you can change the horizontal zoom by Rotate Down Wheel over the dividing ruler, or directly pressing Double Right Click on it. For "infinite cloning," press {SHIFT} + Click & Drag Diagonally ↗ to select the group of note blocks you want to clone. Releasing the mouse click will clone them.

Advanced Editing 7: Clone Selection "n" Times. Use the selection operator 1. You can change the "infinite clone" to clone "n" times. For "n" times, press {SHIFT}{1} to {SHIFT}{9}, and to restore infinite clone, press {SHIFT}{0}. For "n times clone," press {SHIFT} + Click & Drag Diagonally ↗ to select the group of note blocks to clone. Releasing the mouse click will clone them.

Advanced Editing 8: Delete Selection of a Group of Note Blocks. Use the selection operator 1 (blue). This can be very surgical to delete a specific group of note blocks, or even individual note-offs. Press {SHIFT} + Click & Drag Diagonally ↖. Releasing the mouse click will delete. This operation does not affect the clipboard; it simply removes the pattern data. It's somewhat "intelligent" as it analyzes the environment and, if necessary, will automatically add note-offs to preserve the lengths of the affected note blocks.

Advanced Editing 9: Clear Selection of Multiple Note Offs and Add Them. Use the selection operator 1. Locate the note Offs you want to delete. Press {SHIFT} + Click & Drag Diagonally ↖. Releasing the mouse click will delete them. This is especially useful for correcting note endings that are part of chords, for example. Individual blocks can then be corrected with simple editing.

Advanced Editing 10: Select Multiple Note Blocks and Transpose Them. Use the selection operator 2 (orange). Transposing involves changing the pitch (frequency) of notes. To select multiple note blocks from all note columns, press {SHIFT} + Click & Drag Diagonal ↗. To select note blocks only from the current note column, press {SHIFT} + Click & Drag Diagonal ↘. To transpose up, press {SHIFT} + Click & Drag Diagonal ↖. To transpose down, press {SHIFT} + Click & Drag Diagonal ↙. For transposition, you can use a note block as a reference within the envelope of this last selection. For example, if you wrap a note block and vertically wrap 4 cells, you will move that note block 3 semitones, so that the reference note block never falls outside the selection. This is useful for surgically transposing multiple note blocks. Additionally, diagonal selections ↖ ↙ can be used as a reference to other existing note blocks that are outside the note blocks for transposition.

Advanced Editing 11: Select Multiple Note Blocks and Expand/Reduce Them. Use selection operator 3 (yellow). Expand/reduce implies modifying the length (number of cells) of the note blocks. To select several note blocks from all note columns, click {SHIFT} + Click & Drag Diagonally ↗. To select only note blocks from the current note column, press {SHIFT} + Click & Drag Diagonally ↖. To expand the note blocks, click {SHIFT} + Click & Drag Diagonally ↘. To reduce the note blocks, press {SHIFT} + Click & Drag Diagonally ↙. For example, if you select two cells horizontally, all note blocks and empty cells will expand/reduce two more cells, covering only the selection.
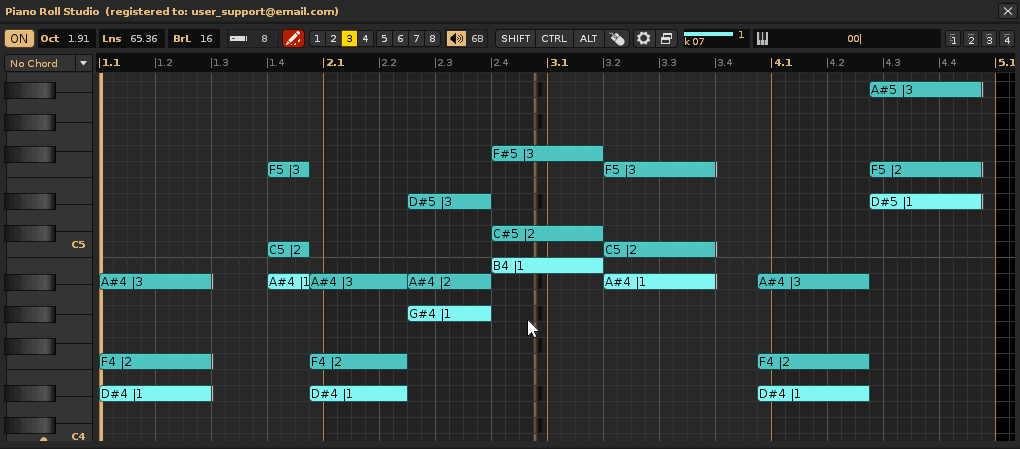
Advanced Editing 12: Insert or Delete Cells with Selection. Use the selection operator 4 (red). Inserting or deleting cells involves shifting the content. To "insert empty cells" in all note columns, press {SHIFT} + Click & Drag Diagonally ↗. If you want to insert empty cells only for the current note column, press {SHIFT} + Click & Drag Diagonally ↘. To "delete empty cells" in all note columns, press {SHIFT} + Click & Drag Diagonally ↖. If you want to delete empty cells only for the current note column, press {SHIFT} + Click & Drag Diagonally ↙. Deleting empty cells can also be used to delete all note blocks. It's common to insert empty cells to create "space" for inserting more note blocks in between. This operator is also "smart," as it analyzes the environment in case you need to delete note blocks or add note breaks outside the selection as needed.
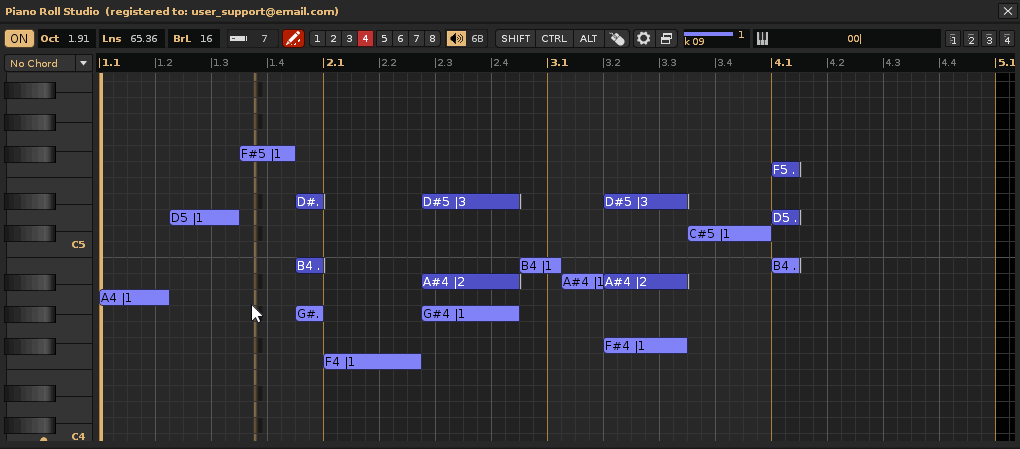
Advanced Editing 13: Changing the Instrument Index of Multiple Note Blocks with Selection. Use the selection operator 5 (purple). First, select the desired instrument index in the instrument navigator in the top control bar. To "change the instrument index" of the note blocks for all note columns, press {SHIFT} + Click & Drag Diagonally ↗. If you want to change the instrument index for only the current note column, press {SHIFT} + Click & Drag Diagonally ↘. This is a surgical way to change the instrument indices associated with notes within a pattern track. If you need to change the indices for the entire track, use the advanced operations panel of the

Advanced Editing 14: Randomize Multiple Note Blocks with Selection. Use the selection operator 5 (purple). Randomizing notes involves varying their pitch or frequency without altering their lengths. To "randomize note blocks" for all columns of notes, press {SHIFT} + Click & Drag Diagonally ↖. If you want to randomize only for the current note column, press {SHIFT} + Click & Drag Diagonally ↙. Always remember to release the click before releasing {SHIFT} to execute the operation. Randomization will only cover the vertically selected range of cells. Randomize and then listen to the result. If the result is not suitable, repeat these steps as many times as necessary. Randomization can be used to test different melodies very quickly, since the note blocks will retain their lengths (try a melody and adapt it while preserving its rhythmic figures). Randomize moderately by selecting a few cells in height and vice versa. Additionally, it can be useful to clone a group of notes with the selection operator 1 to use as a basis for randomizing the pitches of the notes later.

Advanced Editing 15: Detect Chord with Selection and Reuse It. Use the selection operator 6 (brown). To "detect an existing chord" on the grid, press {SHIFT} + Click & Drag Diagonally ↗. If the chord exists in the chord dropdown menu, it will be automatically selected and loaded into the upright piano. If the chord doesn't exist, a notification will appear in the bottom information bar. If it doesn't exist, you can steal it from a custom chord.
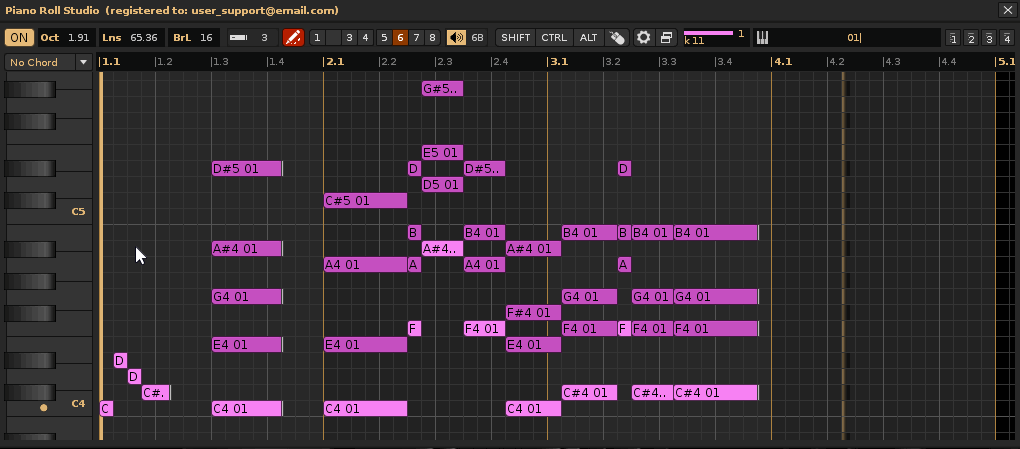
Advanced Editing 16: Steal Chord from Selection and Reuse It. Use selection operator 6 (brown). To "steal a chord" that exists in the grid, but isn't available in the chord dropdown menu, first select a custom chord from the four available ones. Then press {SHIFT} + Click & Drag Diagonally ↗. This will steal the chord and load it into the custom chord. Finally, if you want, you can modify the chord directly on the upright piano and reuse it by inserting it into the grid again.
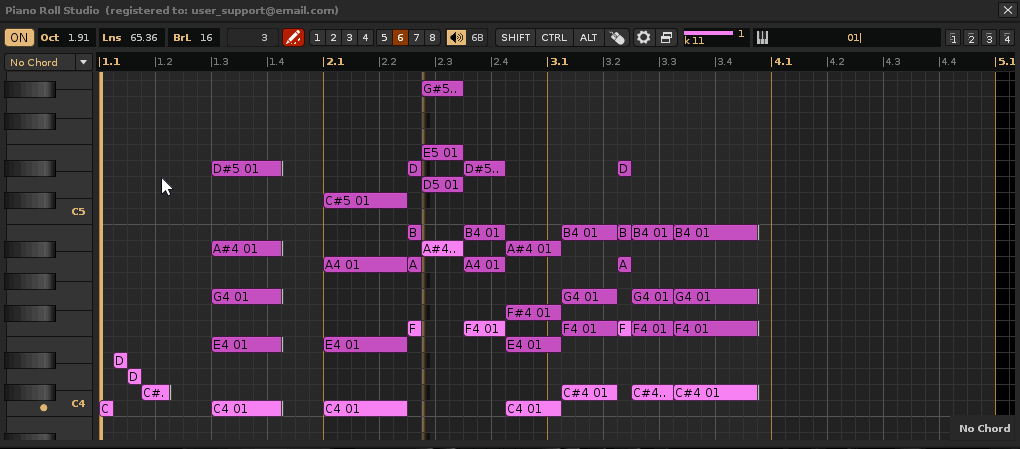
Advanced Editing 17: Convert Note Blocks to Current Chord with Selection or Vice Versa. Use the selection operator 6 (brown). To "delete chords while preserving root notes," press {SHIFT} + Click & Drag Diagonally ↙. To rebuild chords based on existing root notes, first select a specific chord from the chord drop-down menu. Then press {SHIFT} + Click & Drag Diagonally ↘. All of these steps are useful for destroying and rebuilding different chords while preserving the basic melody or previously established progression (maintaining the original length of the root note blocks of each chord).

Advanced Editing 18: Convert Note Blocks to the Current Chord with Cumulative Copying. Use the selection operator 1 (blue). This is an alternative to building manual chords using copying. To do this, you can select a chord from the chord drop-down menu to view it as a reference on the upright piano. Using the selection operator 1, copy a melody (a sequence of several notes) by pressing {SHIFT} + Click & Drag Diagonally ↘, which will act as the root notes of the next chords. Using the upright piano notes as a reference, paste the clipboard in a stacked form by pressing {SHIFT} + Single Click in the strategic cells. For example, if the reference chord has 3 notes, it will paste twice. This can cover the entire pattern or part of it.
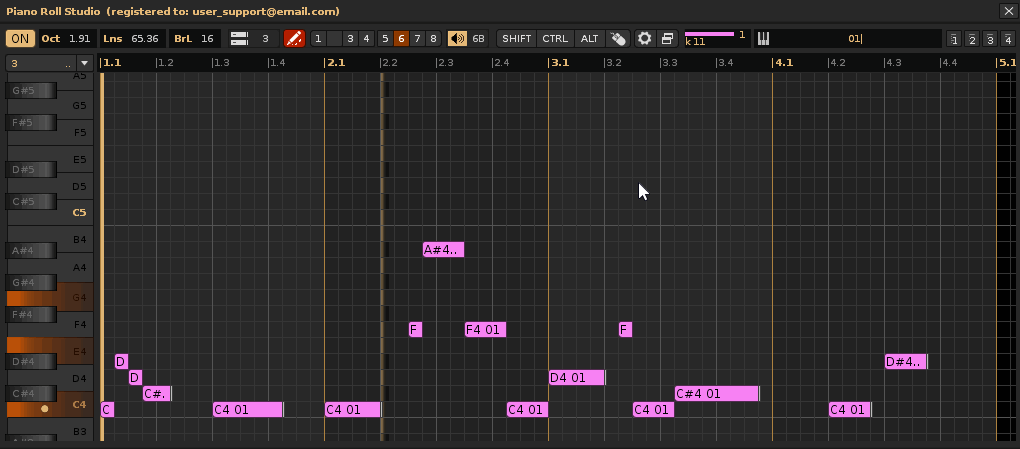
Advanced Editing 19: Creating Cumulative Chord Progressions with Selection. Use the selection operator 6 (brown). This operator is also designed to create chord progressions, easily accumulating chords along the pattern, forming a joint progression base. To do this, press {SHIFT} + Click & Drag Diagonally ↖. The number of cells horizontally will define the length of the accumulated chords from the selection, and the first selected cell will mark the pitch of the chord's root note. This way, you can "slice" a pattern track into chords without inserting note breaks, which defines chord progressions. Once you have your progression as a general base, you can make other adjustments, such as adding note breaks, shortening or lengthening individual chords, or transposing them individually.
Advanced Editing 20: Clear Pattern with Selection. Use the selection operator 7 (magenta). To "clear the entire current pattern," press {SHIFT} + Click & Drag Diagonally ↗, encompassing only one cell. In general, if the zoom is too small, zoom in first. This operation only clears the entire pattern of data, without deleting it.
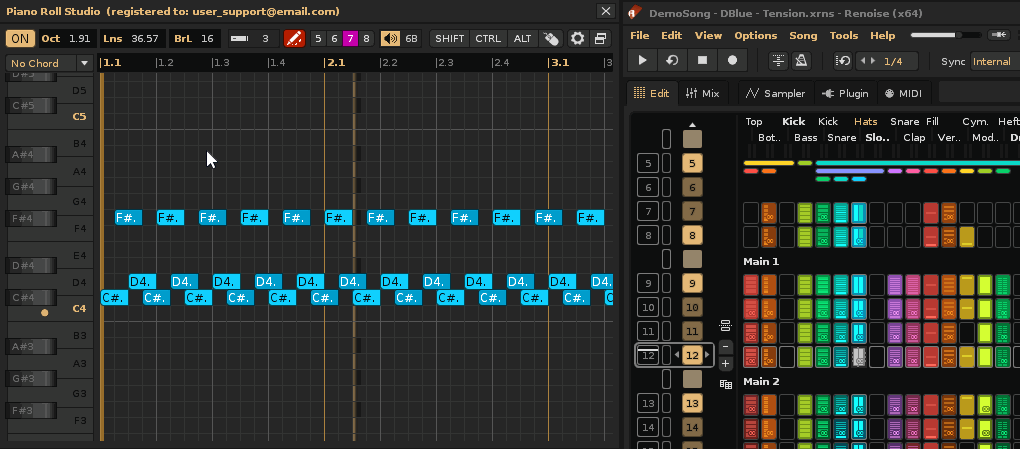
Advanced Editing 21: Delete Pattern with Selection. Use the selection operator 7 (magenta). To "delete the entire current pattern," press {SHIFT} + Click & Drag Diagonally ↗, encompassing more than one cell (it doesn't matter how many). This will delete the entire pattern, shortening the sequence.

Advanced Editing 22: Cumulative Multiple Clone and Add Pattern with Selection. Use the selection operator 7 (magenta). To "clone the entire current pattern multiple times," press {SHIFT} + Click & Drag Diagonally ↘. The number of cells selected vertically determines the cumulative and aggregate number of clones of the pattern in the sequence. For example, if you select 4 cells vertically, the current pattern will be cloned 4 times, and the first cloned pattern in the sequence will be automatically selected. Note that
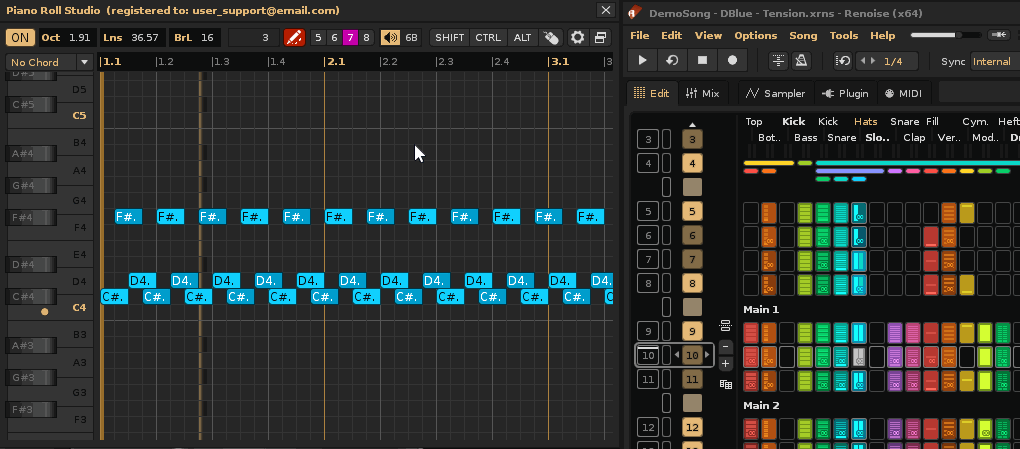
Advanced Editing 23: Multiple Pattern-Track Clone with Selection. Use the selection operator 7 (magenta). Similar to the previous case, to "clone the current pattern-track multiple times" press {SHIFT} + Click & Drag Diagonally ↙. The number of cells selected vertically determines the cumulative number of pattern clones in the sequence. The difference is that this time, no new patterns will be added unless necessary (there are no more patterns in the sequence). This operation overwrites subsequent patterns.

Advanced Editing 24: Clear Pattern-Track with Selection. Use selection operator 7 (magenta). To "clear the current pattern track," press {SHIFT} + Click & Drag Diagonally ↖, regardless of how many cells are selected. This operation is faster than using selection operator 1 to select the entire grid to clear data, since it performs the complete clearing with a small selection. For example, if you are in a pattern track and want to start over to compose it cleanly, this operation is suitable. Keep in mind that, in general, selection operators that clear pattern data also clear effect parameter data.

Advanced Editing 25: Play/Stop Song with Selection. Use the selection operator 8 (green). To "play the current pattern" from its beginning, press {SHIFT} + Click & Drag Diagonally ↗. To "stop playing the current pattern" at any time, do the same, press {SHIFT} + Click & Drag Diagonally ↗. You can change the playback mode from the Control Panel beforehand. Also, remember that to play/stop the pattern you can also directly Double-Click on an empty area of the grid.
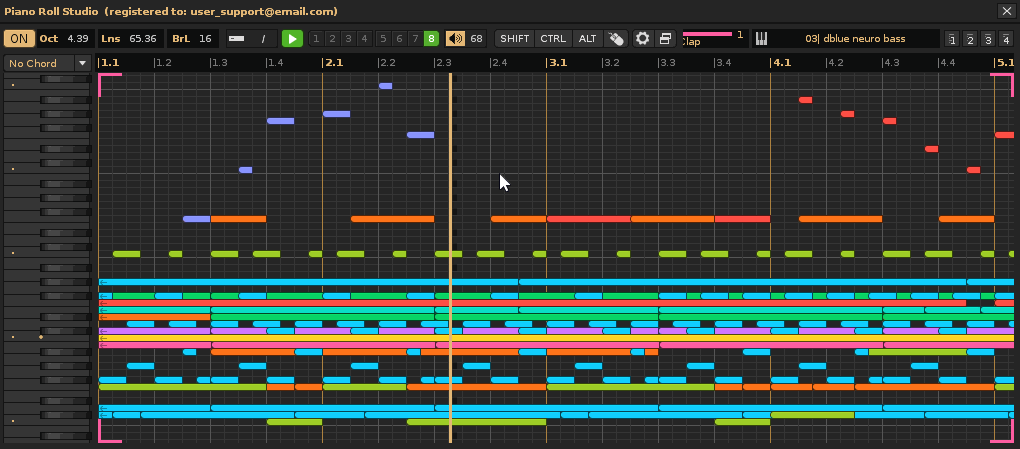
Advanced Editing 26: Play from Specific Lane with Selection. Use the selection operator 8 (green). To "play the current pattern from a specific lane," press {SHIFT} + Click & Drag Diagonally ↘. Likewise, to "stop playing the current pattern" at any time press {SHIFT} + Click & Drag Diagonally ↗ or press Double-Click in any empty area of the grid.

Advanced Editing 27: Create/Unloop Partial Pattern with Selection. Use the selection operator 8 (green). To "create a partial playback loop in the current pattern," press {SHIFT} + Click & Drag Diagonally ↙. The number of cells selected horizontally defines the loop, which will be highlighted in green on the grid. To "unloop," Single Click on the green marker. This will delete the loop while maintaining playback continuity.
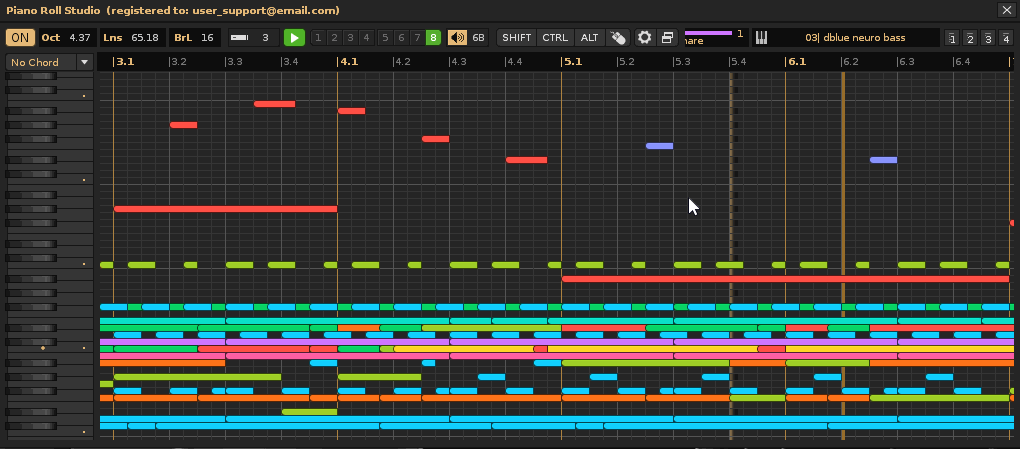
Advanced Editing 28: Set Pattern Loop with Selection. Use the selection operator 8 (green). To "create a full pattern loop" press {SHIFT} + Click & Drag Across Diagonal ↖. To "stop playing the current pattern" at any time press {SHIFT} + Click & Drag Across Diagonal ↗ or Double-Click in some empty zone of the grid. The pattern loop allows you to compose/edit said pattern on the fly while reproducing. If you want to visualize the entire pattern adjusted to the width of the grid, press Right Double-Click on the dividing ruler.
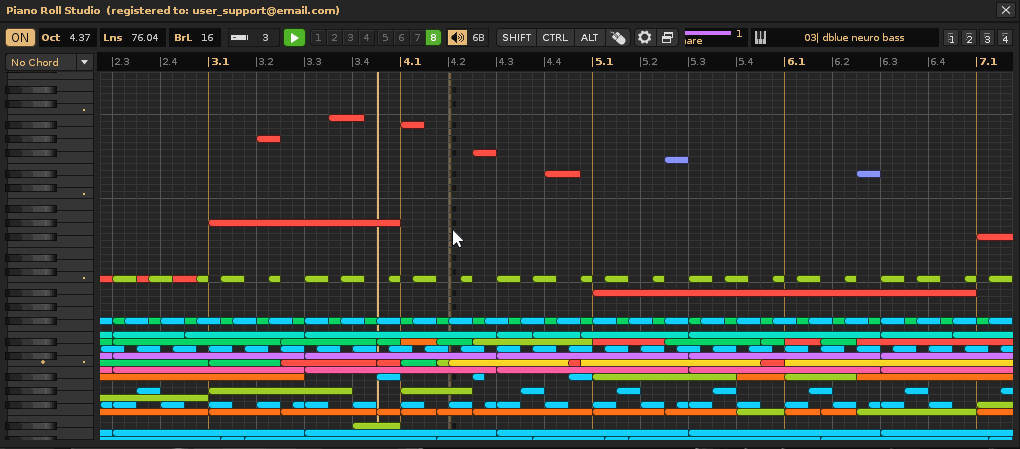
Advanced Editing 29: Create a Custom Chord and Insert It Multiple Times. Go to the chord drop-down menu and select a custom chord from the 4 available. Press {SHIFT} + Single Click on the upright piano keys to add or remove notes that are part of the chord, above the selected root note. You can create chords with up to 12 notes. To insert a custom chord, Double-Click the root note. If necessary, previously establish a certain number of cells for the note block from the top control bar. Then press {CTRL}+ Single Click on the desired cell in the grid to insert the chord. Repeat this operation as many times as necessary to create a progression in the current pattern track.
Advanced Editing 30: Inserting Different Types of Consecutive Chords for Progressions. Go to the chord drop-down menu and select a desired chord type. If necessary, previously establish a certain number of cells for the note block from the top control bar. Next, press {CTRL} + Single Click on the desired cell in the grid to insert the chord. Repeat this process as many times as necessary, switching between different chord types to create the progression, depending on the desired sense of harmonic movement and resolution.
Advanced Editing 31: Inserting Chords and Alternating Note Blocks. Go to the chord drop-down menu and select a desired chord type. If necessary, pre-set a specific number of cells for the note block from the top control bar. Next, press {CTRL} + Single Click on the desired cell in the grid to insert the chord. To switch to "note block insert mode," you can toggle this by pressing {ALT}{<} or {F10}. This toggles between inserting a single note block and inserting the last selected chord. Again, press {CTRL} + Single Click on the desired cell in the grid to insert the note block. Toggle between these steps as many times as necessary to complete the composition.
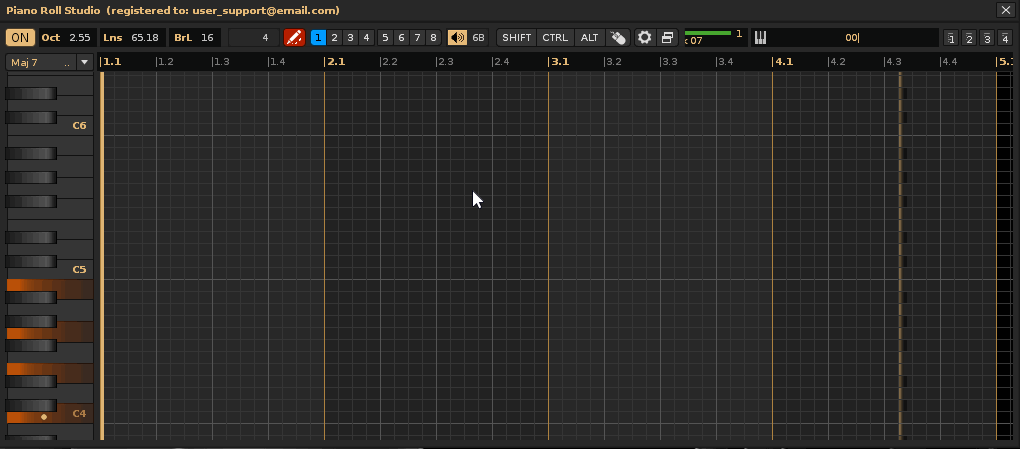
Advanced Edition 32: Modify several different existing chords. You can perform several different surgical operations to modify part or all of the chords. To do this, use the selection operator 1 (blue). Next, make sure that any chord is selected in the drop-down menu, so that the editing is in chord mode. To modify the length of the entire chord, simply modify its root note; press {ALT} + Click & Drag Horizontally on the foot of the root note block, where its note stop is. This will change the length of all the note blocks that make up the chord (the consecutive notes above the root note). If you want to transpose an entire chord, go to the head of the root note block and press {CTRL} + Click & Drag Vertically. If you want to remove a pair of note-offs from part of a chord, use the delete with selection method: press {SHIFT} + Click & Drag Diagonally ↖, encompassing only the cells of the note-offs. If you want to move part of a chord, go to the head of the root note you want and {CTRL}{ALT} + Click & Drag Freely. Note that you can perform any simple editing for the note blocks that make up chords as if they were a single note block, always referring to the root note block. All of these operations allow for exhaustive control over every detail within the composition of the pattern track.

Advanced Edition 33: Chop a chord into smaller ones. This operation is quite common. It involves repeatedly inserting the same chord without any associated note breaks, so that each block extends to the end of the pattern. To do this, first select the desired chord from the chord drop-down menu. Make sure the insert mode is set to "split mode" (without inserting note breaks). To insert into the grid, press {CTRL} + Single Click on the desired cell. Repeat this last step as many times as necessary to "chop" the chord note blocks as you create them. This is a good method for creating clean chord progressions. Once this is done, you can edit the results in detail with simple editing operations.
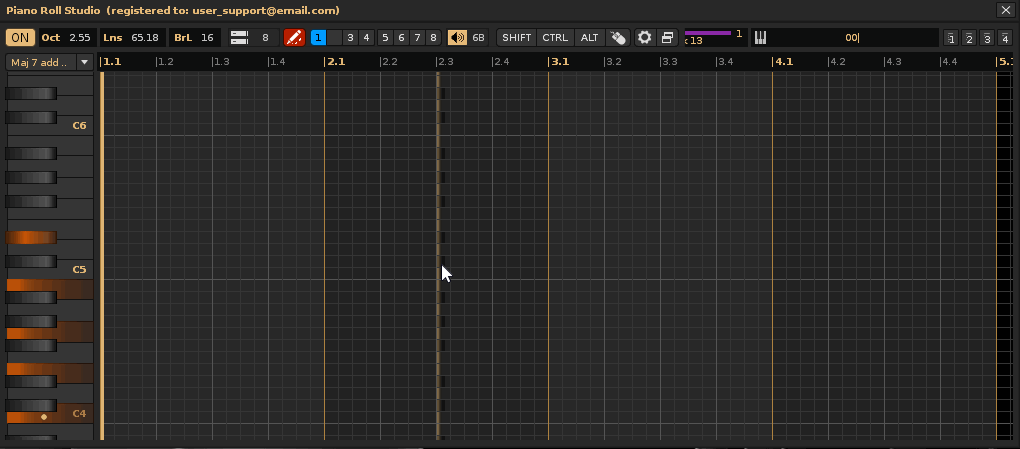
Advanced Editing 34: Transposing Part of a Chord Multiple Times, Transforming It. It's worth remembering that a chord is made up of consecutive notes in note columns on the same line (if there are any empty note columns, this will limit the chord). Therefore, you can transpose parts of the chord (small groups of note blocks that make up the chord) to modify it. To do this, "set an intermediate note block of the chord as the root note" by Single Click on it. This will change the selection of the note column. On the note block's head, press {CTRL} + Vertical Click & Drag to transpose part of that chord. Repeat these steps several times to reconfigure the entire chord. You can then steal it if you want to load it into a custom chord for reuse, if one doesn't exist in the chord dropdown menu.

Advanced Editing 35: Create Chord Progressions with a Transposition Scale. Use the selection operator 1 (blue). It's possible to use a specific transposition scale for the current instrument to generate chords within that scale, creating chord progressions with a specific key and harmony. To do this, go to the upright piano and press {CTRL}{ALT} + Rotate Wheel to change the instrument's transposition scale, for example, "Pentatonic Major" in base C. This will highlight the upright piano keys that are part of the scale in yellow. You can now stack individual notes with simple editing. If necessary, first set the length of the note block, for example, to 8. Press {CTRL}{SHIFT} + Click & Drag Vertically to accumulate the note blocks. When dragging, the grid editor will not allow you to drop notes that are outside the scale. This way, all the chords formed will be groups of notes that are within the scale. Repeat this process as many times as necessary to program the entire progression. Alternatively, you can use pre-established chords, but the editor will modify them to fit within the scale as needed. Always note that keys that are not part of a scale will record the note block on the next lower semitone that is within the scale. Finally, as with other operations, always keep in mind the position of the beats and measures to establish the composition.
Remember that you can combine any type of simple or advanced editing operation in consecutive steps to solve any type of composition. You'll notice there are hundreds of possible combinations. While composing, you can switch to song playback mode to check how the recent composition looks.
Effect parameter editing can be classified as the second phase of composition. Generally, it's advisable to treat it as a step after melodic composition, which is carried out in simple and advanced composition. Adding effect parameters to notes in tracks involves modifying the resulting sound in multiple ways, combined with automation. It's about adding variety, clarity, movement, richness, subtlety, and power to the composition where needed.
The
Effect Parameters and Amounts. Effects and their amounts can be classified into six sections based on the type of note or effect subcolumn that contains them: volume effects, panning effects, delay effects, sample effects, track effects, and global effects. A list with descriptions is shown below. To learn more, click the "Show Content" button.
Effect Parameters for the Volume Section:
- V: For the volume amount from 0 to 80.
- Ix: Fade the volume up in the current note column, in steps of x*10 (x: 0 - F).
- Ox: Fade the volume down in the current note column, in steps of x*10 (x: 0 - F).
- UX: Slide the tone up in X Semitones (x: 0 - f).
- Dx: Slide the tone down in X Semitones (x: 0 - f).
- Gx: Slide towards the note indicated in X Semitones. A value of F will make the sliding instantaneous (x: 0 - f).
- Cx: Cut the note after x ticks (x: 0 - F).
- Bx: Reproducing the sample in the current notes column in reverse (0 is backwards, 1 is forward again).
- Qx: Delay a note by x ticks (x: 0 - F).
- Yx: Maybe shoot the note with a probability of x (x: 0 - f).
- Rx: Retrigger a note every x ticks (x: 0 - F).
Effects Parameters for the Panorama Section:
- P: For the amount of panorama from 0 to 80.
- JX: Slide the span to the left with a step of x (x: 0 - f).
- Kx: Slide the pano to the right with a step of x (x: 0 - f).
- UX: Slide the tone up in X Semitones (x: 0 - f).
- DX: Slide the tone down in X Semitones (x: 0 - f).
- GX: Slide towards the note indicated in X Semitones. A value of F will make the sliding instantaneous (x: 0 - f).
- Cx: Cut the note after x ticks (x: 0 - f).
- Bx: Play the sample in the current note column in reverse (0 is backward, 1 is forward again).
- Qx: Delay a note by x ticks (x: 0 - F).
- Yx: Maybe shoot the note with a probability of x (x: 0 - f).
- Rx: Portrigger (firing) a note every x ticks (x: 0 - f).
- Mx: Send MIDI commands via Effect Commands in the format xxyy, with the instrument index. M0 = controller change message, M1 = pitch change, M2 = program change, M3 = channel pressure (x: 0 - F).
Effect Parameters for the Delay Section:
- D: For the amount of delay from 0 to FF.
Effect Parameters for the Sampling Section:
- Axy: Establish arpeggio, x/y = displacement of the first/second note in semitones. Use 0 for x o and use the original note.
- Uxx: Slide the tone up in XX 1/16 of a semitone (01 is 1/16 semitone, 08 is half a semitone, 10 is a complete semitone).
- DXX: Slide the tone down in xx 1/16 of a semitone (01 is 1/16 of a semitone, 08 is half a semitone, 10 is a whole semitone).
- GXX: Slide toward the indicated note in xx 1/16 of a semitone (01 is 1/16 of a semitone, 08 is half a semitone, 10 is a whole semitone).
- Ixx: Fade the volume up in xx volume units (-I01 inserted) 256 times will cause the volume to fade from 0 to full volume, -I7F inserted twice will do the same thing much faster).
- Oxx: Volume fading down in XX volume units.
- Cxy: Cut the volume to x after y ticks (x = volume factor: 0 = 0%, F = 100%). Does not stop playback.
- QXX: Delay the reproduction of the line by XX ticks (00 - TPL).
- MXX: Set the volume level of the instrument channel (00 = -60dB, FF = +3dB).
- Sxx: Shoot the phrase from line XX.
- Bxx: Play the phrase backward (xx = 00) or forward (xx = 01).
- Rxy: Retrigger the currently playing instrument. This is done every y ticks with a volume factor x applied to each retrigger.
- Yxx: Maybe trigger the row with a probability of xx. 00 = mutually exclusive mode.
- Zxx: Trigger phrase number xx (01 - 7E, 00 = no phrase, 7F = keymap mode).
- Vxy: Set vibrato, the regular pitch variation (x = speed, y = depth).
- Txy: Set tremolo, the regular volume variation (x = speed, y = depth).
- Nxy: Set auto pan, the regular pan variation (x = speed, y = depth).
- Exx: Set the position of all active Envelope, AHDSR, Fader & Stepper Modulation devices to offset xx.
Effect Parameters for the Tracks Section:
- Axy: Establish arpeggio, x/y = displacement of the first/second note in semitones. Use 0 for x o and use the original note.
- Uxx: Slide the pitch up by xx 1/16 of a semitone (01 is 1/16 of a semitone, 08 is a half semitone, 10 is a whole semitone).
- Dxx: Slide the pitch down by xx 1/16 of a semitone (01 is 1/16 of a semitone, 08 is a half semitone, 10 is a whole semitone).
- Gxx: Slide toward the indicated note by xx 1/16 of a semitone (01 is 1/16 of a semitone, 08 is a half semitone, 10 is a whole semitone).
- Ixx: Fade the volume up by xx units. volume (-I01 inserted 256 times will make the volume go from 0 to full volume, -I7F inserted twice will do the same thing much faster).
- Oxx: Fade volume down by xx volume units.
- CXY: Cut volume to x after y ticks (x = volume factor: 0 = 0%, F = 100%). Does not stop playback.
- Qxx: Delay line playback by xx ticks (00 - TPL).
- Mxx: Set the volume level of the instrument channel (00 = -60dB, FF = +3dB).
- Sxx: Shoot the phrase from line XX.
- Bxx: Play the phrase backward (xx = 00) or forward (xx = 01).
- Rxy: Retrigger the currently playing instrument. This is done every y ticks with a volume factor x applied to each retrigger.
- Yxx: Maybe trigger the line with a probability of xx. 00 = mutually exclusive mode.
- ZXX: Trigger phrase number xx (01 - 7E, 00 = no phrase, 7F = keymap mode).
- Vxy: Set vibrato, the regular variation of the pitch (x = speed, y = depth).
- Txy: Set tremolo, the regular variation of the volume (x = speed, y = depth).
- Nxy: Set auto pan, the regular variation of the pan (x = speed, y = depth).
- Exx: Set the position of all active devices in the Envelope, AHDSR, Fader & Stepper Modulation at offset xx.
- Lxx: Set the volume level of the track's pre-shaker, 00 = -Inf, FF = +3dB.
- Pxx: Set the panning of the track's pre-mixer, 00 = full left, 80 = center, FF = full right.
- Wxx: Set the width of the track's pre-mixer surround, 00 = off, FF = maximum.
- Xxx: Stop all notes and effects (-X00), or a specific effect (-Xxx, where xx > 00).
- Jxx: Set the track's output routing to channel xx, 01 onwards = hardware channels, FF down = main groups (00 = master track, 01 = first sound card...)
Global Effect Parameters:
- ZTXX: Set the tempo (BPM) (20 - FF, 00 = stop the song).
- ZLxx: Set Lines Per Bar (LPB) (01 - FF, 00 = stop the song).
- ZKxx: Set Ticks Per Line (TPL) (01 - 10).
- ZGXX: Toggle the song's Groove on/off (00 = off, 01 or higher = on).
- ZBxx: Break pattern. The current pattern ends immediately and jumps to the next pattern on line xx (this value is hexadecimal).
- ZDxx: Delay (pause) pattern playback by xx lines.
- ZMxx: Set the metronome (BPB). Beats Per Measure (01 - 10) (
Piano Roll Studio only). - ZPxx: Set the metronome (LPB). Beats Per Beat (LPB value or 00 - FF, "256" is not valid!) (
Piano Roll Studio only). - xyzz: DSP automation parameter (x = device index, y = parameter index, zz = amount (00 - FF))
Parameter Editing 1: Changing Parameters and Adding/Deleting Amount Bar. To change parameters, first go to the V-P-D-A knob and rotate the wheel over the desired switch to cycle through the different available parameters, for example "V" for Volume. Once you have selected the desired parameter, go to the Effect Parameter Editor panel and press {CTRL} + Click & Drag Vertically to insert the vertical amount bar and vary that amount. Since this is a volume parameter, it will be inserted into the volume sub-column of the current note column. Repeat these steps as many times as necessary to create vertical amount bars, depending on the positions of the note blocks or the capabilities of each parameter.

Parameter Editor 2: Create a Continuous Manual Curve. Always select the desired parameter first, for example, "P" for Panorama. In the Parameter Editor, press {CTRL}{ALT} + Click & Drag Freely to draw the curve as needed. This will sequentially insert the vertical amount bars. With a little skill, you can create straight or tight curves.
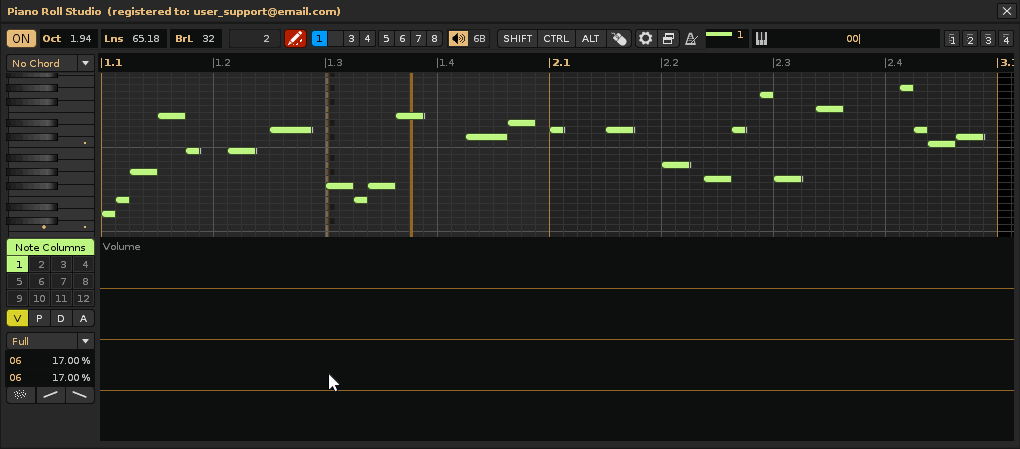
Parameter Editor 3: Create a Manual Curve with Note Affinity. The following operation is similar to the previous one, but only inserts vertical bars of amounts with note affinity. That is, where there are no note triggers/stops, the vertical bars will not be inserted. To do this, press {CTRL}{SHIFT} + Click & Drag Freely to draw the curve as needed. This is very useful, for example, to control individual note volumes or pans (note offs are ignored here). If you do the same with delay values, note offs will also be taken into account.

Parameter edition 4: Assign amounts bars in cells without notes. The following operation is the reverse of the previous one. It only affects empty cells, so you can adjust amounts or even perform cleanup operations (by tracing the path below the quantity of 0). To do this, press {CTRL}{SHIFT}{ALT} + Click & Drag Freely.
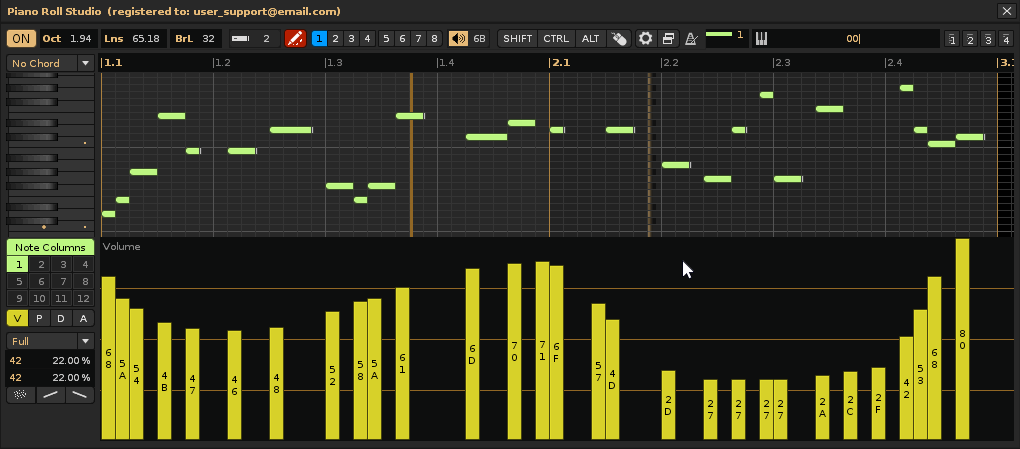
Parameter Editing 5: Erasing by Sweep or Double-Click. By solving a free-drag path, you can sequentially erase any quantity bar, even very quickly. To do this, press {ALT} + Click & Drag Freely. Additionally, you can perform group erasures based on the vertical bar type, starting with the bar by Double-Click. Remember that double-clicking is customizable in both the note editor and the parameter editor. For example, an extreme case would be having 64 volume bars. Go to line 8 and double-click on the vertical bar. This will erase bars from bar 8 to bar 64, since they are all of the same type.

Parameter Editing 6: Group Increment/Decrement of the Same Type of Bars. Once you have established a curve consisting of several vertical bars, you can group increment or decrement their values. To do this, press {SHIFT}{ALT} + Click & Drag Vertically. Up to increase, down to decrease (the reverse is true for vertical delay bars). For slower control, press {SHIFT}{ALT} + Rotate Wheel. These operations only affect bars of the same beat and always proceed from the selected bar forward.
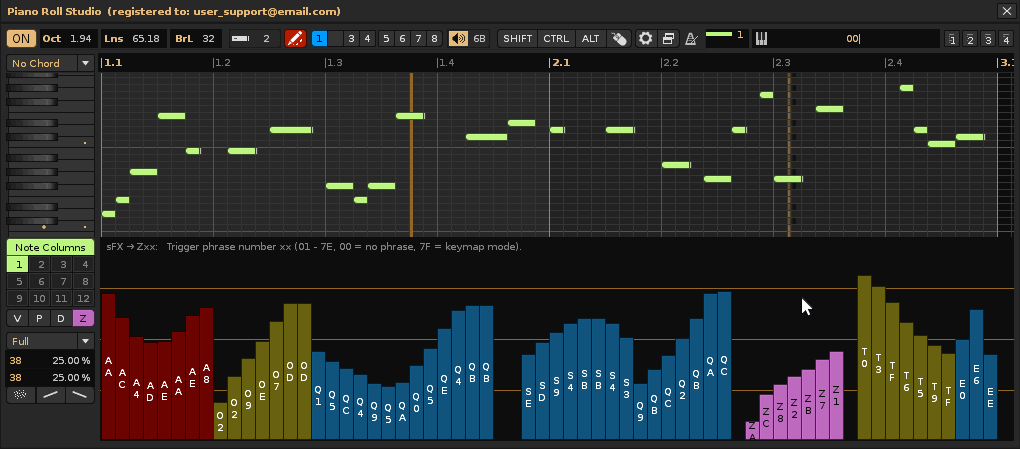
Parameter Editor 7: Switch Between Different Types for Reuse. If you use multiple bar types in the same pattern, you can Single Click on a vertical bar to capture the parameter type. Then you can reuse it. If the desired parameter is not available in any of the vertical bars already inserted, go to the V-P-D-A button to previously select it. Each time you select a bar, information will appear on what that parameter does.

Parameter Edit 8: Manual Note Delay Humanization. Go to the V-P-D-A pad and switch to the "D" delay parameter (for Delay). In the Parameter Editor, press {CTRL}{SHIFT} + Click & Drag Freely very close to the top. You can alter the humanization of notes with these small delays. Clicking on a vertical delay bar will momentarily display the length of the bar and the delay duration.

Parameter Editor 9: Humanization with Note Delay Randomization or Manually. Single Click on the first delay bar. Double-Click on "LNE 1" to capture the % value of the captured vertical bar. Repeating the steps, Single Click on the last delay bar. Double-Click on "Lne 2" to capture the % value of this second captured vertical bar. Set the affinity to "Loyal". After clicking the randomize button, this will subtly randomize all vertical bars within the range of the two captured %. You can humanize the volume using this same methodology.
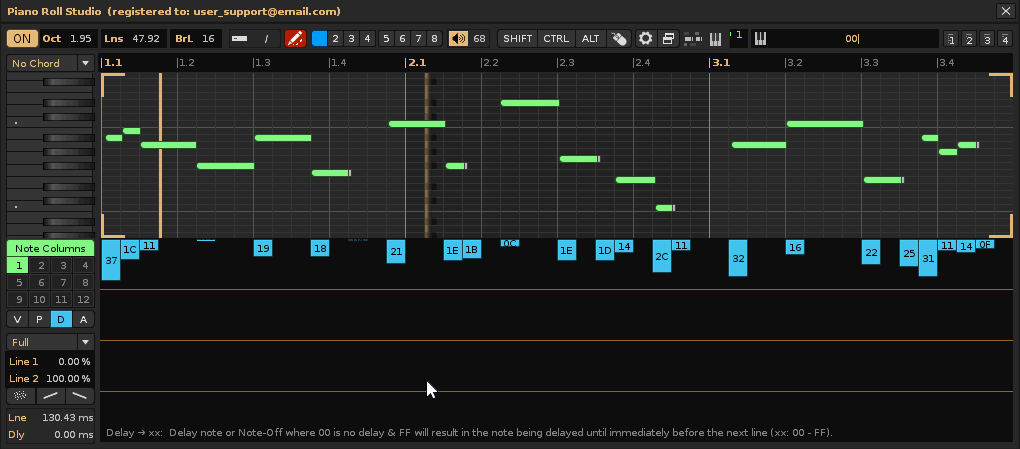
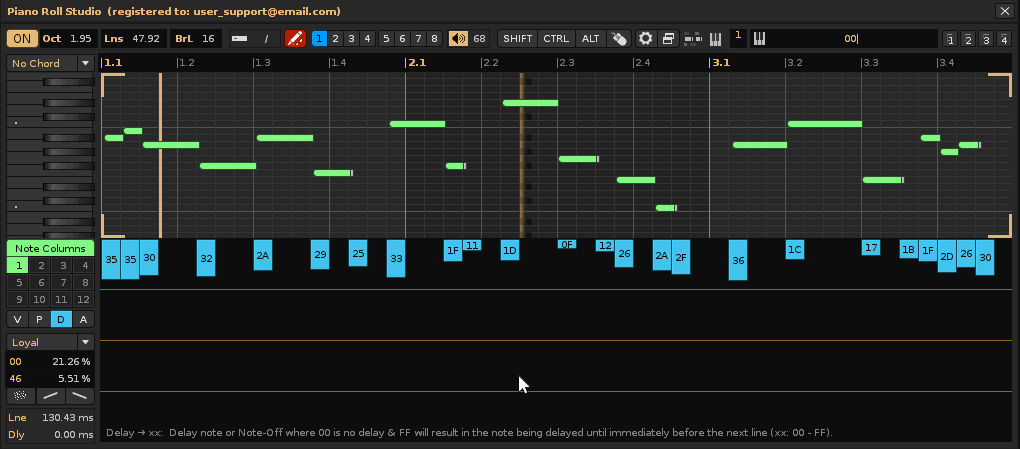
Parameter Editing 10: Creating Linear, Logarithmic, or Exponential Curves. First, set a manual curve layout. Single Click on the first vertical bar. Double-Click on "Line 1" to capture the % value of this bar. Repeating the steps, Single Click on the last vertical bar. Double-Click on "Line 2" to capture the % value of this captured second vertical bar. Set the affinity to "Loyal," "Refill," or "Full" as needed. Now Single Click on one of the curve switches. This will generate the curve. If you want to try other curves, change the curve type, between linear, logarithmic, exponential, or inverse, by Rotate Wheel on the curve switches.

Parameter Editing 11: Changing the Vertical Zoom of the Parameter Editor. The vertical zoom can be changed in three ways. For a slow 40-step zoom, Rotate Wheel. For a quick 10-step zoom, press {CTRL} + Rotate Wheel. To directly switch between small, medium, or large zoom, press {SHIFT} + Single Click on the parameter editor. This will cycle through these three sizes.
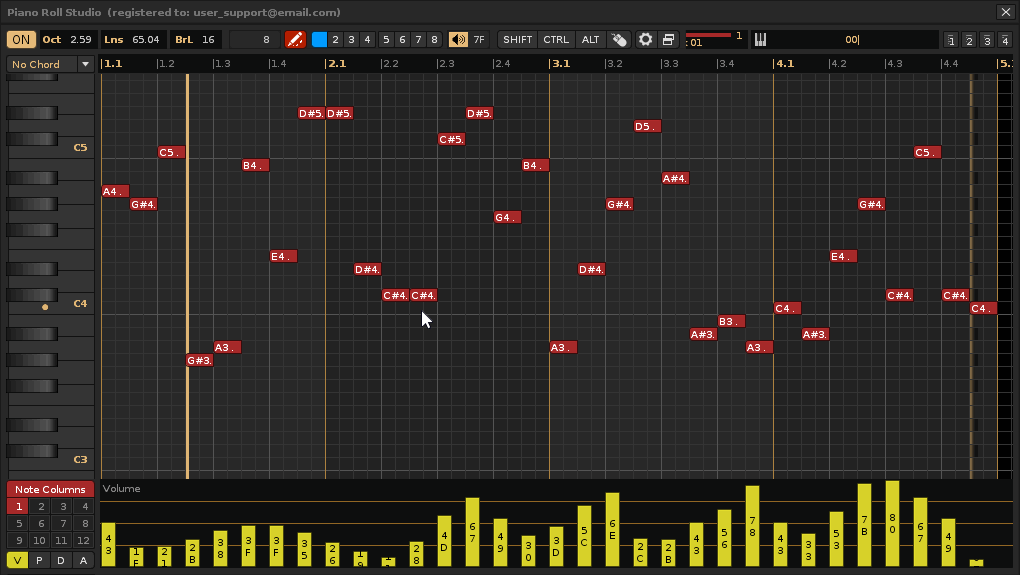
In the following chapter, you'll find a series of tips and tricks that can be used to achieve agile results with Piano Roll Studio. Most of them are focused on rapid workflow and good usability, both for the PRS and the Renoise DAW, with the ultimate goal of making music composition easier and being fully productive when completing projects. Overall, this content can also be useful for other DAWs.
- A Shielded Home Studio. A Minimalist and Healthy Work Environment. In general, a serious composer currently only needs a powerful desktop computer (stay away from any laptop), a large, decent screen, adequate sound hardware, an instrument to play and record live (MIDI piano, guitar, microphone (and a soundproof booth, even a homemade one if you need to record vocals) and a good DAW, all installed in a clutter-free environment, without elements that can distract (internet, social networks, mobile phone, external noises, etc.). The objective is always the same. The mind has ideas that must be captured in the software or notebook/score it wants to use and any distraction can ruin those great ideas that the brain has and is unable to retain for a medium period of time. In this world, losing a good idea is considered a catastrophe! It is essential that the composer thinks of himself as a person who feels with his body and thinks with his brain, needing peace, tranquility, zero distractions and zero stress. This is essential to advance any project and be productive.
- Less Is More! Also for Plugin Libraries, Number of Plugins, or Sample Folders. Lack of training often leads composers to accumulate a large number of plug-in libraries, a large number of plug-in synthesizer instruments, or even folders full of sound samples, or worse, pre-built sample loops, or worse yet, a work environment full of junk. The problem with a large number of plugins is that there comes a time when it becomes tedious to deal with so much content. Often, the brain needs to directly find what it's looking for, and if other sounds are encountered along the way, they can divert the brain from its initial idea, even leading it to lose its way. One of the most important steps for a composer is to find the most suitable sounds for the composition. Therefore, order, measured quantity, and knowledge of the available content are crucial to getting started.
- Avoid Loop Samples. Loop samples are a rigid sound element that generally cannot be transformed. This limits the composer's creativity and also defines them as "lazy composers" if they overuse them. They are samples of rhythms or even small, pre-made melodies that hinder the composer's variety and originality, unless it's a long loop where different parts of it are extracted and triggered. It's advisable to use loose, unprepared sounds so that the composer can generate their own loops and later transform them if necessary. Even if you want to use loops, it's best to recreate them with loose sounds and imitate them to avoid them. Avoid using loops whenever possible, except to get by in unimportant compositions!
- Use Track Templates and a Prepared Sequence According to Musical Style. A good practice when starting to compose a piece of music is to have the piece structured beforehand, ideally using a "soft" template according to style (modifiable and expandable). This "style template" already provides you with the names and colors of the tracks by instrument type, their groups and sends, as well as a specific order of patterns in the sequence with their names classified by section, so it's very easy to get started without wasting time. Streamlining the beginning of something is always helpful so that your mind isn't hindered by other processes and can focus on what matters most: getting what's in your head into the composition as quickly and efficiently as possible. Build your templates as needed to reuse them in a soft way! Finally, the instruments will be the last thing added to a song project. By using a template, you can start composing at the end of the sequence in new patterns for sound testing and add content composed in the initial sequence later.
- Initially Calculating Pattern Resolution Based on the Smallest Rhythm Figure to Use. One of the common problems for some composers just starting out in
Renoise is that they don't know how to properly set up pattern resolution in general for a properly time-based composition. They don't associate the shortest duration unit as the line, which should be the smallest rhythm figure to choose. In this case, two questions need to be asked: How many measures do you want per pattern? What smallest rhythm figure are you going to use throughout the entire composition? Resolution is the number of lines per pattern that will fit enough desirable measures, defined by the LPB value (number of lines per beat). For example, in 4/4 time there are 4 beats, and each beat is represented by a quarter note rhythm figure. In this case, if the smallest rhythmic figure chosen is a thirty-sixth note, one beat should have 8 lines (LPB=8), since a thirty-sixth note would be the smallest unit, meaning it would last one line. So, if we need 4 bars per pattern, the pattern should have 128 lines (32 lines per bar). If only two bars are needed per pattern, that would be 64 lines. This procedure is valid for any time signature. For the same 4/4 time signature, if the smallest rhythmic figure chosen is a thirty-sixth note (which would last one line), the LPB should be 16 (16 lines is one quarter note beat), which gives 64 lines per bar. From here, the tempo, BPM value (number of beats in each minute), is set according to the musical style. To facilitate these calculations, there is a calculator tool in "Piano Roll Studio: Preferences / Note Block & Grid / Bar Calculator" . Note that a sixteenth note rhythmic figure is usually a very short duration. Usually, a thirty-note reference is sufficient, requiring a value of LPB=8 as the most reasonable. - It is Always Recommended to Use Short, Bar-Structured Patterns.
Renoise allows you to use up to 1000 patterns, and each pattern can contain up to 512 lines, giving a total of 512,000 lines for depositing note triggers. For more detailed and precise control in your composition, use patterns of 32, 48, 64, 96, 128, or 192 lines, or similar values, and structured by bars. ForPRS , it is not recommended to use patterns with a higher number of lines due to the horizontal surface area limitations depending on the zoom and the image monitor. For editing, it's ideal to be able to control all the note blocks without moving the pattern, although moving is perfectly possible. This also makes it easier to view the melodies or progressions in each pattern. - Changing Time Signatures at the Start of Each Pattern. Although many musical pieces use the same time signature throughout the entire composition, this doesn't have to be the case. In fact, in orchestral music, heavy metal, or symphonic rock metal, to name a few musical styles, it's common to change time signatures several times, modifying the rhythm and speed (tempo). Therefore, every time you change time signatures (metronome settings), it's advisable to start a new pattern in the sequence. In other words, for convenience and order, a pattern shouldn't contain two or more different measures, but should always repeat the same measure.
Renoise is not prepared for this. However, thePRS allows you to change time signatures on the fly, i.e., the metronome settings, using the ZMxx and ZPxx commands along the master track. - Using One Instrument Per Track. For order and clarity, it's recommended to use only one instrument on each track. In general, it's not recommended to use the same instrument on multiple tracks, although you can strategically use multiple instruments on the same track, for example, for percussion sections. By using one instrument per track, you gain complete control of that track's effects chain so that it only affects the instrument within it.
- Compose the "Clean Notes" First and Add the Effects Parameters Later. One of the best practices when composing is to focus on composing note blocks from the grid, without paying attention to other aspects, and later, when the melodies and their accompaniments are complete, dedicate time to nuance them with effects parameters from the parameter editor, as well as nuance the notes with volume, pan, delay, etc. This implies sectioning tasks also in the composition process, since it is very important before the final result that the melodic part is perfect. The matter here is something like that it does not matter if at the beginning the composition does not sound good, the important thing is to capture and capture the melodic idea as quickly and faithfully as possible, and then it will be "shaped" and adapt the sound.
- Two techniques to start a composition: rhythm and melody for escape. One way to approach the beginning of a composition is to consider the percussion or bass-type accompaniment and create a rhythm, if the piece will feature these elements. This can be used as a basis for later creating a melody that simultaneously relies on the lyrics. Here, the rhythm can also be inspired by part of the lyrics. This is useful for certain styles, such as pop, rock, or sung-through pieces in general. However, there is a more complex method that directly embraces counterpoint, with a completely structural character. It involves creating a main melody at the beginning. Obviously, this melody, as a "subject," will not be at the beginning of the sequence, as a percussion section with rhythm might work. Rather, it is established by considering a wide variety of different instruments that will play that melody with different nuances to generate counterpoint, variation, and thematic development throughout the composition, even taking center stage, generating a "fugue musical structure." Once all this is thought out, it's time to add the rest of the accompanying elements, so that you have a subtle structure close to the final result. This can be useful in electronic or experimental music, or tremendously useful in soundtrack compositions with a full symphony orchestra or in classical music. It also provides an initial rough idea of what instruments will be needed to tackle the composition, as this is crucial in longer, more complex compositions.
- Sectioning a Piano Plugin on Two Tracks for Live Recording. Thanks to "Aliasing" instrument plugins (VSTi or equivalent), it's possible to redistribute two separate ranges of notes from the same instrument to record them live at the same time on two adjacent tracks, using "Renoise: MIDI / Input Device / Start & End Note". For example, instrument 00 could go from the range of C-0 to B-3 for the left hand in the "track 01", and instrument 01 (in alias) could go from the range of C4 to B-9 for the right hand in the "track 02". This allows a divided control of the notes (separating both hands) by not accumulating them on the same track. However, this is not directly possible, at least for the moment, with native XRNI instruments
Renoise . - Establishing a Progression of Long Note Blocks to Then Section Them. Throughout the pattern (or several consecutive patterns in the sequence), a series of long note blocks can be accumulated in a progression, so that they are balanced with the beats and measures to generate a very simple melody. This same melody could serve as the basis for establishing an accompanying melody a couple of octaves lower. These original note blocks can then be broken down into smaller note blocks and transposed to generate a more elaborate or complex melody. This establishes a predetermined order and allows for greater complexity in the composition, simplifying the process.
- Composing Chord Progressions Without Rests to Add After Creating the Main Melody. A good method for creating chord progressions, for example, to create an accompaniment to a main melody, is to create the progression without generating rests (that is, the note blocks do not include associated note-offs). Once the entire progression is complete and the main melody is set up, small silences can be adjusted by shortening the chord lengths.
- Use randomization of notes due to a lack of inspiration or strategy. Note randomization is tremendously useful for creating "fast legato" or "staccato" note progressions, for example, for strings, or for creating different, gentle melodies based on an already established melody. The advantage here is that the rhythmic figures represented by the note blocks remain intact, allowing you to try out and listen to dozens of melody configurations in just a few seconds. It's also a good method to save the composer from moments of lack of inspiration. You may be surprised by what note randomization can achieve at specific moments!
- Creating a Large Master Pattern to Divide into 4 Later. In the case of creating long and complex chords or melodies, a large pattern can be used, for example 256 lines, to be able to PRS. Once the pattern is perfectly programmed, it can be split into four 64-line patterns for more detailed manipulation. For example, to split the first 64 lines, go to the
Renoise pattern editor and place the cursor on line 63 (0-63). Press Right Click and then "Pattern/Split." This will split the 256-line pattern into two patterns of 64 and 192 lines. Repeat for the rest. - Dry Sounds. Remove Effects Included in Plug-in Instrument Libraries. Typically, many instrument plug-in libraries, such as Native Instruments' Kontakt, come with various effects configured to create impact or impression, such as reverb, delay, chorus, compressor, and so on. However,
Renoise has a good arsenal of effects for track effects devices that are more than enough to unify and unify sounds from different sources. Therefore, it is often advisable to recover the "dry" sound, that is, without effects, from libraries or even synthesizer plug-ins. Once the composition is complete, you can put together different effects that affect several libraries, for example, in a group or send track. This avoids problems with effects overload, by not using dry sounds along with track effects. - Avoiding Copy/Paste and Clone Abuse of the Same Content. Experience shows that a considerable number of composers who use
Renoise and, thanks to the use ofPiano Roll Studio , have detected that many of their songs tend to repeat too many parts. This is a common problem that should be analyzed carefully as the song is being put together. Repetitions are useful strategically to make it easier to remember parts of a song, but they should not be overused. Copy/paste or Clone entire patterns are so easy to do that it is tempting to speed up composition by quickly filling in. But the truth is that, once you have a composed base pattern, it is extremely easy to edit it withPRS to add variety. Feel that the same reused passage can sound repetitive even with subtle changes. Originality and variety are essential to concluding a song with sonic richness. - Simple Main Melodies and Complex Accompaniments. This kind of "binomial" is the general basis of countless compositions and the "Holy Grail" of composition in general. A great reference is found in original soundtracks. The difficulty here is not in generating accompaniments to complex melodies or progressions, but in creating simple main melodies that are attractive and therefore memorable. Precisely, many compositions fail precisely here, in generating simple melodies that lack an attractive structure that serves as a basis for a good counterpoint for the entire composition. Although complex accompaniments for these melodies also entail a certain difficulty, they are often more difficult to play or interpret, but easier to compose.
- Including Sonic Richness in Secondary Layers. Musical compositions must often be a mixture of layers, even in a wide variety of musical styles. Each layer can include different elements that play a certain role throughout the song or musical piece, and other layers can be secondary or tertiary, adding nuances only in the background or background, such as being heard from a distance or fainter, which add very interesting elements that often go unnoticed on first listens. A good composition can captivate the listener thanks to these second or third layers of nuances, because it gradually reveals a sonic richness that hasn't been perceived on first listens. This prevents the composition from sounding flat and embraces the use of constant dynamics. It also gives the listener the slight sensation that they are listening to a slightly different piece each time. This is a very interesting topic.
- Easily Humanize Without Live Recording: Delay, Volume, Pan. Another issue that often affects compositions is the overuse of quantization or direct editing without live recording, so that the result sounds too square, that is, "too perfect" or boxed. If the intention is for the composition to sound as natural as possible, even to seem as if part of it should be played by humans, a good post-composition process is the "humanization review." Regarding the triggering and stopping of notes, it involves adding "defects" of duration just as a human being actually works. To do this, you can add small delay values to the triggering and stopping of notes so that they are subtly altered, easily done from the
PRS parameter editor. In addition, an entire track can be subtly advanced to compensate, using the track delay (negative delay). Something similar happens with the volume of each note (touch velocity). Varying the volume of the notes also allows them to be humanized. Another interesting aspect is the panning of the instrument itself. For example, you can emulate the recording of an instrument as if only a central microphone were used, progressively placing the bass notes on the left and the high notes on the right. Something similar also occurs with the placement of the instruments on a stage. Once again, the best example is a symphonic orchestra for the number of members. These are placed strategically according to sound convenience, which can also be emulated with panorama values and slight surround sound effects. In the end, it's about providing information that brings the composition to what seems as real as possible, details that are also possible to steal to emulate in electronic or experimental music. - Transitions of Loud Passages Crossed with Fast Weak Passages. The "cross-mix" between different passages throughout the composition is perhaps the most complex and interesting aspect of counterpoint. There are several ways to compose "leaving something out" to "introduce something new." However, there's a tremendously useful technique for this that also follows a crushing logic. When developing a theme, a point of climax or excitement arrives, the "crowning of a mountain peak," which implies a powerful, strong, and exciting soundscape, which doesn't have to be complex. This soundscape can fade out over the course of a few bars to simultaneously introduce another, weaker but faster soundscape, even changing tempo, generating a "crossover." This technique generates a surprising transition of continuity, indicating to the listener that it's not over yet and that there's more to hear. This can be developed in the bridge of a rock/pop song, without being a radical result, or in the abrupt change in the theme of moving images (scene change) in an original film soundtrack. The well-executed results can be tremendously surprising and engaging in this type of crossover.
- Where can I find an instruction manual for Renoise? The official manual for the
Renoise DAW is available online and is recommended for mastering the software. In fact, some concepts are necessary to understand the features and controls ofPiano Roll Studio . This content is also intended for direct, sporadic reference. It is not necessary to learn the entire content if you lack time, but rather use it as a reference when you have questions. Learn the manual here: Renoise User Manual ↗. - Who is the creator of Piano Roll Studio? He is an independent, self-taught programmer known as ulneiz, based in the Valencian Community (Spain). He is also an active member in the Renoise forums, so it is possible to directly contact him from there. In addition to being responsible for
Piano Roll Studio , he has also developed other programs and tools and has more projects for tools in the near future. This programmer also accepts customizable Lua tool projects for Renoise, upon request. - Can Piano Roll Studio be used or installed alongside other software?No, the
PRS is a program dependent on theRenoise API, which is known as a "tool" (it is not an executable, like an .exe). It will only work alongsideRenoise , and its code uses theRenoise API and the Lua programming language. Obviously, you can use other types of programs separately on the same operating system, including another DAW like Ableton Live or an audio editor like Audacity. - Is Piano Roll Studio maintained and still being "developed"? Yes, its developer ulneiz is constantly reviewing and developing this software, as well as others. PRS has been in continuous development for almost 5 years now, and it also relies heavily on changes to the Renoise API in the future. If the API changes, a new version of PRS will likely be released.
- Is Piano Roll Studio based on user demand for certain features? Yes, in part. The bulk of
PRS is an original idea of its programmer ulneiz and depends a lot on it, but it brings together a large number of features requested by users in recent years (generally on the Renoise Forums). During the progression of continuous versions, concrete applications of users who already control thePRS , and this is still happening, despite the fact that the latest versions are already quite mature. - I come from using other piano rolls from other DAWs. Does the Piano Roll Studio control the same? The
PRS meets certain peculiarities ofRenoise and generally, it is based on control by combination of keyboard commands (SHIFT-CTR-ALT) with the mouse, in addition to having selection operators with execution by diagonal tracing. Although its general control is really easy (it needs a short adaptation period), it is slightly different compared to other piano rolls of other DAWs. If the composer already knows how to handle other piano rolls, it will be even easier to learn to control thePiano Roll Studio , because it already understands a lot of concepts, you will only need to adapt to the most important commands. - How do I get the Full Version of Piano Roll Studio to support the software project? Simply contact the programmer directly ulneiz. You can do it in the Renoise Forums. He will tell him how to get it. You can also ask anything related to the development of this software. By supporting this project, it greatly helps to continue, and these tools also directly support the Renoise project, since it also attracts new users.
- If a new version of Piano Roll Studio is published, can I install it? Yes, with a Custom Use License that you own, you have the right to update to any new version, although having a license does not obligate future versions. Development depends on other factors, such as community support (without support, there is no development).
- Can I share my personalized use license with other users? No, at all, this is totally prohibited. In fact, if it is detected that the license is being shared, it can lose its license forever and be notified and denounced in the Renoise forums, which could prevent this software from ever using. Yes you can use your license in any of your computers on your property, for example, on your desktop PC and your laptop. The use of licenses is something very serious that should not be taken lightly.
- I just install a new version of the Piano Roll Studio. I install my personalized use license but does not seem to work. What I do? No problem. Contact ulneiz directly. You are probably using an "obsolete" license and it is necessary to update it. In this case, you will simply be sent a new license that works correctly with the new version. This is because certain versions are limited to changes in the API of
Renoise and play update. - Is Piano Roll Studio considered for professional field? Yes, the
PRS is a complete, safe, stable and robust program, with support and development. Even a professional composer can ask for additional functions to be added if appropriate and adequate. - Can I compose an entire song project using only the Piano Roll Studio? In general, you can even do it only using only one mouse in one extreme case. Although it is advisable to combine the virtues of the
PRS together with the virtues ofRenoise and use all the recommended hardware and peripherals, such as a piano MIDI keyboard for the already humanized live recording and a USB alphanumeric keyboard to click commands. Keep in mind that you will always needRenoise to configure the instruments, among other details. - With Piano Roll Studio and Renoise can I solve all the processes to finish mastering and rendering a song project without needing or paying third parties?Yes, provided you as a composer know how to solve all the production, mixing and mastering steps. Otherwise, in any of these steps it is better than hiring a professional or relying on him in some way.
- To have sound on the Piano Roll Studio necessary to activate the OSC (Open Sound Control) in Renoise? No. Starting with version 7 of
Piano Roll Studio is no longer necessary to use OSC. Simply install thePRS and it's ready to use without any further configuration. - I have Piano Roll Studio installed and I already know how to use it a bit, but I find it has too many options, which overwhelms me and encourages me not to use it because it seems complicated. Although the
PRS has many options, it's not necessary to change them to use it. It comes ready so that, after a fresh installation, you can use it without any configuration. Little by little, you'll learn the most interesting configuration options. But this is no reason not to use it. All software requires a short initial learning period, although thePRS really is very easy to handle. - Can I demonstrate in videos and publish them using the Piano Roll Studio? Of course, you can show the
PRS while he shows his compositions publicly to his followers. It's very nice to combine the windows of thePiano Roll Studio andRenoise in the videos. - I've read that Renoise isn't a DAW, that it's just "a tracker." Can't I do everything with it?
Renoise is a complete DAW based on a tracker, but it includes everything you need to solve all the composition, production, mixing, and mastering processes for any musical style, even for sung music or complex symphonic orchestras, not just for electronic or experimental music. In fact, it's a DAW that comes better equipped out of the box than other much more expensive DAWs. - I want to use Piano Roll Studio and Renoise to synchronize music composition with video footage. Is this suitable? No. Unfortunately, there is no clear method to synchronize music composed in
Renoise with film footage or a music video. ThisPiano Roll Studio andRenoise software suite would not be suitable. While one could experiment in this area with decent results, there are other music composition programs more focused on synchronizing with short video clips or longer films. - With Piano Roll Studio, is it possible to modify the metronome settings to change the time signatures throughout the duration of the song? Yes. You can use the master track to enter the parameters ZMxx and ZPxx exclusive to
PRS , which allow you to change the metronome's "Beats Per Bar" and "Lines Per Beat" values when needed. To do this, go to "Piano Roll Studio: Preferences / Micellaneous / Metronome Update" and enable/adjust the options there. For proper use, it is recommended to use the same time signature in each pattern and change the metronome settings at the start of the desired pattern. - I want to use Piano Roll Studio and Renoise for vocal music (for pop, rock, and indie music). How do I do this? You can use
Piano Roll Studio andRenoise to compose and edit melodies and accompaniments. However, Renoise has a method for constantly playing an audio file, belonging to the vocal sample, which can be 3-5 minutes long or whatever. This sample is simply loaded into a track synchronized with the rest of the composition (see "Autoseek"). Renoise doesn't offer "audio tracks"; its basis is the tracker-based pattern editor, but this is the closest thing to audio tracks. It's designed for that. In fact, it has a powerful sample editor, which in themselves are like audio tracks. There you can tweak, modulate, or add effects to your long vocal sample. - I'm interested in getting started with music composition. How do I get started with Piano Roll Studio + Renoise and what do I need to buy? In short, it's best to first acquire knowledge of music theory and the physics of sound, at least the basics (the content of this document will help you achieve this). Next, you should familiarize yourself with the
Renoise software (you can use the Demostration Version for this). If you like it, purchase a license forRenoise . Once you have a basic understanding ofRenoise , you can try out thePiano Roll Studio tool (you can use the Demostration Version for this). If you like it, purchase a license forPRS . With both licenses, you won't have spent more than € 130, including taxes, and you'll get one of the most affordable and powerful composing software packages on the market. You also need a PC, a modern desktop PC with a large display and a good sound card is recommended, active speakers or studio-grade headphones, a decent piano-style MIDI keyboard, and a quiet, peaceful place to compose where you won't be disturbed. And a lot of love for your art. That's it. - Can I use more than one display with Piano Roll Studio and Renoise? Yes. In fact, it's highly recommended. You can use up to four monitors and enjoy four full-screen windows: up to three of Renoise and one of Piano Roll Studio. If you absolutely must use a laptop as your main PC, it's also helpful to connect it to a much larger external monitor to have at least two maximized windows.
- Can I use a MIDI controller as a piano or a pad to edit or modify notes on Piano Roll Studio? Yes, in addition to being able to use the USB alphanumeric keyboard or USB mouse to enter/modify notes, it is also possible with a MIDI controller to enter or change individual quantized notes (which do not include delay values) while the song is playing. To do this, go to Piano Roll Studio: Preferences / GUI & Sound / Piano MIDI In Mode and enable/adjust the options there. Keep in mind that, in this case, it is a direct form of editing notes without inserting delay values, not equivalent to the live recording of
Renoise (it accumulates notes with delay values in the note columns as they are received, without order). When using this live recording, please disable thesePRS options as they may interfere with both the sound (slightly duplicated sound) and the insertion of notes when using your MIDI controllers. - Why use Piano Roll Studio for editing when you can also edit from within Renoise?
PRS provides capabilities not available inRenoise . It not only allows you to monitor and locate notes visually in a simpler and more understandable way, but also makes it easier to locate compositional problems, allows you to solve more complex edits, such as note randomization, work in bulk with chords and progressions, detailed editing of effects parameters including curve creation, editing note blocks by associating note-offs, greater control of the rhythm through bar and pulse dividers, greater control of the metronome, humanization capabilities, etc.PRS is an excellent complement toRenoise . ButRenoise is also a good complement toPiano Roll Studio ; They are two programs that complement each other and can be used simultaneously. - I come up with complex melodies quickly, but when it comes to putting them on the computer I forget them. How can I streamline processes so I don't forget ideas? This is very common. It is likely that the composer does not have a work environment that allows him to sit in peace, start the computer and quickly have the software executed to compose, which would be ideal. Not even having the MIDI piano keyboard can hinder the process. However, there is a trick available to anyone today. It is nothing more than taking the mobile phone recorder (this one in plane mode to avoid distractions) and record the idea humming it (or ideas), although it may even sound ridiculous. Subsequently, you can listen to the results and calmly recover the idea to compose it in the DAW. This can save many quick ideas that can unfortunately be lost due to a lack of agility in the initial steps before composing.
- I am interested in composing with a good MIDI piano because I know how to play and interpret. Would it be good to use the Roll Studio and Renoise piano for this? Yes, it's an excellent idea to use a piano-style MIDI keyboard to compose and combine it with this software. In fact, it's the only other feasible peripheral besides a USB alphanumeric keyboard and a USB mouse. Thanks to a piano-style MIDI keyboard, you can add your own personal touch to your musical pieces.
Renoise allows you to record your performances live, and withPRS , you can edit and tweak the results faster, giving you a better understanding of what you've composed. Although it's recommended that you have an 88-key USB MIDI keyboard that mimics a real piano, with at least velocity, it will depend on the space available in your home studio. In fact, it's advisable to adapt your environment to use a keyboard of this size. Prices can range from €100 to €1,000, depending on the model. If you want a compact and well-equipped portable keyboard, look at the 37-key Akai Professional MPK Mini Plus. If you want something more serious, an 88-key keyboard of good quality and "cheap," look at the Studioologic SL88 Studio. Here's a long list of candidates (approximate prices in 2025):
- AKAI Professional MPK Mini MK3: Compact of 25 speed sensitive keys, 8 backlit pads and 8 kNobs (€ 100).
- Arturia Minilab MKII: Keyboard with 25 sensitive keys, 16 encoders and 8 pads. Includes production software (€ 110).
- Novation LaunchKey Mini MK3: Controller with 25 sensitive keys, 16 pads and 8 knobs (€120).
- AKAI Professional APC Keys 25: Keyboard with 25 keys and 40 launch buttons. Ideal for production in Ableton Live (€130).
- Arturia Keystep: Controller with 25 sensitive keys, integrated sequencer and MIDI connectivity (€150).
- Akai MPK Mini Plus: Keyboard with 37 sensitive keys, 8 pads and 8 kNobs. Includes pitch blesy wheels and modulation (€150).
- Studiologic Numa Compact SE 37: With 37 semi-socks, 8 pads and 8 faders. With pitch blesy wheels and modulation (€220).
- Novation Launchkey 37 [MK3]: Controller with 37 semi-weighted keys, 16 sensitive pads and 8 knobs. Integration with DAWs (€250).
- Arturia Keystep 37: Keyboard with 37 sensitive keys, sequencer and arpeggiar. MIDI and CV connectivity (€300).
- Akai Professional MPK Road 88: Controller with 37 hammer action keys, 16 pads and 8 knobs (€350).
- Yamaha MX49: Synthesizer with 49 keys, 1,000 sounds and integrated sequencer (€ 400).
- Studiologic SL49 Studio: With 49 semi-asprained keys, 8 pads and 8 kNobs. With pitch bend wheels and modulation (€220).
- Novation Launchkey 49 [MK3]: Keyboard with 49 semi-weighted keys, 16 pads, and 8 knobs. DAW integration (€300).
- Akai Professional MPK249: Controller with 49 hammer-action keys, 16 pads, and 8 knobs (€350).
- Arturia Keylab Essential 49: With 49 semi-weighted keys, 8 pads, and 9 faders. With pitch bend and modulation wheels (€400).
- Native Instruments Komplete Kontrol A49: With 49 key holds, 8 knobs, and color display. Pitch blesy wheels and modulation (€ 450).
- Studiologic SL61 Studio: Keyboard with 61 semi-weighted keys, 8 pads, and 8 knobs. Includes pitch bend and modulation wheels (€250).
- Novation Launchkey 61 [MK3]: Controller with 61 semi-weighted keys, 16 pads, and 8 knobs. DAW integration (€320).
- AKAI PROFESSIONAL MPK261: Keyboard with 61 hammer-action keys, 16 pads, and 8 kNobs (€400).
- Arturia Keylab Essential 61: With 61 semi-weighted keys, 8 pads, and 9 faders. Pitch bend and modulation wheels (€450).
- Native Instruments Komplete Kontrol A61: With 61 Fatar keys, 8 knobs, and a color display. Pitch bend and modulation wheels (€500).
- Studiologic SL73 Studio: With 73 hammer-action keys, 8 pads, and 8 knobs. Pitch bend and modulation wheels (€300).
- Novation Launchkey 73 [MK3]: Keyboard with 73 semi-weighted keys, 16 pads, and 8 knobs. DAW integration (€400).
- Akai Professional MPK273: Controller with 73 hammer-action keys, 16 pads, and 8 knobs (€500).
- Arturia Keylab Essential 73: With 73 semi-weighted keys, 8 pads, and 9 faders. Pitch bend and modulation wheels (€550).
- Native Instruments Komplete Kontrol A73: With 73 hammer-action keys, 8 knobs, and a color display. Pitch bend and modulation wheels (€600).
- Studiologic SL88 Studio: With 88 TP/100LR Fatar keys, 3 pitch bend and modulation levers, a joystick, and 4 definable areas (€350).
- Studiologic SL88 MK2: TP/100LR Fatar hammer action, 2 pitch bend/modulation levers, a joystick, and 2+4 wheels (€500).
- Arturia KeyLab Essential 88: Sensitive semi-weighted keys, 8 pads, and 9 faders. With pitch bend and modulation wheels (€500).
- NI Komplete Kontrol S88 MK2: Fatar hammer action keys, 8 knobs, and color displays. Pitch bend and modulation wheels (€700).
- Roland A-88 MKII: PHA-4 Standard weighted keys, pitch bend and modulation joystick, and 3 definable zones (€800).
- Studiologic SL88 Grand: Mechanical wood keys with TP40 Wood hammers and aftertouch, and a 6-way control joystick (€900).
- Yamaha P-125: Digital keyboard with 88 Graded Hammer Standard weighted keys, built-in speakers, and multiple HD sound effects (€600).
- I want to use a laptop to compose with Piano Roll Studio + Renoise. Is this a good idea? No. Laptops, no matter how powerful they are (the clamshell type with a screen), are not recommended for professionals (artists or composers) who compose music, and not even for amateurs. These computers are not generally easy to use, they have compact keyboards, the mouse may not be used and instead touch gestures are used via the "touchpad" and what is worse, the image screen is usually small (13-17"). All these details influence the workflow making the composer slower in the long run, and this is not a problem of their capabilities, but of what they are controlling as the main environment. Laptops are fine for transporting work in specific cases and for tinkering, sporadic uses at events, presentations, gigs etc., but not to use as the main computer for composition, no matter how much the brands would have you believe otherwise. Use a powerful desktop computer with a good image screen as far as possible. In this case, the whole set can result in an outlay of € 1,800-2,500. Or mini computers (Apple has the Mac Mini, and Intel/AMD have a multitude of High-performance miniPCs) that fit in the palm of your hand and can be transported from one place to another, but can be connected to large monitors and other peripherals for proper production. This eliminates the need for slow control peripherals while also offering portability. The miniPC alone can cost around €700–€2,000, depending on the make and model. This was unthinkable years ago. Now, with current electronics technology, it's perfectly usable. Here are some examples of miniPCs (approximate prices in 2025):
- MSI Cubi 5 12M: Processor: 12th generation Intel Core i7, RAM: 16 GB, Storage: 512 GB SSD (€800).
- Apple Mac Mini M1: Processor: Apple M1, RAM: 16 GB, Storage: 512 GB SSD (€1,100).
- Beelink MINIS 12 PRO: Processor: Intel N100, RAM: 8 GB, Storage: 256 GB SSD (€400).
- HP Envy Desktop PC: Processor: 13th generation Intel Core i9, RAM: 32 GB, Storage: 2 TB SSD (€2,500).
- Dell XPS 8950: Processor: 12th Generation Intel Core i7, RAM: 32 GB, Storage: 1 TB SSD (€1,800).
- Medion S06 MD35300: Processor: 13th Generation Intel Core i5, RAM: 16 GB, Storage: 512 GB SSD (€400).
- Medion T80 MD35423: Processor: 13th Generation Intel Core i5, RAM: 16 GB, Storage: 512 GB SSD (€500).
- Intel NUC 13 Pro: Processor: 13th Generation Intel Core i7, RAM: 32 GB, Storage: 1 TB SSD (€1,600).
- Apple Mac Mini M4: Processor: Apple M4, RAM: 16 GB, Storage: 512 GB SSD (€1,200).
- HP Elite Slice G2: Processor: 8th generation Intel Core i7, RAM: 16 GB, Storage: 512 GB SSD (€1,000).
- Lenovo ThinkCentre M90n-1 Nano: Processor: 10th generation Intel Core i5, RAM: 8 GB, Storage: 256 GB SSD (€700).
- ASUS PN50 Mini PC: Processor: AMD Ryzen 7 4800U, RAM: 16 GB, Storage: 512 GB SSD (€800).
- Gigabyte Brix Pro: Processor: 9th generation Intel Core i7, RAM: 32 GB GB, Storage: 1 TB SSD (€1,500).
- Zotac ZBOX Magnus EN72070V: Processor: 10th Generation Intel Core i7, RAM: 16 GB, Storage: 512 GB SSD (€1,200).
- Acer Revo Build M1-601: Processor: AMD A4-5000, RAM: 4 GB, Storage: 500 GB HDD (€500).
- MSI Trident 3 10th: Processor: 10th Generation Intel Core i7, RAM: 16 GB, Storage: 512 GB SSD (€1,300).
- Intel NUC 11 Performance: Processor: 11th Generation Intel Core i5, RAM: 8 GB, Storage: 256 GB SSD (€600).
- ASRock DeskMini X300: Processor: AMD Ryzen 5 3400G, RAM: 16 GB, Storage: 512 GB SSD (€700).
- Gigabyte BRIX GB-BRR7-4800: Processor: AMD Ryzen 7 4800U, RAM: 16 GB, Storage: 512 GB SSD (€800).
- Lenovo ThinkPad Tiny-in-One: Processor: 10th Generation Intel Core i5, RAM: 8 GB, Storage: 256 GB SSD (€700).