An original tool for the Renoise DAW.
Sample Multi Controller - Basic User Guide
Sample Multi Controller v2.1 build 060. July 2021
Created by: ulneiz (Comunidad Valenciana, Spain)
Ideas & User Guide contribution: Neuro_No_Neuro (Tucson, Arizona)
This document contains more than 5,000 words. Estimated reading time: 50 minutes.
Content Index
- 1. What is the "Sample Multi Controller"?
- 2. Top Bar. Navigation
- 3. Sample Properties Control Panel
- 3.1. One-Shot, Release Mode & Loop Mode. The Loop Window
- 3.2. Loop Start & End Frames. Relative Step
- 3.3. Sample Zoom & Speed
- 3.4. Volume & Panning Sample Properties
- 3.5. Transpose, Finetune, & Beatsync Sample Properties
- 3.6. Tabs Navigation: Pattern Editor, Keyzone Editor & Waveform Editor
- 3.7. Instrument Sliced. Slices 1 to 6 control
- 4. Custom Track Devices Panel
- 5. Macros Routing Panel
- 6. Virtual Piano
- 7. OSC Configuration & MIDI Input Velocity Sensitivity
- 8. MIDI Mapping. Direct Sample Control
- 9. Automation: Use of the Doofer with *Instr. Macros
- 10. SMC Manager: Load or Save the Configuration
1. What is the "Sample Multi Controller"?
1.1. Concept ▲
The Sample Multi Controller, also known as SMC is a "window tool" with multiple instances for the manipulation of the sample, exclusively for Renoise DAW. (64 bit, v3.3.2). SMC began as a program capable to control sample start and end loop frames focused for the MIDI input. From there, it grew into a mature tool to control a total of 12 different sampler properties:
- One-Shot
- Release Mode (Note-OFF or Loop)
- Loop Mode (No Loop, Forward, Backward, PingPong)
- Loop Window
- Start Frame
- End Frame
- Volume
- Panning
- Transposition
- Finetune
- Beatsync Lines
- Beatsync Mode (No Beatsync, Repitch, Percussion, Texture)
Also, when the instrument is sliced, SMC can control multiple slices, up to 6 (which are properties of the instrument, not of the sample):
- Slice 1
- Slice 2
- Slice 3
- Slice 4
- Slice 5
- Slice 6
But it doesn't stop there! Controlling - Routing - Automating
The SMC not only is 100% MIDI mappable, it also allows broad control with the Automation. The composer can control all of these values via MIDI and different automation methods using a Doofer with up to eight (8) Macros (*Instr. Macros).
[Multiple Meta Devices] --> [Doofer [*Instr. Macros] ] --> Linked Instrument (Index) --> SMC Instance (with Macros Bridge)
Renoise is limited to 8 macros per instrument. The SMC offers up to 16 instances (16 equal windows). Each instance of the SMC was then developed to allow the composer to route each Macro to a particular feature of a sample. So, the 8 Macros of the instrument are able to be assigned to each of the 12 available sample properties and up to 6 slices, a novelty that will expand Reniose's capabilities.
In addition, the SMC has a virtual piano, easily controllable with the mouse. It will allow you to keep the note playing while using your mouse or using the usual keyboard commands to play notes. This permet to pre-test the loop and modify the rest of the properties comfortably, controlling everything from the mouse. It is even possible to hold several notes at a time to try. The virtual piano has been added on purpose for this. It is also MIDI-mappable, with velocity sensitivity, and is also able to show the notes that are assigned to each sample.
To further clarify, you can control everything with the mouse (even the automation of the Doofer). You can also control everything with hardware MIDI input, including the entire tool window or the linked Doofer.
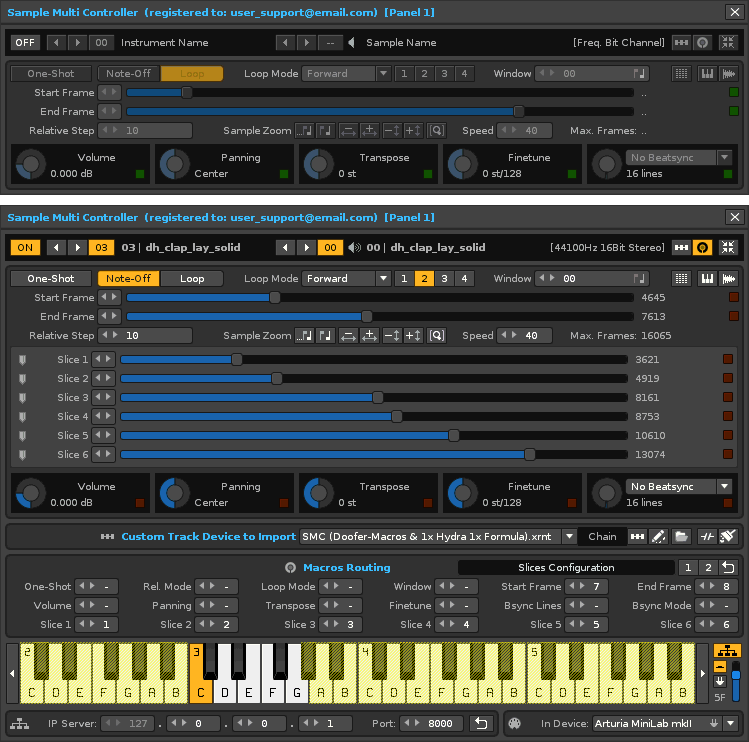
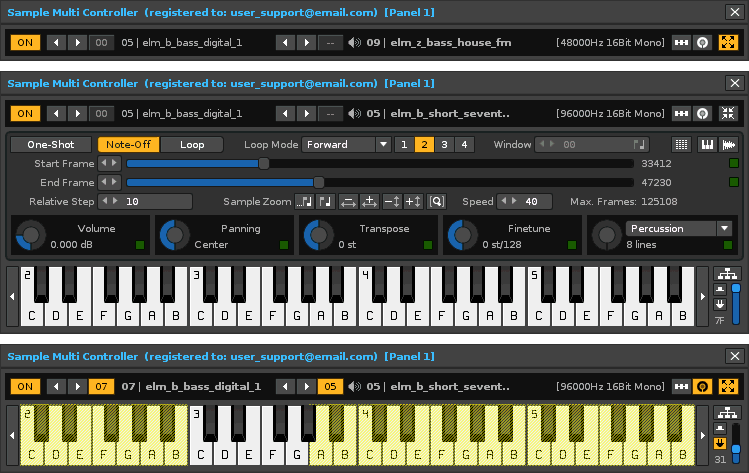
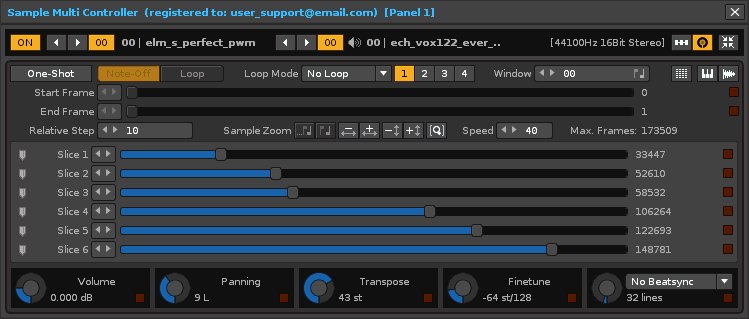
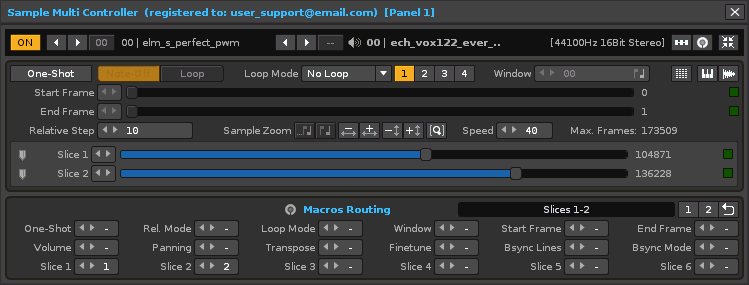
SMC window initial view and SMC window expanded
Above, you can see the floating window in its initial appearance and in its expanded appearance, once the composer begins working with the routing and virtual piano.
Route, automate, live record and repeat!
1.2. Demo & Full Version Installation Instructions ▲
The SMC program is distributed in 64-bit XRNX format through as a "Demo Version", free, so that anyone can try it. SMC is available as a "Full Version", which requires a personalized user license. If you are interested, please, contact the author "ulneiz" to get your personalized user license.
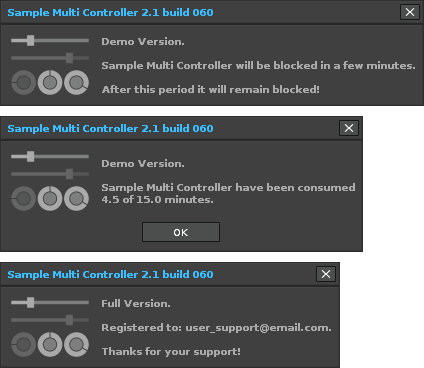
Demo and Full version floating windows
SMC is compatible with Renoise 3.3.2 (or higher) and must be the 64-bit version. To install the SMC tool, it is installed like any other tool, by double clicking on the file "name_of_the_tool.rnsx" or by dragging that file over the Renoise window. Keep in mind that the installation folder is different depending on the operating system used (Windows, macOS, Linux). For example, in Windows or macOS the address or installation path of the tool's root folder is as follows:
Caution! If you want to reinstall or update the tool to a new version, if you have new config files inside the "smc config" folder and/or new device files inside the "smc devices" folder, make a backup copy of these folders to avoid lose them. Then, restore thes folders ("smc config", "smc devices") previously saved in the installation folder of the tool.
Pay attention. Please, before continuing reading this User Guide, go to "Renoise: tools / Sample Multi Controller / More Info" and read the files "Readme.txt" and "License.txt", which include very relevant information about the installation and use of the tool.
1.3. How to Start and Use Multiple Instances ▲
Starting Sample Multi Controller is a short, but detailed process. The very first thing you'll want to do as the composer is make sure that the Sample Multi Controller shows up in your tools menu.
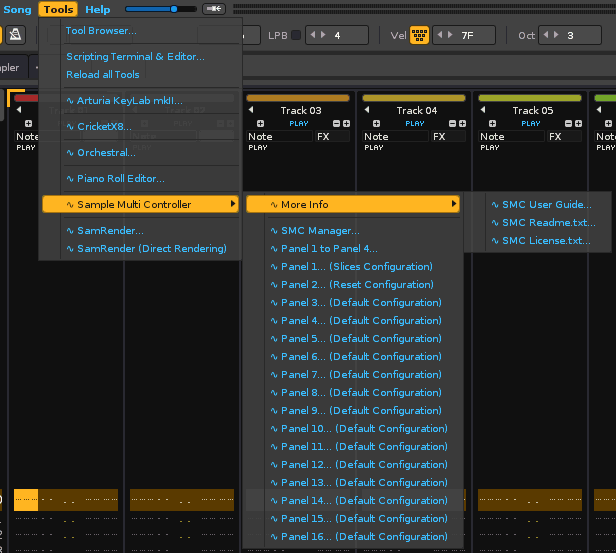
Renoise Tools menu: access to Sample Multi Controller
If it has not shown up, first re-try the instructions found in 1.2. Demo and Full Version Installation Instructions. Once the SMC tool has show up in the tools menu, click on it and then select "Panel 1". The tool's window will show up as a floating window above the Renoise workspace.

Multiple instances of Sample Multi Controller - Up to 16 instances are available
The very next step you'll want to take is to use your mouse and click on the button in the upper-left corner of the tool's window that says "OFF" and it should light up and say "ON". When you manage to select a sample within an Instrument, most controls will be activated. You will see that some of them have green LEDs on the right. These LEDs will show the activity of the previously assigned MIDI input. If the Macros Bridge mode is activated, the LEDs will be red. You can do exactly the same with all window instances. They're all the same.
To create additional and independent SMC instances, simply select in the Renoise Tools menu: Sample Multi Controller, the "Panel 2" or "Panel 3" ... or "Panel 16" and a new instance will be made available. You will be able to tell which Panel you are using as it is listed on the right side of the background and labeled in it's tool bar as "[Panel 1]", "[Panel 2]", etc.
1.4. Configure the User Interface scaling Beforehand ▲
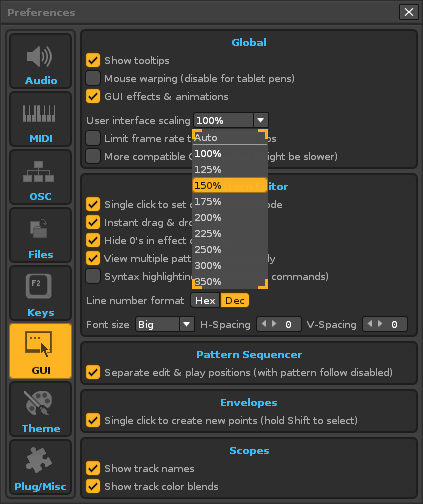
Renoise: Edit / Preferences / GUI: User inferface scaling
SMC also is compatible with Hi-DPI display (Retina). Go to "Renoise: Edit / Preferences" and select "GUI" to adjust the user interface size. Find "User interface scaling" and select the scale you'd like. Choose from "Auto", "100%" up to "350%".
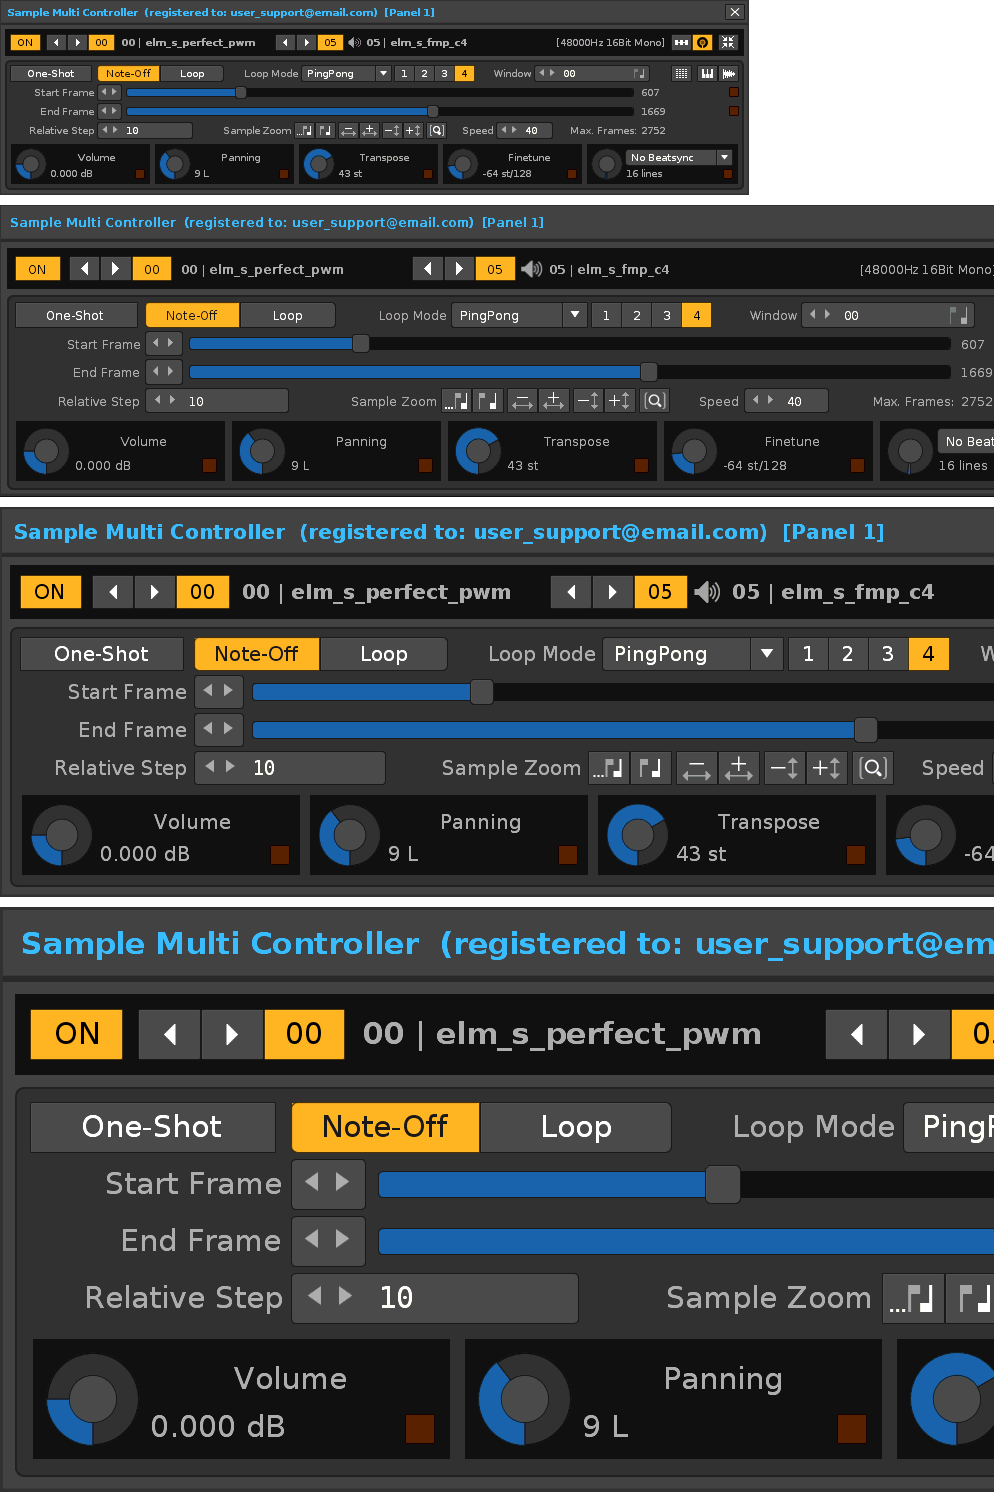
SMC with scaling: 100%, 150%, 200% and 300%
2. Top Bar. Navigation
2.1. The ON/OFF Switch ▲
The ON / OFF switch is always located in the upper-left corner of the tool and this switch activates the tool for usage. Without clicking on it, you will not be able to use the tool. The switch's state will change from "OFF" to "ON" by lighting up when it is activated.

ON / OFF switch
2.2. Instrument Navigation & Selection ▲
To first get any sort of sound from the SMC tool, you will need to choose either a Renoise Instrument or a Sample from the Renoise Menu and place that in the "Instrument Box" area. Regarding Instrument slots - the tool will ignore any Instrument slot that does not contain samples. It is not possible to select an Instrument with, for example, only a loaded VSTi Instrument.
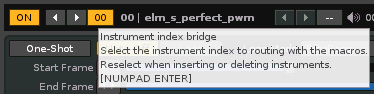
Instrument index selection
Since the SMC tool is already "ON", the Instrument or Sample should show up automatically in the SMC's Instrument / Sample Index at the top of the tool's window. Using the arrows to the left of the Instrument, or the keyboard commands [NUMPAD -], [NUMPAD +], you can select other Instruments already placed in Renoise's "Instrument Box" area (press & hold to continuous repetition). A similar method is integrated in the Sample Navigator (next topic).
Pay attention. On the right side of the navigation buttons of the Instrument is another button, which will be used to lock the selected Instrument when the "Macros Bridge" is activated (red LEDs). You will always have to keep this button in mind when linking Instruments with the Macros. Press the keyboard command [NUMPAD ENTER] or click to reassign it again to another Instrument. Maybe you will also need to do this when inserting or removing another Instrument, because the index of the previously bridged Instrument will change!
2.3. Sample Navigation with or without Buffer & Selection ▲
Similar to the Instrument Index Selection portion of the SMC tool, the Sample Navigation portion has a couple of extra details. One thing that may have been apparent in the selection of an Instrument is that if an Instrument happens to have multiple samples in it, you can cycle through the available samples within that Instrument via the Sample Index's arrow keys (to the left of the Sample Index); use the keyboard commands [PRIOR], [NEXT] (press & hold for continuous repetition). You can navigate between the Instrument samples when the Macros Bridge is deactivated or the Macros Bridge is activated and the linked Instrument is selected.
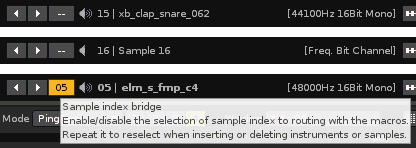
Sample index selection and its sound characteristics
In addition to the index and the name of the sample, some more features will appear: sampling frequency, number of bits and number of channels (mono or stereo).
An additional feature of the Sample Navigator is the detection of each buffer. Each sample slot can be empty or with sample data (buffer). When the buffer exists, a speaker icon will appear with 3 waves. This way, you will know if a sample slot has sample data or not. Additionally, it will also show the index of the sample (something that Renoise does not do).
Pay attention. On the right side of the navigation buttons of the Samples is a switch, which will be used to lock the selected Sample when the "Macros Bridge" is working (red LEDs). You will always have to keep this switch in mind when linking Samples with the Macros. Disable and enable to reassign it again to another Sample. Maybe you will also need to do this when inserting or removing another Instrument or Sample, because the index of the previously bridged Sample will change!
2.4. Show/Hide Track Devices Panel or Import Device ▲
The show / hide track devices Panel is used to select pre-assigned Macros that have been saved within a Doofer as presets. This is used to save the composer time when looking for oft-used Macro sets for sample manipulation. As you can see below, another portion of the SMC tool is made visible, with the capability to choose Custom Track Devices.
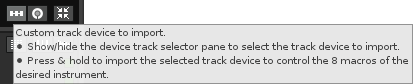
Track devices panel or device import button
Caution. If you have a favorite Doofer / Macro device collections, you can save them in the folder called "smc devices" inside the root folder of the tool. The drop-down list will show all files of type device (XRDP) or chain devices (XRNT) to be able to easily load on the selected track. This files will be deleted if the tool is removed. So please, make a backup in this case!
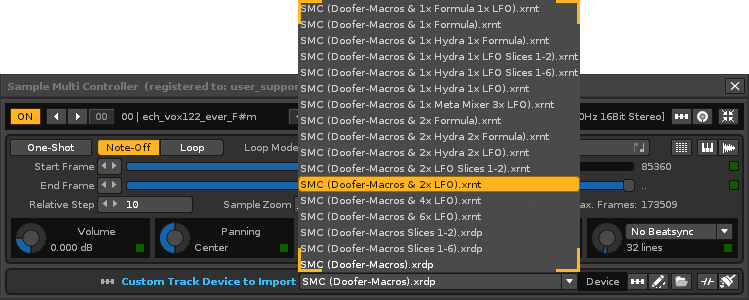
Select a device chain or a individual device to import into the current track
2.5. Show/Hide Macros Routing Panel: Enable Macros Bridge ▲
This particular button is used to show the parameters that you can assign to the Doofer Macro controls that you choose (see below).
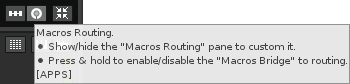
Macros Routing button
To enable the Macros Bridge, press & hold this button. Macros Bridge will link the controls with the Macros of the selected Instrument and convert the green LEDs to red. Then, it is advisable to control the tool through a Doofer linked to a *Instr. Macros device, with its Instrument correctly linked. The Doofer can be contained in any type of track. You can also use the keyboard command [APPS].
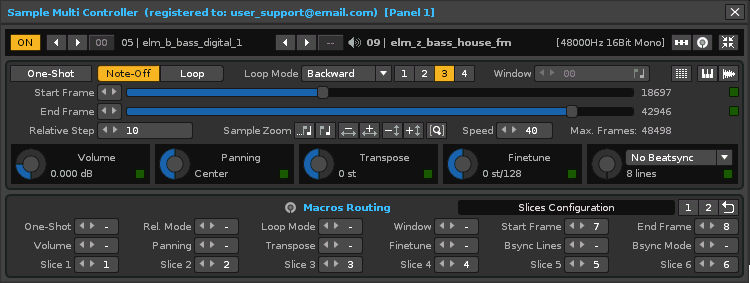
Macros Routing panel diplayed
Caution. Please, use each SMC instance ("Panel 1", "Panel 2", "Panel 3"...) for different instruments. It is recommended not to bridge multiple SMC instances on the same instrument! Automating multiple SMC instances on the same instrument can have an impact on performance. Use each Panel intelligently!
2.6. Compact Mode or Virtual Piano GUI Views ▲
This switch is used to compress the tool window. Make a simple click to compress or expand. You can combine with the other expansion buttons of other panels to display the panels that interest you.
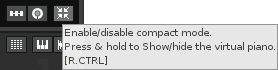
Compact mode view or virtual piano switch
On the other hand, press and hold to show or hide the lower virtual piano. You can use the keyboard command [R.CTRL] in both cases.
Various SMC tool panel views. Show the virtual piano
3. Sample Properties Control Panel
3.1. One-Shot, Release Mode, & Loop Mode. The Loop Window ▲
In this portion of the tool, you will be able to select how a sample plays. While these options are available in Renoise's Sampler section, this is designed to save the composer time by make the options available from within the SMC tool. You can quickly switch between the 4 loop modes from the buttons 1, 2, 3 and 4, also by pressing the keyboard commands [F9], [F10], [F11] and [F12]. Press [F7] or [F8] to One-Shot or Release Mode (Note-Off or Loop).

Selections to adjust sample playback
The Loop Window will only work if the Macros Bridge is activated. It serves to coordinate the Start Frame with the End Frame, maintaining at all times the same width of frames (window). This value should always be less than the maximum number of frames in the sample. This will be userful when using the LFO or Formula device.
3.2. Loop Start & End Frames: Relative Step ▲
The sliders for sample Start or End Frames size can all be automated via MIDI, LFO / Doofers and manually adjusted by mouse. Use to adjust the size of the sample you'd like to hear played back and where the sample starts and stops, down to microscopic levels. These ranges are variable according to the sample and really defines the complexity of this tool.

This is where sample length and start / end frames can be adjusted
The Relative Step value is the jump value for the relative mode of the MIDI input. Use a high value when the sample has many frames, so that the physical control has more travel in relative mode (recomended Map Mode: Relative two's comp).
3.3. Sample Zoom & Speed ▲
Using these controls, you can adjust the way you view the sample in Renoise's sample window. You can also zoom the entire loop or zoom the entire loop from the beginning of the sample.

Sample zoom & speed control panel portion
The speed value defines the repeat speed of the zoom controls (width and height).
3.4. Volume and Panning Sample Properties ▲
Here's where the composer can adjust the previous Volume and previous Panning of the SMC tool. These can be automated via MIDI, LFO / Doofers and manually adjusted by mouse.

Volume and panning macro knobs
3.5. Transpose, Finetune, & Beatsync Sample Properties ▲
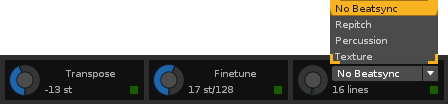
Sample transposition, sample finetune, and sample beatsync controls
Here's where the composer can adjust the previous Sample Transposition, previous Sample Finetune and Sample Beatsync controls of the SMC tool. These can be automated via MIDI, LFO / Doofers and manually adjusted by mouse.
3.6. Tabs Navigation: Pattern Editor, Keyzone Editor & Waveform Editor ▲
In addition to offering control of the main properties of the sample, the SMC has 3 buttons to navigate between different tabs, specifically the Pattern Editor [F1], the Keyzone Editor [F2], and the Waveform Editor [F3].

Additional navigation buttons
The Keyzone Editor button is somewhat special. By pressing and holding, you can distribute the keyboard areas equally for multiple samples. It is another additional distribution method, different from the methods that Renoise offers.
Hide VPTFB properties frame
On the other hand, it is also possible to hide or show the frame of the VPTFB properties by pressing the [F4] keyboard command.
Pay attention. Remember that all keyboard commands have their equivalent through MIDI input. Go to the Renoise: MIDI Mapping window and assign those controls you need.
3.7. Sliced Instrument. Slices 1 to 6 control ▲
When the instrument is sliced (a single sample), SMC will display from 1 to 6 slices. This allows each slice to be controlled in a similar way as the rest of the sample properties, via macro routing.
Each slice is guaranteed to not intersect with neighboring slices. There will always be a separation of at least 1 frame between slices.
Slice Panel visible. Slices 1 to 6. Macro Routing for Slices
Like the Start Frame and End Frame properties, Slices 1 through 6 can be controlled via MIDI Input (relative or absolute) or by Macro Routing, controllable from a track’s effects chain.
Pay attention. Remember that slice control to work, the main sample with the slices (sample 01) must be selected at all times. Remember you can lock it with the "Sample index bridge" switch.
Slice Panel visible. Slices 1 & 2
Controlling up to 6 slices can be very complex, requiring many adjustments via automation. A reasonable control setup is to use 2 slices. The first slice (Slice 1) may mark the beginning of the sectioned sample. The second slice (Slice 2) can act as a real-time way to lengthen or shorten the sample as it plays back. This will allow you to create an ear-catching, unique microsound effects. There is a wide variety of techniques to manipulate the sound through automation or use of Meta devices such as LFO, Hydra or Formula...
4. Custom Track Devices Panel
4.1. Import Individual Devices or Device Chains ▲
As mentioned before, this is where Doofers and other Track Devices can be selected and assigned to the SMC tool panel, which is explained below. Import the desired individual device or device chain. Use the right button to open the device folder, if desired.

Import device / device chain or save device chain
4.2. Device: Doofer with Linked Instrument and Instrument Macros ▲
How to load doofers with linked Instrument and Instrument macros
Follow the animated process above to learn how to select a custom device and to select what it controls.
- Click the "Custom Track Device" button to expand the panel to import devices.
- Select a device or chain inside the popup and click the right button to import the individual device or the device chain selected. It will appear inside the DSP chain of the current track.
- Press & hold the top right button to enable the Macros Bridge (red LEDs).
- Click the Doofer's editing button to deploy the right panel of linked devices.
- Finally, assign the Macro's Instrument Index to the Instrument that you'd like to control. This is very important! The Instrument linked button (top left) must be the same Instrument index as the one previously selected for Macros.
- Ready. Now the tool will be linked to the Doofer. And at the same time, the Doofer will be linked to the Instr device. Macros with the desired Instrument linked.
4.3. Bypass or Clearing the Device Chain on a Track ▲
Two controls to either bypass the SMC tool or clear it's track devices
Follow the animated process above to learn how to both bypass the SMC tool's effect on audio or to clear the Doofer / Meta Devices, etc. imported from the SMC tools menu.
5. Macros Routing Panel
5.1. Macro Custom Naming. Restart or Override Routing ▲
By pressing the Macros Routing button, your panel appear. You have the option to edit the global name of the Macro configuration via the text-box labeled "_ _ _ _ Configuration" and manually change each link (each valuebox). 3 Presets (1, 2 and Reset) are available. Each preset will redistribute the routing of all the features available for each of the 8 macros on the instrument:
- Preset 1 (Default Configuration): [-, -, 5, 6, 7, 8] [1, 2, 3, 4, -, -] [-, -, -, -, -, -]
- Preset 2 (Slices Configuration): [-, -, -, -, 7, 8] [-, -, -, -, -, -] [1, 2, 3, 4, 5, 6]
- Preset Reset (Reset Configuration): [-, -, -, -, -,-] [-, -, -, -, -, -] [-, -, -, -, -, -]
Keep in mind that the first 12 properties belong to each Sample. On the other hand, the remaining 6 (Slice 1 to Slice 6) are properties of the Instrument.
Macros Routing name, clear and routing override
All routing settings and name are permanently saved in the tool, even if you log out of Renoise. This makes each window instance unique, allowing each instance to be customized according to need. Remember that you have 16 independent panels of SMC to customize.
5.2. Only 8 Macros for 12 Sample Properties? Choose Wisely! ▲
At this point, the composer can begin getting creative with how to assign one of the eight (8) Macros to the various SMC tool parameters (12 sample properties and 6 slices). Since Renoise has a limitation of 8 knobs of Macro per Instrument and only one Doofer can be assigned to each SMC tool Panel, the composer must choose wisely. For example: If the composer does not need to adjust Volume, Panning, Transpose, or Finetune, etc. to the SMC tool / Doofer, then they will find that 8 assignable Macros is enough. This is a limitation of Renoise currently and cannot be extended through its API.
Various ways to adjust sample manipulation via macro controls and mouse modification. Fix Window value
6. Virtual Piano
6.1. Navigation & Sample Note Range ▲
By exposing the virtual piano and dragging and dropping the samples you'd like to use in the Sample List, you can quickly assign each sample to a set of keys in the virtual piano. First by click on the "Show Keyzone Editor" button on the SMC tool panel, then hold that same button down. By doing so, this will map the samples in order to a set of keys.
How to use the navigation and sample note range control
You will see that the SMC virtual piano cleverly displays the range of notes of the selected sample. This greatly facilitates the location of the notes that trigger the selected sample and get the virtual piano to make more sense and be more useful.
6.2. Press & Hold Mode (Mouse Only) ▲
Do you want to use only the mouse? The virtual piano of the SMC has two modes of pressing keys with the mouse: "press and release" or "press or release". The first mode is the usual: the sound will stop when you stop clicking. By activating the switch on the right, you can press and release any key and it will continue to sound. Repeat the operation to release the illuminated key again. This allows you to test the sound of each sample and manipulate its properties, all from the mouse. It will even allow you to test chords from the mouse.
The piano-hold switch
6.3. Velocity-sensitive Mode (MIDI Input) & Volume ▲
The entire virtual piano of the SMC is MIDI mappable. If you have mapped the keys of the SMC virtual piano with your physical MIDI device, you can control the velocity sensitivity. Be sure to activate the plug switch and choose your MIDI device in the tool. Then, the virtual keyboard volume bar will adjust to the keys' velocity. You can also manually control the right volume bar of the piano. Finally, you can also change the octaves with the keyboard commands [NUMPAD /] and [NUMPAD *].
Piano velocity sensitivity adjustment via a mouse and MIDI Mapping combination
Pay attention. Make sure your physical MIDI device supports velocity sensitivity and that this option is enabled in the Renoise preferences panel (MIDI/Record & Play Filter: Velocities checkbox).
7. OSC Configuration & MIDI Input Velocity Sensitivity
7.1. OSC Configuration: Sound & Audition ▲
The virtual piano uses the OSC protocol to play the notes as well as to be able to edit notes directly in the pattern editor. Keyboard commands for playing notes ([Z], [S], [X], [D], [C], [V], etc.) also use the OSC protocol.
Go to "Renoise: Edit / Preferences / OSC" and click on the checkbox for "Enable Server". Use Port 8000. You'll need to follow through with this step to ensure that the virtual piano works, otherwise you won't get any sound playback or editing capabilities from it.
Activate and configure the OSC protocol for sound and editing
Caution. Each SMC instance is configured to use the IP 127.0.0.1 and Port 8000 via UDP. In this way, SMC can communicate with Renoise. You can also change the IP and the Port if necessary. Try using the same Port on both! This only affects the Virtual Piano.
The SMC also has a few other basic keyboard commands for transport and more:
- [SPACE] stop or play the pattern from the beginning
- [R.ALT] stop or play the pattern from the current line
- [CTRL Z] undo
- [CTRL Y] redo
- [NUMPAD /] move keyboard down an octave
- [NUMPAD *] move keyboard up an octave
7.2. MIDI Input Velocity Sensitivity: Device Selection ▲
The virtual piano is fully MIDI mappable, including all 120 keys (both black and white) Map the keys one by one. Save your MIDI configuration in an XRNM file to preserve the configuration in other sessions.
Activating velocity sensitivity for MIDI input
Through the popup, choose a connected USB MIDI controller device (either pad or piano) that is velocity sensitive. Activate the plug switch to use it. Disable the plug switch to manually control volume from the slider on the right.
8. MIDI Mapping: Direct Sample Control
8.1. MIDI Map an Instance ▲
All instances of the SMC are mappable via MIDI. You can use a separate MIDI channel for each instance. Once you have mapped your desired controls, you can save an XRNM MIDI mapping file to recover it again in another session.
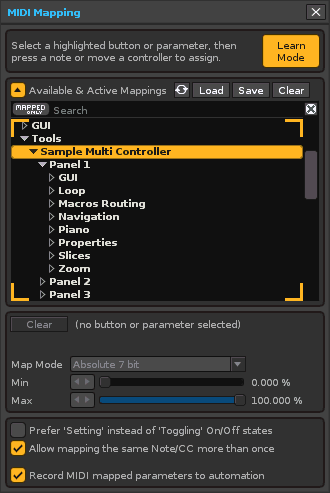
Renoise's MIDI Mapping window [CTRL M] grants access to the SMC's MIDI assignements
As you can see bellow, it is possible to select a control (button, switch, knob, fader, etc.) and map it directly to your MIDI controller. Each assignment will also appear in the Renoise MIDI Map window. There you can select within the Map Mode several types of absolute or relative settings.
MIDI input: How to assign the controls
8.2. MIDI Map Modes: Absolute or Relative (Green LED Activity) ▲
SMC converts the values for absolute map mode according to the type of parameter, usually from 0 to 127 or higher or specific range, always >= 0. This is suitable for knobs or faders with limited travel.
Likewise, SMC also converts the values for relative map mode according to the type of parameter. For any negative values, SMC will return a -1. For any positive value, SMC will return a +1. For example, using the relative Map Mode "Relative two's comp", the composer can increase or decrease a unit with infinitely rotating knobs.
Start Frame and End Frame sliders assigned to two physical knobs.
This example shows the control of the two Start Frame and End Frame faders assigned to two knobs in relative map mode (Relative two's comp). The "Relative Step" value can be modified to rotate or cycle faster the physical control. With 10, it will return values of -10 and +10. With 80 it will return values of -80 and +80. Use a higher values for samples with many frames.
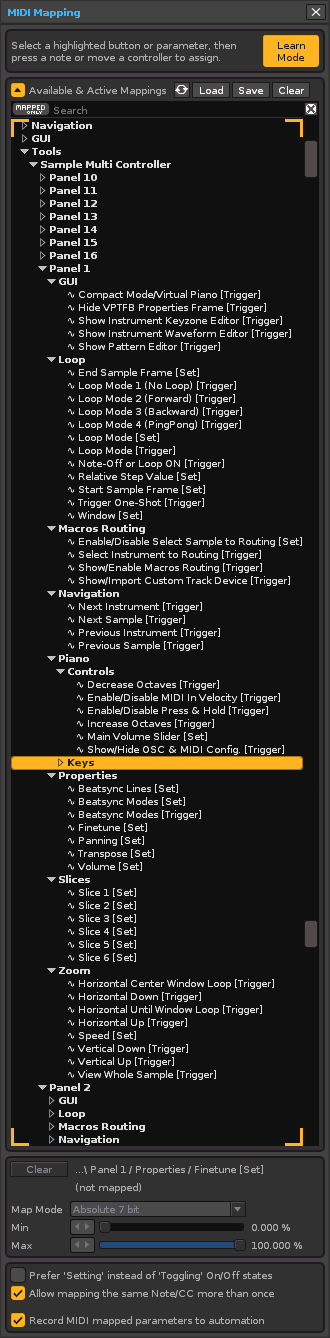
MIDI Mapping windows. SMC assignements [Panel 1], including the 120 piano keys
9. Automation: Use of the Doofer with *Instr. Macros
The Sample Multi Controller would not make much sense if it could not be automated. Through a Doofer, which is bridged with the device *Instr. Macros will allow you to automate the 12 properties and up to 6 slices available in the SMC panel, up to 8 at a time, depending on the routing of each property in the Macros Routing panel.
Automation is the strong point of this tool. It will allow the composer to be very creative with capabilities that Renoise is not yet able to offer. Use automation methods to take full advantage of these capabilities.
There are several ways to automate the SMC: manually, automatically or both:
- Manually, it is possible to use a physical MIDI controller and automate several sample properties at the same time (with two hands or even several users). Ideally, use the automation editor to record points, since each property will be recorded independently of the others.
- Manually, it is also possible to use the mouse, automating a property individually on each pass (with one hand). Here, it is possible to record automation parameters in the effect columns of the pattern editor. In order not to superimpose values, it is necessary to previously select the target effects column.
- It is also possible to combine the mouse with the physical MIDI controller to automate several properties at the same time (with two hands). This scenario is somewhat more complicated to control.
- Automatically, using Meta Devices linked to each sample property (if necessary) and using an effect track for each Instrument. This allows you to automate up to 8 sample properties (or even 12!), conveniently activating and deactivating the devices using two window instances of the SMC tool. You can use Meta Devices such as LFO, Formula, Hydra, or Meta Mixer to achieve the desired automation effect(s).
- Using manual and automatic methods at the same time, it is also possible to mix the various methods described above. Have fun automating!
All of this offers a wide range of possibilities to manipulate each sample. Use up to 16 window instances of the SMC to achieve unique and creative compositions. You will have the ability to control up to 16 samples in a crazy and daring way!
Pay attention. You will only have to load the necessary SMC instances and link them to use them in the song in each session. Turn on the SMC panel, link it to the desired Instrument and you're done! Remember that each instance can have a custom name of Macros Routing. You can use the Song Comments window to make related annotations. Finally, to render the entire song, you can use the real-time rendering method, with all SMC instances activated.
9.1. Manual Automation with MIDI Input Inside the Automation Editor ▲
Using the mouse to select SMC parameters, the composer can make quick work of automating individual parameters in whatever order they choose.
Manual Automation: knobs are assigned to the MIDI input to record live in the Automation Editor
As you can see in the image above, via MIDI Mapping using the mouse, then selecting the SMC tool / sample effects you'd like to edit, you'll be knocking out tracks rapidly!
9.2. Manual Automation with Mouse Inside the Pattern Editor ▲
Let's say you don't have a MIDI controller and you want to automate the various parameters of the SMC tool, you can also record each Doofer's set of Macros via mouse and they will show up in Renoise's "FX" section in the sequencer.
Manual Automation: right-click with the mouse on the Doofer to record live in the Pattern Editor
In the image above, you can see the the mouse pointer (click and hold right button) controlling the End Frame of the SMC tool and in Renoise's sequencer, the values are showing up in the Track 1 "FX" lane. This is very handy for both quick edits to an SMC tool parameter when you don't want to assign a parameter to a MIDI controller, or if you do not have a MIDI controller.
Remember that with this method (with the right mouse button) you can also record automation points in the Automation Editor.
9.3. Automatic Automation with devices: LFO, Formula, Hydra, etc. ▲
There are many ways to automate the SMC tool. As you can see below, the SMC's Doofer is being controlled via both LFOs and the Hydra Meta Devices. Using these devices to automate the SMC can give the composer a wider range of sounds, from a sample or several samples, without having to interact constantly with each SMC instance.

Automatic Automation: a track DSP chain of Doofer + Macros with 2 Hydras and 2 LFO devices
Using this method, if the composer is looking for generative sample manipulation to use as a sound-bed underneath their composition, they'll get an amazing amount of content from even the most simple audio material.
SMC offers by default several combinations of DSP devices to use. On the other hand, the composer will be able to create and combine their device chains to use them conveniently in the tracks of notes, groups or tracks of effects.
Automatic Automation: a track DSP chain of Doofer + Macros with 1 Hydra and 1 LFO devices
Similarly, the composer can control up to 6 slices automatically, in groups or individually. There are many ways to combine effect devices to control the sliders.
Experiment, create and enjoy!
Caution. Please, use each SMC instance ("Panel 1", "Panel 2", "Panel 3"...) for different instruments. It is recommended not to bridge multiple SMC instances on the same instrument! Automating multiple SMC instances on the same instrument can have an impact on performance. Use each Panel wisely!
10. SMC Manager: Load or Save the Configuration
10.1. Load or Save the SMC Configuration ▲
The SMC Manager is a centralized window to manage the 16 Sample Multi Controller panels. It has a compact mode (upper right button) to be able to invoke one or several SMC panels at the same time (buttons 1 to 16), or close them all together (button X).
At the top of the SMC Manager window it is possible to load XML configuration files (click the right button from the drop-down list) that will reconfigure each SMC panel if it is "ON". The central frame shows the configuration presets of each panel. This prevents the composer from having to remember each panel's settings, and will speed up the process of starting a already composed song that use the SMC tool. This is very useful if you have bridged panels with Macros from a previous session.
The upper left button will update the drop-down list if you need to manually add or edit a compatible XML file (SMC Config) contained in the "smc config" folder.
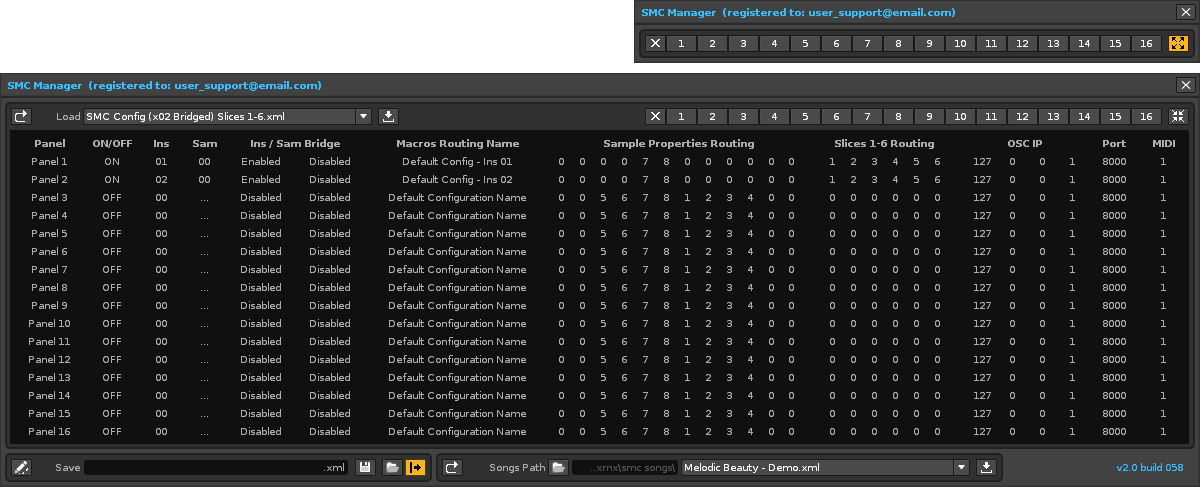
SMC Manager: compact mode and expanded view
The SMC Config XML format files are contained in the "smc config" folder. They can be used to restore the last state of the panels used after saving a song. To do this, follow the steps below:
- Use the SMC panels as usual. Enable the Macros Bridge to automate the sample properties for each desired instrument.
- When you finish your song, save your song XRNS as usual, with a specific name.
- Then, at the bottom of the SMC Manager window, save an XML file with the same name as the name of the song you saved.
Caution. If you have a favorite SMC Config collections for your songs, you can save them in the folder called "smc config" inside the root folder of the tool. The drop-down list will show all files of config (XML) to be able to easily load inside the current song. This files will be deleted if the tool is removed. So please, make a backup in this case!
The saved XML files will automatically appear in the top drop-down list, ready to be reloaded. In this way, the composer can create and load default configuration files or adjusted configuration files for each song. Do not forget to perform the last step every time after saving your song, before closing the Renoise session.
The XML files of SMC Config have the following header:
10.2. Load a Song with SMC Configuration ▲
Finally, in the lower right frame it is possible to directly load an Renoise Song file XRNS with its associated SMC Config file XML. To do this, select the folder path that contains the two necessary files, select the desired song in the drop-down list, and click on the right button to load. In addition, it is possible to do the following operations:
- Press the left button to reload the drop-down list. Press & hold to restore the default "smc songs" folder path.
- Press the folder button to select a specific folder path. Press & hold to open the folder path already selected in a window. The selected folder path will be permanently saved in the tool even if you close Renoise.
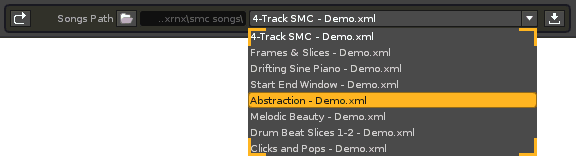
SMC Manager: Songs Path frame
The file name of the song and the file name of the SMC configuration must match:
- song_name.xml (SMC Config file)
- song_name.xrns (Renoise song file)
The SMC Manager includes some demo songs contained in the "smc songs" folder, which is the default folder for songs when starting the tool. You can see what some examples of microsound style and some tricks of sample manipulation.
Record new samples using the SMC, create, manipulate and enjoy!